
Java developers, when using the JMS interface, often prefer to work with the Spring Framework. Spring can simplify the coding of new applications by providing templates for common patterns and has been used successfully for many years with the MQ JMS classes. The Spring JmsTemplate class is a key interface, but it still depends on the configurations and dependencies in the code.
The Spring Framework includes various modules for various needs. One such component is Spring Boot. Spring Boot starters conveniently pull up all the dependencies and auto-configuration libraries needed to use a particular technology. This makes it very easy to get started with a new application and technology, faster than working directly with classes such as JmsTemplate. So, how can we take advantage of this easy access for MQ applications?
Translated by
@middle_javaMark e taylorPosted on 04/03/2018 / Updated 12/06/2018
11 commentsIn
this article, I described how to directly download MQ classes from
Maven Central Repository Java. And now we will use this to create the
Spring Boot Starter for MQ . You can download the full source code of the module from
GitHub .
Getting started with MQ Spring Boot
First of all, we need a running queue manager. Then we will create an application that accesses this queue manager.
Starting a queue manager in a container
To get started quickly, you can use the
IBM MQ container
for developers , which runs server processes. When this container is launched, several objects are created by default and their definitions are known to the auto-configuration module. The default values correspond to the values required by the container queue manager.
This means that you can start the queue manager using the Docker environment and connect to it without additional settings. You can start the container on Linux using the following command:
docker run --env LICENSE=accept --env MQ_QMGR_NAME=QM1 \ --publish 1414:1414 \ --publish 9443:9443 \ --detach \ ibmcom/mq
Application example
It uses an approach consistent with the JMS application model in the
Spring JMS Getting Started Guide . I followed the path of importing this project into the Eclipse workspace and used the
gradle build
process , but the
maven- based process also works. As an exercise, I used the maven configuration from the command line instead of the Eclipse IDE.
The same code from the example works with MQ with minimal modification:
- Modify the source messaging provider in the dependency list to point to the IBM MQ package.
- Change the queue name in Application.java (the example uses “mailbox”) to “DEV.QUEUE.1” - this is the queue predefined by the Developer configuration in the Docker container. If you do not use the default Developer configuration parameters, then you will either have to set the queue name to the same as the existing queue, or define the corresponding new queue.
The modified
build.gradle file that controls compilation now has:
dependencies { compile("com.ibm.mq:mq-jms-spring-boot-starter:+") compile("com.fasterxml.jackson.core:jackson-databind") }
If you prefer to use Maven, then the corresponding section in
pom.xml is as follows:
<dependencies> <dependency> <groupId>com.fasterxml.jackson.core</groupId> <artifactId>jackson-databind</artifactId> </dependency> <dependency> <groupId>com.ibm.mq</groupId> <artifactId>mq-jms-spring-boot-starter</artifactId> <version>0.0.3</version> </dependency> </dependencies>
The only real difference is that a specific version of the MQ Spring Boot module is specified in the Maven configuration.
Default configuration
MQ Boot Starter configuration attribute names begin with the ibm.mq prefix. Attributes by default
ibm.mq.queueManager=QM1 ibm.mq.channel=DEV.ADMIN.SVRCONN ibm.mq.connName=localhost(1414) ibm.mq.user=admin ibm.mq.password=passw0rd
They correspond to the default values of the Docker container.
Advanced configuration options
If you already have a running MQ queue manager that you want to use, then you can easily change the default configuration by specifying overridden values. A queue manager can be a local service or even a service hosted on
IBM Cloud . The
application.properties file in a Java project is one way of putting these attributes out of the project. The configuration takes effect without any code changes.
Specify the name of the queue manager attribute:
ibm.mq.queueManager=QM1
For client connections to the queue manager, you must also set
ibm.mq.channel ibm.mq.connName
If neither channel nor connName is specified, it is assumed that the local queue manager is used. The configuration component also supports some TLS-related attributes. They are described in more detail in the README file, but their default values are null. You may also need to install
ibm.mq.user ibm.mq.password=passw0rd
to override the default values. These attributes can be left blank to use the local userid of the operating system without authentication, if allowed by the queue manager.
Example contents of
application.properties file:
ibm.mq.queueManager=QM1 ibm.mq.channel=SYSTEM.DEF.SVRCONN ibm.mq.connName=server.example.com(1414) ibm.mq.user=user1 ibm.mq.password=passw0rd
After that, Spring Boot will create a ConnectionFactory that can be used to interact with the queue manager.
Testing the sample program
You can run the sample program using the
gradle bootRun . Or use maven to run
mvn package and then
java -jar ./target/gs-messaging-jms.jar to execute the program. You should see the following:
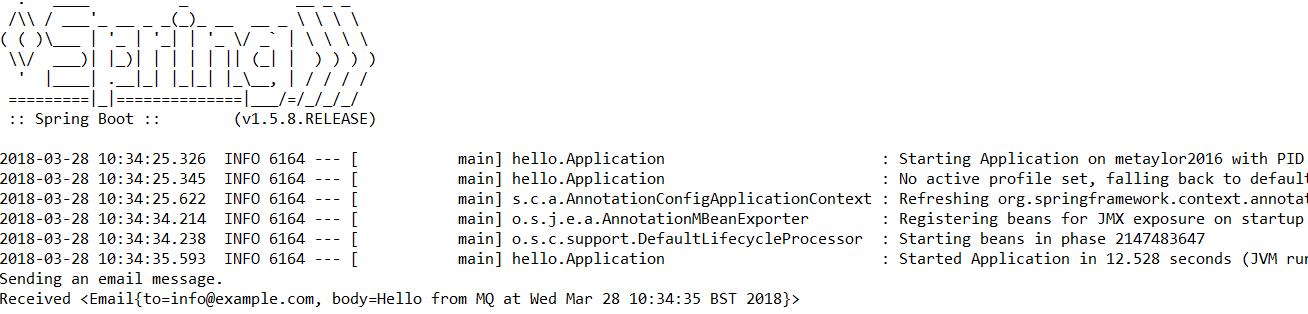
Here you can see how the application put the message (“sending an email message”), and then retrieved it.
conclusions
Using Spring Boot Starter with MQ allows you to get started very quickly. Then, after launching your first application, you can expand it to use other MQ features. After you try it, you can give feedback here or on the
GitHub issues page.
Update - June 2018
Earlier this year, a major update to the Spring Boot Framework, known as Boot 2, was released. The MQ Boot Starter was updated to work with this new version of the platform. Of course, all publicly released versions of this code are available in the
Maven Central Repository . For compatibility with Spring Boot 1, you must continue to use
version 0.0.4 of this artifact;
version 2.0.0 is compatible with Boot 2 and will be used as the basis for any future updates.
Tags
jms ,
mq ,
mqseries ,
spring ,
spring bootauthor
Mark E Taylor11 comments on the article "Developing MQ JMS applications on Spring Boot"
(Only useful comments and comments with answers translated)3.
Horacio May 16, 2019
Mark, great job.
Can I handle more than one queue?
I see that the prefix is hardcoded in @ConfigurationProperties (prefix = "bm.mq")
o Mark E Taylor May 17, 2019
I really don't understand the question. A “prefix” refers to configuration attributes that basically show how to connect to the queue manager. This has nothing to do with the queues that the application uses after connecting. If you really wanted to ask about connecting to multiple queue managers, see
github.com/ibm-messaging/mq-jms-spring/issues/7 to see which approaches people use.
7.
Peter May 17, 2018
"Hello.Application" is missing, are the files located on github?
o Mark E Taylor June 12, 2018
To extract and import a sample application, I used the Spring Getting Started page (see
spring.io/guides/gs/messaging-jms ), and then made minor changes. For various reasons, I intentionally did not want to have a separate copy of this code here.
Translated by
@middle_java .