It is difficult to imagine a modern service without an integrated notification system. We are carefully informed that one of our friends appreciated the photo, the courier with the long-awaited pizza is already on the way, and a taxi arrived at the house.
In job management systems, the role of notifications becomes critical as it deeply integrates into the team’s workflow. Like a ball thrown from hand to hand, notifications promptly inform about changes in tasks, call for the implementation of their part of the work and prompt important information.
Below I will share my experience with a systematic approach to designing notifications. How to detect and take into account all situations in order to make the product more useful for users and save the resources of your team?

Step 1: Identify process participants
Consider the classic story of a marketing agency:
Art director Anthony is in a hurry: his company will soon launch a new product on the market, so promo banners must be delivered by the end of the week. Designer Johnny has already completed all the work, but in order to accept it, the layouts must be approved with the project managers.
Therefore, Anthony sets the task for approval with a deadline until Friday and adds an explanation: "Please approve the banners for the campaign."
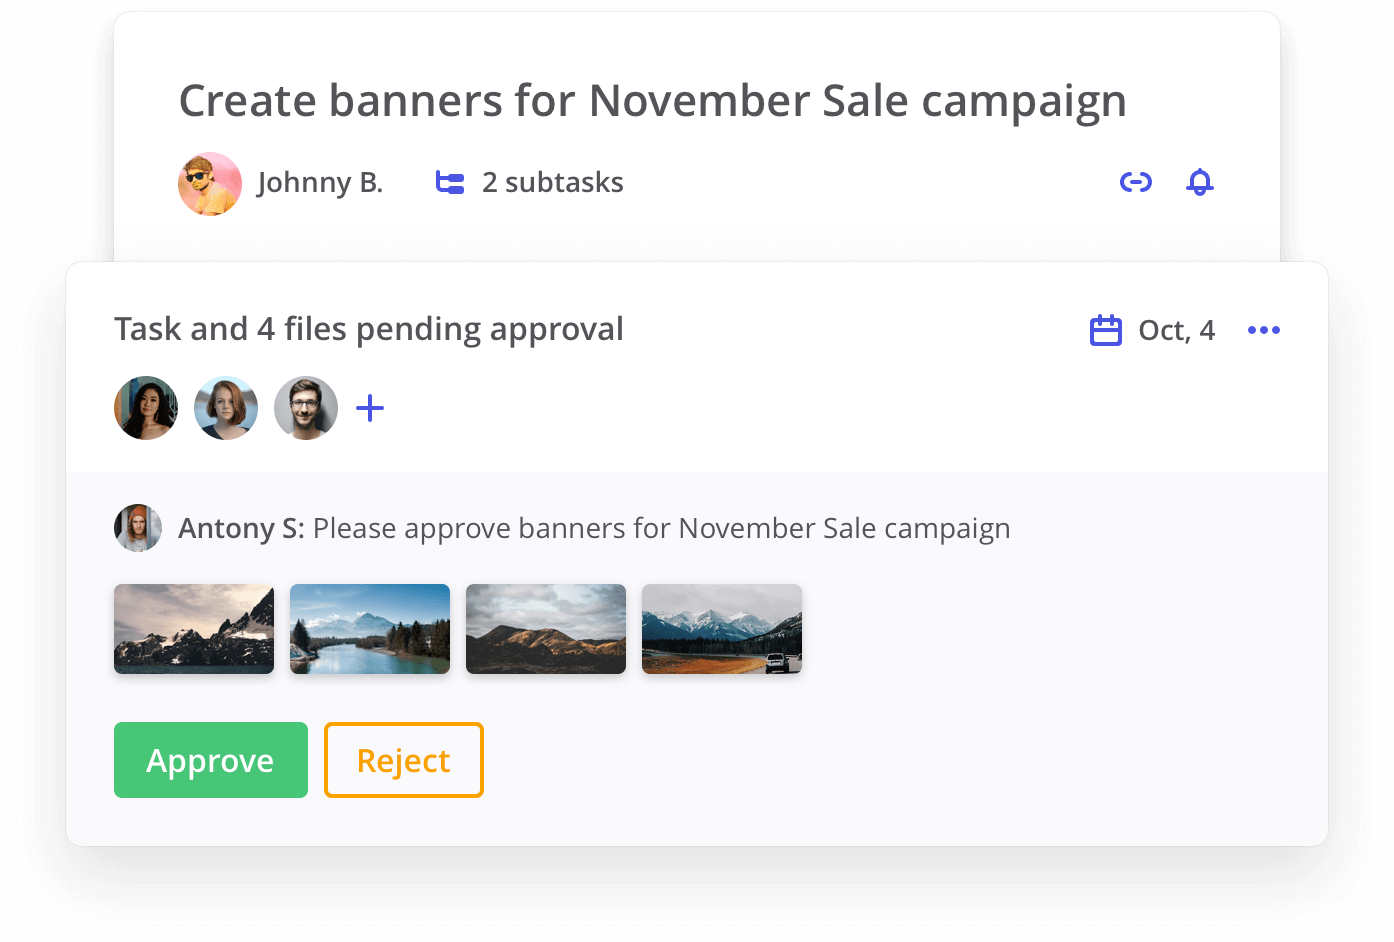
Let's take a closer look at who is participating in the system:
- The designer is the performer of the task. Although his work has already been completed, it is important for him to know the result: the models were accepted or returned for revision.
- Art Director - accepts the work performed and approves it with the manager-customer. It is important for him to monitor the voting process and make tactical decisions quickly.
- Managers - get the finished work for approval. It is important for them to understand that they are being asked to check and how urgently it is necessary to consider the task. And, of course, make a decision with the opportunity to comment on it.
To build a notification model, we highlight the abstract roles involved in the system:
- Contractor - one or a group of people to whom the task is assigned. Defined by the Performers field in the task.
- Initiator - the user who started the approval process.
- Approver - One or a group of users assigned for approval.
Often there can be implicit roles in a system that you should not forget about. For example, if you want to send notifications about the status of the ongoing process, it will be useful to introduce the role of "Robot" - messages to users on behalf of your product.
Try to limit this list. The more complex the role system you build, the more difficult it will be for users to understand what logic it works with.
Step 2: Build the table “Event - Notification”
Build the frame
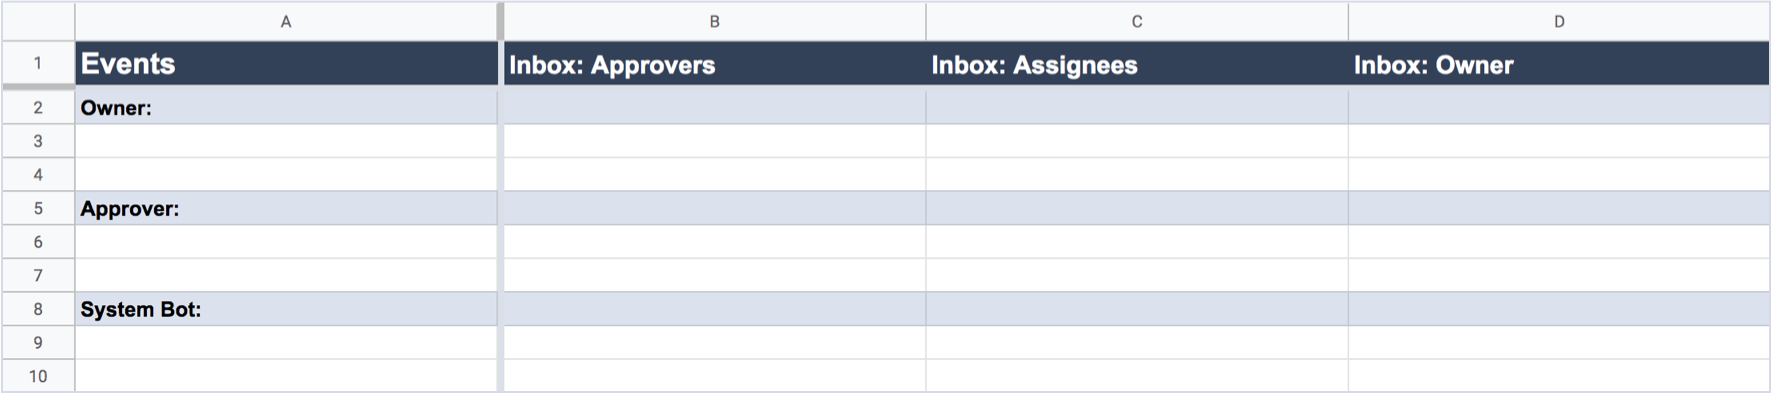
To design notifications systematically and visually, let's build a table. The frame will consist of two parts:
Left column. Here we will record possible events in the process of approval by roles. They will cause sending notifications. Not all roles in practice can affect the system. For example, the “Contractor” in our example is just an observer, so you can not add it to the left column. Total, we get three sections:
- Initiator - actions of the initiator from the start of the statement to its end;
- Approving - decision making and commentary on it;
- Robot - system status events.
Top row. Here we record the roles that should receive notifications. In practice, different communication channels are also used, for example, push notifications or SMS. For simplicity, we will consider only one “Inbox” communication channel - a personal notification feed:
- Approver
- Executor
- Initiator
The table is most conveniently maintained in Google Sheets. In addition to powerful functionality, it will be convenient for her to share with your team and other departments that need this information. For example, with Customer Support.
Share the link with the Commenting access rights. So the team will have the opportunity to discuss events in the comments on the cells and no one except you will be able to change or delete them.
Fill events
When the table frame is ready, we begin to fill in the left column with all the events that the user in the approval can make. It is necessary for each role to evaluate each state of the interface and write out the available actions. At this point, stick to a few tips:
- Write monosyllabic events where possible. If you hurry with the grouping, you can lose some of the simple events, immediately complicate the wording and lose the clarity of the table.
- Consider the logical model of the system. Some events, depending on the context, may produce different results. For example, if we remove the last approver from the active process, in addition to the delete event, the statement itself must be canceled.
- Do not be afraid of duplicates. For some roles, events may be repeated. For example, the initiator and any user with rights can change the due date. Let this enlarge the table, but it will help to better describe the system of actions available for everyone and unique for each role.

Step 3: Determine the principles for receiving notifications
Events are ready, but before adding notifications, it is useful to determine the principles for receiving them by role. They are useful in order to design only relevant lists for each role and not overwhelm users with unnecessary information. This will help the results of user interviews, studies of similar products, as well as conceptual solutions put into the system.
In our approval model, we outline the following principles:
- Initiator - receives notifications about decisions approving and about all changes that someone makes in his process.
- Approver - receives notifications about the start of a new approval with his participation and all significant changes to the process.
- Performer - is an observer. He learns about the start of the approval, the decisions made and its end.
Record these principles for each role in the recipient lines. It is convenient to indicate them with comments on cells. With the development of the system, the principles will help keep one course.
Step 4: Fill Notifications
Finally, you can start creating the notifications themselves. Go sequentially from the event from the left column through the cells of each role of the recipient. Follow these guidelines:
- Try to reuse the wording or their identical parts. So the notifications will be more consistent. If you are creating an international product, this will facilitate the work of the localization team.
- In the notification lines, highlight the variable data among the body text. For example, "USER: changed the due date to DATE." This will make it easier for developers to work with your strings.
- Do not forget about the rules of good notifications: short wording, maximum of useful information, tone in accordance with your brand, selected principles of receipt. Try to pre-test the length of the lines in the interface of your product or mobile push notifications - some formulations can be difficult to read or cut with ellipses.
- Put dashes where notifications should not be sent. When a project takes a long time, it is easy to get confused where you haven’t filled out the table yet, and where you decided that they should not be. This will also remove team issues.

According to the situation, enter the color coding in the cells and fix it as a legend in the header of the table. For example: black text - draft of the line, green text - the line is checked and ready to work, red text - there are implementation problems and details in the cell comments.
Step 5: Finalizing Events
After filling in all the cells, the table should be finalized:
- Bring all such lines to one form. Sometimes it happens that in a large list the parts that are identical in meaning are different: slightly different cases, prepositions, synonyms.
- Add wording for mass events where possible to reduce the number of piece notifications. For example, "USER: Added N files to the statement"
- Add new unique lines to replace sequential action groups. For example, instead of deleting the approvers and then adding others, you can make the event “Replaced the approver with the APPROVING to the APPROVING”
- Discuss all notifications with the development team. The architecture of the product may not allow you to realize some of your ideas, even if they look simple and logical. The sooner you show a draft to your backend developer, the more time you will save in further development.
Conclusion
Even the most complex scenarios can become visual and easy to develop if you approach systematically and adhere to the selected principles. A well-designed notification table will help the designer make the product more useful and understandable for users. The team - not to spend extra resources on understanding the idea and all the details, but concentrate on the quality of implementation.
Some useful tips for further work with the table:
- For different product scenarios, use separate table pages. It will be easier to navigate and find the right places.
- Give a presentation to the development team. Explain the logic and principles of its construction. Answer the questions so that everyone has the same understanding of the work.
- If other designers work with notifications in your product, implement the approach and use a common table. So all events will be saved in one place, and the overall picture will be visible.