D3.js هي مكتبة جافا سكريبت لمعالجة المستندات بناءً على بيانات الإدخال. Angular هو إطار عمل يتميز بربط البيانات عالي الأداء.
أدناه سوف ألقي نظرة على نهج واحد جيد لتسخير كل هذه القوة. من محاكاة D3 إلى حقن SVG واستخدام بنية القالب.
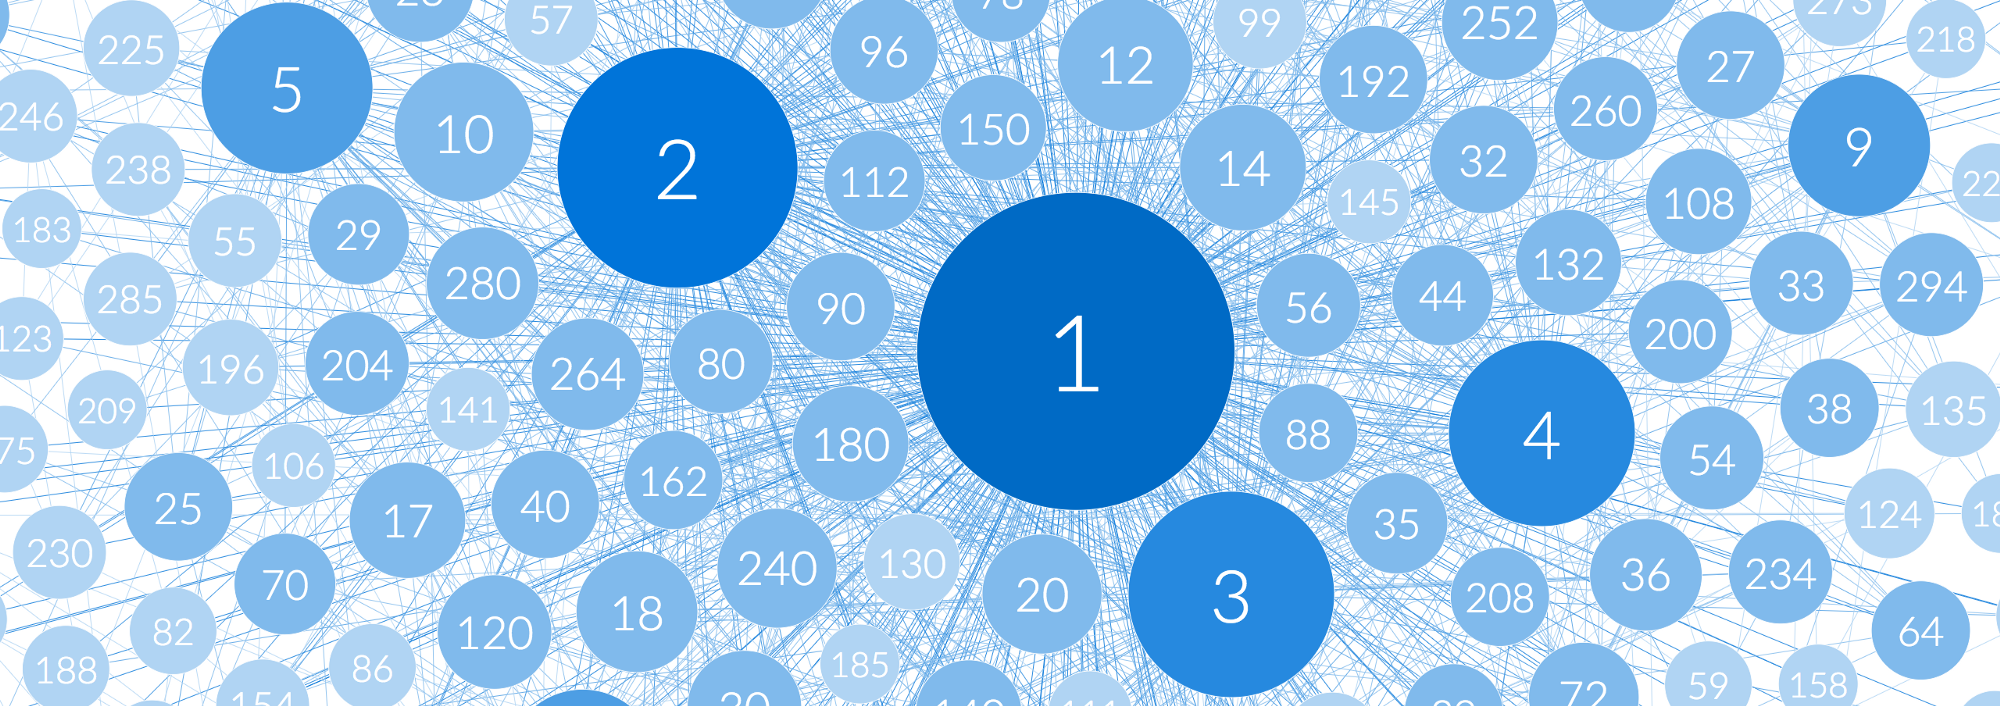 عرض توضيحي: أرقام موجبة تصل إلى 300 مرتبطة بقواسمها.
بالنسبة إلى kulhackers الذين لن يقرؤوا هذه المقالة ، يوجد رابط إلى المستودع مع رمز مثال أدناه. بالنسبة لجميع الفلاحين الأوسطين الآخرين (بالطبع أنت لست كذلك) ، فإن التعليمات البرمجية في هذه المقالة مبسطة للقراءة.
شفرة المصدر (تم تحديثها مؤخرًا إلى Angular 5)
تجريبيكيفية جعل nishtyaki بارد بسهولة
أدناه سوف أعرض نهج واحد لاستخدام Angular + D3. سنقوم باتباع الخطوات التالية:
- تهيئة المشروع
- إنشاء واجهات d3 للزوايا
- توليد المحاكاة
- ربط بيانات المحاكاة بمستند عبر الزاوية
- تفاعل المستخدم ملزم لرسم بياني
- تحسين الأداء من خلال الكشف عن التغيير
- نشر وتذمر حول استراتيجية الإصدار الزاوية
لذا ، افتح محطتك الطرفية ، وابدأ محرري الكود ولا تنسى إشعال الحافظة ، نبدأ في الغمر في الكود.
هيكل التطبيق
سنفصل الشفرة المرتبطة بـ d3 و svg. سأصف بمزيد من التفصيل متى سيتم إنشاء الملفات الضرورية ، ولكن في الوقت الحالي ، إليك هيكل تطبيقنا المستقبلي:
d3 |- models |- directives |- d3.service.ts visuals |- graph |- shared
تهيئة التطبيق الزاوي
قم بتشغيل مشروع تطبيق Angular. تم اختبار الرمز الزاوي 5 أو 4 أو 2 على جميع الإصدارات الثلاثة.
إذا لم يكن لديك الزاوي كلي بعد ، فقم بتثبيته بسرعة
npm install -g @angular/cli
ثم قم بإنشاء مشروع جديد:
ng new angular-d3-example
سيتم إنشاء التطبيق الخاص بك في مجلد
angular-d3-example . قم بتشغيل الأمر
ng serve من جذر هذا الدليل ، وسيكون التطبيق متاحًا على
localhost:4200 .
التهيئة D3
تذكر التثبيت وإعلان TypeSctipt الخاص به.
npm install --save d3 npm install --save-dev @types/d3
إنشاء واجهات d3 للزوايا
للاستخدام الصحيح لـ d3 (أو أي مكتبات أخرى) داخل الإطار ، من الأفضل التفاعل من خلال واجهة مخصصة ، والتي نحددها من خلال الفئات والخدمات الزاوية والتوجيهات. عند القيام بذلك ، سوف نفصل الوظيفة الرئيسية عن المكونات التي ستستخدمها. هذا سيجعل هيكل تطبيقنا أكثر مرونة وقابلية للتوسع ، ويعزل الأخطاء.
سيكون لمجلدنا مع D3 الهيكل التالي:
d3 |- models |- directives |- d3.service.ts
توفر
models سلامة النوع وستوفر كائنات مسندًا.
ستوضح
directives للعناصر كيفية استخدام وظيفة d3.
d3.service.ts جميع الطرق لاستخدام نماذج d3 ، والتوجيهات ، وكذلك المكونات الخارجية للتطبيق.
ستحتوي هذه الخدمة على نماذج وسلوكيات حسابية.
getForceDirectedGraph طريقة
getForceDirectedGraph للرسم البياني الموجه. تسمح لك
applyDraggableBehaviour و
applyDraggableBehaviour بربط تفاعلات المستخدم بسلوكياتهم.
// path : d3/d3.service.ts import { Injectable } from '@angular/core'; import * as d3 from 'd3'; @Injectable() export class D3Service { constructor() {} applyZoomableBehaviour() {} applyDraggableBehaviour() {} getForceDirectedGraph() {} }
رسم بياني موجه
نشرع في إنشاء فئة من الرسوم البيانية الموجهة والنماذج ذات الصلة. يتكون الرسم البياني لدينا من العقد والروابط ، دعنا نحدد النماذج المقابلة.
// path : d3/models/index.ts export * from './node'; export * from './link'; // To be implemented in the next gist export * from './force-directed-graph';
// path : d3/models/link.ts import { Node } from './'; // Implementing SimulationLinkDatum interface into our custom Link class export class Link implements d3.SimulationLinkDatum<Node> { // Optional - defining optional implementation properties - required for relevant typing assistance index?: number; // Must - defining enforced implementation properties source: Node | string | number; target: Node | string | number; constructor(source, target) { this.source = source; this.target = target; } }
// path : d3/models/node.ts // Implementing SimulationNodeDatum interface into our custom Node class export class Node extends d3.SimulationNodeDatum { // Optional - defining optional implementation properties - required for relevant typing assistance index?: number; x?: number; y?: number; vx?: number; vy?: number; fx?: number | null; fy?: number | null; id: string; constructor(id) { this.id = id; } }
بعد الإعلان عن النماذج الرئيسية كمعالجة للرسم البياني ، دعنا نعلن نموذج الرسم البياني نفسه.
// path : d3/models/force-directed-graph.ts import { EventEmitter } from '@angular/core'; import { Link } from './link'; import { Node } from './node'; import * as d3 from 'd3'; const FORCES = { LINKS: 1 / 50, COLLISION: 1, CHARGE: -1 } export class ForceDirectedGraph { public ticker: EventEmitter<d3.Simulation<Node, Link>> = new EventEmitter(); public simulation: d3.Simulation<any, any>; public nodes: Node[] = []; public links: Link[] = []; constructor(nodes, links, options: { width, height }) { this.nodes = nodes; this.links = links; this.initSimulation(options); } initNodes() { if (!this.simulation) { throw new Error('simulation was not initialized yet'); } this.simulation.nodes(this.nodes); } initLinks() { if (!this.simulation) { throw new Error('simulation was not initialized yet'); } // Initializing the links force simulation this.simulation.force('links', d3.forceLink(this.links) .strength(FORCES.LINKS) ); } initSimulation(options) { if (!options || !options.width || !options.height) { throw new Error('missing options when initializing simulation'); } if (!this.simulation) { const ticker = this.ticker; // Creating the force simulation and defining the charges this.simulation = d3.forceSimulation() .force("charge", d3.forceManyBody() .strength(FORCES.CHARGE) ); // Connecting the d3 ticker to an angular event emitter this.simulation.on('tick', function () { ticker.emit(this); }); this.initNodes(); this.initLinks(); } this.simulation.force("centers", d3.forceCenter(options.width / 2, options.height / 2)); this.simulation.restart(); } }
نظرًا لأننا حددنا نماذجنا ، فلنقم أيضًا بتحديث طريقة
D3Service في
D3Service getForceDirectedGraph(nodes: Node[], links: Link[], options: { width, height} ) { let graph = new ForceDirectedGraph(nodes, links, options); return graph; }
سيؤدي إنشاء مثيل لـ
ForceDirectedGraph إلى إرجاع الكائن التالي
ForceDirectedGraph { ticker: EventEmitter, simulation: Object }
يحتوي هذا الكائن على خاصية
simulation مع البيانات التي تم تمريرها من قبلنا ، بالإضافة إلى خاصية
ticker التي تحتوي على باعث الحدث الذي يتم إطلاقه مع كل علامة من المحاكاة. إليك كيفية استخدامه:
graph.ticker.subscribe((simulation) => {});
سيتم تحديد الطرق المتبقية لفئة
D3Service لاحقًا ، لكننا سنحاول الآن ربط بيانات كائن
simulation بالمستند.
ربط المحاكاة
لدينا مثيل لكائن ForceDirectedGraph ، يحتوي على بيانات محدثة باستمرار من القمم (العقدة) والأقواس (الرابط). يمكنك ربط هذه البيانات بمستند يشبه d3 (مثل وحشية):
function ticked() { node .attr("cx", function(d) { return dx; }) .attr("cy", function(d) { return dy; }); }<source> , 21 , , . Angular . <h3><i>: SVG Angular</i></h3> <h3>SVG Angular</h3> SVG, svg html . Angular SVG Angular ( <code>svg</code>). SVG : <ol> <li> <code>svg</code>.</li> <li> “svg”, Angular', <code><svg:line></code></li> </ol> <source lang="xml"> <svg> <line x1="0" y1="0" x2="100" y2="100"></line> </svg>
app.component.html
<svg:line x1="0" y1="0" x2="100" y2="100"></svg:line>
link-example.component.html
مكونات SVG في الزاوي
لن يعمل تعيين المحددات للمكونات الموجودة في مساحة اسم SVG كالمعتاد. يمكن تطبيقها فقط من خلال محدد السمات.
<svg> <g [lineExample]></g> </svg>
app.component.html
import { Component } from '@angular/core'; @Component({ selector: '[lineExample]', template: `<svg:line x1="0" y1="0" x2="100" y2="100"></svg:line>` }) export class LineExampleComponent { constructor() {} }
link-example.component.ts
لاحظ البادئة svg في قالب المكوننهاية العرض الجانبي
تجليد المحاكاة - الجزء المرئي
مسلحًا بالمعرفة القديمة لـ svg ، يمكننا البدء في إنشاء مكونات تحاكي بياناتنا. بعد عزلها في مجلد
visuals ، سنقوم بإنشاء المجلد
shared (حيث سنضع المكونات التي يمكن استخدامها من قبل أنواع أخرى من الرسوم البيانية) ومجل
graph الرئيسي ، والذي سيحتوي على جميع التعليمات البرمجية اللازمة لعرض الرسم البياني الموجه (Force Directed Graph).
visuals |- graph |- shared
التصور البياني
لنقم بإنشاء مكون الجذر الخاص بنا ، والذي سيقوم بإنشاء رسم بياني وربطه بالمستند. نقوم بتمرير العقد والروابط إليه من خلال سمات إدخال المكون.
<graph [nodes]="nodes" [links]="links"></graph>
يقبل المكون خصائص
nodes links ForceDirectedGraph إنشاء فئة
ForceDirectedGraph // path : visuals/graph/graph.component.ts import { Component, Input } from '@angular/core'; import { D3Service, ForceDirectedGraph, Node } from '../../d3'; @Component({ selector: 'graph', template: ` <svg #svg [attr.width]="_options.width" [attr.height]="_options.height"> <g> <g [linkVisual]="link" *ngFor="let link of links"></g> <g [nodeVisual]="node" *ngFor="let node of nodes"></g> </g> </svg> `, styleUrls: ['./graph.component.css'] }) export class GraphComponent { @Input('nodes') nodes; @Input('links') links; graph: ForceDirectedGraph; constructor(private d3Service: D3Service) { } ngOnInit() { this.graph = this.d3Service.getForceDirectedGraph(this.nodes, this.links, this.options); } ngAfterViewInit() { this.graph.initSimulation(this.options); } private _options: { width, height } = { width: 800, height: 600 }; get options() { return this._options = { width: window.innerWidth, height: window.innerHeight }; } }
العقدة المكونة
بعد ذلك ، دعنا نضيف مكونًا لتقديم الرأس (العقدة) ، سيعرض دائرة بمعرف الرأس.
// path : visuals/shared/node-visual.component.ts import { Component, Input } from '@angular/core'; import { Node } from '../../../d3'; @Component({ selector: '[nodeVisual]', template: ` <svg:g [attr.transform]="'translate(' + node.x + ',' + node.y + ')'"> <svg:circle cx="0" cy="0" r="50"> </svg:circle> <svg:text> {{node.id}} </svg:text> </svg:g> ` }) export class NodeVisualComponent { @Input('nodeVisual') node: Node; }
مكون LinkVisual
وهنا عنصر تصور القوس (حلقة الوصل):
// path : visuals/shared/link-visual.component.ts import { Component, Input } from '@angular/core'; import { Link } from '../../../d3'; @Component({ selector: '[linkVisual]', template: ` <svg:line [attr.x1]="link.source.x" [attr.y1]="link.source.y" [attr.x2]="link.target.x" [attr.y2]="link.target.y" ></svg:line> ` }) export class LinkVisualComponent { @Input('linkVisual') link: Link; }
السلوكيات
دعنا نعود إلى الجزء d3 من التطبيق ، وابدأ في إنشاء توجيهات وأساليب للخدمة ، والتي ستمنحنا طرقًا رائعة للتفاعل مع الرسم البياني.
السلوك - تكبير
أضف الروابط لوظيفة التكبير / التصغير ، بحيث يمكن استخدامها لاحقًا بسهولة:
<svg #svg> <g [zoomableOf]="svg"></g> </svg>
// path : d3/d3.service.ts // ... export class D3Service { applyZoomableBehaviour(svgElement, containerElement) { let svg, container, zoomed, zoom; svg = d3.select(svgElement); container = d3.select(containerElement); zoomed = () => { const transform = d3.event.transform; container.attr("transform", "translate(" + transform.x + "," + transform.y + ") scale(" + transform.k + ")"); } zoom = d3.zoom().on("zoom", zoomed); svg.call(zoom); } // ... }
// path : d3/directives/zoomable.directive.ts import { Directive, Input, ElementRef } from '@angular/core'; import { D3Service } from '../d3.service'; @Directive({ selector: '[zoomableOf]' }) export class ZoomableDirective { @Input('zoomableOf') zoomableOf: ElementRef; constructor(private d3Service: D3Service, private _element: ElementRef) {} ngOnInit() { this.d3Service.applyZoomableBehaviour(this.zoomableOf, this._element.nativeElement); } }
السلوك - السحب والإفلات
لإضافة السحب والإفلات ، نحتاج إلى الوصول إلى كائن المحاكاة حتى نتمكن من إيقاف الرسم مؤقتًا أثناء السحب.
<svg #svg> <g [zoomableOf]="svg"> <g [nodeVisual]="node" *ngFor="let node of nodes" [draggableNode]="node" [draggableInGraph]="graph"> </g> </g> </svg>
// path : d3/d3.service.ts // ... export class D3Service { applyDraggableBehaviour(element, node: Node, graph: ForceDirectedGraph) { const d3element = d3.select(element); function started() { /** Preventing propagation of dragstart to parent elements */ d3.event.sourceEvent.stopPropagation(); if (!d3.event.active) { graph.simulation.alphaTarget(0.3).restart(); } d3.event.on("drag", dragged).on("end", ended); function dragged() { node.fx = d3.event.x; node.fy = d3.event.y; } function ended() { if (!d3.event.active) { graph.simulation.alphaTarget(0); } node.fx = null; node.fy = null; } } d3element.call(d3.drag() .on("start", started)); } // ... }
// path : d3/directives/draggable.directives.ts import { Directive, Input, ElementRef } from '@angular/core'; import { Node, ForceDirectedGraph } from '../models'; import { D3Service } from '../d3.service'; @Directive({ selector: '[draggableNode]' }) export class DraggableDirective { @Input('draggableNode') draggableNode: Node; @Input('draggableInGraph') draggableInGraph: ForceDirectedGraph; constructor(private d3Service: D3Service, private _element: ElementRef) { } ngOnInit() { this.d3Service.applyDraggableBehaviour(this._element.nativeElement, this.draggableNode, this.draggableInGraph); } }
إذن ما لدينا في النهاية:
- توليد الرسوم البيانية والمحاكاة من خلال D3
- ربط بيانات المحاكاة بوثيقة باستخدام Angular
- تفاعل المستخدم مع الرسم البياني حتى d3
ربما تفكر الآن: "بيانات المحاكاة الخاصة بي تتغير باستمرار ، والزاوية تغير باستمرار هذه البيانات إلى المستند باستخدام الكشف عن التغيير ، ولكن لماذا يجب أن أفعل ذلك ، أريد تحديث الرسم البياني بنفسي بعد كل علامة من المحاكاة."
حسنًا ، أنت على حق جزئيًا ، لقد قارنت نتائج اختبارات الأداء بآليات مختلفة لتتبع التغييرات واتضح أنه عند تطبيق التغييرات بشكل خاص ، نحصل على مكاسب أداء جيدة.
الزاوي ، D3 وتتبع التغيير (اكتشاف التغيير)
سنقوم بتعيين تتبع التغييرات في طريقة onPush (سيتم تتبع التغييرات فقط عندما يتم استبدال الروابط إلى الكائنات بالكامل).
لا تتغير مراجع كائنات الرؤوس والأقواس ؛ وبناءً على ذلك ، لن يتم تتبع التغييرات. هذا رائع! يمكننا الآن التحكم في تتبع التغيير ووضع علامة عليه لعمليات التحقق عند كل علامة من المحاكاة (باستخدام باعث الحدث للبار الذي قمنا بتثبيته).
import { Component, ChangeDetectorRef, ChangeDetectionStrategy } from '@angular/core'; @Component({ selector: 'graph', changeDetection: ChangeDetectionStrategy.OnPush, template: `<!-- svg, nodes and links visuals -->` }) export class GraphComponent { constructor(private ref: ChangeDetectorRef) { } ngOnInit() { this.graph = this.d3Service.getForceDirectedGraph(...); this.graph.ticker.subscribe((d) => { this.ref.markForCheck(); }); } }
الآن ستقوم Angular بتحديث الرسم البياني عند كل علامة ، وهذا ما نحتاجه.
هذا كل شيء!
لقد نجت من هذه المقالة وأنشأت تصوراً رائعاً وقابلاً للتطوير. آمل أن يكون كل شيء واضحًا ومفيدًا. إذا لم يكن كذلك ، أخبرني!
شكرا للقراءة!
ليران شرير