أقترح قراءة ترجمة مجانية لمقال قصير حول التطبيق العملي لـ GraphQL. الأصل متاح هنا (باللغة الإنجليزية).
بضع كلمات حول GraphQL
GraphQL هي لغة استعلام API تقدم منهجًا تعريفيًا لاسترداد البيانات. يسمح للعملاء بطلب البيانات الضرورية فقط من خادم الويب وليس أكثر. تم تطويره في عام 2012 بواسطة Facebook ، والذي لا يزال مدعومًا ، بدأ استخدام GraphQL من قبل العديد من الشركات الكبيرة الأخرى. من بين أمور أخرى ، Yelp ، Shopify و Github.
عند استخدام REST APIs ، عادةً ما يتم إرسال الطلبات إلى عدة عناوين للحصول على جميع البيانات الضرورية في التطبيق. تتيح لك واجهة برمجة تطبيقات GraphQL إرسال الطلب بالكامل إلى العنوان الذي يشير بالضبط إلى البيانات التي ترغب في تلقيها مع هذا الطلب. لذلك ، بالمناسبة ، فإن GraphQL رائع عند استخدامه في اتصال جوال بطيء.
يمكن أن تكون إصدارات API صداعًا لفرق التطوير. مع GraphQL ، لا تقلق بشأن ذلك. يتيح لك GraphQL إضافة حقول وأنواع جديدة (سيتم مناقشتها لاحقًا) في واجهة برمجة تطبيقات GraphQL الخاصة بك دون التأثير على الاستعلامات الموجودة ؛ يمكن إخفاء الحقول القديمة وغير المستخدمة من عملاء API. باستخدام إصدار واحد ومتطور ، توفر واجهة برمجة تطبيقات GraphQL للتطبيق وصولًا مستمرًا إلى تطبيقات API الجديدة وتوفر قاعدة تعليمات برمجية نظيفة وسهلة الصيانة.
متطلب سابق
قبل البدء ، تأكد من تثبيت Node الإصدار 6 والإصدارات الأقدم. يمكنك التحقق من الإصدار باستخدام الأمر:
node -v
إذا لم يكن لديك عقدة مثبتة ، فانتقل إلى URL:
https://nodejs.org/ واتبع تعليمات التثبيت.
تخصيص GraphQL و Express
طريقة سهلة لإنشاء خادم Graph API هي استخدام Express ، وهو إطار عمل شائع لـ Node.js. تثبيت Express باستخدام npm:
npm init npm install express --save
ثم قم بتثبيت `Graphql` و` express-graphql`:
npm install graphql express-graphql --save
لذلك ، ستكون البنية الأولية للمجلد كما يلي:
|---- node_modules
|---- package.json
بداية سريعة في GraphQL API
في هذا القسم الصغير ، سنحاول إنشاء API GraphQL بسيط بسرعة. هذا مهم لمزيد من السرد ، بحيث يصبح من الواضح لك ما نقوم به بالضبط ، وما هو شكل API الذي تم إنشاؤه باستخدام GraphQL. إذا كانت بعض النقاط ستبدو صعبة وغير مفهومة ، فلا تقلق ، فسنعود إليها.
لذلك الآن سنستخدم كائن `buildSchema` من` graphql` لإنشاء المخطط ("المخطط"). قم بإنشاء ملف example.js في مجلدنا.
const express = require('express'); const { buildSchema } = require('graphql'); const graphqlHTTP = require('express-graphql'); let port = 3000; let schema = buildSchema(` type Query { postTitle: String, blogTitle: String } `); let root = { postTitle: () => { return 'Build a Simple GraphQL Server With Express and NodeJS'; }, blogTitle: () => { return 'scotch.io'; } }; const app = express(); app.use('/', graphqlHTTP({ schema: schema, rootValue: root, graphiql: true
يمكنك الآن تشغيل `example.js` في المحطة:
node example.js
الآن على localhost: 3000 يمكنك اكتشاف GraphiQL. سيسمح لك باختبار API الخاص بك في متصفح. وهو يدعم الإكمال التلقائي ويضع افتراضات لك بناءً على الأنواع والحقول المتاحة في مخططك.

الآن دعنا نطلب مخططنا لـ `blogTitle`:

بهذه البساطة يمكنك طلب واجهة برمجة تطبيقات GraphQL.
مقدمة
الآن أنت تفهم كيف يعمل GraphQL ويمكن أن نبدأ الموضوع أعمق.
لنبدأ بإنشاء خادم GraphQL على أساس Express. الآن ، في مجلدنا ، قم بإنشاء المجلد `src` ، وقم فيه بإنشاء وحفظ ملف` schema.js`. سيبدو هذا الملف كما يلي:
بعد ذلك ، قم بإنشاء المجلد `data` في المجلد` src`. سنضع ملفين فيهما: "author.js" و "posts.js".
محتويات هذه الملفات كبيرة جدًا ، لذا لا يمكنك أخذها
عبر الرابط على Github أو تحت المفسد.
المؤلفون const Authors = [ { id: '8dlx7ak38fd39dv79ad', name: 'Orinami Olatunji', twitterHandle: '@orinami_' }, { id: 'jd3kd03d0w9a0l35rh74', name: 'Ojima Udale', twitterHandle: '@uncooloj' }, { id: '0hy894hf0dlkfh9oinv', name: 'Xabi Alonso', twitterHandle: '@alonso' } ]; module.exports = Authors;
posts.js const Posts = [ {'id':'0176413761b289e6d64c2c14a758c1c7','author_id':'0hy894hf0dlkfh9oinv','author':'alonso', 'category':'meteor','body':'Most developers and companies use two different apps for the marketing website and for the app itself. Thus, they can update each of the apps without affecting the other. [Stripe](https://stripe.com/), [Digital Ocean](https://www.digitalocean.com/) and many other companies follow this technique. Most Meteor apps also do the same.\n\nSo, in a scenario like this, sometimes we need to show the login state of the app on the landing page too. For an example, see our Kadira home page (\u003chttps://kadira.io\u003e). If you are logged into the Kadira app (\u003chttps://ui.kadira.io\u003e), we show a button with "Open Kadira UI" on the home page, which replaces the login button.\n\n[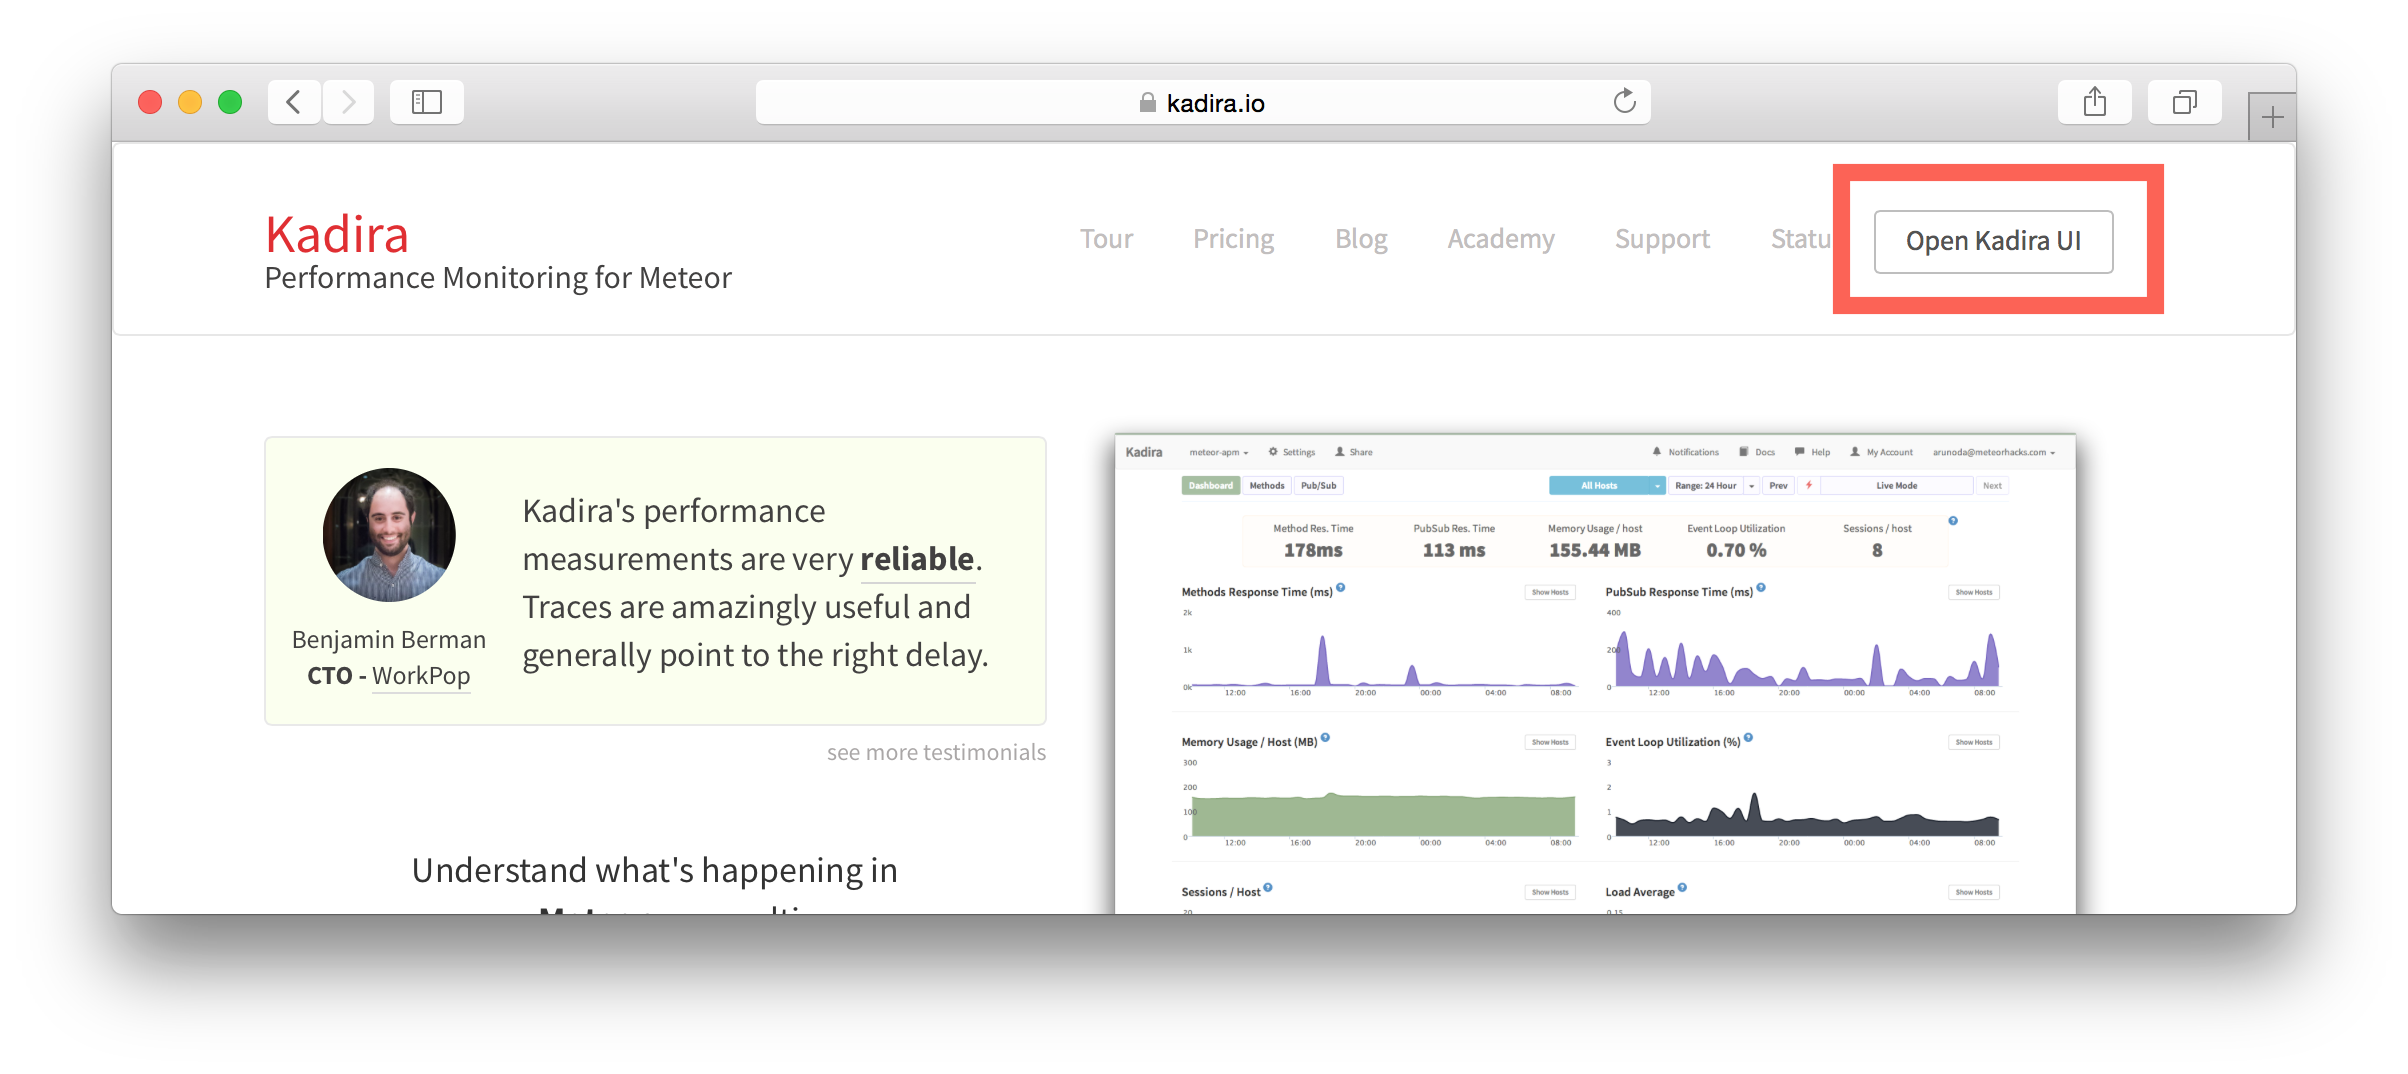](https://kadira.io)\n\n## How Did We Do It?\n\nMeteor does not have a built-in way to share login states across multiple apps or subdomains. So, we have to find an alternative way to do so.\n\nAs a solution, we can use browser cookies to share the login state between multiple domains. That\'s exactly what we did. We wrapped this up into a Meteor package, which now you can also use.\n\nIn this guide, I\'m going to explain how to share the login state between multiple domains using the [`kadira:login-state`](https://github.com/kadirahq/meteor-login-state) package.\n\n### On Meteor App\n\nFirst of all, install the `kadira:login-state` package in your Meteor app:\n\n~~~\nmeteor add kadira:login-state\n~~~\n\nThen, you need to add a new entry in the `public` object as the `loginState` in the `settings.json` file for your app. (If you haven\'t created the settings.json yet, you need to create it first.)\n\n~~~json\n{\n "public": {\n "loginState": {\n "domain": ".your-domain-name.com",\n "cookieName": "app-login-state-cookie-name"\n }\n }\n}\n~~~\n\nThe `domain` field must be your main domain name, starting with a dot. It allows you to share the login state, which can be accessed from any of its subdomains. You can use any appropriate identifier, such as `cookieName`.\n\nNow, everything has been set up on the Meteor app.\n\n### On the Static App (the Landing Page)\n\nNow we have to show the login state of the app on the landing page. For this, we need to add support for the login state for the static app (or landing page).\n\nActually, there are three different ways to do this. Here I will show you how to do so by pasting a few lines of JavaScript code.\n\nYou need to create a JavaScript file in your js folder. I create it as `js/login_state.js`. After that, copy and paste the following code snippet into it:\n\n~~~javascript\nLoginState = {};\n\nLoginState.get = function(cookieName) {\n var loginState = getCookie(cookieName);\n if(loginState) {\n return JSON.parse(decodeURIComponent(loginState));\n } else {\n return false;\n }\n};\n\nfunction getCookie(cname) {\n var name = cname + "=";\n var ca = document.cookie.split(\';\');\n for(var i=0; i \u003c ca.length; i++) {\n var c = ca[i];\n while (c.charAt(0)==\' \') c = c.substring(1);\n if (c.indexOf(name) != -1) return c.substring(name.length,c.length);\n }\n return;\n}\n~~~\n\nInsert that file into the head section of your HTML document: \n\n`\u003cscript src="js/login-state.js"\u003e\u003c/script\u003e`\n\n\u003e If you prefer, you can also use [Browserify](https://github.com/kadirahq/meteor-login-state#installing-via-browserify) or [Bower](https://github.com/kadirahq/meteor-login-state#installing-via-bower) to load the above JS file.\n\u003e The package name for both Browserify and Bower is `meteor-login-state`.\n\nThen, use the following code to get the login state of your app. You need to provide the relevant `cookieName` to do so: \n\n~~~javascript\nvar loginState = LoginState.get("app-login-state-cookie-name");\nif(loginState) {\n // the user has loggedIn to the meteor app\n // see the loginState Object for the addtional data\n // (append your code here!)\n console.log(loginState);\n} else {\n // user has not loggedIn yet.\n // (append your code here!) \n}\n~~~\n\nThe `loginState` object will be something like this:\n\n~~~json\n{\n timestamp: 1435835751489,\n username: "username",\n userId: "meteor-user-id",\n email: "user@email.com"\n url: "https://ui.kadira.io"\n}\n~~~\n\nNow you can do whatever you need to do with the login state.\n\nGive it a try and let me know what you think.','date':{'$date':'2015-07-07T00:00:00.000Z'},'layout':'blog_post','slug':'sharing-meteor-login-state-between-sub-domains','summary':'In this blog we\'ll show you how we shared login state between our static web app and our Meteor app Kadira UI.','title':'Sharing the Meteor Login State Between Subdomains'}, {'id':'03390abb5570ce03ae524397d215713b','author_id':'0hy894hf0dlkfh9oinv','author':'alonso', 'category':'product','body':'Here is a common feedback we received from our users:\n\n\u003e Hi, I have a suggestion. It would be great if I could "dismiss" errors or mark them as resolved on my end. This way, I can keep track of which errors I have resolved.\n\nToday we are happy to announce new Kadira feature which allows you to track **status** to errors. With that, you can mark errors as "Ignored", "Fixing" or "Fixed".\n\nOnce you mark an error as "Ignored", it will be hidden. \n\nBut you can click on "Show Ignored Errors" checkbox or filter by "ignored" status to view them again.\n\n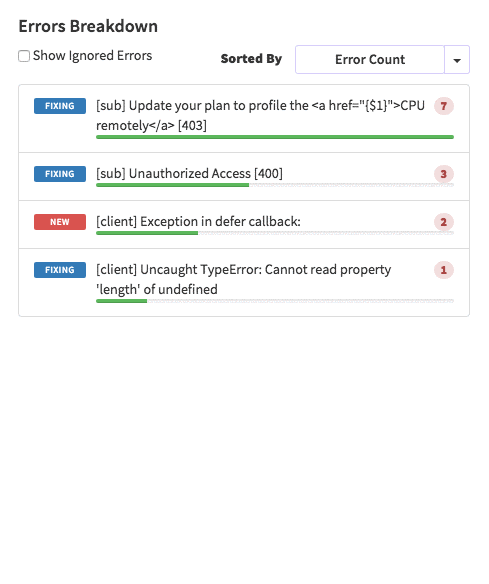\n\nYou can also filter errors by status like this:\n\n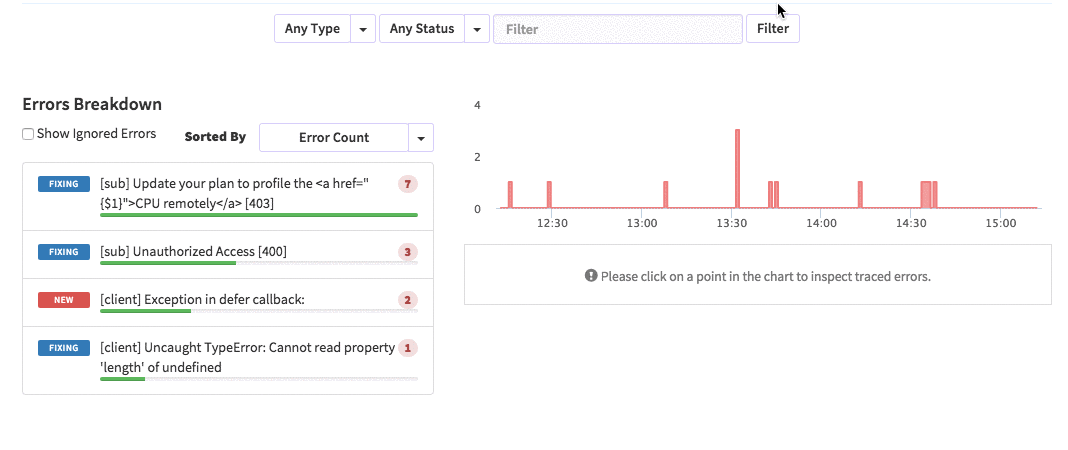\n\nWe are rolling out this feature to all our paid users. [Give it a try](https://ui.kadira.io/apps/AUTO/errors/overview?metric=count).\n\n### What's next?\n\nRight now we are planning to add few more feature related this. Could you help us on [prioritizing](https:
GraphQL
GraphQL 'grapql/type', . 'graphql/type' 'graphql'
ID ,
String ,
Int ,
Float Boolean . (Author). schema.js :
const AuthorType = new GraphQLObjectType({ name: "Author", description: "This represent an author", fields: () => ({ id: {type: new GraphQLNonNull(GraphQLString)}, name: {type: new GraphQLNonNull(GraphQLString)}, twitterHandle: {type: GraphQLString} }) });
, : GraphQLObjectType . Name Description — , Fields Author: id, name twitterHandler.
graphql.org/graphql-js/type/(Post):
const PostType = new GraphQLObjectType({ name: "Post", description: "This represent a Post", fields: () => ({ id: {type: new GraphQLNonNull(GraphQLString)}, title: {type: new GraphQLNonNull(GraphQLString)}, body: {type: GraphQLString}, author: { type: AuthorType, resolve: function(post) { return _.find(Authors, a => a.id == post.author_id); } } }) });
schema.js. PostType, Root Query( — . , GraphQL API).
Root Query
Root Query , . 2 : .
`schema.js`:
const BlogQueryRootType = new GraphQLObjectType({ name: 'BlogAppSchema', description: "Blog Application Schema Query Root", fields: () => ({ authors: { type: new GraphQLList(AuthorType), description: "List of all Authors", resolve: function() { return Authors } }, posts: { type: new GraphQLList(PostType), description: "List of all Posts", resolve: function() { return Posts } } }) });
BlogQueryRootType. , : new GraphQLList(). , .
, , , . , ( ). , , , .
:
const BlogAppSchema = new GraphQLSchema({ query: BlogQueryRootType });
BlogQueryRootType, API.
GraphQL API
`lodash`. `Lodash` , Javascript , , . `underscore`, ! Lodash , underscore.
npm install lodash --save
lodash package.json .
schema.js.
const _ = require('lodash');
schema.js. .
const _ = require('lodash');
PostType, resolve. Resolve , , .. .
BlogAppSchema server.js , module.exports
, server.js :
const express = require('express'); const graphqlHTTP = require('express-graphql'); const schema = require('./src/schema.js'); let port = 3000; const app = express(); app.use('/', graphqlHTTP({ schema: schema, graphiql: true })); app.listen(port); console.log('GraphQL API server running at localhost:'+ port);
localhost:3000. :
node server.js
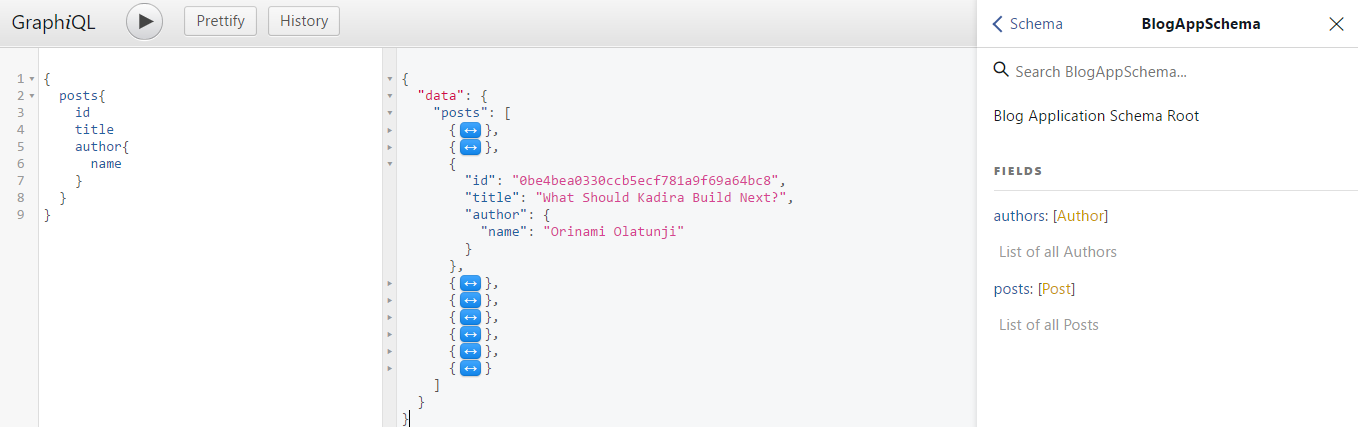
النتيجة:
graphiql, API . :
{ posts { id title author { name } } }
:
الخلاصة
, . , GraphQL API Express NodeJS. , .
GraphQL
graphql.org .