مرحبا عزيزي habrozhitel.
اليوم أريد أن أشارك القليل من الأعمال الأساسية المصممة لتحويل بطاقات PCAD-s إلى G- كود. مرنة وبسيطة ومفتوحة المصدر. صحيح ، آسف عبادي ، على كيو تي. الكتابة عليه ، بالطبع ، أمر جيد ، ولكن نشر وجمع رموز الآخرين ...
الجزء الأول الميكانيكا.
منذ بعض الوقت ، قمت بتأجيل مشروعي على الرأس ل prius ، ولهذا:
بينما كنت أنتظر رقائق البطاطس ، بينما كنت أجرب الدوائر ، أدركت بوضوح أنني أريد عمل لوحات دوائر مطبوعة في المنزل. نعم ، نعم ، هناك خبرة في تكنولوجيا الكي بالليزر ، وحتى الرسم بالورنيش ، لكني أردت شيئًا حقيقيًا. تقرر استخدام مقاوم للضوء ومصباح للأشعة فوق البنفسجية للأظافر. بطبيعة الحال ، نشأت المشكلة من حفر وطلاء الثقوب. وتبين من ذلك أن الثقوب تحتاج إلى تعدينها قبل حفر المسارات على السبورة. خلاف ذلك ، فإن تطبيق تيار على كل حفرة هو قصة كاملة.
اتضح أن الحفر اليدوي يختفي ، لأنه ببساطة لا يوجد شيء للتنقل (دعنا لا نقدم ورق به ثقوب).
تقرر تعليق عمود دوران على طابعة ثلاثية الأبعاد موجودة بدلاً من الرأس المباشر ، والعيش على هذا النحو. وهنا توجد حلول أود مشاركتها اليوم.
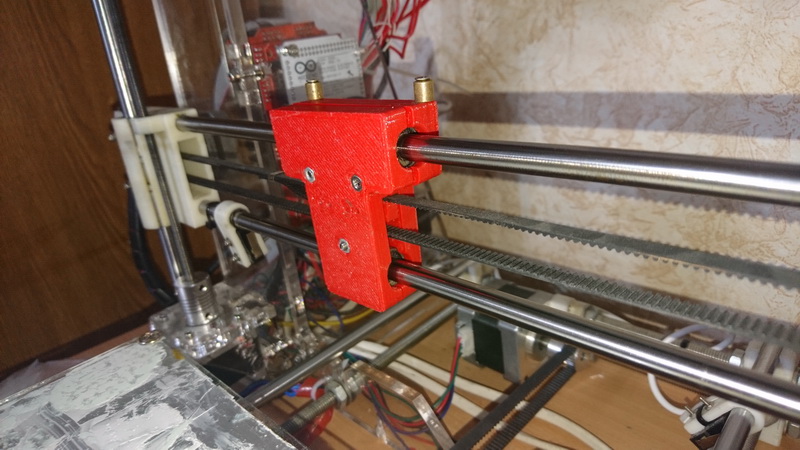
رئيس للتبادل ل RepRap
من أجل تحويل الطابعة بسهولة إلى مثقاب والعكس بالعكس ، تقرر جعل الرأس قابل للفصل. المنزلق المثبت على السيور منفصل ، وكل شيء آخر قابل للإزالة. بالنظر إلى أن هذه ليست أخبار جيدة ، يا لها من صعوبة ، ليس هناك فائدة من وضع مقال منفصل. هنا مجرد صور وروابط
لنماذج STL ، إذا كان أي شخص يريد أن يفعل الشيء نفسه بالضبط. يحتوي الأرشيف أيضًا على مصادر SLDPRT ، إذا كان هناك شيء يجب إصلاحه. يتأرجح ببطء - بفضل ADSL من Beltelecom ، ولكن يجب أن يستغرق وقتًا طويلاً.
والنتيجة هي:

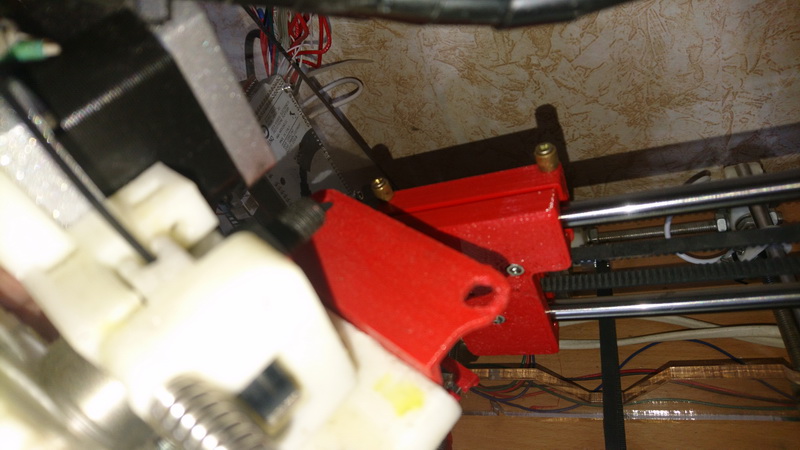

رأس المغزل
كل شيء بسيط هنا - بعد محاولات طويلة لإنشاء مغزلي الخاص ، قررت شراء واحد على AliExpress ، وتعليقه فقط على القوس. لا توجد صورة أثناء العملية.
G-Code Generator
وهنا يبدأ المرح.
مع عولمتي المتأصلة ، راجعت الحلول المتاحة ، وأدركت أن كل واحد منهم لا يمكن أن يخلق مجموعة من المشاكل فقط عند نشر التكنولوجيا في المنزل ، ولكن أيضًا توصيلها بشكل منتظم ومنهجي ، حتى التقاعد. ما الذي لم يعجبك؟ المرونة. كلهم أكثر للآلات ، مع خصائص محددة مسبقًا للقوالب ، إلخ. نعم ، الأمر ليس معقدًا. لكنني في الحقيقة لم أكن أرغب في مواجهة موقف يومًا ما تحتاج فيه إلى تعديل الخوارزمية قليلاً ، وعدم التمكن من القيام بذلك. على سبيل المثال ، لم أر أداة يمكنها تدوير الثقوب حول محور. ولكن بعد التعدين ، لا يمكنك وضع لوحة 1: 1. لكن هذه أفكار للمستقبل. لا أحتاجها بعد. لكن هذا ممكن بالفعل. بشكل عام ، أردت شيئًا بسيطًا وخفيفًا ومرنًا وفعالًا. قررت رشّي بمفردي.
تم استخدام مكتبات Qt 5.11 كقاعدة. يتم كتابة التطبيق بأسلوب وحدة التحكم. بنية التطبيق مصنوعة بأسلوب لينكس.
يتلقى التطبيق ملف DRL المسحوب من PCAD عند إنشاء مجموعة Geber-kit. (قد تضطر إلى تعديل المحلل اللغوي إذا كنت تريد إطعامه شيئًا من AltiumDesigner. لكن بنفسي ، قررت شخصيًا أن أخرج وحش Altium هذا من الخطيئة. لما هو الآن في أحلام رهيبة ولا يسمح لي بنسي اسمي الخاص).
يتم تحديد ملف XML كمعلمة. سيتم وصف تنسيق هذا الملف في النصف الثاني من المقالة. يحدد هذا الملف ، في الواقع ، آلية إنشاء G-Code (وفي الواقع ، أي ملف نصي) لنقله (G-code) إلى طابعة ثلاثية الأبعاد.
آلية التطبيق
- تتم قراءة تنسيق DRL (وهو M48 أو Excellon ) والتعرف عليه. والنتيجة هي أدوات تحتوي على قائمة بالثقوب التي يتم حفرها باستخدام هذه الأدوات.
- مع البيانات التي تم الحصول عليها من البند 1 ، نذهب إلى XML ، ونبحث عن عقدة البرنامج النصي هناك ، ونقوم ببساطة بتنفيذ كل ما هو مكتوب هناك. هناك خمسة مشغلين ، لكننا لسنا بحاجة إلى المزيد.
- أثناء تنفيذ الخطوة 2 ، حدثت عبارات الطباعة. يتم طباعة النتيجة على دفق الإخراج.
الجزء الثاني تنسيق ملف XML
من أجل جعل البرنامج مرنًا قدر الإمكان ، تم استخدام مكتبة ScriptEngine. طغت نفسه قليلا مما يمكن فعله الآن حقا مع التكوين. الفرضية الرئيسية هي: هناك العديد من المعلمات المحسوبة التي يتم التعامل معها بأكبر قدر ممكن من الشفافية: يتم تمرير النص إلى وحدة ScriptEngine ، ويتم استخدام النتيجة. يحدث نفس الموقف إذا تم العثور على مجموعة $ {blah blah blah} في قالب G-Code. علاوة على ذلك ، سيتم تمرير كل شيء داخل الأقواس المتعرجة إلى الحساب ، وسيتم استبدال القالب بأكمله بالنتيجة.
نموذج ملف لطابعتي<xml> <variables> <var name="ZChangeToolValue" value="30"/> <var name="ZTravelValue" value="10"/> <var name="ZDrillValue" value="0"/> </variables> <functions> <plate_increase_dia f="a+0.2"/> </functions> <tools> <tool description="0,3mm" range_min="0" range_max="0.3" plated="both" position="0" /> <tool description="0,4mm" range_min="0.3" range_max="0.4" plated="both" position="1" /> <tool description="0,5mm" range_min="0.4" range_max="0.5" plated="both" position="2" /> <tool description="0,6mm" range_min="0.5" range_max="0.6" plated="both" position="3" /> <tool description="0,7mm" range_min="0.6" range_max="0.7" plated="both" position="4" /> <tool description="0,8mm" range_min="0.7" range_max="0.8" plated="both" position="5" /> <tool description="0,9mm" range_min="0.8" range_max="0.9" plated="both" position="6" /> <tool description="1,0mm" range_min="0.9" range_max="1.0" plated="both" position="7" /> <tool description="1,1mm" range_min="1.0" range_max="1.1" plated="both" position="8" /> <tool description="1,2mm" range_min="1.1" range_max="5" plated="both" position="9" /> </tools> <patterns> <pattern name="start"> G90 ;${var hcnt=holesCount;var tcnt=toolsCount;"Hello"} M117 Homing G28 XY M117 Move Z to travel G0 X${minX} Y${minY} M76 G92 Z${ZTravelValue} </pattern> <pattern name="finish"> G0 Z${ZChangeToolValue} M104 S0 ; disable spindle G0 X0 Y220 M117 Drill finished M300 S600 P1 ; Stats: ; Holes : ${holesCount} ; Tools : ${toolsCount} </pattern> <pattern name="set_tool"> ; Tools rest: ${tcnt--} G0 Z${ZChangeToolValue} G0 X100 Y0 M104 S0 ; disable spindle M117 Change tool to ${description} M300 S600 P1 M76 ; pause job M117 Drilling M104 S100 ; enable spindle G28 X </pattern> <pattern name="go_drill"> ; Holes rest: ${hcnt--} ; Percent rest: ${var percent=Math.round(hcnt*100/holesCount); percent}% M73 P${100-percent} G0 Z${ZTravelValue} G0 X${Math.round(x*100)/100} Y${Math.round(y*100)/100} G0 Z${ZDrillValue} G0 Z${ZTravelValue} </pattern> </patterns> <script> <command verb="assign tools" /> <command verb="join tools" /> <command verb="offset" xoffs="-minX+10" yoffs="-minY+10"/> <command verb="print" pattern="start"/> <loop type="tools"> <command verb="print" pattern="set_tool"/> <command verb="print context" line_begin=";"/> <loop type="toolholes"> <command verb="print" pattern="go_drill"/> <command verb="print context" line_begin=";"/> </loop> </loop> <command verb="print" pattern="finish"/> </script> </xml>
ونسخة من نفس الملف بعد الاختبارات العملية <xml> <variables> <var name="ZChangeToolValue" value="10"/> <var name="ZTravelValue" value="2"/> <var name="ZDrillValue" value="-3"/> <var name="FeedHorizontal" value="24000"/> <var name="FeedDown" value="100"/> <var name="FeedFree" value="2000"/> <var name="StartOffsX" value="20"/> <var name="StartOffsY" value="20"/> <var name="ZZeroPosition" value="0.1"/> <var name="first" value="0"/> </variables> <functions> <plate_increase_dia f="a+0.3"/> </functions> <tools> <tool description="0,3mm" range_min="0" range_max="0.3" plated="both" position="0" /> <tool description="0,4mm" range_min="0.3" range_max="0.4" plated="both" position="1" /> <tool description="0,5mm" range_min="0.4" range_max="0.5" plated="both" position="2" /> <tool description="0,6mm" range_min="0.5" range_max="0.6" plated="both" position="3" /> <tool description="0,7mm" range_min="0.6" range_max="0.7" plated="both" position="4" /> <tool description="0,8mm" range_min="0.7" range_max="0.8" plated="both" position="5" /> <tool description="0,9mm" range_min="0.8" range_max="0.9" plated="both" position="6" /> <tool description="1,0mm" range_min="0.9" range_max="1.0" plated="both" position="7" /> <tool description="1,1mm" range_min="1.0" range_max="1.1" plated="both" position="8" /> <tool description="1,2mm" range_min="1.1" range_max="5" plated="both" position="9" /> </tools> <patterns> <pattern name="start1"> ; Start </pattern> <pattern name="set_tool1"> ; Set tool ${description} </pattern> <pattern name="finish1"> ; Finish </pattern> <pattern name="go_drill1"> ; Drill X${Math.round(x*100)/100} Y${Math.round(y*100)/100} </pattern> <pattern name="start"> ;${var hcnt=holesCount;var tcnt=toolsCount;"Hello"} M117 Homing G28 G0 Z0 F${FeedFree} G92 Z1.6 </pattern> <pattern name="finish"> G0 Z${ZChangeToolValue} F${FeedFree} M400 M5 ; disable spindle G0 X0 Y220 F${FeedHorizontal} M117 Drill finished M300 S600 P100 ; Stats: ; Holes : ${holesCount} ; Tools : ${toolsCount} </pattern> <pattern name="set_tool"> ; Tools rest: ${tcnt--} G0 Z${ZChangeToolValue} F${FeedFree} M400 G0 X100 Y0 F${FeedHorizontal} M117 Stopping spindle M5 ; disable spindle M117 Change tool to ${description} M300 S600 P100 M400 ; This strange line is just crutch to prevent Marlin from read-n-exec other commands begore do pause M25 M400 ; This strange line is just crutch to prevent Marlin from read-n-exec other commands begore do pause M400 ; This strange line is just crutch to prevent Marlin from read-n-exec other commands begore do pause M400 ; This strange line is just crutch to prevent Marlin from read-n-exec other commands begore do pause M400 ; This strange line is just crutch to prevent Marlin from read-n-exec other commands begore do pause M400 ; This strange line is just crutch to prevent Marlin from read-n-exec other commands begore do pause M400 ; This strange line is just crutch to prevent Marlin from read-n-exec other commands begore do pause M400 ; This strange line is just crutch to prevent Marlin from read-n-exec other commands begore do pause M400 ; This strange line is just crutch to prevent Marlin from read-n-exec other commands begore do pause M400 ; This strange line is just crutch to prevent Marlin from read-n-exec other commands begore do pause M400 ; This strange line is just crutch to prevent Marlin from read-n-exec other commands begore do pause M400 ; This strange line is just crutch to prevent Marlin from read-n-exec other commands begore do pause M400 ; This strange line is just crutch to prevent Marlin from read-n-exec other commands begore do pause G28 XY G0 X${StartOffsX-1} Y${StartOffsX-1} Z${ZTravelValue} F${FeedHorizontal} G0 Z${ZZeroPosition} F${FeedFree} M117 Check zero-hole M300 S600 P100 M400 ; This strange line is just crutch to prevent Marlin from read-n-exec other commands begore do pause M25 M400 ; This strange line is just crutch to prevent Marlin from read-n-exec other commands begore do pause M400 ; This strange line is just crutch to prevent Marlin from read-n-exec other commands begore do pause M400 ; This strange line is just crutch to prevent Marlin from read-n-exec other commands begore do pause M400 ; This strange line is just crutch to prevent Marlin from read-n-exec other commands begore do pause M400 ; This strange line is just crutch to prevent Marlin from read-n-exec other commands begore do pause M400 ; This strange line is just crutch to prevent Marlin from read-n-exec other commands begore do pause M400 ; This strange line is just crutch to prevent Marlin from read-n-exec other commands begore do pause M400 ; This strange line is just crutch to prevent Marlin from read-n-exec other commands begore do pause M400 ; This strange line is just crutch to prevent Marlin from read-n-exec other commands begore do pause M400 ; This strange line is just crutch to prevent Marlin from read-n-exec other commands begore do pause M400 ; This strange line is just crutch to prevent Marlin from read-n-exec other commands begore do pause M400 ; This strange line is just crutch to prevent Marlin from read-n-exec other commands begore do pause G92 Z${ZZeroPosition} F${FeedDown} M117 Starting spindle M3 ; enable spindle G0 Z${ZDrillValue} F${FeedDown/3} G0 Z${ZTravelValue} F${FeedFree} M117 Drilling M117 Starting spindle M3 ; enable spindle </pattern> <pattern name="go_drill"> ; Holes rest: ${hcnt--} ; Percent rest: ${var percent=Math.round(hcnt*100/holesCount); percent}% M73 P${100-percent} M117 Drilling X${Math.round(x*100)/100} Y${Math.round(y*100)/100} Z${ZTravelValue} G0 Z${ZTravelValue} F${FeedFree} G0 X${(Math.round(x*100)/100)-2} Y${(Math.round(y*100)/100)-2} F${FeedHorizontal} G0 X${Math.round(x*100)/100} Y${Math.round(y*100)/100} F${FeedHorizontal} M400 G0 Z${Math.round((ZZeroPosition+0.2)*100)/100} F${FeedFree} G0 Z${Math.round((ZZeroPosition-0.3)*100)/100} F${FeedDown/10} G0 Z${ZDrillValue} F${FeedDown} M117 Return G0 Z${ZTravelValue} F${FeedFree} </pattern> <pattern name="second_time"> ; ${var hcnt=holesCount;var tcnt=toolsCount;"SECOND!!!"} </pattern> </patterns> <script> <command verb="assign tools" /> <command verb="join tools" /> <command verb="offset" xoffs="-minX+StartOffsX" yoffs="-minY+StartOffsY"/> <command verb="sort tools"/> <command verb="print" pattern="start"/> <loop type="tools"> <condition content="first++==0"> <command verb="print" pattern="set_tool"/> </condition> <command verb=";print context" line_begin=";"/> <loop type="toolholes"> <command verb="print" pattern="go_drill"/> <command verb=";print context" line_begin=";"/> </loop> </loop> <condition content="first=0"> <command verb=";dummy"/> </condition> <command verb="print" pattern="second_time"/> <loop type="tools"> <condition content="first++>0"> <command verb="print" pattern="set_tool"/> <command verb=";print context" line_begin=";"/> <loop type="toolholes"> <command verb="print" pattern="go_drill"/> <command verb=";print context" line_begin=";"/> </loop> </condition> </loop> <command verb="print" pattern="finish"/> </script> </xml>
في الواقع ، لا يوجد شيء معقد ، إذا قرأته. لكن دعنا نحلل قسمًا تلو الآخر:
<variables> <var name=" " value=" "/> </variables>
في قسم المتغيرات ، كما يوحي الاسم ، يمكننا تحديد مجموعة عشوائية من المتغيرات العالمية. لا تؤثر على تشغيل البرنامج بأي شكل من الأشكال حتى تلتقي في بعض التعبير المحسوب.
<functions> <plate_increase_dia f="a+0.2"/> </functions>
وظائف حسنا ، بتعبير أدق ، وظيفة. حتى الآن ، تم تحديده مسبقًا ، واحد: حساب القطر الفعلي للحفر للثقوب الممعدنة. من المعروف أن التعدين يسرق القطر ، وغالبًا ما يؤدي ذلك إلى وقوع حوادث عند محاولة التمسك بساق مكون 0.8 ، والذي لا يدخل في الفتحة الموضوعة على شكل 0.9. لكي لا أزعجك بهذا عند التصميم ، قررت إضافة هذه الوظيفة.
معنى هذا القسم هو تحديد الوظائف التي يمكن للمحول استخدامها لأغراض معينة. لا يمكن استخدام هذه الوظائف (بعد؟) بشكل مستقل.
<tools> <tool description="0,3mm" range_min="0" range_max="0.3" plated="both" position="0" /> </tools>
تدريبات. هنا تحتاج إلى الإشارة إلى أمر البرنامج النصي "محاذاة الأدوات" ، والذي أدناه. يحدد كل عنصر في هذا القسم خلية يتم فيها تجميع جميع الأدوات المعترف بها في ملف الإدخال. الفكرة هي أنه في كثير من الأحيان عند التصميم ، تحدث أقطار بوصة ، والعديد من الأدوات بقيمها 0.478 ... 0.492 ... إلخ. لكي لا تعبث معهم ، قمنا بتعيين المعلمات
المطلوبة range_min و range_max. مطلوب أيضا علامة التعدين. يتم فحص عقد XML بالتسلسل ، وبمجرد أن الأداة التالية من DRL تلائم التعريف ، يتم التعرف على العقدة على أنها مناسبة.
يمكنك تعيين أي معلمات أخرى في العقدة. يمكن استخدامها في وقت لاحق في القوالب.
يمكنك تعيين الموضع في علبة القلم الرصاص أو الإحداثيات حيث يمكنك التقاط التدريبات ، إذا كان لديك آلة مزودة بأداة تغيير تلقائي. ويمكنك وصف الأداة بأحرف للعرض على شاشة الطابعة ، إذا كان لديك مارلين وتغيير يدوي لقم الثقب.
<patterns> <pattern name="start"> G90 ;${var hcnt=holesCount;var tcnt=toolsCount;"Hello"} M117 Homing G28 XY M117 Move Z to travel G0 X${minX} Y${minY} M76 G92 Z${ZTravelValue} </pattern>
والآن ، نقدر كل سحر آلة النص! قوالب. يعمل المحول ، كما قلت بالفعل ، مع القوالب ببساطة: فهو يبحث عن جميع أجزاء النموذج $ {...} ، ويرسله إلى آلة النص. وهناك لغة شبيبة. لذلك ، في الواقع ، يمكنك حتى البرمجة قليلاً. في هذا المثال ، يمكنك أن ترى كيف ، عند عرض نمط البدء ، حددنا أولاً زوجًا من المتغيرات التي تم تعيينها لقيم عامة. حسنًا ، عندها فقط كتبوا ثابتًا ، والذي سيكون قيمة تنفيذ هذه القطعة.
عندما يتم إخراج هذا القالب إلى ملف الإخراج ، سنرى:
G90 ;Hello M117 Homing G28 XY M117 Move Z to travel G0 X10 Y10 M76 G92 Z10
حسنًا ، لا يمكنني التفاخر. قيم القطعة من القالب لحفر كل حفرة:
; Holes rest: ${hcnt--} ; Percent rest: ${var percent=Math.round(hcnt*100/holesCount); percent}% M73 P${100-percent}
نعم ... في كل مرة نكتب تعليقًا على بقية الثقوب ، سنقوم بإنقاص قيمة hcnt. وقد تم تحديده ، كما نتذكر ، أثناء كتابة البداية ، وبالتالي ، يقع في السياق أعلاه. ثم سنقوم بحساب متغير النسبة المئوية من أجل استخدامه في قطعة أخرى بعد ذلك - عند تمريره إلى الأمر M73 (يفرض هذا الأمر مارلن لتحريك شريط التقدم). كود G الذي تم إنشاؤه بواسطة هذا الجزء:
; Holes rest: 6 ; Percent rest: 13% M73 P87
بالمناسبة ، toolsCount ، minX هي أسماء محددة مسبقًا للمتغيرات العالمية.
ألاحظ أن أسماء القوالب ليست محددة مسبقًا ، أي يمكنك استخدام أي. سيتم طباعة القالب عند مواجهة أمر الطباعة واسمه في البرنامج النصي.
<script> <command verb="assign tools" />
والقاعدة هي قسم النص
يمكن العثور على العقد التي تحتوي على أمر الأسماء وحلقة داخل قسم.
تنسيق عقدة
الأوامر :
<command verb=" " .... ... />
يعد بيان الإجراء أحد العوامل القليلة. الخيارات لكل منها موصوفة أدناه. يمكن تكميلها من قبل أي أشخاص آخرين ، كما فهمت بالفعل ، يمكن استخدامها في القوالب.
تنسيق عقدة الحلقة:
<loop type=" "> ..... </loop>
الحلقة هي قسم يتم تنفيذ محتوياته لكل عنصر يحدده نوع الحلقة. هناك اثنان منهم (الآن):
أدوات - سيتم تنفيذ حلقة لكل أداة ، و
ثقوب الأدوات - سيتم تنفيذ دورة لكل حفرة مصممة للحفر باستخدام هذه الأداة. من الواضح أن
حلقة ثقوب الأدوات يمكن أن تكون متداخلة فقط في
الأدوات .
علاوة على ذلك ، عند تنفيذ حلقة متداخلة ، تتوفر جميع المتغيرات للأداة الحالية. لماذا؟ لا اعرف. أخبرت للتو.
عوامل التشغيل
تعيين الأدواتخيارات: لا يوجد.
يعين كل تمرين من ملف الأداة المصدر من XML. بدونها ، فإن معظم الإجراءات الأخرى لا معنى لها.
أدوات الانضمامخيارات: لا يوجد.
المزيد من التنظيم - يجمع بين جميع الأدوات التي تم تعيينها نفسها من ملف XML. من المنطقي مباشرة بعد أدوات التعيين ، لكنني قررت إعطاء المستخدم الفرصة للقيام بعملياته.
أدوات الفرزالمعلمات: لا شيء (حتى الآن).
فرز التدريبات عن طريق زيادة الأقطار
تعويضمعلمات:
xoffs ، yoffs - قيم الإزاحة. آلة النص قيد التشغيل.
ينقل كل الثقوب إلى القيم المحددة. نعم ، غالبًا ما يحدث أن اللوحة ليست بعيدة عن الأصل.
طباعةمعلمة:
pattern اسم النمط.
يطبع قالب بالاسم المحدد في دفق الإخراج.
سياق الطباعةمعلمات:
line_begin ، line_end - بداية ونهاية كل سطر.
شيء التصحيح - يسمح لك بإخراج جميع المتغيرات المتاحة حاليًا وقيمها في أي مكان في الإخراج. يتم عرض كل متغير في سطر منفصل ، ويتم تحديد البداية والنهاية في المعلمات
أسماء محددة مسبقًا للمتغيرات العالمية.
holesCount، toolsCount - أتمنى حقًا ألا يحتاج معنى هذه المتغيرات إلى تفسير. نعم نعم. هذا هو عدد الأدوات وعدد الثقوب.
minX و maxX و minY و maxY - وهذه أيضًا. لا ، حسنًا ، فقط في حالة ، هذه هي إحداثيات مجال الحفر. جميع الثقوب داخل هذا المستطيل. إعادة الحساب بعد أمر الإزاحة.
الخلاصة
هنا ، في الواقع ، حاولت بإيجاز ، ولكن بشكل كامل قدر الإمكان وصف التولزا التي تم إنشاؤها.
بصراحة ، بينما كنت أحاول أن أتخيل سيناريوهات الاستخدام ، تخيلت بوضوح عدد المرات التي سيظهر فيها نير التتار المغول على الأراضي الروسية (يعتقد أنهم أحضروا لنا الحصيرة).
ومن هنا السؤال: هل يستحق الأمر الخلط ، وإنشاء صفحة ويب بسيطة حيث يمكنك إدخال الإدخال والنص ، والحصول على G-Code النهائي ، متجاوزًا مراحل التجميع من المصدر؟تحديث:
شكرا لأولئك الذين صوتوا.
غسلتها . و ... نعم: لقد كتبت أن صفحة الويب ستكون بسيطة؟ إذا لم يكن شخصًا كسولًا للغاية بحيث لا يضفي عليه مظهرًا أكثر جمالية - فقم بإلقاء HTML في PM.