تخصيص التطبيق الخاص بك مع
@ConfigurationProperties ، كبديل لاستخدام
@Value .
في المقال
- تعيين وظائف التطبيق وتغييرها من خلال application.properties باستخدام ConfigurationProperties
- دمج خصائص application.properties مع IDE
- التحقق من الإعدادات
يتم وصف الاختلافات بين النهجين هنا -
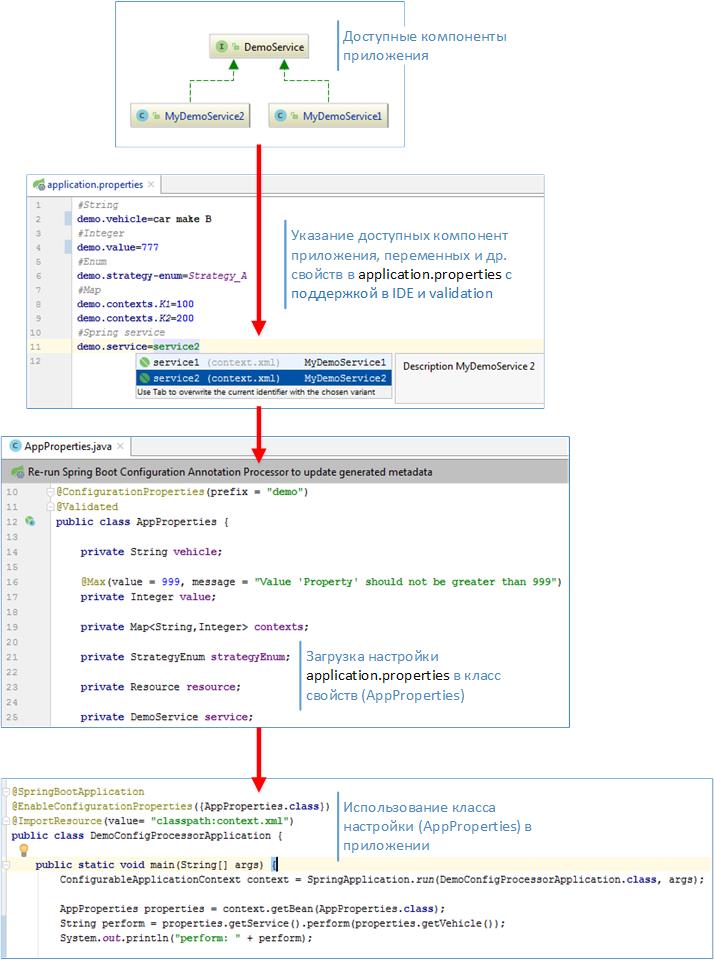
ConfigurationProperties مقابل. القيمةفي الصورة أعلاه ، التكوين الرئيسي ومبدأ التشغيل. يمكن تحديد مكونات النظام المتاحة ، وهي مكونات الربيع ، والفئات فقط ، والثوابت المختلفة ، والمتغيرات ، وما إلى ذلك في ملف application.properties ، وحتى في الوقت الذي تشير إليه بيئة التطوير ، سيتم عرض الخيارات ، والتحقق من ذلك. عند بدء التطبيق ، سيتم التحقق من القيم المحددة للتوافق مع النوع والقيود ، وإذا كان كل شيء مرضًا ، فسيبدأ التطبيق. على سبيل المثال ، من الملائم للغاية تكوين وظيفة التطبيق من قائمة مكونات Spring المتاحة ، أدناه سأوضح كيف.
فئة الملكية
لإنشاء إعدادات التطبيق باستخدام ConfigurationProperties ، يمكنك البدء بفئة خاصية. إنه يشير بالفعل إلى الخصائص ومكونات النظام التي نريد تكوينها.
AppProperties.java @ConfigurationProperties(prefix = "demo") @Validated public class AppProperties { private String vehicle; @Max(value = 999, message = "Value 'Property' should not be greater than 999") private Integer value; private Map<String,Integer> contexts; private StrategyEnum strategyEnum; private Resource resource; private DemoService service; public String getVehicle() { return vehicle; } public void setVehicle(String vehicle) { this.vehicle = vehicle; } public Map<String, Integer> getContexts() { return contexts; } public void setContexts(Map<String, Integer> contexts) { this.contexts = contexts; } public StrategyEnum getStrategyEnum() { return strategyEnum; } public void setStrategyEnum(StrategyEnum strategyEnum) { this.strategyEnum = strategyEnum; } public Resource getResource() { return resource; } public void setResource(Resource resource) { this.resource = resource; } public DemoService getService() { return service; } public void setService(DemoService service) { this.service = service; } public Integer getValue() { return value; } public void setValue(Integer value) { this.value = value; } @Override public String toString() { return "MyAppProperties{" + "\nvehicle=" + vehicle + "\n,contexts=" + contexts + "\n,service=" + service + "\n,value=" + value + "\n,strategyEnum=" + strategyEnum + '}'; } }
في البادئة class = "demo" سيتم استخدامها في application.properties ، كبادئة للخاصية.
فئة تطبيق SpringApplication ومشروع pom.xml @SpringBootApplication @EnableConfigurationProperties({AppProperties.class}) @ImportResource(value= "classpath:context.xml") public class DemoConfigProcessorApplication { public static void main(String[] args) { ConfigurableApplicationContext context = SpringApplication.run(DemoConfigProcessorApplication.class, args); AppProperties properties = context.getBean(AppProperties.class); String perform = properties.getService().perform(properties.getVehicle()); System.out.println("perform: " + perform); System.out.println(properties.toString()); } }
<?xml version="1.0" encoding="UTF-8"?> <project xmlns="http://maven.apache.org/POM/4.0.0" xmlns:xsi="http://www.w3.org/2001/XMLSchema-instance" xsi:schemaLocation="http://maven.apache.org/POM/4.0.0 http://maven.apache.org/xsd/maven-4.0.0.xsd"> <modelVersion>4.0.0</modelVersion> <groupId>com.example</groupId> <artifactId>demoConfigProcessor</artifactId> <version>0.0.1-SNAPSHOT</version> <packaging>jar</packaging> <name>demoConfigProcessor</name> <description>Demo project for Spring Boot Configuration Processor</description> <parent> <groupId>org.springframework.boot</groupId> <artifactId>spring-boot-starter-parent</artifactId> <version>2.1.0.RELEASE</version> <relativePath/> </parent> <properties> <project.build.sourceEncoding>UTF-8</project.build.sourceEncoding> <project.reporting.outputEncoding>UTF-8</project.reporting.outputEncoding> <java.version>1.8</java.version> </properties> <dependencies> <dependency> <groupId>org.springframework.boot</groupId> <artifactId>spring-boot-starter</artifactId> </dependency> <dependency> <groupId>org.springframework.boot</groupId> <artifactId>spring-boot-starter-validation</artifactId> </dependency> <dependency> <groupId>org.springframework.boot</groupId> <artifactId>spring-boot-configuration-processor</artifactId> <optional>true</optional> </dependency> <dependency> <groupId>org.springframework.boot</groupId> <artifactId>spring-boot-starter-test</artifactId> <scope>test</scope> </dependency> <dependency> <groupId>com.jayway.jsonpath</groupId> <artifactId>json-path</artifactId> </dependency> </dependencies> <build> <plugins> <plugin> <groupId>org.springframework.boot</groupId> <artifactId>spring-boot-maven-plugin</artifactId> </plugin> </plugins> </build> </project>
ثم أعلنت عن صندوقي زنبرك
سياق الربيع (context.xml) <?xml version="1.0" encoding="UTF-8"?> <beans xmlns="http://www.springframework.org/schema/beans" xmlns:xsi="http://www.w3.org/2001/XMLSchema-instance" xsi:schemaLocation="http://www.springframework.org/schema/beans http://www.springframework.org/schema/beans/spring-beans.xsd"> <bean id="service1" class="com.example.demoConfigProcessor.MyDemoService1"> <description>Description MyDemoService 1</description> </bean> <bean id="service2" class="com.example.demoConfigProcessor.MyDemoService2"> <description>Description MyDemoService 2</description> </bean> </beans>
في فئة AppProperties ، حددت رابطًا لبعض خدمات التطبيقات المتاحة ، وسأغيرها في application.properties ، وسأكون اثنين من عمليات التنفيذ الخاصة بها ، وسأقوم بتوصيل أحدهما في application.properties.
هنا هو تنفيذها
خدمة DemoService public interface DemoService { String perform(String value); }
public class MyDemoService1 implements DemoService { @Override public String perform(String value) { return "Service №1: perform routine maintenance work on <" + value +">"; } }
public class MyDemoService2 implements DemoService { @Override public String perform(String value) { return "Service №2: perform routine maintenance work on <" + value +">"; } }
هذا يكفي الآن لبدء تخصيص application.properties. ولكن كلما تم إجراء تغييرات على الفصل الدراسي باستخدام ConfigurationProperties ، تحتاج إلى
إعادة بناء المشروع ، وبعد ذلك يظهر الملف في المشروع
\target\classes\META-INF\spring-configuration-metadata.json . في الواقع ، يستخدم IDE للتحرير في ملف application.properties. سأوضح هيكلها في الرابط في المواد. سيتم إنشاء هذا الملف بناءً على فئة AppProperties. إذا فتحت الآن ملف application.properties وبدأت في كتابة "العرض التوضيحي" ، فستبدأ البيئة في عرض الخصائص المتاحة

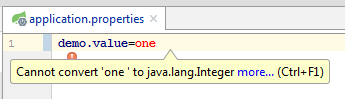
إذا حاولت إدخال نوع خاطئ ، فسيقدم تقرير IDE
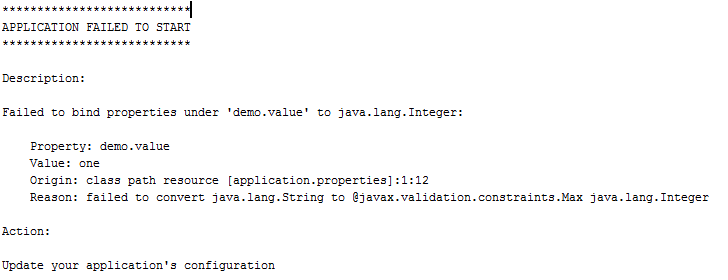
حتى إذا تركتها كما هي وحاولت بدء التطبيق ، فسيكون هناك خطأ واضح تمامًا
إضافة بيانات تعريف إضافية
بيانات تعريف إضافية ، هذا فقط من أجل تسهيل العمل مع خصائص application.properties في IDE ، إذا لم يكن ذلك ضروريًا ، لا يمكنك القيام بذلك. للقيام بذلك ، من الممكن تحديد تلميحات ومعلومات أخرى للبيئة في ملف إضافي. للقيام بذلك ، انسخ ملف spring-config-metadata.json الذي تم إنشاؤه إلى
\src\main\resources\META-INF\ وأعد تسميته إلى
additional-spring-configuration-metadata.json .
additional-spring-configuration-metadata.json . في هذا الملف ، سأكون مهتمًا فقط بقسم التلميحات: []
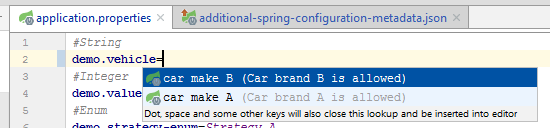
في ذلك سيكون من الممكن سرد قيم صالحة ، على سبيل المثال ، demo.vehicle
"hints": [ { "name": "demo.vehicle", "values": [ { "value": "car make A", "description": "Car brand A is allowed." }, { "value": "car make B", "description": "Car brand B is allowed." } ] }]
في حقل "الاسم" ، تتم الإشارة إلى الخاصية "demo.vehicle" ، وفي "القيم" قائمة بالقيم الصالحة. الآن إذا قمت بإعادة بناء المشروع وانتقلت إلى ملف application.properties ، عند إدخال demo.vehicle أحصل على قائمة بالقيم الصالحة
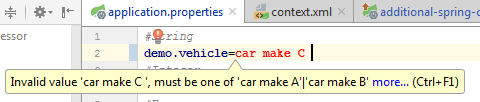
إذا قمت بإدخال نوع مختلف عن النوع المقترح ، ولكن من نفس النوع ، فسوف يبرز المحرر ، ولكن سيبدأ التطبيق في هذه الحالة ، نظرًا لأن هذا ليس تقييدًا صارمًا ، ولكنه مجرد تلميح.
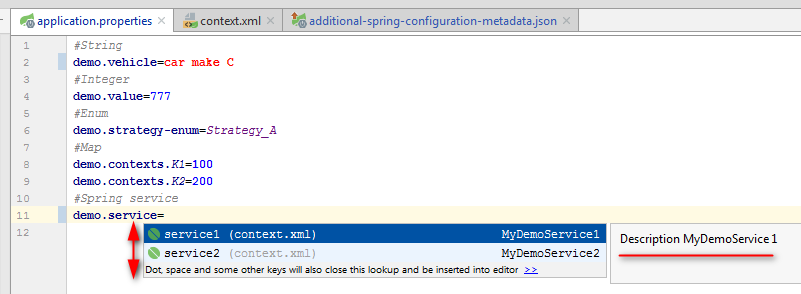
في وقت سابق من المشروع ، أعلنت عن خدمتين MyDemoService1 و MyDemoService2 ، وكلاهما يطبقان واجهة DemoService ، والآن يمكنك التكوين بحيث يمكن الوصول إلى الخدمات التي تنفذ هذه الواجهة فقط إلى application.properties ، وبالتالي ، تتم تهيئة الفئة المحددة في فئة AppProperties. للقيام بذلك ، هناك موفرين ، يمكنك تحديدهم في بيانات تعريف تهيئة الربيع الإضافية. هناك عدة أنواع من مقدمي الخدمات التي يمكن العثور عليها في الوثائق ، وسأعرض مثالًا
spring-bean-reference واحد. يوضح هذا النوع أسماء الفاصوليا المتاحة في المشروع الحالي. تقتصر القائمة على الفئة الأساسية أو الواجهة.
مثال لمقدمي الخدمة لـ DemoService:
"hints": [ { "name": "demo.service", "providers": [ { "name": "spring-bean-reference", "parameters": { "target": "com.example.demoConfigProcessor.DemoService" } } ] } ]
بعد ذلك ، في application.properties للمعلمة demo.service ، سيتوفر اختيار خدمتين ، يمكنك رؤية وصفها (الوصف من التعريف).
الآن من المناسب اختيار الخدمة المناسبة ، وتغيير وظائف التطبيق. هناك نقطة واحدة لإعدادات الكائن ، يحتاج Spring إلى القليل من المساعدة في تحويل السلسلة المحددة في الإعدادات إلى كائن. للقيام بذلك ، يتم توريث فئة صغيرة من المحول.
ServiceConverter @Component @ConfigurationPropertiesBinding public class ServiceConverter implements Converter<String, DemoService> { @Autowired private ApplicationContext applicationContext; @Override public DemoService convert(String source) { return (DemoService) applicationContext.getBean(source); } }
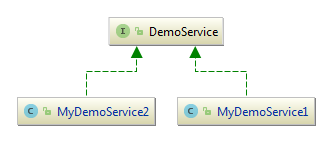
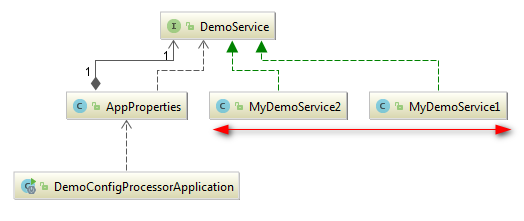
يوضح مخطط فئة المشروع كيف يتم فصل هذه الخدمات عن التطبيق الرئيسي ويمكن الوصول إليها من خلال AppProperties.
خاصية التحقق
إلى حقول فئة AppProperties ، يمكنك إضافة الشيكات المتاحة في إطار JSR 303. لقد كتبت عن هذا
هنا . سيؤدي هذا إلى ملف تكوين تطبيق مناسب يمكن التحقق منه.
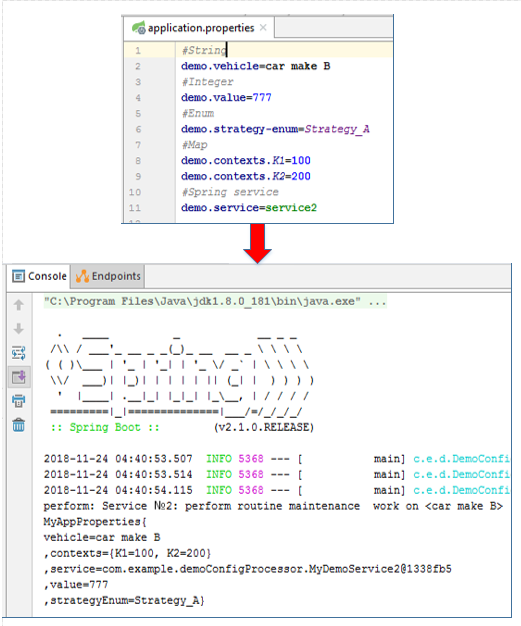
إخراج وحدة التحكم
هيكل المشروع

ملف كامل - Spring-config-metadata.json
بيانات تعريف تكوين الربيع الإضافية { "groups": [ { "name": "demo", "type": "com.example.demoConfigProcessor.AppProperties", "sourceType": "com.example.demoConfigProcessor.AppProperties" } ], "properties": [ { "name": "demo.contexts", "type": "java.util.Map<java.lang.String,java.lang.Integer>", "sourceType": "com.example.demoConfigProcessor.AppProperties" }, { "name": "demo.vehicle", "type": "java.lang.String", "sourceType": "com.example.demoConfigProcessor.AppProperties" } ], "hints": [ { "name": "demo.vehicle", "values": [ { "value": "car make A", "description": "Car brand A is allowed." }, { "value": "car make B", "description": "Car brand B is allowed." } ] }, { "name": "demo.service", "providers": [ { "name": "spring-bean-reference", "parameters": { "target": "com.example.demoConfigProcessor.DemoService" } } ] } ] }
تكوين بيانات التعريف