يوم جيد ، أيها القراء الأعزاء.
في مقالتي ، أريد مشاركة تطبيق طريقة عرض الشجرة مع RecyclerView. دون استخدام أي مكتبات إضافية ودون استخدام مجموعة فرعية.
من يهتم ، من فضلك ، تحت القط. سأحاول وصف قدر الإمكان ماذا وكيف.
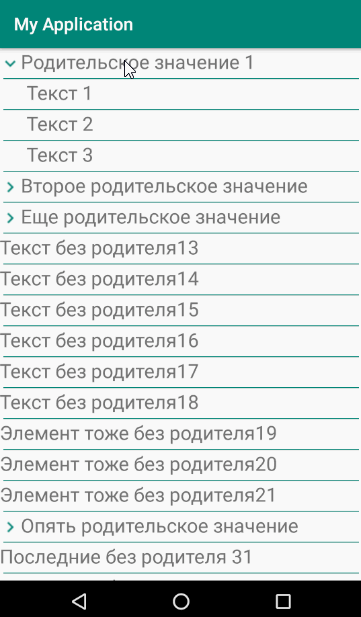
مبدأ تشكيل قائمة العناصر هو أنه سيتم عرض العناصر الفرعية أو إخفاؤها.
على الرغم من أنني قلت إن التنفيذ سيكون بدون مكتبات إضافية ، إلا أن المكتبات القياسية لا تزال بحاجة إلى الاتصال.
مكتبات متصلةdependencies { implementation 'com.android.support:appcompat-v7:26.1.0' implementation 'com.android.support:design:26.1.0' implementation 'com.android.support:recyclerview-v7:26.1.0' }
ستكون العلامة ضئيلة للغاية - قائمة RecyclerView فقط.
العلامات <RelativeLayout xmlns:android="http://schemas.android.com/apk/res/android" android:layout_width="match_parent" android:layout_height="match_parent"> <android.support.v7.widget.RecyclerView android:layout_width="match_parent" android:layout_height="match_parent" android:id="@+id/recycler_list"> </android.support.v7.widget.RecyclerView> </RelativeLayout>
بالإضافة إلى ذلك ، نحتاج إلى فصل منفصل سنخزن به قيم القائمة.
فئة البيانات Data.java public final class Data { private String valueText = "";
يجب أن تكون التعليقات واضحة ، لكنني سأوضحها. لكل عنصر من عناصر القائمة ، سنقوم بتخزين قيمة المعرف ،
وقيمة الاسم ،
والنص ، ومعرف العنصر الأصل ،
والوسم الذي يشير إلى أن العنصر هو العنصر الأصل ، والقيمة
المرئية للعناصر الفرعية التابعة
للطفل .
الخطوة التحضيرية التالية هي إنشاء ترميز لعنصر القائمة نفسه.
ترميز item.xml <LinearLayout xmlns:android="http://schemas.android.com/apk/res/android" xmlns:app="http://schemas.android.com/apk/res-auto" android:id="@+id/item" android:layout_width="match_parent" android:layout_height="wrap_content"> <RelativeLayout android:layout_width="match_parent" android:layout_height="match_parent"> <android.support.v7.widget.AppCompatImageView android:id="@+id/icon_tree" android:layout_width="wrap_content" android:layout_height="wrap_content" android:background="@drawable/icon_hide" android:visibility="gone" app:backgroundTint="@color/colorPrimary" android:layout_centerVertical="true"/> <LinearLayout android:id="@+id/block_text" android:layout_width="match_parent" android:layout_height="wrap_content" android:layout_toRightOf="@+id/icon_tree"> <TextView android:id="@+id/value_name" android:layout_width="match_parent" android:layout_height="wrap_content" android:foreground="?android:attr/selectableItemBackground" android:text="sdfdsf"/> </LinearLayout> <View android:layout_width="match_parent" android:layout_height="1dp" android:background="@color/colorPrimary" android:layout_below="@+id/block_text" android:layout_marginTop="4dp" android:layout_marginLeft="4dp" android:layout_marginRight="4dp"/> </RelativeLayout> </LinearLayout>
مطلوب
AppCompatImageView لعرض حالة العنصر الأصل.
TextView - لعرض قيمة عنصر.
عرض هو فقط للمشاركة.
الخطوة التحضيرية النهائية هي إنشاء فصل دراسي للتعامل مع محول القائمة.
محول للحصول على قائمة RecyclerViewAdapter.java public class RecyclerViewAdapter extends RecyclerView.Adapter<RecyclerViewAdapter.ViewHolder> { private View vv; private List<Data> allRecords;
تتم المعالجة الرئيسية في إجراء
onBindViewHolder . لكل عنصر من عناصر القائمة ، يتم الحصول على معرفها والقيمة والمعلمات الخاصة بالقيمة الأصل. إظهار أو إخفاء العناصر الفرعية ، وكذلك أيقونة الحالة للعنصر الأصل. حسنًا ، تم تعليق معالجة النقرات في القائمة. ثم يقرر الجميع كيف يحتاج إلى معالجة القائمة. يوضح المثال ببساطة رسالة ذات معرف وقيمة العنصر.
في إجراء إظهار أو إخفاء إخفاء
setVisibility ، يتم وضع مسافة بادئة للنص بالإضافة إلى العنصر
الفرعي عند 80 بكسل.
يبقى فقط لملء القائمة في المكان المناسب.
بناء قائمة List<Data> records = new ArrayList<Data>();
والنتيجة هي قائمة بسيطة مع دعم للعناصر الفرعية. يتيح لك هذا التطبيق ملء العديد من العناصر المتداخلة. لكنك تحتاج إلى تحسين المسافة البادئة للعناصر الفرعية قليلاً إذا كان مستوى التعشيش أكثر من 1.
شكرا لكم جميعا على اهتمامكم والمشاريع الناجحة.