
هذه المقالة مخصصة لمطوري جافا الذين يحتاجون إلى نشر منتجاتهم بسرعة في المستودعات المركزية و / أو المخازن المركزية باستخدام GitLab. في هذه المقالة سأتحدث عن إعداد gitlab-runner و gitlab-ci و maven-plugin لحل هذه المشكلة.
خلفية:
- تخزين آمن لمفاتيح mvn و GPG.
- التنفيذ الآمن لمهام CI العامة.
- قم بتحميل الأعمال الفنية (إطلاق / لقطة) إلى المستودعات العامة.
- تحقق تلقائيا إصدارات الإصدار للنشر في مخضرم المركزية.
- حل عام لتحميل الأعمال الفنية إلى مستودع لمشاريع متعددة.
- البساطة وسهولة الاستخدام.
محتوى
- تم وصف وصف تفصيلي لآلية نشر القطع الأثرية إلى Maven Central من خلال خدمة استضافة مستودعات تخزين OSS الخاصة بشركة Sonatype بالفعل في هذه المقالة من قِبل Googolplex ، لذلك سأشير إلى هذه المقالة في الأماكن الصحيحة.
- نقوم بالتسجيل المسبق مع Sonatype JIRA وبدء تذكرة لفتح المستودع (لمزيد من التفاصيل ، اقرأ القسم إنشاء تذكرة لـ Sonatype JIRA ). بعد فتح المستودع ، سيتم استخدام زوج JIRA لتسجيل الدخول / كلمة المرور (يُشار إليه فيما يلي بحساب Sonatype) لتحميل القطع الأثرية إلى Sonatype nexus.
- علاوة على ذلك ، يتم وصف عملية إنشاء مفتاح GPG بشكل جاف للغاية. راجع تكوين GnuPG لتوقيع القطع الأثرية لمزيد من المعلومات.
- إذا كنت تستخدم وحدة التحكم Linux لإنشاء مفتاح GPG (gnupg / gnupg2) ، فأنت بحاجة إلى تثبيت أدوات rng لإنشاء إنتروبيا. خلاف ذلك ، يمكن أن يستغرق توليد المفتاح وقتًا طويلاً للغاية.
- خدمات لتخزين مفاتيح GPG العامة
إلى المحتوى
تكوين مشروع نشر في GitLab
- بادئ ذي بدء ، من الضروري إنشاء وتكوين مشروع يتم فيه تخزين خط الأنابيب لنشر القطع الأثرية. دعوت مشروعي بسيط ومباشر - نشر
- بعد تكوين مستودع التخزين ، يجب أن تقوم بتقييد الوصول لتغيير مستودع التخزين.
انتقل إلى المشروع -> الإعدادات -> المستودع -> الفروع المحمية. نحذف جميع القواعد ونضيف القاعدة الوحيدة مع Wildcard * مع الحق في الدفع والاندماج فقط للمستخدمين الذين لديهم دور Maintainers. ستعمل هذه القاعدة لجميع مستخدمي هذا المشروع ، وكذلك المجموعة التي يكون هذا المشروع عضوًا فيها.

- إذا كان هناك العديد من المشرفين ، فإن أفضل حل هو الحد من الوصول إلى المشروع من حيث المبدأ.
انتقل إلى المشروع -> الإعدادات -> عام -> الرؤية وميزات المشروع والأذونات وتعيين رؤية المشروع على خاص .
لديّ مشروع في المجال العام ، حيث إنني أستخدم GitLab Runner الخاصة بي ولديّ فقط إمكانية الوصول لتغيير المستودع. حسنًا ، في الواقع ، ليس من اهتماماتي تأجيل المعلومات الخاصة في سجلات خطوط الأنابيب العامة. - قواعد أكثر صرامة لتغيير المخزون
انتقل إلى المشروع -> الإعدادات -> المستودع -> قواعد الدفع واضبط قيود Committer Committer ، تحقق مما إذا كان المؤلف هو مستخدم GitLab. أوصي أيضًا بتكوين توقيع التعيينات وتعيين علامة رفض التعيينات غير الموقعة. - بعد ذلك ، تحتاج إلى تكوين المشغل لتشغيل المهام
انتقل إلى المشروع -> الإعدادات -> CI / CD -> مشغلات خطوط الأنابيب وإنشاء رمز مميز جديد للمشغل
يمكن إضافة هذا الرمز المميز على الفور إلى التكوين العام للمتغيرات لمجموعة من المشاريع.
انتقل إلى المجموعة -> الإعدادات -> CI / CD -> المتغيرات وأضف المتغير DEPLOY_TOKEN مع رمز التشغيل في القيمة.
إلى المحتوى
عداء Gitlab
يصف هذا القسم التكوين الخاص ببدء تشغيل المهام باستخدام النشر الخاص به (المحدد) وعام (مشترك) العام.
عداء محدد
أستخدم المتسابقين الخاصين بي ، فهو أولاً وقبل كل شيء مناسب وسريع ورخيص.
بالنسبة للعدائين ، أوصي Linux VDS مع وحدة المعالجة المركزية 1 ، ذاكرة الوصول العشوائي 2 جيجابايت ، محرك الأقراص الصلبة 20 جيجابايت. سعر الإصدار هو ~ 3000₽ سنويا.
عداء بلديبالنسبة للعداء ، أخذت وحدة VDS 4 CPU وذاكرة وصول عشوائي سعتها 4 جيجابايت و 50 جيجابايت محرك أقراص الحالة الثابتة. يكلف ~ 11000 روبل ولم يندم عليه.
لدي ما مجموعه 7 سيارات. 5 على أروبا و 2 على ihor.
لذلك ، لدينا عداء. الآن سنقوم بتكوينه.
نذهب إلى الجهاز على SSH وتثبيت java ، git ، maven ، gnupg2.
إلى المحتوى
تثبيت gitlab عداء
- إنشاء مجموعة جديدة
runner
sudo groupadd runner
- إنشاء دليل لذاكرة التخزين المؤقت مخضر وإرفاق حقوق مجموعة
runner
يمكنك تخطي هذا العنصر إذا كنت لا تخطط لتشغيل العديد من المتسابقين على نفس الجهاز.
mkdir -p /usr/cache/.m2/repository chown -R :runner /usr/cache chmod -R 770 /usr/cache
- قم
gitlab-deployer وأضف runner إلى المجموعة
useradd -m -d /home/gitlab-deployer gitlab-deployer usermod -a -G runner gitlab-deployer
- أضف السطر التالي إلى الملف
/etc/ssh/sshd_config
AllowUsers root@* gitlab-deployer@127.0.0.1
- إعادة تشغيل
sshd
systemctl restart sshd
- قمنا بتعيين كلمة المرور
gitlab-deployer (يمكن أن تكون بسيطة ، حيث يتم تطبيق قيود المضيف gitlab-deployer )
passwd gitlab-deployer
- تثبيت GitLab Runner (Linux x86-64)
sudo wget -O /usr/local/bin/gitlab-runner https://gitlab-runner-downloads.s3.amazonaws.com/latest/binaries/gitlab-runner-linux-amd64 sudo chmod +x /usr/local/bin/gitlab-runner ln -s /usr/local/bin/gitlab-runner /etc/alternatives/gitlab-runner ln -s /etc/alternatives/gitlab-runner /usr/bin/gitlab-runner
- انتقل إلى gitlab.com -> نشر المشروع -> الإعدادات -> CI / CD -> العدائين -> العدائين المحددون ونسخ رمز التسجيل
هذه العملية Runtime platform arch=amd64 os=linux pid=17594 revision=3001a600 version=11.10.0 Running in system-mode. Please enter the gitlab-ci coordinator URL (eg https://gitlab.com/): https://gitlab.com/ Please enter the gitlab-ci token for this runner: REGISTRATION_TOKEN Please enter the gitlab-ci description for this runner: [ih1174328.vds.myihor.ru]: Deploy Runner Please enter the gitlab-ci tags for this runner (comma separated): deploy Registering runner... succeeded runner=ZvKdjJhx Please enter the executor: docker-ssh, parallels, virtualbox, docker-ssh+machine, kubernetes, docker, ssh, docker+machine, shell: shell Runner registered successfully. Feel free to start it, but if it's running already the config should be automatically reloaded!
- تأكد من تسجيل العداء. انتقل إلى gitlab.com -> نشر المشروع -> الإعدادات -> CI / CD -> Runners -> Runners محددة -> Runners المنشط لهذا المشروع
- إضافة خدمة منفصلة
/etc/systemd/system/gitlab-deployer.service
[Unit] Description=GitLab Deploy Runner After=syslog.target network.target ConditionFileIsExecutable=/usr/local/bin/gitlab-runner [Service] StartLimitInterval=5 StartLimitBurst=10 ExecStart=/usr/local/bin/gitlab-runner "run" "--working-directory" "/home/gitlab-deployer" "--config" "/etc/gitlab-runner/gitlab-deployer-config.toml" "--service" "gitlab-deployer" "--syslog" "--user" "gitlab-deployer" Restart=always RestartSec=120 [Install] WantedBy=multi-user.target
- نبدأ الخدمة.
systemctl enable gitlab-deployer.service systemctl start gitlab-deployer.service systemctl status gitlab-deployer.service
- تحقق من أن العداء قيد التشغيل.
إلى المحتوى
GPG جيل المفتاح
من نفس الجهاز ، نذهب فوق ssh تحت gitlab-deployer المستخدم gitlab-deployer (هذا مهم لتوليد مفتاح GPG)
ssh gitlab-deployer@127.0.0.1
نقوم بإنشاء مفتاح من خلال الإجابة على الأسئلة. لقد استخدمت اسمي والبريد.
تأكد من تحديد كلمة المرور للمفتاح. هذا المفتاح سيوقع القطع الأثرية.
gpg --gen-key
مراجعة
gpg --list-keys -a /home/gitlab-deployer/.gnupg/pubring.gpg ---------------------------------------- pub 4096R/00000000 2019-04-19 uid Petruha Petrov <pp@example.com> sub 4096R/11111111 2019-04-19
تحميل المفتاح العام لدينا إلى خادم المفاتيح
gpg --keyserver keys.gnupg.net --send-key 00000000 gpg: sending key 00000000 to hkp server keys.gnupg.net
إلى المحتوى
الإعداد مخضرم
- نذهب تحت المستخدم
gitlab-deployer
su gitlab-deployer
- إنشاء مستودع maven وارتباط إلى ذاكرة التخزين المؤقت (لا نخطئ)
يمكنك تخطي هذا العنصر إذا كنت لا تخطط لتشغيل العديد من المتسابقين على نفس الجهاز.
mkdir -p ~/.m2/repository ln -s /usr/cache/.m2/repository /home/gitlab-deployer/.m2/repository
- إنشاء مفتاح رئيسي
mvn --encrypt-master-password password {hnkle5BJ9HUHUMP+CXfGBl8dScfFci/mpsur/73tR2I=}
- قم بإنشاء الملف ~ / .m2 / settings-security.xml
<settingsSecurity> <master>{hnkle5BJ9HUHUMP+CXfGBl8dScfFci/mpsur/73tR2I=}</master> </settingsSecurity>
- نقوم بتشفير كلمة المرور لحساب Sonatype
mvn --encrypt-password SONATYPE_PASSWORD {98Wv5+u+Tn0HX2z5G/kR4R8Z0WBgcDBgi7d12S/un+SCU7uxzaZGGmJ8Cu9pAZ2J}
- قم بإنشاء الملف ~ / .m2 / settings.xml
<settings> <profiles> <profile> <id>env</id> <activation> <activeByDefault>true</activeByDefault> </activation> <properties> <gpg.passphrase>GPG_SECRET_KEY_PASSPHRASE</gpg.passphrase> </properties> </profile> </profiles> <servers> <server> <id>sonatype</id> <username>SONATYPE_USERNAME</username> <password>{98Wv5+u+Tn0HX2z5G/kR4R8Z0WBgcDBgi7d12S/un+SCU7uxzaZGGmJ8Cu9pAZ2J}</password> </server> </servers> </settings>
حيث،
GPG_SECRET_KEY_PASSPHRASE - كلمة المرور من مفتاح GPG
SONATYPE_USERNAME - تسجيل الدخول إلى حساب sonatype
هذا يكمل الإعداد عداء ، يمكنك الذهاب إلى قسم GitLab CI
إلى المحتوى
عداء مشترك
GPG جيل المفتاح
بادئ ذي بدء ، تحتاج إلى إنشاء مفتاح GPG. للقيام بذلك ، قم بتثبيت gnupg.
yum install -y gnupg
نقوم بإنشاء مفتاح من خلال الإجابة على الأسئلة. لقد استخدمت اسمي والبريد. تأكد من تحديد كلمة المرور للمفتاح.
gpg --gen-key
نعرض المعلومات على المفتاح
gpg --list-keys -a pub rsa3072 2019-04-24 [SC] [expires: 2021-04-23] 2D0D1706366FC4AEF79669E24D09C55BBA3FD728 uid [ultimate] tttemp <temp@temp.temp> sub rsa3072 2019-04-24 [E] [expires: none]
تحميل المفتاح العام لدينا إلى خادم المفاتيح
gpg --keyserver keys.gnupg.net --send-key 2D0D1706366FC4AEF79669E24D09C55BBA3FD728 gpg: sending key 2D0D1706366FC4AEF79669E24D09C55BBA3FD728 to hkp server keys.gnupg.net
الحصول على المفتاح الخاص
gpg --export-secret-keys --armor 2D0D1706366FC4AEF79669E24D09C55BBA3FD728 -----BEGIN PGP PRIVATE KEY BLOCK----- lQWGBFzAqp8BDADN41CPwJ/gQwiKEbyA902DKw/WSB1AvZQvV/ZFV77xGeG4K7k5 ... =2Wd2 -----END PGP PRIVATE KEY BLOCK-----
انتقل إلى إعدادات المشروع -> الإعدادات -> CI / CD -> المتغيرات وحفظ المفتاح الخاص في متغير GPG_SECRET_KEY

إلى المحتوى
الإعداد مخضرم
- إنشاء مفتاح رئيسي
mvn --encrypt-master-password password {hnkle5BJ9HUHUMP+CXfGBl8dScfFci/mpsur/73tR2I=}
- انتقل إلى إعدادات المشروع -> الإعدادات -> CI / CD -> المتغيرات وحفظ الأسطر التالية في متغير
SETTINGS_SECURITY_XML :
<settingsSecurity> <master>{hnkle5BJ9HUHUMP+CXfGBl8dScfFci/mpsur/73tR2I=}</master> </settingsSecurity>
- نقوم بتشفير كلمة المرور لحساب Sonatype
mvn --encrypt-password SONATYPE_PASSWORD {98Wv5+u+Tn0HX2z5G/kR4R8Z0WBgcDBgi7d12S/un+SCU7uxzaZGGmJ8Cu9pAZ2J}
- انتقل إلى إعدادات المشروع -> الإعدادات -> CI / CD -> المتغيرات وحفظ الأسطر التالية في متغير
SETTINGS_XML :
<settings> <profiles> <profile> <id>env</id> <activation> <activeByDefault>true</activeByDefault> </activation> <properties> <gpg.passphrase>GPG_SECRET_KEY_PASSPHRASE</gpg.passphrase> </properties> </profile> </profiles> <servers> <server> <id>sonatype</id> <username>sonatype_username</username> <password>{98Wv5+u+Tn0HX2z5G/kR4R8Z0WBgcDBgi7d12S/un+SCU7uxzaZGGmJ8Cu9pAZ2J}</password> </server> </servers> </settings>
حيث،
GPG_SECRET_KEY_PASSPHRASE - كلمة المرور من مفتاح GPG
SONATYPE_USERNAME - تسجيل الدخول إلى حساب sonatype
إلى المحتوى
نشر صورة عامل ميناء
قم بإنشاء Dockerfile بسيط بما يكفي لتشغيل المهام عند النشر باستخدام الإصدار الصحيح من Java. أدناه مثال على جبال الألب.
FROM java:8u111-jdk-alpine RUN apk add gnupg maven git --update-cache \ --repository http://dl-4.alpinelinux.org/alpine/edge/community/ --allow-untrusted && \ mkdir ~/.m2/
نحن نجمع الحاوية لمشروعك
docker build -t registry.gitlab.com/group/deploy .
مصادقة وتحميل الحاوية في التسجيل.
docker login -u USER -p PASSWORD registry.gitlab.com docker push registry.gitlab.com/group/deploy
إلى المحتوى
Gitlab ci
نشر المشروع
أضف ملف .gitlab-ci.yml إلى جذر مشروع النشر
يعرض البرنامج مهمتين متبادلتين عند النشر. عداء معين أو عداء مشترك على التوالي.
.gitlab-ci.yml stages: - deploy Specific Runner: extends: .java_deploy_template # shell- tags: - deploy Shared Runner: extends: .java_deploy_template # docker- tags: - docker # GitLab Runner -> Shared Runner -> Docker image: registry.gitlab.com/group/deploy-project:latest before_script: # GPG - printf "${GPG_SECRET_KEY}" | gpg --batch --import # maven - printf "${SETTINGS_SECURITY_XML}" > ~/.m2/settings-security.xml - printf "${SETTINGS_XML}" > ~/.m2/settings.xml .java_deploy_template: stage: deploy # , DEPLOY java only: variables: - $DEPLOY == "java" variables: # GIT_STRATEGY: none script: # - git config --global credential.helper store # gitlab-ci-token # gitlab.com - echo "https://gitlab-ci-token:${CI_JOB_TOKEN}@gitlab.com" >> ~/.git-credentials # - rm -rf .* * # , Sonatype Nexus - git clone ${DEPLOY_CI_REPOSITORY_URL} . # - git checkout ${DEPLOY_CI_COMMIT_SHA} -f # pom.xml autoReleaseAfterClose . # maven central - > for pom in $(find . -name pom.xml); do if [[ $(grep -q autoReleaseAfterClose "$pom" && echo $?) == 0 ]]; then echo "File $pom contains prohibited setting: <autoReleaseAfterClose>"; exit 1; fi; done # DEPLOY_CI_COMMIT_TAG , SNAPSHOT- - > if [[ "${DEPLOY_CI_COMMIT_TAG}" != "" ]]; then mvn versions:set -DnewVersion=${DEPLOY_CI_COMMIT_TAG} else VERSION=$(mvn -q -Dexec.executable=echo -Dexec.args='${project.version}' --non-recursive exec:exec) if [[ "${VERSION}" == *-SNAPSHOT ]]; then mvn versions:set -DnewVersion=${VERSION} else mvn versions:set -DnewVersion=${VERSION}-SNAPSHOT fi fi # - mvn clean deploy -DskipTests=true
إلى المحتوى
مشروع جافا
في مشاريع java التي من المفترض أن يتم تحميلها إلى المستودعات العامة ، تحتاج إلى إضافة خطوتين لتنزيل إصدارات Release و Snapshot.
.gitlab-ci.yml stages: - build - test - verify - deploy <...> Release: extends: .trigger_deploy # o . only: - tags Snapshot: extends: .trigger_deploy # SNAPSHOT when: manual # , . except: - tags .trigger_deploy: stage: deploy variables: # GIT_STRATEGY: none # deploy- URL: "https://gitlab.com/api/v4/projects/<deploy project ID>/trigger/pipeline" # deploy- POST_DATA: "\ token=${DEPLOY_TOKEN}&\ ref=master&\ variables[DEPLOY]=${DEPLOY}&\ variables[DEPLOY_CI_REPOSITORY_URL]=${CI_REPOSITORY_URL}&\ variables[DEPLOY_CI_PROJECT_NAME]=${CI_PROJECT_NAME}&\ variables[DEPLOY_CI_COMMIT_SHA]=${CI_COMMIT_SHA}&\ variables[DEPLOY_CI_COMMIT_TAG]=${CI_COMMIT_TAG} " script: # cURL, --fail --show-error # , HTTP 400 - wget --content-on-error -qO- ${URL} --post-data ${POST_DATA}
في هذا الحل ، ذهبت أبعد من ذلك قليلاً وقررت استخدام قالب CI واحد لمشاريع java.
مزيد من التفاصيللقد قمت بإنشاء مشروع gitlab-ci منفصل حيث قمت بوضع قالب CI لمشاريع java common.yml .
common.yml stages: - build - test - verify - deploy variables: SONAR_ARGS: "\ -Dsonar.gitlab.commit_sha=${CI_COMMIT_SHA} \ -Dsonar.gitlab.ref_name=${CI_COMMIT_REF_NAME} \ " .build_java_project: stage: build tags: - touchbit-shell variables: SKIP_TEST: "false" script: - mvn clean - mvn package -DskipTests=${SKIP_TEST} artifacts: when: always expire_in: 30 day paths: - "*/target/reports" .build_sphinx_doc: stage: build tags: - touchbit-shell variables: DOCKERFILE: .indirect/docs/Dockerfile script: - docker build --no-cache -t ${CI_PROJECT_NAME}/doc -f ${DOCKERFILE} . .junit_module_test_run: stage: test tags: - touchbit-shell variables: MODULE: "" script: - cd ${MODULE} - mvn test artifacts: when: always expire_in: 30 day paths: - "*/target/reports" .junit_test_run: stage: test tags: - touchbit-shell script: - mvn test artifacts: when: always expire_in: 30 day paths: - "*/target/reports" .sonar_review: stage: verify tags: - touchbit-shell dependencies: [] script: - > if [ "$CI_BUILD_REF_NAME" == "master" ]; then mvn compile sonar:sonar -Dsonar.login=$SONAR_LOGIN $SONAR_ARGS else mvn compile sonar:sonar -Dsonar.login=$SONAR_LOGIN $SONAR_ARGS -Dsonar.analysis.mode=preview fi .trigger_deploy: stage: deploy tags: - touchbit-shell variables: URL: "https://gitlab.com/api/v4/projects/10345765/trigger/pipeline" POST_DATA: "\ token=${DEPLOY_TOKEN}&\ ref=master&\ variables[DEPLOY]=${DEPLOY}&\ variables[DEPLOY_CI_REPOSITORY_URL]=${CI_REPOSITORY_URL}&\ variables[DEPLOY_CI_PROJECT_NAME]=${CI_PROJECT_NAME}&\ variables[DEPLOY_CI_COMMIT_SHA]=${CI_COMMIT_SHA}&\ variables[DEPLOY_CI_COMMIT_TAG]=${CI_COMMIT_TAG} " script: - wget --content-on-error -qO- ${URL} --post-data ${POST_DATA} .trigger_release_deploy: extends: .trigger_deploy only: - tags .trigger_snapshot_deploy: extends: .trigger_deploy when: manual except: - tags
نتيجة لذلك ، في مشاريع جافا نفسها .gitlab-ci.yml تبدو مضغوطة جدًا وليست مطوّلة
.gitlab-ci.yml include: https://gitlab.com/TouchBIT/gitlab-ci/raw/master/common.yml Shields4J: extends: .build_java_project Sphinx doc: extends: .build_sphinx_doc variables: DOCKERFILE: .docs/Dockerfile Sonar review: extends: .sonar_review dependencies: - Shields4J Release: extends: .trigger_release_deploy Snapshot: extends: .trigger_snapshot_deploy
إلى المحتوى
تكوين Pom.xml
تم وصف هذا الموضوع بالتفصيل من قِبل Googolplex في تكوين المافن للتوقيع التلقائي وتحميل القطع الأثرية للقطعة والمستودعات المؤقتة ، لذلك سوف أصف بعض الفروق الدقيقة في استخدام المكونات الإضافية. سوف أصف أيضًا كيف يمكنك بسهولة وبطريقة طبيعية استخدام nexus-staging-maven-plugin إذا كنت لا تريد أو لا يمكنك استخدام org.sonatype.oss: oss-parent بصفتك الوالد لمشروعك.
مخضرم تثبيت البرنامج المساعد
تثبيت الوحدات النمطية في المستودع المحلي.
مفيد للغاية للتحقق المحلي من الحلول في مشاريع أخرى ، وكذلك الاختباري.
<plugin> <groupId>org.apache.maven.plugins</groupId> <artifactId>maven-install-plugin</artifactId> <executions> <execution> <id>install-project</id> <phase>install</phase> <configuration> <file>target/${project.artifactId}-${project.version}.jar</file> ```target/${project.artifactId}-${project.version}-sources.jar</sources> <pomFile>dependency-reduced-pom.xml</pomFile> <updateReleaseInfo>true</updateReleaseInfo> <createChecksum>true</createChecksum> </configuration> </execution> </executions> </plugin>
إلى المحتوى
مخضرم-جافادوك-المساعد
توليد javadoc للمشروع.
<plugin> <groupId>org.apache.maven.plugins</groupId> <artifactId>maven-javadoc-plugin</artifactId> <executions> <execution> <goals> <goal>jar</goal> </goals> <phase>prepare-package</phase> <configuration> <failOnError>true</failOnError> <failOnWarnings>true</failOnWarnings> <detectOfflineLinks>false</detectOfflineLinks> </configuration> </execution> </executions> </plugin>
إذا كان لديك وحدة نمطية لا تحتوي على جافا (مثل الموارد فقط)
أو لا ترغب في إنشاء javadoc من حيث المبدأ ، ثم maven-jar-plugin يساعد maven-jar-plugin
<plugin> <groupId>org.apache.maven.plugins</groupId> <artifactId>maven-jar-plugin</artifactId> <executions> <execution> <id>empty-javadoc-jar</id> <phase>generate-resources</phase> <goals> <goal>jar</goal> </goals> <configuration> <classifier>javadoc</classifier> <classesDirectory>${basedir}/javadoc</classesDirectory> </configuration> </execution> </executions> </plugin>
إلى المحتوى
مخضرم-المنافع العامة العالمية-المساعد
<plugin> <groupId>org.apache.maven.plugins</groupId> <artifactId>maven-gpg-plugin</artifactId> <executions> <execution> <id>sign-artifacts</id> <phase>deploy</phase> <goals> <goal>sign</goal> </goals> </execution> </executions> </plugin>
إلى المحتوى
مخضرم الصلة بين التدريج-المساعد
التكوين:
<project> <build> <plugins> <plugin> <groupId>org.sonatype.plugins</groupId> <artifactId>nexus-staging-maven-plugin</artifactId> </plugin> </plugins> <pluginManagement> <plugins> <plugin> <groupId>org.sonatype.plugins</groupId> <artifactId>nexus-staging-maven-plugin</artifactId> <extensions>true</extensions> <configuration> <serverId>sonatype</serverId> <nexusUrl>https://oss.sonatype.org/</nexusUrl> <updateReleaseInfo>true</updateReleaseInfo> </configuration> </plugin> <plugin> <groupId>org.apache.maven.plugins</groupId> <artifactId>maven-deploy-plugin</artifactId> <configuration> <skip>true</skip> </configuration> </plugin> </plugins> </pluginManagement> </build> <distributionManagement> <snapshotRepository> <id>sonatype</id> <name>Nexus Snapshot Repository</name> <url>https://oss.sonatype.org/content/repositories/snapshots/</url> </snapshotRepository> <repository> <id>sonatype</id> <name>Nexus Release Repository</name> <url>https://oss.sonatype.org/service/local/staging/deploy/maven2/</url> </repository> </distributionManagement> </project>
إذا كان لديك مشروع متعدد الوحدات ، ولا تحتاج إلى تنزيل وحدة نمطية محددة إلى المستودع ، skipNexusStagingDeployMojo nexus-staging-maven-plugin skipNexusStagingDeployMojo nexus-staging-maven-plugin مع skipNexusStagingDeployMojo إلى pom.xml لهذه الوحدة
<build> <plugins> <plugin> <groupId>org.sonatype.plugins</groupId> <artifactId>nexus-staging-maven-plugin</artifactId> <configuration> <skipNexusStagingDeployMojo>true</skipNexusStagingDeployMojo> </configuration> </plugin> </plugins> </build>
بمجرد تنزيلها ، تتوفر إصدارات اللقطة / الإصدار في مستودع التخزين المؤقت.
<repositories> <repository> <id>SonatypeNexus</id> <url>https://oss.sonatype.org/content/groups/staging/</url> </repository> </repositories>
المزيد من المزايا
- قائمة غنية جدًا بالأهداف الخاصة بالعمل مع مستودع nexus (
mvn help:describe -Dplugin=org.sonatype.plugins:nexus-staging-maven-plugin ). - تحقق تلقائيا الافراج عن القدرة على التحميل في وسط مخضرم
إلى المحتوى
يؤدي
نشر نسخة SNAPSHOT
عند إنشاء مشروع ، هناك إمكانية لبدء مهمة يدوياً لتنزيل إصدار SNAPSHOT في Nexus

عند بدء هذه المهمة ، يتم تشغيل المهمة المقابلة في مشروع النشر ( مثال ).
سجل قلصت Running with gitlab-runner 11.10.0 (3001a600) on Deploy runner JSKWyxUw Using Shell executor... Running on ih1174328.vds.myihor.ru... Skipping Git repository setup Skipping Git checkout Skipping Git submodules setup $ rm -rf .* * $ git config --global credential.helper store $ echo "https://gitlab-ci-token:${CI_JOB_TOKEN}@gitlab.com" >> ~/.git-credentials $ git clone ${DEPLOY_CI_REPOSITORY_URL} . Cloning into 'shields4j'... $ git checkout ${DEPLOY_CI_COMMIT_SHA} Note: checking out '850f86aa317194395c5387790da1350e437125a7'. You are in 'detached HEAD' state. You can look around, make experimental changes and commit them, and you can discard any commits you make in this state without impacting any branches by performing another checkout. If you want to create a new branch to retain commits you create, you may do so (now or later) by using -b with the checkout command again. Example: git checkout -b new_branch_name HEAD is now at 850f86a... skip deploy test-core $ for pom in $(find . -name pom.xml); do # collapsed multi-line command $ if [[ "${DEPLOY_CI_COMMIT_TAG}" != "" ]]; then # collapsed multi-line command [INFO] Scanning for projects... [INFO] Inspecting build with total of 4 modules... [INFO] Installing Nexus Staging features: [INFO] ... total of 4 executions of maven-deploy-plugin replaced with nexus-staging-maven-plugin [INFO] ------------------------------------------------------------------------ [INFO] Reactor Build Order: [INFO] [INFO] Shields4J [pom] [INFO] test-core [jar] [INFO] Shields4J client [jar] [INFO] TestNG listener [jar] [INFO] [INFO] --------------< org.touchbit.shields4j:shields4j-parent >--------------- [INFO] Building Shields4J 1.0.0 [1/4] [INFO] --------------------------------[ pom ]--------------------------------- [INFO] [INFO] --- versions-maven-plugin:2.5:set (default-cli) @ shields4j-parent --- [INFO] Searching for local aggregator root... [INFO] Local aggregation root: /home/gitlab-deployer/JSKWyxUw/0/TouchBIT/deploy/shields4j [INFO] Processing change of org.touchbit.shields4j:shields4j-parent:1.0.0 -> 1.0.0-SNAPSHOT [INFO] Processing org.touchbit.shields4j:shields4j-parent [INFO] Updating project org.touchbit.shields4j:shields4j-parent [INFO] from version 1.0.0 to 1.0.0-SNAPSHOT [INFO] [INFO] Processing org.touchbit.shields4j:client [INFO] Updating parent org.touchbit.shields4j:shields4j-parent [INFO] from version 1.0.0 to 1.0.0-SNAPSHOT [INFO] Updating dependency org.touchbit.shields4j:test-core [INFO] from version 1.0.0 to 1.0.0-SNAPSHOT [INFO] [INFO] Processing org.touchbit.shields4j:test-core [INFO] Updating parent org.touchbit.shields4j:shields4j-parent [INFO] from version 1.0.0 to 1.0.0-SNAPSHOT [INFO] [INFO] Processing org.touchbit.shields4j:testng [INFO] Updating parent org.touchbit.shields4j:shields4j-parent [INFO] from version 1.0.0 to 1.0.0-SNAPSHOT [INFO] Updating dependency org.touchbit.shields4j:client [INFO] from version 1.0.0 to 1.0.0-SNAPSHOT [INFO] Updating dependency org.touchbit.shields4j:test-core [INFO] from version 1.0.0 to 1.0.0-SNAPSHOT [INFO] [INFO] ------------------------------------------------------------------------ [INFO] Reactor Summary: [INFO] [INFO] Shields4J 1.0.0 .................................... SUCCESS [ 0.992 s] [INFO] test-core .......................................... SKIPPED [INFO] Shields4J client ................................... SKIPPED [INFO] TestNG listener 1.0.0 .............................. SKIPPED [INFO] ------------------------------------------------------------------------ [INFO] BUILD SUCCESS [INFO] ------------------------------------------------------------------------ [INFO] Total time: 2.483 s [INFO] Finished at: 2019-04-21T02:40:42+03:00 [INFO] ------------------------------------------------------------------------ $ mvn clean deploy -DskipTests=${SKIP_TESTS} [INFO] Scanning for projects... [INFO] Inspecting build with total of 4 modules... [INFO] Installing Nexus Staging features: [INFO] ... total of 4 executions of maven-deploy-plugin replaced with nexus-staging-maven-plugin [INFO] ------------------------------------------------------------------------ [INFO] Reactor Build Order: [INFO] [INFO] Shields4J [pom] [INFO] test-core [jar] [INFO] Shields4J client [jar] [INFO] TestNG listener [jar] [INFO] [INFO] --------------< org.touchbit.shields4j:shields4j-parent >--------------- [INFO] Building Shields4J 1.0.0-SNAPSHOT [1/4] [INFO] --------------------------------[ pom ]--------------------------------- ... DELETED ... [INFO] * Bulk deploy of locally gathered snapshot artifacts finished. [INFO] Remote deploy finished with success. [INFO] ------------------------------------------------------------------------ [INFO] Reactor Summary: [INFO] [INFO] Shields4J 1.0.0-SNAPSHOT ........................... SUCCESS [ 2.375 s] [INFO] test-core .......................................... SUCCESS [ 3.929 s] [INFO] Shields4J client ................................... SUCCESS [ 3.815 s] [INFO] TestNG listener 1.0.0-SNAPSHOT ..................... SUCCESS [ 36.134 s] [INFO] ------------------------------------------------------------------------ [INFO] BUILD SUCCESS [INFO] ------------------------------------------------------------------------ [INFO] Total time: 47.629 s [INFO] Finished at: 2019-04-21T02:41:32+03:00 [INFO] ------------------------------------------------------------------------
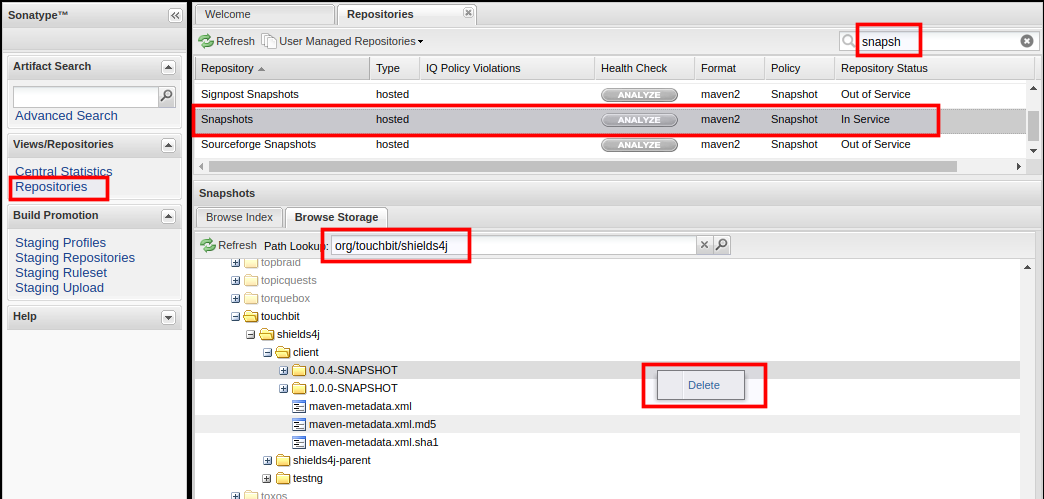
نتيجة لذلك ، يتم تحميل الإصدار 1.0.0-SNAPSHOT في نيكزس.
يمكن حذف جميع إصدارات اللقطة من المستودع على oss.sonatype.org ضمن حسابك.
إلى المحتوى
نشر نسخة الاصدار
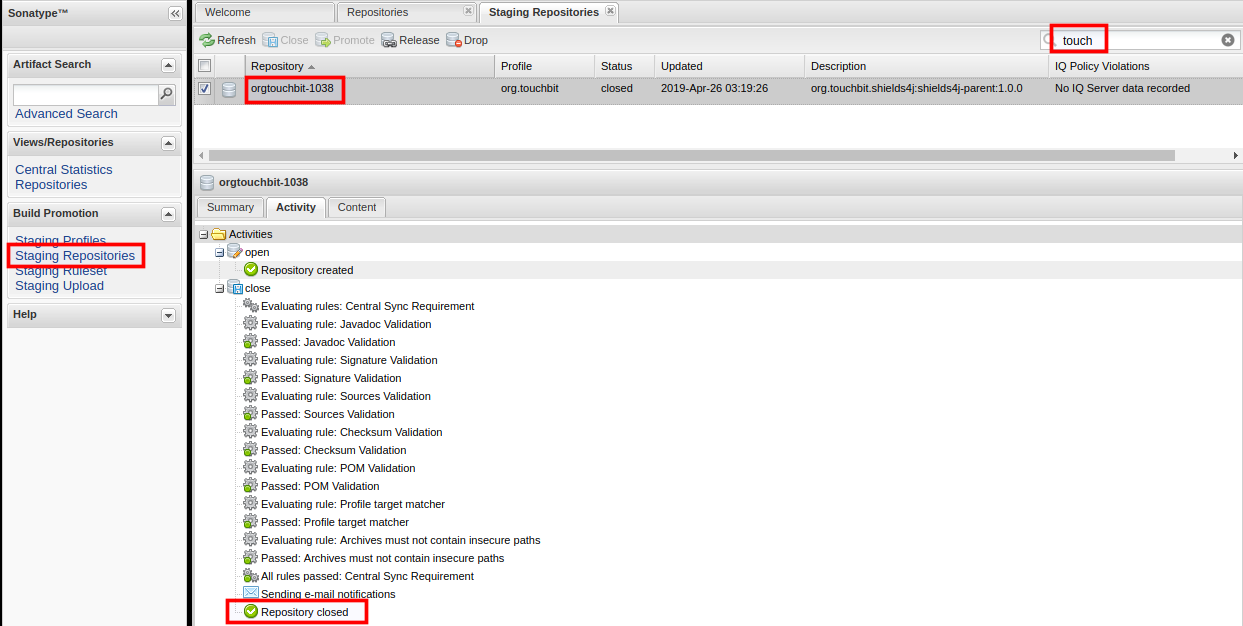
عند تثبيت العلامة ، يتم تشغيل المهمة المقابلة في مشروع النشر تلقائيًا لتنزيل نسخة الإصدار في nexus ( مثال ).

أفضل جزء هو أنه يتم تشغيل الإصدار الوثيق في nexus تلقائيًا.
[INFO] Performing remote staging... [INFO] [INFO] * Remote staging into staging profile ID "9043b43f77dcc9" [INFO] * Created staging repository with ID "orgtouchbit-1037". [INFO] * Staging repository at https://oss.sonatype.org:443/service/local/staging/deployByRepositoryId/orgtouchbit-1037 [INFO] * Uploading locally staged artifacts to profile org.touchbit [INFO] * Upload of locally staged artifacts finished. [INFO] * Closing staging repository with ID "orgtouchbit-1037". Waiting for operation to complete... ......... [INFO] Remote staged 1 repositories, finished with success. [INFO] ------------------------------------------------------------------------ [INFO] Reactor Summary: [INFO] [INFO] Shields4J 1.0.0 .................................... SUCCESS [ 9.603 s] [INFO] test-core .......................................... SUCCESS [ 3.419 s] [INFO] Shields4J client ................................... SUCCESS [ 9.793 s] [INFO] TestNG listener 1.0.0 .............................. SUCCESS [01:23 min] [INFO] ------------------------------------------------------------------------ [INFO] BUILD SUCCESS [INFO] ------------------------------------------------------------------------ [INFO] Total time: 01:47 min [INFO] Finished at: 2019-04-21T04:05:46+03:00 [INFO] ------------------------------------------------------------------------
وإذا حدث خطأ ما ، فإن المهمة ستفشل بالتأكيد [INFO] Performing remote staging... [INFO] [INFO] * Remote staging into staging profile ID "9043b43f77dcc9" [INFO] * Created staging repository with ID "orgtouchbit-1038". [INFO] * Staging repository at https://oss.sonatype.org:443/service/local/staging/deployByRepositoryId/orgtouchbit-1038 [INFO] * Uploading locally staged artifacts to profile org.touchbit [INFO] * Upload of locally staged artifacts finished. [INFO] * Closing staging repository with ID "orgtouchbit-1038". Waiting for operation to complete... ....... [ERROR] Rule failure while trying to close staging repository with ID "orgtouchbit-1039". [ERROR] [ERROR] Nexus Staging Rules Failure Report [ERROR] ================================== [ERROR] [ERROR] Repository "orgtouchbit-1039" failures [ERROR] Rule "signature-staging" failures [ERROR] * No public key: Key with id: (1f42b618d1cbe1b5) was not able to be located on <a href=http://keys.gnupg.net:11371/>http://keys.gnupg.net:11371/</a>. Upload your public key and try the operation again. ... [ERROR] Cleaning up local stage directory after a Rule failure during close of staging repositories: [orgtouchbit-1039] [ERROR] * Deleting context 9043b43f77dcc9.properties [ERROR] Cleaning up remote stage repositories after a Rule failure during close of staging repositories: [orgtouchbit-1039] [ERROR] * Dropping failed staging repository with ID "orgtouchbit-1039" (Rule failure during close of staging repositories: [orgtouchbit-1039]). [ERROR] Remote staging finished with a failure: Staging rules failure! [INFO] ------------------------------------------------------------------------ [INFO] Reactor Summary: [INFO] [INFO] Shields4J 1.0.0 .................................... SUCCESS [ 4.073 s] [INFO] test-core .......................................... SUCCESS [ 2.788 s] [INFO] Shields4J client ................................... SUCCESS [ 3.962 s] [INFO] TestNG listener 1.0.0 .............................. FAILURE [01:07 min] [INFO] ------------------------------------------------------------------------ [INFO] BUILD FAILURE [INFO] ------------------------------------------------------------------------
. .
, 
إلى المحتوى
استنتاج
- deploy- CI .
- Deploy- Owner Maintainer.
- Specific Runner "" deploy .
- snapshot/release .
- release maven central.
- "" maven central.
- snapshot " ".
- snapshot/release .
- // java .
GitLab CI . CI " " , . GitLab . . ( :) ).
.
, GitLab CI ( docker-compose), shell .
إلى المحتوى