
أصبحت Kubernetes بسرعة المعيار لتقديم وتوسيع نطاق التطبيقات في حاويات وإدارتها. هذا حل مفتوح المصدر مرن جدًا ومتعدد الاستخدامات. إنه يحتوي على وثائق مستفيضة ، وليس من السهل دائمًا العثور على القسم الصحيح فيه. لذلك ، Kubernetes من الصعب جدا السيطرة. بعد التخطيط للكتلة ، لا تزال بحاجة إلى تثبيته ، ولكن هنا ، أيضًا ، كل شيء لا يسير بسلاسة. لذلك ، هناك أدوات النشر ، مثل Kubespray ، والتي تبسط العمل. سأتحدث عن النشر التلقائي لمجموعة Kubernetes باستخدام Kubespray في سحابة OpenStack (Open Telekom Cloud).
للنشر التلقائي لـ Kubernetes ، تستخدم Kubespray أداة تهيئة Ansible للتهيئة والتكوين وأداة التسليم. ويوفر Kubespray مكتبة لتهيئة الموارد على منصات سحابة مختلفة. للقيام بذلك ، استخدم أداة "البنية التحتية كرمز" Terraform. يدعم مشروع Kubespray الآن Terraform لـ AWS و OpenStack و Packet clouds. يتم استخدام هذه الأداة بالاقتران مع مكتبة OpenStack لتوفير البنية الأساسية في هذا السيناريو.
متطلبات
أولاً ، دعونا نلقي نظرة على متطلبات النشر. وهي مقسمة إلى فئتين: متطلبات Kubespray ومتطلبات مكتبة الموفر.
يحتاج Kubespray إلى المكونات التالية:
- بيثون 2.7 (أو أعلى)
- Ansible 2.7 (أو أعلى)
- جينجا 2.9 (أو أعلى)
متطلبات مكتبة موفر OpenStack:
لتثبيت Terraform ، تحتاج إلى تنزيل الحزمة المناسبة من موقع Hashicorp وفك ضغطها . ثم يجب حفظ المسار إلى الملف الذي تم فك حزمه في متغير PATH. استخدم الأمر terraform للتحقق من تثبيت كل شيء. اكتشف المزيد هنا.
اعتمادًا على نظام التشغيل ، يمكن تثبيت Ansible مع اثنين من الأوامر. انظر وثائق Ansible. هنا يمكنني استخدام أوبونتو وتثبيت Ansible على النحو التالي.
sudo apt update sudo apt install ansible
ثم تحتاج إلى تثبيت تبعيات Kubespray. يتم ذلك عن طريق الأمر التالي. لكن عليك أولاً استنساخ المستودع.
git clone https://github.com/kubernetes-sigs/kubespray sudo pip install -r requirements.txt
لاستخدام Open Telekom Cloud ، قم بتكوين بيانات الوصول باستخدام .ostackrc في الدليل الجذر وتحميل متغيرات البيئة.
التخطيط العنقودي
تتميز Kubernetes بمرونة عالية ، لذا يمكن تكييف المجموعة وفقًا لاحتياجاتك. هنا لن نفكر في خيارات مختلفة للمجموعات. يمكنك أن تقرأ عن ذلك في وثائق Kubernetes في إنشاء كتلة مخصصة من البداية. على سبيل المثال ، سنقوم بإنشاء كتلة من المعالج مع etcd وعقدتي عمل. لن يكون للمجموعة عنوان IP عائم ، لذلك لن يكون متاحًا من الإنترنت.
نحتاج أيضًا إلى اختيار CNI (واجهة شبكة الحاوية). هناك العديد من الخيارات (cilium ، calico ، flannel ، شبكة نسج ، وما إلى ذلك) ، لكننا سنتخذ الفانيلا ، التي لا تحتاج إلى تكوين. ستعمل Calico ، ولكن ستحتاج إلى تكوين منافذ OpenStack Neutron لشبكات فرعية من الخدمات والقرون.
لإدارة المجموعات في لوحة معلومات Kubernetes بعد النشر ، نحتاج إلى تثبيت لوحة المعلومات هذه.
تكوين الكتلة
قم بتشغيل الأوامر التالية في دليل المستودع ، مع تحديد الاسم المطلوب في متغير $ CLUSTER.
cp -LRp contrib/terraform/openstack/sample-inventory \ inventory/$CLUSTER cd inventory/$CLUSTER ln -s ../../contrib/terraform/openstack/hosts ln -s ../../contrib
بعد تنفيذ الأوامر ، قم بتحرير ملف المخزون / $ CLUSTER / cluster.tf.
# your Kubernetes cluster name here cluster_name = "k8s-test-cluster" az_list=["eu-de-01", "eu-de-02"] dns_nameservers=["100.125.4.25", "8.8.8.8"] # SSH key to use for access to nodes public_key_path = "~/.ssh/id_rsa.pub" # image to use for bastion, masters, standalone etcd instances, and nodes image = "Standard_CentOS_7_latest" # user on the node (ex. core on Container Linux, ubuntu on Ubuntu, etc.) ssh_user = "linux" # 0|1 bastion nodes number_of_bastions = 0 flavor_bastion = "s2.xlarge.4" # standalone etcds number_of_etcd = 0 flavor_etcd = "s2.xlarge.4" # masters number_of_k8s_masters = 0 number_of_k8s_masters_no_etcd = 0 number_of_k8s_masters_no_floating_ip = 1 number_of_k8s_masters_no_floating_ip_no_etcd = 0 flavor_k8s_master = "s2.xlarge.4" # nodes number_of_k8s_nodes = 0 number_of_k8s_nodes_no_floating_ip = 2 flavor_k8s_node = "s2.xlarge.4" # GlusterFS # either 0 or more than one #number_of_gfs_nodes_no_floating_ip = 1 #gfs_volume_size_in_gb = 150 # Container Linux does not support GlusterFS image_gfs = "Standard_CentOS_7_latest" # May be different from other nodes #ssh_user_gfs = "linux" #flavor_gfs_node = "s2.xlarge.4" # networking network_name = "k8s-test-network" external_net = "Externel_Network_ID" subnet_cidr = "192.168.100.0/24" floatingip_pool = "admin_external_net" bastion_allowed_remote_ips = ["0.0.0.0/0"]
وصف المتغيرات قراءة هنا. في هذا المثال ، سنقوم بإنشاء كتلة مع رئيسي واحد واثنين من العقد Kubernetes العمل على أساس أحدث إصدار من CentOS 7 و s2.xlarge.4. etcd أيضا تثبيت على المعالج.
نشر البنية التحتية
نحن الآن على استعداد لنشر البنية التحتية لنظام المجموعة باستخدام Terraform. يوضح الشكل كيف تبدو البنية التحتية بعد النشر. التفاصيل أدناه.

لبدء نشر Terraform ، انتقل إلى دليل المخزون / $ CLUSTER / وقم بتشغيل الأوامر التالية. أولاً ، قم بتثبيت المكونات الإضافية الضرورية. للقيام بذلك ، نحتاج إلى وسيطة init والمسار إلى المكونات الإضافية.
terraform init ../../contrib/terraform/openstack
هذه العملية سريعة جدا. Terraform جاهز الآن لنشر البنية التحتية باستخدام وسيطة التطبيق.
terraform apply -var-file=cluster.tf ../../contrib/terraform/openstack
بعد بضع ثوانٍ ، يجب أن تظهر Terraform نتيجة مماثلة ، وستكون المثيلات متاحة للعمل.
Apply complete! Resources: 3 added, 0 changed, 0 destroyed.
للتحقق من توفر الخادم ، قم بتشغيل الأمر Ansible التالي ، ثم سننتقل إلى المجلد الجذر للمستودع.
$ ansible -i inventory/$CLUSTER/hosts -m ping all example-k8s_node-1 | SUCCESS => { "changed": false, "ping": "pong" } example-etcd-1 | SUCCESS => { "changed": false, "ping": "pong" } example-k8s-master-1 | SUCCESS => { "changed": false, "ping": "pong" }
نشر الكتلة Kubernetes
تم نشر البنية التحتية ، والآن تحتاج إلى تثبيت نظام Kubernetes. أولاً ، قم بتكوين متغيرات الكتلة في ملف المخزون / $ CLUSTER / group_vars / all / all.yml. تحتاج هنا إلى تعيين قيمة cloud_provider إلى openstack ، وبالنسبة إلى bin_dir ، المسار الذي سيتم تثبيت الملفات به. في مثالنا ، نستخدم التكوين التالي.
## Directory where etcd data stored etcd_data_dir: /var/lib/etcd ## Directory where the binaries will be installed bin_dir: /usr/local/bin ## The access_ip variable is used to define how other nodes should access ## the node. This is used in flannel to allow other flannel nodes to see ## this node for example. The access_ip is really useful AWS and Google ## environments where the nodes are accessed remotely by the "public" ip, ## but don't know about that address themselves. #access_ip: 1.1.1.1 ## External LB example config ## apiserver_loadbalancer_domain_name: "elb.some.domain" #loadbalancer_apiserver: # address: 1.2.3.4 # port: 1234 ## Internal loadbalancers for apiservers #loadbalancer_apiserver_localhost: true ## Local loadbalancer should use this port instead, if defined. ## Defaults to kube_apiserver_port (6443) #nginx_kube_apiserver_port: 8443 ### OTHER OPTIONAL VARIABLES ## For some things, kubelet needs to load kernel modules. For example, dynamic kernel services are needed ## for mounting persistent volumes into containers. These may not be loaded by preinstall kubernetes ## processes. For example, ceph and rbd backed volumes. Set to true to allow kubelet to load kernel ## modules. #kubelet_load_modules: false ## Upstream dns servers used by dnsmasq #upstream_dns_servers: # - 8.8.8.8 # - 8.8.4.4 ## There are some changes specific to the cloud providers ## for instance we need to encapsulate packets with some network plugins ## If set the possible values are either 'gce', 'aws', 'azure', 'openstack', 'vsphere', 'oci', or 'external' ## When openstack is used make sure to source in the openstack credentials ## like you would do when using nova-client before starting the playbook. ## Note: The 'external' cloud provider is not supported. ## TODO(riverzhang): https://kubernetes.io/docs/tasks/administer-cluster/running-cloud-controller/#running-cloud-controller-manager cloud_provider: openstack ## Set these proxy values in order to update package manager and docker daemon to use proxies #http_proxy: "" #https_proxy: "" ## Refer to roles/kubespray-defaults/defaults/main.yml before modifying no_proxy #no_proxy: "" ## Some problems may occur when downloading files over https proxy due to ansible bug ## https://github.com/ansible/ansible/issues/32750. Set this variable to False to disable ## SSL validation of get_url module. Note that kubespray will still be performing checksum validation. #download_validate_certs: False ## If you need exclude all cluster nodes from proxy and other resources, add other resources here. #additional_no_proxy: "" ## Certificate Management ## This setting determines whether certs are generated via scripts. ## Chose 'none' if you provide your own certificates. ## Option is "script", "none" ## note: vault is removed #cert_management: script ## Set to true to allow pre-checks to fail and continue deployment #ignore_assert_errors: false ## The read-only port for the Kubelet to serve on with no authentication/authorization. Uncomment to enable. #kube_read_only_port: 10255 ## Set true to download and cache container download_container: false ## Deploy container engine # Set false if you want to deploy container engine manually. #deploy_container_engine: true ## Set Pypi repo and cert accordingly #pyrepo_index: https://pypi.example.com/simple #pyrepo_cert: /etc/ssl/certs/ca-certificates.crt
الآن قم بتكوين ملف المخزون / $ CLUSTER / group_vars / k8s-cluster / k8s-cluster.yml. بالنسبة للمتغير kube_network_plugin ، قم بتعيين الفانيلا أو الكاليكو (تحتاج إلى تكوين منافذ نيوترون OpenStack ). سيكون لدينا هذا الفانيلا ، الذي لا يحتاج إلى تكوين. بالنسبة إلى متغير Solvconf_mode ، قم بتعيين docker_dns. تخبر هذه القيمة Kubespray بتعيين معلمات Docker daemon. أدناه ترى مثال التكوين لدينا الكتلة.
# Kubernetes configuration dirs and system namespace. # Those are where all the additional config stuff goes # the kubernetes normally puts in /srv/kubernetes. # This puts them in a sane location and namespace. # Editing those values will almost surely break something. kube_config_dir: /etc/kubernetes kube_script_dir: "{{ bin_dir }}/kubernetes-scripts" kube_manifest_dir: "{{ kube_config_dir }}/manifests" # This is where all the cert scripts and certs will be located kube_cert_dir: "{{ kube_config_dir }}/ssl" # This is where all of the bearer tokens will be stored kube_token_dir: "{{ kube_config_dir }}/tokens" # This is where to save basic auth file kube_users_dir: "{{ kube_config_dir }}/users" kube_api_anonymous_auth: true ## Change this to use another Kubernetes version, eg a current beta release kube_version: v1.13.3 # kubernetes image repo define kube_image_repo: "gcr.io/google-containers" # Where the binaries will be downloaded. # Note: ensure that you've enough disk space (about 1G) local_release_dir: "/tmp/releases" # Random shifts for retrying failed ops like pushing/downloading retry_stagger: 5 # This is the group that the cert creation scripts chgrp the # cert files to. Not really changeable... kube_cert_group: kube-cert # Cluster Loglevel configuration kube_log_level: 2 # Directory where credentials will be stored credentials_dir: "{{ inventory_dir }}/credentials" # Users to create for basic auth in Kubernetes API via HTTP # Optionally add groups for user kube_api_pwd: "{{ lookup('password', credentials_dir + '/kube_user.creds length=15 chars=ascii_letters,digits') }}" kube_users: kube: pass: "{{kube_api_pwd}}" role: admin groups: - system:masters ## It is possible to activate / deactivate selected authentication methods (basic auth, static token auth) #kube_oidc_auth: false #kube_basic_auth: false #kube_token_auth: false ## Variables for OpenID Connect Configuration https://kubernetes.io/docs/admin/authentication/ ## To use OpenID you have to deploy additional an OpenID Provider (eg Dex, Keycloak, ...) # kube_oidc_url: https:// ... # kube_oidc_client_id: kubernetes ## Optional settings for OIDC # kube_oidc_ca_file: "{{ kube_cert_dir }}/ca.pem" # kube_oidc_username_claim: sub # kube_oidc_username_prefix: oidc: # kube_oidc_groups_claim: groups # kube_oidc_groups_prefix: oidc: # Choose network plugin (cilium, calico, contiv, weave or flannel) # Can also be set to 'cloud', which lets the cloud provider setup appropriate routing kube_network_plugin: flannel # Setting multi_networking to true will install Multus: https://github.com/intel/multus-cni kube_network_plugin_multus: false # Kubernetes internal network for services, unused block of space. kube_service_addresses: 10.233.0.0/18 # internal network. When used, it will assign IP # addresses from this range to individual pods. # This network must be unused in your network infrastructure! kube_pods_subnet: 10.233.64.0/18 # internal network node size allocation (optional). This is the size allocated # to each node on your network. With these defaults you should have # room for 4096 nodes with 254 pods per node. kube_network_node_prefix: 24 # The port the API Server will be listening on. kube_apiserver_ip: "{{ kube_service_addresses|ipaddr('net')|ipaddr(1)|ipaddr('address') }}" kube_apiserver_port: 6443 # (https) #kube_apiserver_insecure_port: 8080 # (http) # Set to 0 to disable insecure port - Requires RBAC in authorization_modes and kube_api_anonymous_auth: true kube_apiserver_insecure_port: 0 # (disabled) # Kube-proxy proxyMode configuration. # Can be ipvs, iptables kube_proxy_mode: ipvs # A string slice of values which specify the addresses to use for NodePorts. # Values may be valid IP blocks (eg 1.2.3.0/24, 1.2.3.4/32). # The default empty string slice ([]) means to use all local addresses. # kube_proxy_nodeport_addresses_cidr is retained for legacy config kube_proxy_nodeport_addresses: >- {%- if kube_proxy_nodeport_addresses_cidr is defined -%} [{{ kube_proxy_nodeport_addresses_cidr }}] {%- else -%} [] {%- endif -%} # If non-empty, will use this string as identification instead of the actual hostname #kube_override_hostname: >- # {%- if cloud_provider is defined and cloud_provider in [ 'aws' ] -%} # {%- else -%} # {{ inventory_hostname }} # {%- endif -%} ## Encrypting Secret Data at Rest (experimental) kube_encrypt_secret_data: false # DNS configuration. # Kubernetes cluster name, also will be used as DNS domain cluster_name: cluster.local # Subdomains of DNS domain to be resolved via /etc/resolv.conf for hostnet pods ndots: 2 # Can be dnsmasq_kubedns, kubedns, coredns, coredns_dual, manual or none dns_mode: coredns # Set manual server if using a custom cluster DNS server #manual_dns_server: 10.xxx # Enable nodelocal dns cache enable_nodelocaldns: False nodelocaldns_ip: 169.254.25.10 # Can be docker_dns, host_resolvconf or none resolvconf_mode: docker_dns # Deploy netchecker app to verify DNS resolve as an HTTP service deploy_netchecker: false # Ip address of the kubernetes skydns service skydns_server: "{{ kube_service_addresses|ipaddr('net')|ipaddr(3)|ipaddr('address') }}" skydns_server_secondary: "{{ kube_service_addresses|ipaddr('net')|ipaddr(4)|ipaddr('address') }}" dnsmasq_dns_server: "{{ kube_service_addresses|ipaddr('net')|ipaddr(2)|ipaddr('address') }}" dns_domain: "{{ cluster_name }}" ## Container runtime ## docker for docker and crio for cri-o. container_manager: docker ## Settings for containerized control plane (etcd/kubelet/secrets) etcd_deployment_type: docker kubelet_deployment_type: host helm_deployment_type: host # K8s image pull policy (imagePullPolicy) k8s_image_pull_policy: IfNotPresent # audit log for kubernetes kubernetes_audit: false # dynamic kubelet configuration dynamic_kubelet_configuration: false # define kubelet config dir for dynamic kubelet #kubelet_config_dir: default_kubelet_config_dir: "{{ kube_config_dir }}/dynamic_kubelet_dir" dynamic_kubelet_configuration_dir: "{{ kubelet_config_dir | default(default_kubelet_config_dir) }}" # pod security policy (RBAC must be enabled either by having 'RBAC' in authorization_modes or kubeadm enabled) podsecuritypolicy_enabled: false # Make a copy of kubeconfig on the host that runs Ansible in {{ inventory_dir }}/artifacts # kubeconfig_localhost: false # Download kubectl onto the host that runs Ansible in {{ bin_dir }} # kubectl_localhost: false # dnsmasq # dnsmasq_upstream_dns_servers: # - /resolvethiszone.with/10.0.4.250 # - 8.8.8.8 # Enable creation of QoS cgroup hierarchy, if true top level QoS and pod cgroups are created. (default true) # kubelet_cgroups_per_qos: true # A comma separated list of levels of node allocatable enforcement to be enforced by kubelet. # Acceptable options are 'pods', 'system-reserved', 'kube-reserved' and ''. Default is "". # kubelet_enforce_node_allocatable: pods ## Supplementary addresses that can be added in kubernetes ssl keys. ## That can be useful for example to setup a keepalived virtual IP # supplementary_addresses_in_ssl_keys: [10.0.0.1, 10.0.0.2, 10.0.0.3] ## Running on top of openstack vms with cinder enabled may lead to unschedulable pods due to NoVolumeZoneConflict restriction in kube-scheduler. ## See https://github.com/kubernetes-sigs/kubespray/issues/2141 ## Set this variable to true to get rid of this issue volume_cross_zone_attachment: false # Add Persistent Volumes Storage Class for corresponding cloud provider ( OpenStack is only supported now ) persistent_volumes_enabled: false ## Container Engine Acceleration ## Enable container acceleration feature, for example use gpu acceleration in containers # nvidia_accelerator_enabled: true ## Nvidia GPU driver install. Install will by done by a (init) pod running as a daemonset. ## Important: if you use Ubuntu then you should set in all.yml 'docker_storage_options: -s overlay2' ## Array with nvida_gpu_nodes, leave empty or comment if you dont't want to install drivers. ## Labels and taints won't be set to nodes if they are not in the array. # nvidia_gpu_nodes: # - kube-gpu-001 # nvidia_driver_version: "384.111" ## flavor can be tesla or gtx # nvidia_gpu_flavor: gtx
أخيرًا ، قم بتحرير ملف المخزون / $ CLUSTER / group_vars / k8s-cluster / addons.yml وتعيين dashboard_enabled على true لإعداد لوحة المعلومات. مثال التكوين:
# Kubernetes dashboard # RBAC required. see docs/getting-started.md for access details. dashboard_enabled: true # Helm deployment helm_enabled: false # Registry deployment registry_enabled: false # registry_namespace: kube-system # registry_storage_class: "" # registry_disk_size: "10Gi" # Metrics Server deployment metrics_server_enabled: false # metrics_server_kubelet_insecure_tls: true # metrics_server_metric_resolution: 60s # metrics_server_kubelet_preferred_address_types: "InternalIP" # Local volume provisioner deployment local_volume_provisioner_enabled: false # local_volume_provisioner_namespace: kube-system # local_volume_provisioner_storage_classes: # local-storage: # host_dir: /mnt/disks # mount_dir: /mnt/disks # fast-disks: # host_dir: /mnt/fast-disks # mount_dir: /mnt/fast-disks # block_cleaner_command: # - "/scripts/shred.sh" # - "2" # volume_mode: Filesystem # fs_type: ext4 # CephFS provisioner deployment cephfs_provisioner_enabled: false # cephfs_provisioner_namespace: "cephfs-provisioner" # cephfs_provisioner_cluster: ceph # cephfs_provisioner_monitors: "172.24.0.1:6789,172.24.0.2:6789,172.24.0.3:6789" # cephfs_provisioner_admin_id: admin # cephfs_provisioner_secret: secret # cephfs_provisioner_storage_class: cephfs # cephfs_provisioner_reclaim_policy: Delete # cephfs_provisioner_claim_root: /volumes # cephfs_provisioner_deterministic_names: true # Nginx ingress controller deployment ingress_nginx_enabled: false # ingress_nginx_host_network: false # ingress_nginx_nodeselector: # node.kubernetes.io/node: "" # ingress_nginx_tolerations: # - key: "node.kubernetes.io/master" # operator: "Equal" # value: "" # effect: "NoSchedule" # ingress_nginx_namespace: "ingress-nginx" # ingress_nginx_insecure_port: 80 # ingress_nginx_secure_port: 443 # ingress_nginx_configmap: # map-hash-bucket-size: "128" # ssl-protocols: "SSLv2" # ingress_nginx_configmap_tcp_services: # 9000: "default/example-go:8080" # ingress_nginx_configmap_udp_services: # 53: "kube-system/kube-dns:53" # Cert manager deployment cert_manager_enabled: false # cert_manager_namespace: "cert-manager"
بعد تغيير التكوين ، قم بتشغيل ansible-playbook من خلال التكوين الخاص بنا عن طريق تشغيل الأمر التالي.
ansible-playbook --become -i inventory/$CLUSTER/hosts cluster.yml
يقوم Ansible بالعديد من العمليات ، وإذا تم إكمالها جميعها بنجاح ، ستبدو المجموعة في هذا الشكل.

تجريب
لاختبار الكتلة ، أدخل المعالج ، وانتقل إلى المستخدم الجذر ، وفي kubectl قم بتشغيل الأمر kubectl cluster-info للحصول على معلومات حول الكتلة. ستشاهد معلومات حول نقطة نهاية المعالج والخدمات في الكتلة. إذا كان كل شيء على ما يرام مع الكتلة ، قم بإنشاء مستخدم لوحة معلومات Kubernetes باستخدام الأوامر التالية.
# Create service account kubectl create serviceaccount cluster-admin-dashboard-sa # Bind ClusterAdmin role to the service account kubectl create clusterrolebinding cluster-admin-dashboard-sa \ --clusterrole=cluster-admin \ --serviceaccount=default:cluster-admin-dashboard-sa # Parse the token kubectl describe secret $(kubectl -n kube-system get secret | awk '/^cluster-admin-dashboard-sa-token-/{print $1}') | awk '$1=="token:"{print $2}'
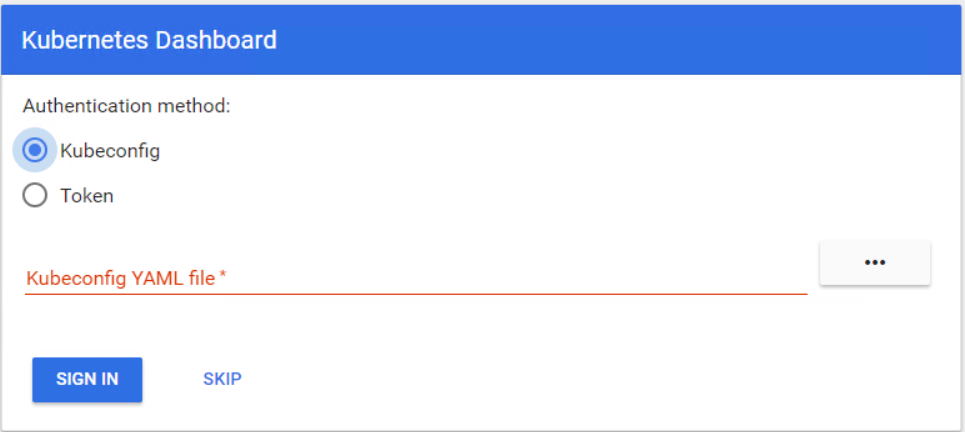
يمكنك الآن إدخال لوحة القيادة باستخدام الرمز المميز. تحتاج أولاً إلى إنشاء نفق إلى معالج Kubernetes ، لأن لوحة التحكم لا تزال مفتوحة للمضيف المحلي على المنفذ 8001. بعد ذلك ، يمكنك الوصول إلى لوحة المعلومات باستخدام مضيف محلي: 8001 URL. الآن حدد الرمز ، أدخل الرمز المميز وقم بتسجيل الدخول.
أنت جاهز لبدء العمل في مجموعة Kubernetes. في هذه المقالة ، رأيت مدى سهولة نشر وتكوين كتلة Kubernetes في سحابة OpenStack.