دخول Aeronet الحلقة 3: العثور على الكرة

اليوم سنبحث في كيفية اكتشاف كرة حمراء باستخدام كاميرا Raspberry PI ، وكيفية البدء في توجيه الطائرة بدون طيار لدينا.
البحث بالون


في المقالات السابقة ، درسنا بالتفصيل إطلاق طائرة استطلاع افتراضية وحقيقية مستقلة. لقد حان الوقت لطائرة بدون طيار لدينا لإيجاد هدف حقيقي.
سيكون الهدف ، كما ذكرنا ، كرة حمراء.


توت العليق


سنكتب برنامجًا للتصفية على إصدار سطح المكتب من Raspbian. منذ تكوين المرشح نذهب في الوقت نفسه إلى تحريف الإعدادات ومعرفة نتيجة الغش لدينا.
على محرك أقراص فلاش منفصل ، سنقوم بتثبيت Raspbian Desktop .
للعمل مع سطح المكتب Raspbian ، تحتاج إلى شاشة منفصلة + لوحة مفاتيح + ماوس متصلة بـ Raspberry ، وهي ليست مريحة للغاية. ولكن يمكنك العمل مع سطح المكتب بدون رأس وعبر الشبكة ، عبر VNC.
للقيام بذلك ، تحتاج إلى:


  1. تمكين VNC في raspi-config
  2. تكوين نقطة اتصال واي فاي على التوت. لا يتم التركيز على wpa_supplicant على إصدار سطح المكتب ، هنا تكمن التعليمات الخاصة بإعداد نقاط wifi في Raspberry.
  3. كعميل ، يمكنك استخدام realvnc .

لتطوير مرشح في بيثون - ضع OpenCV:


sudo apt-get install python-opencv 

مرشح HSV لدفق الفيديو


هناك طريقة بسيطة وطريقة سريعة لتسليط الضوء على كائن ملون في صورة ما هي نقل الصورة إلى فراغ لون HSV ، ثم التصفية حسب النطاق المطلوب من الصبغة والتشبع والقيمة باستخدام cv2.inRange. أخذت هذا المثال كأساس.


خصوصية مهمتنا هي أن الكرة لدينا حمراء ، وإذا نظرنا بعناية إلى مقياس النغمة (HUE) ، سنرى أن اللون الأحمر على حوافه:
مقياس HSV


لذلك ، إذا قمت بتصفية جزء واحد فقط من النطاق ، عندما تتغير الإضاءة ، فقد "تختفي" الكرة من المرشح ، مما يؤثر سلبًا على هدف الطائرة بدون طيار لدينا. لذلك ، بالإضافة إلى المعلمات H و S و V ، سنضيف علامة الانعكاس العكسية إلى الفلتر - حتى نتمكن من تصفية كل شيء ما عدا الكرة ، ثم عكس الفلتر ببساطة.


يظهر رمز برنامج التصفية أدناه:
 #coding=utf-8 import cv2 import numpy as np def nothing(*arg): pass cv2.namedWindow( "result" ) #    cv2.namedWindow( "img" ) #   cv2.namedWindow( "settings" ) #    cap = cv2.VideoCapture(0)#video.create_capture(0) #  6         cv2.createTrackbar('invert', 'settings', 0, 1, nothing) cv2.createTrackbar('h1', 'settings', 0, 255, nothing) cv2.createTrackbar('s1', 'settings', 0, 255, nothing) cv2.createTrackbar('v1', 'settings', 0, 255, nothing) cv2.createTrackbar('h2', 'settings', 255, 255, nothing) cv2.createTrackbar('s2', 'settings', 255, 255, nothing) cv2.createTrackbar('v2', 'settings', 255, 255, nothing) while True: flag, img = cap.read() hsv = cv2.cvtColor(img, cv2.COLOR_BGR2HSV ) #    invert = cv2.getTrackbarPos('invert', 'settings') h1 = cv2.getTrackbarPos('h1', 'settings') s1 = cv2.getTrackbarPos('s1', 'settings') v1 = cv2.getTrackbarPos('v1', 'settings') h2 = cv2.getTrackbarPos('h2', 'settings') s2 = cv2.getTrackbarPos('s2', 'settings') v2 = cv2.getTrackbarPos('v2', 'settings') #       h_min = np.array((h1, s1, v1), np.uint8) h_max = np.array((h2, s2, v2), np.uint8) #       HSV thresh = cv2.inRange(hsv, h_min, h_max) if invert>0: cv2.bitwise_not(thresh,thresh) cv2.imshow('result', thresh) cv2.imshow('img', img) ch = cv2.waitKey(5) if ch == 27: break cap.release() cv2.destroyAllWindows() 

وضع عامل التصفية على الكرة يبدو كالتالي:


حساب موقع الكرة في الفضاء


بعد تلقي المرشح ، يمكننا العثور على الكرة في صورة المرشح باستخدام وظيفة تمييز الكفاف cv2.findContours .


في برنامجنا ، سنقوم بالتكرار على جميع المعالم الموجودة ، ونختار أكثر من 10x10 نقطة ، ونختار أكبرها - ستكون هذه هي الكرة المرغوبة. إذا ضربت عدة أشياء الكاميرا - للتوجيه ، فإننا نستخدم أقرب واحد ، أي أكبر واحد.


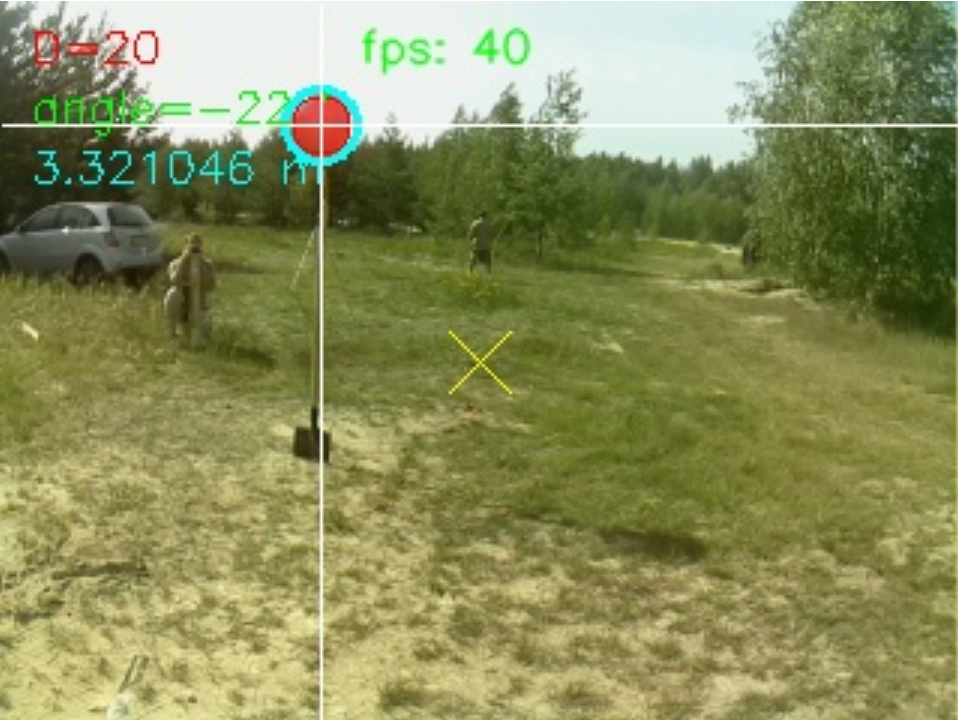
نرسم المعلومات المفيدة للمرشح إلى الصورة الناتجة: ارسم الخطوط العريضة التي تم العثور عليها ودائرة أكبرها ، وحدد مركز الخط (إلى أين تطير) مع الخطوط ، واشتق قطر الكرة عند النقاط وحساب المسافة إليه ، زاوية الانحراف. بالإضافة إلى ذلك ، في وسط الشاشة ، أضفت "نطاق" + أحسب وعرضت معدل الإطار - للتحكم في سرعة مرشحنا.


ويرد النص الكامل لبرنامج التصفية أدناه:
 #coding=utf-8 import cv2 import numpy as np import math if __name__ == '__main__': def nothing(*arg): pass cv2.namedWindow( "result" ) #    cv2.namedWindow( "source" ) # source video cv2.namedWindow( "settings" ) #    cap = cv2.VideoCapture(0) cap.set(cv2.CAP_PROP_FRAME_WIDTH, 320) cap.set(cv2.CAP_PROP_FRAME_HEIGHT, 240) cap.set(cv2.CAP_PROP_FPS,40) #  6         cv2.createTrackbar('invert', 'settings', 0, 1, nothing) cv2.createTrackbar('h1', 'settings', 0, 255, nothing) cv2.createTrackbar('s1', 'settings', 0, 255, nothing) cv2.createTrackbar('v1', 'settings', 0, 255, nothing) cv2.createTrackbar('h2', 'settings', 255, 255, nothing) cv2.createTrackbar('s2', 'settings', 255, 255, nothing) cv2.createTrackbar('v2', 'settings', 255, 255, nothing) crange = [0,0,0, 0,0,0] #set up initial values cv2.setTrackbarPos('invert','settings',1) cv2.setTrackbarPos('h1','settings',7) cv2.setTrackbarPos('h2','settings',158) cv2.setTrackbarPos('s1','settings',0) cv2.setTrackbarPos('s2','settings',255) cv2.setTrackbarPos('v1','settings',0) cv2.setTrackbarPos('v2','settings',255) color_blue = (255,255,0) color_red = (0,0,255) color_green = (0,255,0) color_white = (255,255,255) color_yellow = (0,255,255) color_black = (0,0,0) real_ballon_r = 0.145 #baloon real radius in meters while True: flag, img = cap.read() hsv = cv2.cvtColor(img, cv2.COLOR_BGR2HSV ) #    invert = cv2.getTrackbarPos('invert', 'settings') h1 = cv2.getTrackbarPos('h1', 'settings') s1 = cv2.getTrackbarPos('s1', 'settings') v1 = cv2.getTrackbarPos('v1', 'settings') h2 = cv2.getTrackbarPos('h2', 'settings') s2 = cv2.getTrackbarPos('s2', 'settings') v2 = cv2.getTrackbarPos('v2', 'settings') #       h_min = np.array((h1, s1, v1), np.uint8) h_max = np.array((h2, s2, v2), np.uint8) #       HSV thresh = cv2.inRange(hsv, h_min, h_max) if invert>0: cv2.bitwise_not(thresh,thresh) #find contours _, contours0, hierarchy = cv2.findContours( thresh.copy(), cv2.RETR_EXTERNAL, cv2.CHAIN_APPROX_NONE) max_area = 0 max_center_x=None max_center_y=None max_baloon_r=None max_yaw_shift=None for cnt in contours0: rect = cv2.minAreaRect(cnt) box = cv2.boxPoints(rect) box = np.int0(box) center = (int(rect[0][0]),int(rect[0][1])) area = int(rect[1][0]*rect[1][1]) if area > 100: baloon_r = int(math.sqrt(area)/2) yaw_shift = int( (center[0] - 320/2) * 130 / 320) # 130 degree camera for 320 pics image cv2.circle(img, center, baloon_r , color_red, 1) if area>max_area: max_area=area max_center_x = center[0] max_center_y = center[1] max_baloon_r = baloon_r max_yaw_shift = yaw_shift #draw main baloon if max_area>0: cv2.circle(img, (max_center_x,max_center_y), max_baloon_r+2 , color_blue, 2) cv2.putText(img, "D=%d" % int(max_baloon_r*2), (10, 20), cv2.FONT_HERSHEY_SIMPLEX, 0.5, color_red, 1) cv2.putText(img, "angle=%d '" % max_yaw_shift, (10, 40), cv2.FONT_HERSHEY_SIMPLEX, 0.5, color_green, 1) max_distance = real_ballon_r/math.tan(max_baloon_r/320.0*(math.pi*160.0/360.0)) #distance to baloon #print max_distance cv2.putText(img, "%fm" % max_distance, (10, 60), cv2.FONT_HERSHEY_SIMPLEX, 0.5, color_blue, 1) cv2.line(img, (max_center_x, 1), (max_center_x, 239) , color_white, 1) cv2.line(img, (1,max_center_y), (319, max_center_y) , color_white, 1) #draw target cv2.line(img, (320/2-10, 240/2-10), (320/2+10, 240/2+10) , color_yellow, 1) cv2.line(img, (320/2+10, 240/2-10), (320/2-10, 240/2+10) , color_yellow, 1) # show results cv2.imshow('source', img) cv2.imshow('result', thresh) ch = cv2.waitKey(5) if ch == 27: break cap.release() cv2.destroyAllWindows() 

ينظر برنامج الصورة من الكاميرا إلى المسافة إلى الكرة وزوايا الانحراف والميل التي تنحرف بها الكرة عن مركز صورة الكاميرا. هذه المعلومات كافية لنا لهدف الطائرة بدون طيار على الكرة. كذلك سوف نشارك في برنامج التوجيه.


كشف الكرة ROS الحزمة


يمكن نقل الوظيفة المطورة إلى نظام التوت بدون رأس مع تثبيت ROS. سنقوم بإنشاء حزمة baloon ROS التي ستؤدي الوظائف التالية:


  1. إطلاق mavros ، تزويدنا وحدة تحكم الطيران
  2. تشغيل برنامج الكشف عن الكرة لدينا. في البرنامج ، سنضيف نشر إحداثيات الكرة وتصحيح الصور في موضوعات ROS المقابلة
  3. قم بتشغيل web_video_server - أحد مكونات ROS التي تسمح لنا بمراقبة مرشحنا من الخارج باستخدام متصفح

قبل إنشاء حزمة ROS ، أضف الوظيفة التالية إلى برنامج تصفية ROS لدينا للعمل في بيئة ROS:


  1. قراءة إعدادات الكاميرا. يتم تعيين المعلمات في ROS في شكل ملف yaml ، والتي يتم الحصول عليها عادة أثناء معايرة الكاميرا . نحن مهتمون فقط بأحجام الصور (العرض والارتفاع) ، ولكن من أجل اتباع مفهوم ROS ، سنحصل عليها من ملف yaml.
  2. الحصول على المعلمات مرشح المحدد. سنقوم بتدوين معلمات المرشح المحددة مسبقًا في ملف الإطلاق لحزمة ROS الخاصة بنا.
  3. نشر إحداثيات الكرة المستلمة في موضوع ROS /baloon_detector/twist
  4. نشر صور التصحيح على موضوعات ROS /baloon_detector/image_filter و /baloon_detector/image_result

يمكنك تشغيل البرنامج للتنفيذ باستخدام python baloon_pose_cv.py المعتاد - ولكن هناك أيضًا طريقة أكثر ملاءمة - لحزم الوظائف التي نحتاجها في حزمة ROS وتكوين تشغيله التلقائي عند بدء تشغيل النظام.


هناك الكثير من الدروس حول إنشاء حزم ROS على الشبكة ، لذلك سأقتصر على قائمة الخطوات اللازمة.


دعنا ننشئ دليل مساحة عمل ROS لحزمتنا ، وحزمة ROS نفسها:


 mkdir -p ~/baloon_ws/src cd ~/baloon_ws/ catkin_make source devel/setup.bash cd src catkin_create_pkg baloon std_msgs rospy 

نضع في الدليل ~ / baloon_ws / src / baloon / src الملفات الضرورية لتشغيل الحزمة الخاصة بنا:


  1. baloon_pose_cv.py - برنامج الكشف عن الكرة
  2. baloon_cv.launch - ملف الإطلاق لإطلاق حزمة ROS الخاصة بنا
  3. fe130_320_01.yaml - ملف تم الحصول عليه نتيجة لمعايرة الكاميرا . نحن مهتمون به فقط في حجم الصورة ، ولكن في المستقبل يمكن استخدام هذا الملف لإجراء تحليل أعمق للصور ، واستعادة المشاهد ثلاثية الأبعاد من صورة ، إلخ.
  4. baloon.service ، roscore.env - يتم استخدام هذه الملفات للتشغيل التلقائي لحزمة ROS

فيما يلي نصوص كل ملف:


baloon_pose_cv.py - برنامج الكشف الرئيسي عن الكرة
 #!/usr/bin/env python # coding=UTF-8 # zuza baloon seeker import rospy from sensor_msgs.msg import CameraInfo, Image import time import cv2 from cv_bridge import CvBridge, CvBridgeError import numpy as np #import tf.transformations as t from geometry_msgs.msg import TwistStamped, Quaternion, Point, PoseStamped, TransformStamped import copy from std_msgs.msg import ColorRGBA import tf2_ros import math import yaml my_cam_info=None my_fps=0 my_last_fps=0 my_time_fps=time.time() bridge = CvBridge() mtx=None dist=None def raspicam_loop_cv(): global my_fps, my_last_fps, my_time_fps, mtx, dist # initialize the camera and grab a reference to the raw camera capture camera = cv2.VideoCapture(0) camera.set(cv2.CAP_PROP_FRAME_WIDTH, my_cam_info.width) camera.set(cv2.CAP_PROP_FRAME_HEIGHT, my_cam_info.height) camera.set(cv2.CAP_PROP_FPS, rospy.get_param('/baloon_detector/framerate')) # allow the camera to warmup time.sleep(0.1) color_blue = (255,255,0) color_red = (0,0,255) color_green = (0,255,0) color_white = (255,255,255) color_yellow = (0,255,255) color_black = (0,0,0) #    invert = rospy.get_param('/baloon_detector/invert') h1 = rospy.get_param('/baloon_detector/h1') s1 = rospy.get_param('/baloon_detector/s1') v1 = rospy.get_param('/baloon_detector/v1') h2 = rospy.get_param('/baloon_detector/h2') s2 = rospy.get_param('/baloon_detector/s2') v2 = rospy.get_param('/baloon_detector/v2') real_ballon_r = rospy.get_param('/baloon_detector/real_ballon_r') #       h_min = np.array((h1, s1, v1), np.uint8) h_max = np.array((h2, s2, v2), np.uint8) while not rospy.is_shutdown(): ret, image_raw = camera.read() # calculate FPS cur_time2 = time.time() if cur_time2-my_time_fps>5: my_last_fps=my_fps my_fps=1 my_time_fps=cur_time2 else: my_fps+=1 image_hsv = cv2.cvtColor(image_raw, cv2.COLOR_BGR2HSV ) #       HSV thresh = cv2.inRange(image_hsv, h_min, h_max) if invert>0: cv2.bitwise_not(thresh,thresh) #find contours _, contours0, hierarchy = cv2.findContours( thresh.copy(), cv2.RETR_EXTERNAL, cv2.CHAIN_APPROX_NONE) max_area = 0 max_center_x=None max_center_y=None max_baloon_r=None max_yaw_shift=None for cnt in contours0: rect = cv2.minAreaRect(cnt) box = cv2.boxPoints(rect) box = np.int0(box) center = (int(rect[0][0]),int(rect[0][1])) area = int(rect[1][0]*rect[1][1]) if area > 100: baloon_r = int(math.sqrt(area)/2) yaw_shift = int( (center[0] - my_cam_info.width/2) * 130 / my_cam_info.width) # 130 degree camera for my_cam_info.width pics image cv2.circle(image_raw, center, baloon_r , color_red, 1) if area>max_area: max_area=area max_center_x = center[0] max_center_y = center[1] max_baloon_r = baloon_r max_yaw_shift = yaw_shift #draw main baloon if max_area>0: cv2.circle(image_raw, (max_center_x,max_center_y), max_baloon_r+2 , color_blue, 2) cv2.putText(image_raw, "D=%d" % int(max_baloon_r*2), (10, 20), cv2.FONT_HERSHEY_SIMPLEX, 0.5, color_red, 1) cv2.putText(image_raw, "angle=%d '" % max_yaw_shift, (10, 40), cv2.FONT_HERSHEY_SIMPLEX, 0.5, color_green, 1) max_distance = real_ballon_r/math.tan(max_baloon_r/float(my_cam_info.width)*(math.pi*160.0/360.0)) #distance to baloon #print max_distance cv2.putText(image_raw, "%fm" % max_distance, (10, 60), cv2.FONT_HERSHEY_SIMPLEX, 0.5, color_blue, 1) cv2.line(image_raw, (max_center_x, 1), (max_center_x, my_cam_info.height-1) , color_white, 1) cv2.line(image_raw, (1,max_center_y), (my_cam_info.width-1, max_center_y) , color_white, 1) # post baloon Twist tws = TwistStamped() tws.header.stamp = rospy.Time.now() tws.header.frame_id = 'fcu' tws.twist.linear.x = max_distance tws.twist.angular.z = float(-max_yaw_shift)/360.0*math.pi#yaw tws.twist.angular.y = float( (max_center_y - my_cam_info.height/2) * 130.0 / my_cam_info.height) /360.0*math.pi #pitch publisher_baloontwist.publish(tws) #draw target cv2.line(image_raw, (my_cam_info.width/2-10, my_cam_info.height/2-10), (my_cam_info.width/2+10, my_cam_info.height/2+10) , color_yellow, 1) cv2.line(image_raw, (my_cam_info.width/2+10, my_cam_info.height/2-10), (my_cam_info.width/2-10, my_cam_info.height/2+10) , color_yellow, 1) #Draw FPS on image cv2.putText(image_raw,"fps: "+str(my_last_fps/5),(120,20), cv2.FONT_HERSHEY_SIMPLEX, 0.5,(0,255,0),1,cv2.LINE_AA) #  1   5,      if my_fps%5==0: try: publisher_image_raw_result.publish(bridge.cv2_to_imgmsg(image_raw,"bgr8")) publisher_image_raw_filter.publish(bridge.cv2_to_imgmsg(thresh, "mono8")) except CvBridgeError as e: print(e) def publish_dummy_vp(event): ps = PoseStamped() ps.header.stamp = rospy.Time.now() ps.header.frame_id = 'local_origin' ps.pose.orientation.w = 1; publisher_vp.publish(ps); def callback_handle_pose(mavros_pose): rospy.loginfo("Got mavros pose, stop publishing zeroes.") dummy_timer.shutdown() handle_pose_sub.unregister() def process_camera_info_yaml(): global mtx, dist, my_cam_info my_cam_info = CameraInfo() filename = rospy.get_param('/baloon_detector/camera_info_url') with open(filename, 'r') as ymlfile: cfg = yaml.load(ymlfile) my_cam_info.width = cfg['image_width'] my_cam_info.height= cfg['image_height'] my_cam_info.K = cfg['camera_matrix']['data'] my_cam_info.D = cfg['distortion_coefficients']['data'] mtx=np.zeros((3,3)) dist=np.zeros((1,5)) for i in range(3): for j in range(3): mtx[i,j]=my_cam_info.K[i*3+j] for i in range(5): dist[0,i]=my_cam_info.D[i] print mtx, dist if __name__ == '__main__': rospy.init_node('baloon_detector') ## init pose publishing from FCU publisher_vp = rospy.Publisher('/mavros/vision_pose/pose', PoseStamped, queue_size=1) dummy_timer=rospy.Timer(rospy.Duration(0.5), publish_dummy_vp) handle_pose_sub = rospy.Subscriber('mavros/local_position/pose', PoseStamped, callback_handle_pose) ## init camera process_camera_info_yaml() print my_cam_info rospy.loginfo("image translation starting.........") publisher_image_raw_filter = rospy.Publisher('baloon_detector/image_filter', Image, queue_size=1) publisher_image_raw_result = rospy.Publisher('baloon_detector/image_result', Image, queue_size=1) publisher_baloontwist= rospy.Publisher('baloon_detector/twist', TwistStamped ,queue_size=1) raspicam_loop_cv() try: rospy.spin() except KeyboardInterrupt: print("Shutting down") 

baloon_cv.launch - ملف الإطلاق لإطلاق حزمة ROS الخاصة بنا
 <launch> <!-- mavros --> <include file="$(find mavros)/launch/px4.launch"> <arg name="fcu_url" value="/dev/ttyAMA0:921600"/> <arg name="gcs_url" value="tcp-l://0.0.0.0:5760"/> </include> <!-- baloon pose estimator --> <node name="baloon_detector" pkg="baloon" type="baloon_pose_cv.py" output="screen"> <param name="invert" value="1"/> <param name="h1" value="7"/> <param name="h2" value="158"/> <param name="s1" value="0"/> <param name="s2" value="255"/> <param name="v1" value="0"/> <param name="v2" value="255"/> <param name="real_ballon_r" value="0.145"/> <param name="camera_info_url" value="$(find baloon)/src/fe130_320_01.yaml"/> <param name="framerate" value="40"/> </node> <!-- web video server --> <node name="web_video_server" pkg="web_video_server" type="web_video_server" required="false" respawn="true" respawn_delay="5"/> </launch> 

fe130_320_01.yaml - ملف معايرة الكاميرا
 image_width: 320 image_height: 240 camera_name: main_camera_optical camera_matrix: rows: 3 cols: 3 data: [251.8636348237197, 0, 161.853506252244, 0, 252.36606604425, 102.0038140308112, 0, 0, 1] distortion_model: plumb_bob distortion_coefficients: rows: 1 cols: 5 data: [-0.4424451138703088, 0.1594038086314775, 0.006694781700363117, 0.00174908936506397, 0] rectification_matrix: rows: 3 cols: 3 data: [1, 0, 0, 0, 1, 0, 0, 0, 1] projection_matrix: rows: 3 cols: 4 data: [174.0442047119141, 0, 163.822732720786, 0, 0, 175.2916412353516, 105.5565883832869, 0, 0, 0, 1, 0] 

بعد وضع الملفات في الدليل baloon_ws / src / baloon / src ، تحتاج إلى إضافة السمة "ملف قابل للتنفيذ" (cmod + x) إلى الملفات baloon_pose_cv.py و baloon.service. ثم ، كاختبار أول ، نطلق عقدة ROS الخاصة بنا يدويًا:


 roslaunch baloon baloon_cv.launch 

بعد بدء العقدة ، يمكننا أن نلاحظ صورة مرشحنا والكرة من خلال متصفح الويب:


وكذلك الحصول على إحداثيات الكرة المكتشفة في الموضوع /baloon_detector/twist :


 pi@raspberry:~ $ rostopic list |grep baloon /baloon_detector/image_filter /baloon_detector/image_result /baloon_detector/twist pi@raspberry:~ $ rostopic echo /baloon_detector/twist header: seq: 1 stamp: secs: 1554730508 nsecs: 603406906 frame_id: "fcu" twist: linear: x: 6.6452559203 y: 0.0 z: 0.0 angular: x: 0.0 y: 0.137081068334 z: -0.165806278939 --- 

يبقى لإضافة التشغيل التلقائي للعقدة لدينا في بداية التوت.
للقيام بذلك ، قم بإنشاء ملف وصف خدمة systemd baloon.service ، مع المحتويات التالية:


 [Unit] Description=BALOON ROS package Requires=roscore.service After=roscore.service [Service] EnvironmentFile=/home/pi/baloon_ws/src/baloon/src/roscore.env ExecStart=/opt/ros/kinetic/bin/roslaunch baloon baloon_cv.launch --wait Restart=on-abort [Install] WantedBy=multi-user.target 

يشير الملف إلى وصف متغير البيئة roscore.env:


 ROS_ROOT=/opt/ros/kinetic/share/ros ROS_DISTRO=kinetic ROS_PACKAGE_PATH=/home/pi/baloon_ws/src:/opt/ros/kinetic/share ROS_PORT=11311 ROS_MASTER_URI=http://localhost:11311 CMAKE_PREFIX_PATH=/home/pi/baloon_ws/devel:/opt/ros/kinetic PATH=/opt/ros/kinetic/bin:/usr/local/sbin:/usr/local/bin:/usr/sbin:/usr/bin:/sbin:/bin:/usr/games:/usr/local/games:/snap/bin LD_LIBRARY_PATH=/opt/ros/kinetic/lib PYTHONPATH=/home/pi/catkin_ws/devel/lib/python2.7/dist-packages:/opt/ros/kinetic/lib/python2.7/dist-packages ROS_IP=192.168.11.1 

يتم توصيل وبدء الخدمة باستخدام الأوامر:


 sudo systemctl enable ~/baloon_ws/src/baloon/src/baloon.service sudo systemctl start baloon 

الآن يجب أن تبدأ العقدة تلقائيًا عند بدء تشغيل التوت.
يمكنك إيقاف العقدة باستخدام الأمر sudo systemctl stop baloon ، وإلغاء تشغيل تلقائي - sudo systemctl disable balloon .


نتيجة لإجراءاتنا ، حصلنا على "كاشف كروي تلقائي" يتم إطلاقه عند بدء تشغيل النظام على الكمبيوتر الموجود على متن الطائرة.


في الجزء التالي ، سنشرع في الإطلاق النهائي لطائرة بدون طيار صاروخ موجه.


يتم تحميل شفرة المصدر للبرامج إلى جيثب .

Source: https://habr.com/ru/post/ar462923/


All Articles