تخيل موقفًا يحتاج إلى تجميع مشروعك في بيئات مختلفة.
الآن تخيل أنه لا ينبغي أن تمر جميع الاختبارات في هذه البيئات - لكل منها مجموعة الاختبارات الخاصة به.
ومن الأفضل تهيئة اختيار الاختبارات التي ينبغي إجراؤها في ملف ... application.properties - كل اختبار له مفتاح تشغيل / إيقاف خاص به.
تبدو رائعة ، أليس كذلك؟
ثم مرحبًا بك في القط ، حيث ننفذ كل هذا باستخدام SpringBoot 2 و JUnit 5.
المسبقة
أولاً ، دعنا نوقف تشغيل JUnit 4 ، والذي يأتي افتراضيًا في SpringBoot 2 ، ونشغل JUnit 5 .
للقيام بذلك ، قم بإجراء تغييرات على pom.xml :
<dependencies> <dependency> <groupId>org.springframework.boot</groupId> <artifactId>spring-boot-starter-test</artifactId> <scope>test</scope> <exclusions> <exclusion> <groupId>junit</groupId> <artifactId>junit</artifactId> </exclusion> </exclusions> </dependency> <dependency> <groupId>org.junit.jupiter</groupId> <artifactId>junit-jupiter-engine</artifactId> <version>5.3.2</version> <scope>test</scope> </dependency> </dependencies>
الحل المقترح
نريد تعليق كل اختبار بتعليق توضيحي بسيط مع خاصية تشير إلى ما إذا كان الاختبار ممكّنًا أم لا. دعني أذكرك بأننا سنقوم بتخزين قيم هذه الخاصية في ملف application.properties .
ملخص
إنشاء تعليق توضيحي :
@Retention(RetentionPolicy.RUNTIME) @ExtendWith(TestEnabledCondition.class) public @interface TestEnabled { String property(); }
معالجة الشرح
معالج التعليقات التوضيحية أمر لا غنى عنه.
public class TestEnabledCondition implements ExecutionCondition { @Override public ConditionEvaluationResult evaluateExecutionCondition(ExtensionContext context) { Optional<TestEnabled> annotation = context.getElement().map(e -> e.getAnnotation(TestEnabled.class)); return context.getElement() .map(e -> e.getAnnotation(TestEnabled.class)) .map(annotation -> { String property = annotation.property(); return Optional.ofNullable(environment.getProperty(property, Boolean.class)) .map(value -> { if (Boolean.TRUE.equals(value)) { return ConditionEvaluationResult.enabled("Enabled by property: "+property); } else { return ConditionEvaluationResult.disabled("Disabled by property: "+property); } }).orElse( ConditionEvaluationResult.disabled("Disabled - property <"+property+"> not set!") ); }).orElse( ConditionEvaluationResult.enabled("Enabled by default") ); } }
يجب عليك إنشاء فصل @Component (بدون تعليق توضيحي @Component ) يقوم ExecutionCondition واجهة ExecutionCondition .
في هذه الفئة ، تحتاج إلى تطبيق طريقة واحدة من هذه الواجهة - ConditionEvaluationResult evaluateExecutionCondition(ExtensionContext context) .
تأخذ هذه الطريقة سياق الاختبار الذي تديره JUnit وتُرجع الشرط فيما إذا كان يجب تشغيل الاختبار أم لا.
اقرأ المزيد عن التنفيذ المشروط لاختبارات JUnit5 في الوثائق الرسمية.
ولكن كيف نتحقق من قيمة العقار المسجل في application.properties في هذه الحالة؟
الوصول إلى سياق الربيع من سياق JUnit
وبهذه الطريقة يمكننا الحصول على بيئة Spring التي تم بها تشغيل اختبار JUnit الخاص بنا من ExtensionContext .
Environment environment = SpringExtension.getApplicationContext(context).getEnvironment();
يمكنك إلقاء نظرة على الكود الكامل لفئة TestEnabledCondition .
إنشاء اختبارات
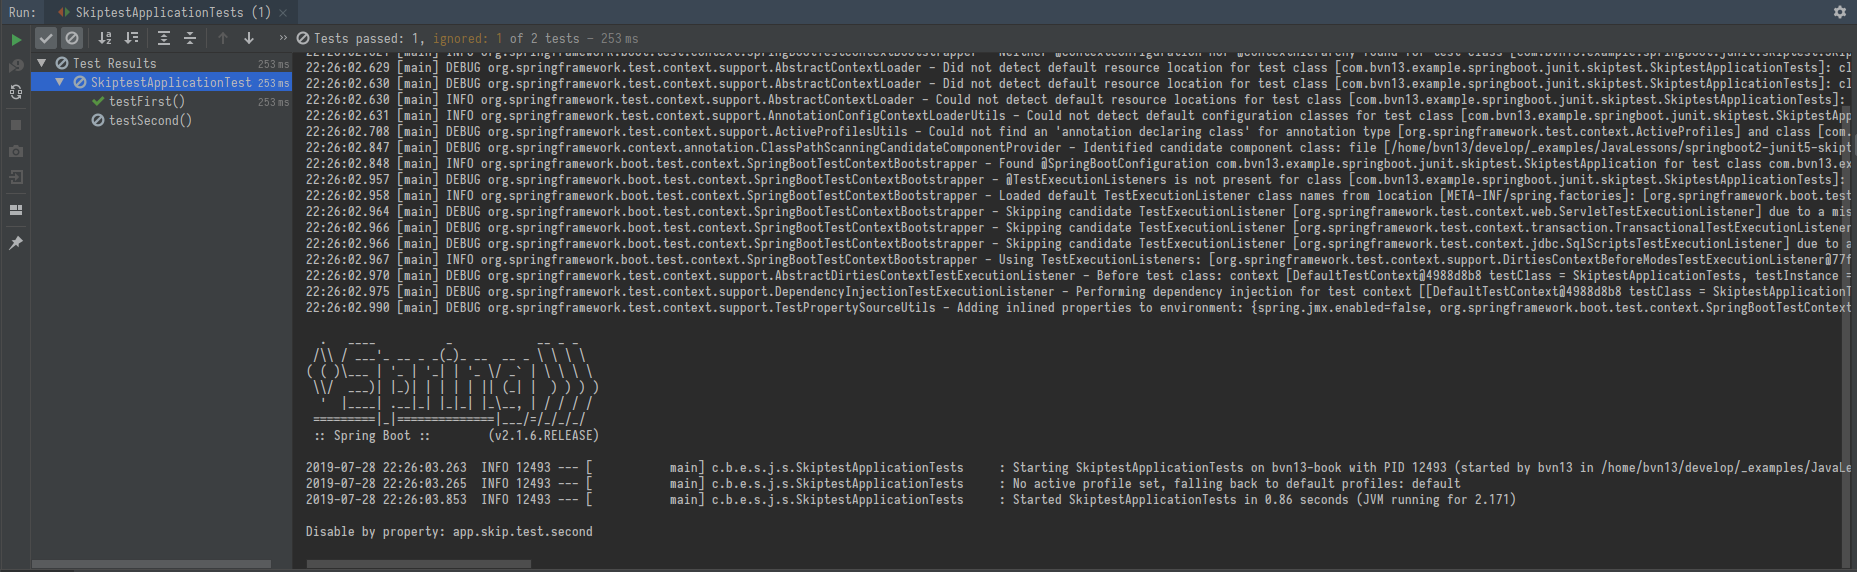
لنقم بإنشاء بعض الاختبارات ومحاولة التحكم في إطلاقها:
@SpringBootTest public class SkiptestApplicationTests { @TestEnabled(property = "app.skip.test.first") @Test public void testFirst() { assertTrue(true); } @TestEnabled(property = "app.skip.test.second") @Test public void testSecond() { assertTrue(false); } }
يبدو ملف application.properties لدينا كما يلي:
app.skip.test.first=true app.skip.test.second=false
لذلك ...
نتيجة بدء التشغيل:
والخطوة التالية هي فصل بادئات فنادقنا في شرح الفصل
كتابة أسماء الخصائص كاملة من application.properties قبل كل اختبار مهمة شاقة. لذلك ، من المعقول وضع بادئة على مستوى فئة الاختبار - في تعليق توضيحي منفصل.
إنشاء تعليق توضيحي لتخزين البادئات - TestEnabledPrefix :
@Target(ElementType.TYPE) @Retention(RetentionPolicy.RUNTIME) public @interface TestEnabledPrefix { String prefix(); }
معالجة واستخدام الشرح TestEnabledPrefix
ننتقل إلى معالجة الشرح الجديد.
دعونا إنشاء فئة مساعد AnnotationDescription
باستخدام هذه الفئة ، يمكننا تخزين اسم الخاصية من application.properties وقيمته.
public class TestEnabledCondition implements ExecutionCondition { static class AnnotationDescription { String name; Boolean annotationEnabled; AnnotationDescription(String prefix, String property) { this.name = prefix + property; } String getName() { return name; } AnnotationDescription setAnnotationEnabled(Boolean value) { this.annotationEnabled = value; return this; } Boolean isAnnotationEnabled() { return annotationEnabled; } } }
هذه الفئة مفيدة لنا ، لأن نحن نستخدم تعبيرات لامدا.
لنقم بإنشاء طريقة لاستخراج قيمة خاصية البادئة من التعليقات التوضيحية لفئة TestEnabledPrefix
public class TestEnabledCondition implements ExecutionCondition { private AnnotationDescription makeDescription(ExtensionContext context, String property) { String prefix = context.getTestClass() .map(cl -> cl.getAnnotation(TestEnabledPrefix.class)) .map(TestEnabledPrefix::prefix) .map(pref -> !pref.isEmpty() && !pref.endsWith(".") ? pref + "." : "") .orElse(""); return new AnnotationDescription(prefix, property); } }
والآن ، دعونا نتحقق من قيمة الخاصية من application.properties بالاسم المحدد في الاختبار التوضيحي
public class TestEnabledCondition implements ExecutionCondition { @Override public ConditionEvaluationResult evaluateExecutionCondition(ExtensionContext context) { Environment environment = SpringExtension.getApplicationContext(context).getEnvironment(); return context.getElement() .map(e -> e.getAnnotation(TestEnabled.class)) .map(TestEnabled::property) .map(property -> makeDescription(context, property)) .map(description -> description.setAnnotationEnabled(environment.getProperty(description.getName(), Boolean.class))) .map(description -> { if (description.isAnnotationEnabled()) { return ConditionEvaluationResult.enabled("Enabled by property: "+description.getName()); } else { return ConditionEvaluationResult.disabled("Disabled by property: "+description.getName()); } }).orElse( ConditionEvaluationResult.enabled("Enabled by default") ); } }
رمز الفصل الكامل متاح هنا.
باستخدام الشرح الجديد
الآن قم بتطبيق التعليق التوضيحي على فئة الاختبار :
@SpringBootTest @TestEnabledPrefix(property = "app.skip.test") public class SkiptestApplicationTests { @TestEnabled(property = "first") @Test public void testFirst() { assertTrue(true); } @TestEnabled(property = "second") @Test public void testSecond() { assertTrue(false); } }
الآن رمز الاختبار لدينا هو أنظف وأبسط.
أود أن أشكر مستخدمي رديت على نصائحهم:
1) dpash للحصول على المشورة
2) BoyRobot777 للحصول على المشورة
PS
المقالة ترجمة. يتم نشر النسخة الإنجليزية في ملف README.md بجانب رمز المشروع.