Python + OpenCV + Keras: جعل التعرف على النص في نصف ساعة

مرحباً هبر.

بعد تجربة قاعدة بيانات مشهورة مكونة من 60000 رقم مكتوب بخط اليد ، MNIST ، ظهر السؤال المنطقي حول ما إذا كان هناك شيء مشابه ، ولكن مع دعم ليس فقط للأرقام ، ولكن أيضًا للأحرف. كما اتضح ، فهناك ، وتسمى هذه القاعدة ، كما قد تتصور ، Extended MNIST (EMNIST).

إذا كان أي شخص مهتمًا بكيفية استخدام قاعدة البيانات هذه ، فيمكنك التعرف على نص بسيط ، مرحبًا بك في cat.


ملاحظة : هذا المثال تجريبي وتعليمي ، كنت مهتمًا فقط برؤية ما يأتي منه. لم أخطط ولا أخطط للقيام ببرنامج FineReader الثاني ، فالكثير من الأشياء هنا ، بالطبع ، لم يتم تنفيذها. لذلك ، لا يتم قبول المطالبات في أسلوب "لماذا" ، "بالفعل أفضل" ، إلخ. من المحتمل وجود مكتبات OCR جاهزة لبايثون بالفعل ، ولكن كان من المثير للاهتمام أن تفعل ذلك بنفسك. بالمناسبة ، بالنسبة لأولئك الذين يرغبون في معرفة كيفية عمل FineReader الحقيقي ، هناك مقالتان على مدونة Habré الخاصة بهم لعام 2014: 1 و 2 (ولكن بالطبع ، بدون أكواد المصدر والتفاصيل ، كما في أي مدونة للشركات). حسنًا ، لنبدأ ، كل شيء مفتوح هنا وكل شيء مفتوح المصدر.

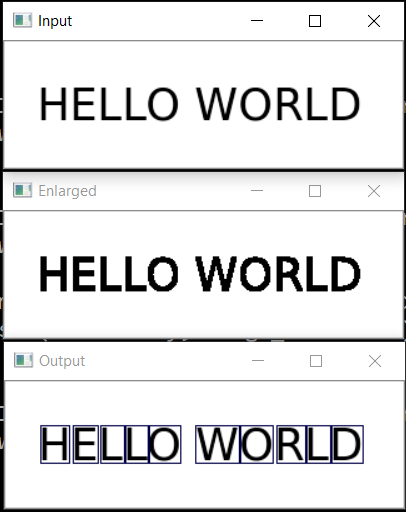
على سبيل المثال سنأخذ النص العادي. هنا واحد:

مرحبا العالم


ودعونا نرى ما الذي يمكن عمله به.

تقسيم النص إلى حروف


الخطوة الأولى هي تقسيم النص إلى حروف منفصلة. يعد OpenCV مفيدًا لهذا ، على نحو أكثر دقة وظيفة findContours الخاصة به.

افتح الصورة (cv2.imread) ، وقم بترجمتها إلى b / w (cv2.cvtColor + cv2.threshold) ، قم بزيادة قليلاً (cv2.erode) وابحث عن الخطوط العريضة.

image_file = "text.png" img = cv2.imread(image_file) gray = cv2.cvtColor(img, cv2.COLOR_BGR2GRAY) ret, thresh = cv2.threshold(gray, 0, 255, cv2.THRESH_BINARY) img_erode = cv2.erode(thresh, np.ones((3, 3), np.uint8), iterations=1) # Get contours contours, hierarchy = cv2.findContours(img_erode, cv2.RETR_TREE, cv2.CHAIN_APPROX_NONE) output = img.copy() for idx, contour in enumerate(contours): (x, y, w, h) = cv2.boundingRect(contour) # print("R", idx, x, y, w, h, cv2.contourArea(contour), hierarchy[0][idx]) # hierarchy[i][0]: the index of the next contour of the same level # hierarchy[i][1]: the index of the previous contour of the same level # hierarchy[i][2]: the index of the first child # hierarchy[i][3]: the index of the parent if hierarchy[0][idx][3] == 0: cv2.rectangle(output, (x, y), (x + w, y + h), (70, 0, 0), 1) cv2.imshow("Input", img) cv2.imshow("Enlarged", img_erode) cv2.imshow("Output", output) cv2.waitKey(0) 

نحصل على شجرة معالم ذات تسلسل هرمي (المعلمة cv2.RETR_TREE). أولاً ، الخطوط العريضة العامة للصورة ، ثم الخطوط العريضة للأحرف ، ثم الخطوط العريضة الداخلية. نحن بحاجة فقط إلى الخطوط العريضة للرسائل ، لذلك أتحقق من أن "المخطط" هو المخطط العام. هذا أسلوب مبسط ، وقد لا ينجح هذا في عمليات الفحص الحقيقية ، على الرغم من أنه ليس من الضروري التعرف على لقطات الشاشة.

النتيجة:


والخطوة التالية هي حفظ كل حرف ، بعد تغيير حجمه مسبقًا إلى مربع 28 × 28 (في هذا التنسيق يتم تخزين قاعدة بيانات MNIST). تم تصميم OpenCV على أساس numpy ، حتى نتمكن من استخدام وظائف العمل مع صفائف للمحاصيل والقياس.

 def letters_extract(image_file: str, out_size=28) -> List[Any]: img = cv2.imread(image_file) gray = cv2.cvtColor(img, cv2.COLOR_BGR2GRAY) ret, thresh = cv2.threshold(gray, 0, 255, cv2.THRESH_BINARY) img_erode = cv2.erode(thresh, np.ones((3, 3), np.uint8), iterations=1) # Get contours contours, hierarchy = cv2.findContours(img_erode, cv2.RETR_TREE, cv2.CHAIN_APPROX_NONE) output = img.copy() letters = [] for idx, contour in enumerate(contours): (x, y, w, h) = cv2.boundingRect(contour) # print("R", idx, x, y, w, h, cv2.contourArea(contour), hierarchy[0][idx]) # hierarchy[i][0]: the index of the next contour of the same level # hierarchy[i][1]: the index of the previous contour of the same level # hierarchy[i][2]: the index of the first child # hierarchy[i][3]: the index of the parent if hierarchy[0][idx][3] == 0: cv2.rectangle(output, (x, y), (x + w, y + h), (70, 0, 0), 1) letter_crop = gray[y:y + h, x:x + w] # print(letter_crop.shape) # Resize letter canvas to square size_max = max(w, h) letter_square = 255 * np.ones(shape=[size_max, size_max], dtype=np.uint8) if w > h: # Enlarge image top-bottom # ------ # ====== # ------ y_pos = size_max//2 - h//2 letter_square[y_pos:y_pos + h, 0:w] = letter_crop elif w < h: # Enlarge image left-right # --||-- x_pos = size_max//2 - w//2 letter_square[0:h, x_pos:x_pos + w] = letter_crop else: letter_square = letter_crop # Resize letter to 28x28 and add letter and its X-coordinate letters.append((x, w, cv2.resize(letter_square, (out_size, out_size), interpolation=cv2.INTER_AREA))) # Sort array in place by X-coordinate letters.sort(key=lambda x: x[0], reverse=False) return letters 

في النهاية ، نقوم بتصنيف الحروف حسب إحداثي X ، تمامًا كما ترى ، نحفظ النتائج في شكل tuple (x ، w ، letter) ، بحيث يمكن تحديد المسافات من المسافات بين الحروف.

تأكد من أن كل شيء يعمل:

 cv2.imshow("0", letters[0][2]) cv2.imshow("1", letters[1][2]) cv2.imshow("2", letters[2][2]) cv2.imshow("3", letters[3][2]) cv2.imshow("4", letters[4][2]) cv2.waitKey(0) 


الرسائل جاهزة للاعتراف بها ، وسوف نتعرف عليها باستخدام شبكة تلافيفية - هذا النوع من الشبكات مناسب تمامًا لمثل هذه المهام.

الشبكة العصبية (CNN) للتعرف عليها


تحتوي مجموعة بيانات مصدر EMNIST على 62 حرفًا مختلفًا (A..Z ، 0..9 ، إلخ):

 emnist_labels = [48, 49, 50, 51, 52, 53, 54, 55, 56, 57, 65, 66, 67, 68, 69, 70, 71, 72, 73, 74, 75, 76, 77, 78, 79, 80, 81, 82, 83, 84, 85, 86, 87, 88, 89, 90, 97, 98, 99, 100, 101, 102, 103, 104, 105, 106, 107, 108, 109, 110, 111, 112, 113, 114, 115, 116, 117, 118, 119, 120, 121, 122] 

بناءً على ذلك ، تحتوي الشبكة العصبية على 62 ناتجًا ، عند الإدخال ، ستتلقى 28 × 28 صورة ، بعد التعرف على "1" سيكون في إخراج الشبكة المقابل.

إنشاء نموذج الشبكة.

 from tensorflow import keras from keras.models import Sequential from keras import optimizers from keras.layers import Convolution2D, MaxPooling2D, Dropout, Flatten, Dense, Reshape, LSTM, BatchNormalization from keras.optimizers import SGD, RMSprop, Adam from keras import backend as K from keras.constraints import maxnorm import tensorflow as tf def emnist_model(): model = Sequential() model.add(Convolution2D(filters=32, kernel_size=(3, 3), padding='valid', input_shape=(28, 28, 1), activation='relu')) model.add(Convolution2D(filters=64, kernel_size=(3, 3), activation='relu')) model.add(MaxPooling2D(pool_size=(2, 2))) model.add(Dropout(0.25)) model.add(Flatten()) model.add(Dense(512, activation='relu')) model.add(Dropout(0.5)) model.add(Dense(len(emnist_labels), activation='softmax')) model.compile(loss='categorical_crossentropy', optimizer='adadelta', metrics=['accuracy']) return model 

كما ترون ، هذه شبكة تلافيفية كلاسيكية تسلط الضوء على ميزات معينة من الصورة (عدد المرشحات 32 و 64) ، حيث يتصل "الإخراج" بشبكة MLP "الخطية" ، والتي تشكل النتيجة النهائية.

تدريب الشبكة العصبية


نمر إلى أطول مرحلة - تدريب الشبكة. للقيام بذلك ، نأخذ قاعدة بيانات EMNIST ، والتي يمكن تنزيلها من الرابط (حجم الأرشيف 536 ميجابايت).

لقراءة قاعدة البيانات ، استخدم مكتبة idx2numpy. سنقوم بإعداد البيانات للتدريب والتحقق من الصحة.

 import idx2numpy emnist_path = '/home/Documents/TestApps/keras/emnist/' X_train = idx2numpy.convert_from_file(emnist_path + 'emnist-byclass-train-images-idx3-ubyte') y_train = idx2numpy.convert_from_file(emnist_path + 'emnist-byclass-train-labels-idx1-ubyte') X_test = idx2numpy.convert_from_file(emnist_path + 'emnist-byclass-test-images-idx3-ubyte') y_test = idx2numpy.convert_from_file(emnist_path + 'emnist-byclass-test-labels-idx1-ubyte') X_train = np.reshape(X_train, (X_train.shape[0], 28, 28, 1)) X_test = np.reshape(X_test, (X_test.shape[0], 28, 28, 1)) print(X_train.shape, y_train.shape, X_test.shape, y_test.shape, len(emnist_labels)) k = 10 X_train = X_train[:X_train.shape[0] // k] y_train = y_train[:y_train.shape[0] // k] X_test = X_test[:X_test.shape[0] // k] y_test = y_test[:y_test.shape[0] // k] # Normalize X_train = X_train.astype(np.float32) X_train /= 255.0 X_test = X_test.astype(np.float32) X_test /= 255.0 x_train_cat = keras.utils.to_categorical(y_train, len(emnist_labels)) y_test_cat = keras.utils.to_categorical(y_test, len(emnist_labels)) 

قمنا بإعداد مجموعتين للتدريب والتحقق من الصحة. الشخصيات نفسها عبارة عن مصفوفات عادية يسهل عرضها:


نستخدم أيضًا 1/10 فقط من مجموعة البيانات للتدريب (المعلمة k) ، وإلا ستستغرق العملية 10 ساعات على الأقل.

نبدأ التدريب على الشبكة ، في نهاية العملية نقوم بحفظ النموذج المدربين على القرص.

 # Set a learning rate reduction learning_rate_reduction = keras.callbacks.ReduceLROnPlateau(monitor='val_acc', patience=3, verbose=1, factor=0.5, min_lr=0.00001) # Required for learning_rate_reduction: keras.backend.get_session().run(tf.global_variables_initializer()) model.fit(X_train, x_train_cat, validation_data=(X_test, y_test_cat), callbacks=[learning_rate_reduction], batch_size=64, epochs=30) model.save('emnist_letters.h5') 

تستغرق عملية التعلم نفسها حوالي نصف ساعة:


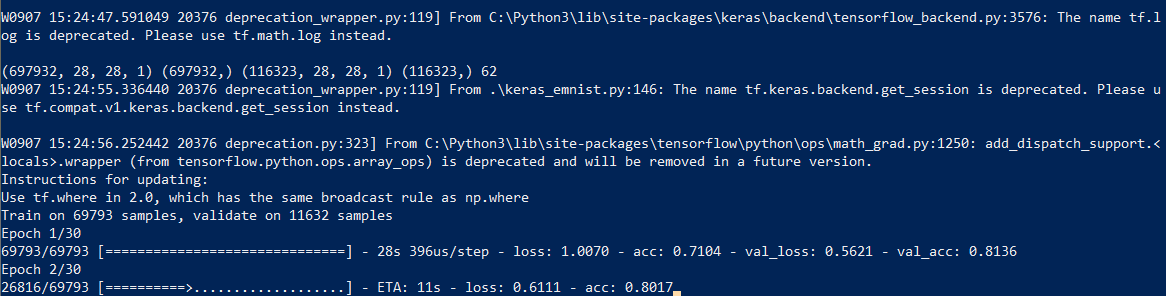
يجب القيام بذلك مرة واحدة فقط ، ثم سنستخدم ملف النموذج المحفوظ بالفعل. عند الانتهاء من التدريب ، كل شيء جاهز ، يمكنك التعرف على النص.

اعتراف


للاعتراف ، نقوم بتحميل النموذج ونستدعي دالة Forecast_classes.

 model = keras.models.load_model('emnist_letters.h5') def emnist_predict_img(model, img): img_arr = np.expand_dims(img, axis=0) img_arr = 1 - img_arr/255.0 img_arr[0] = np.rot90(img_arr[0], 3) img_arr[0] = np.fliplr(img_arr[0]) img_arr = img_arr.reshape((1, 28, 28, 1)) result = model.predict_classes([img_arr]) return chr(emnist_labels[result[0]]) 

كما اتضح ، تم تدوير الصور في مجموعة البيانات مبدئيًا ، لذلك يتعين علينا تدوير الصورة قبل التعرف عليها.

الوظيفة الأخيرة ، التي تستقبل ملفًا به صورة عند الإدخال وتعطي خطًا في الإخراج ، تشغل 10 سطور فقط من الكود:

 def img_to_str(model: Any, image_file: str): letters = letters_extract(image_file) s_out = "" for i in range(len(letters)): dn = letters[i+1][0] - letters[i][0] - letters[i][1] if i < len(letters) - 1 else 0 s_out += emnist_predict_img(model, letters[i][2]) if (dn > letters[i][1]/4): s_out += ' ' return s_out 

نستخدم هنا عرض الأحرف المحفوظة مسبقًا لإضافة مسافات إذا كان التباعد بين الأحرف أكثر من 1/4 من الحرف.

مثال للاستخدام:
 model = keras.models.load_model('emnist_letters.h5') s_out = img_to_str(model, "hello_world.png") print(s_out) 

النتيجة:


ميزة مضحكة هي أن الشبكة العصبية "تخلط" بين الحرف "O" والرقم "0" ، ومع ذلك ، فإنه ليس من المستغرب منذ تحتوي مجموعة EMNIST الأصلية على أحرف وأرقام مكتوبة بخط اليد ليست مثل الحروف المطبوعة تمامًا. من الناحية المثالية ، للتعرف على نصوص الشاشة ، تحتاج إلى إعداد مجموعة منفصلة بناءً على خطوط الشاشة ، وتدريب شبكة عصبية عليها بالفعل.

استنتاج


كما ترون ، ليس الآلهة هم الذين يحرقون الأواني ، وما بدا أنه "سحر" بمساعدة المكتبات الحديثة أصبح بسيطًا للغاية.

نظرًا لأن Python عبارة عن نظام أساسي مشترك ، ستعمل الشفرة في كل مكان ، على أنظمة Windows و Linux و OSX. مثل Keras يتم نقله إلى iOS / Android ، لذلك من الناحية النظرية ، يمكن أيضًا استخدام النموذج المدرب على الأجهزة المحمولة .

بالنسبة لأولئك الذين يرغبون في تجربة من تلقاء أنفسهم ، شفرة المصدر هي تحت المفسد.

keras_emnist.py
 # Code source: dmitryelj@gmail.com import os # Force CPU # os.environ["CUDA_VISIBLE_DEVICES"] = "-1" # Debug messages # 0 = all messages are logged (default behavior) # 1 = INFO messages are not printed # 2 = INFO and WARNING messages are not printed # 3 = INFO, WARNING, and ERROR messages are not printed os.environ['TF_CPP_MIN_LOG_LEVEL'] = '3' import cv2 import imghdr import numpy as np import pathlib from tensorflow import keras from keras.models import Sequential from keras import optimizers from keras.layers import Convolution2D, MaxPooling2D, Dropout, Flatten, Dense, Reshape, LSTM, BatchNormalization from keras.optimizers import SGD, RMSprop, Adam from keras import backend as K from keras.constraints import maxnorm import tensorflow as tf from scipy import io as spio import idx2numpy # sudo pip3 install idx2numpy from matplotlib import pyplot as plt from typing import * import time # Dataset: # https://www.nist.gov/node/1298471/emnist-dataset # https://www.itl.nist.gov/iaui/vip/cs_links/EMNIST/gzip.zip def cnn_print_digit(d): print(d.shape) for x in range(28): s = "" for y in range(28): s += "{0:.1f} ".format(d[28*y + x]) print(s) def cnn_print_digit_2d(d): print(d.shape) for y in range(d.shape[0]): s = "" for x in range(d.shape[1]): s += "{0:.1f} ".format(d[x][y]) print(s) emnist_labels = [48, 49, 50, 51, 52, 53, 54, 55, 56, 57, 65, 66, 67, 68, 69, 70, 71, 72, 73, 74, 75, 76, 77, 78, 79, 80, 81, 82, 83, 84, 85, 86, 87, 88, 89, 90, 97, 98, 99, 100, 101, 102, 103, 104, 105, 106, 107, 108, 109, 110, 111, 112, 113, 114, 115, 116, 117, 118, 119, 120, 121, 122] def emnist_model(): model = Sequential() model.add(Convolution2D(filters=32, kernel_size=(3, 3), padding='valid', input_shape=(28, 28, 1), activation='relu')) model.add(Convolution2D(filters=64, kernel_size=(3, 3), activation='relu')) model.add(MaxPooling2D(pool_size=(2, 2))) model.add(Dropout(0.25)) model.add(Flatten()) model.add(Dense(512, activation='relu')) model.add(Dropout(0.5)) model.add(Dense(len(emnist_labels), activation='softmax')) model.compile(loss='categorical_crossentropy', optimizer='adadelta', metrics=['accuracy']) return model def emnist_model2(): model = Sequential() # In Keras there are two options for padding: same or valid. Same means we pad with the number on the edge and valid means no padding. model.add(Convolution2D(filters=32, kernel_size=(3, 3), activation='relu', padding='same', input_shape=(28, 28, 1))) model.add(MaxPooling2D((2, 2))) model.add(Convolution2D(64, (3, 3), activation='relu', padding='same')) model.add(MaxPooling2D((2, 2))) model.add(Convolution2D(128, (3, 3), activation='relu', padding='same')) model.add(MaxPooling2D((2, 2))) # model.add(Conv2D(128, (3, 3), activation='relu', padding='same')) # model.add(MaxPooling2D((2, 2))) ## model.add(Dropout(0.25)) model.add(Flatten()) model.add(Dense(512, activation='relu')) model.add(Dropout(0.5)) model.add(Dense(len(emnist_labels), activation='softmax')) model.compile(loss='categorical_crossentropy', optimizer='adadelta', metrics=['accuracy']) return model def emnist_model3(): model = Sequential() model.add(Convolution2D(filters=32, kernel_size=(3, 3), padding='same', input_shape=(28, 28, 1), activation='relu')) model.add(Convolution2D(filters=32, kernel_size=(3, 3), padding='same', activation='relu')) model.add(MaxPooling2D(pool_size=(2, 2))) model.add(Dropout(0.25)) model.add(Convolution2D(filters=64, kernel_size=(3, 3), padding='same', activation='relu')) model.add(Convolution2D(filters=64, kernel_size=(3, 3), padding='same', activation='relu')) model.add(MaxPooling2D(pool_size=(2, 2), strides=(2, 2))) model.add(Dropout(0.25)) model.add(Flatten()) model.add(Dense(512, activation="relu")) model.add(Dropout(0.5)) model.add(Dense(len(emnist_labels), activation="softmax")) model.compile(loss='categorical_crossentropy', optimizer=RMSprop(lr=0.001, rho=0.9, epsilon=1e-08, decay=0.0), metrics=['accuracy']) return model def emnist_train(model): t_start = time.time() emnist_path = 'D:\\Temp\\1\\' X_train = idx2numpy.convert_from_file(emnist_path + 'emnist-byclass-train-images-idx3-ubyte') y_train = idx2numpy.convert_from_file(emnist_path + 'emnist-byclass-train-labels-idx1-ubyte') X_test = idx2numpy.convert_from_file(emnist_path + 'emnist-byclass-test-images-idx3-ubyte') y_test = idx2numpy.convert_from_file(emnist_path + 'emnist-byclass-test-labels-idx1-ubyte') X_train = np.reshape(X_train, (X_train.shape[0], 28, 28, 1)) X_test = np.reshape(X_test, (X_test.shape[0], 28, 28, 1)) print(X_train.shape, y_train.shape, X_test.shape, y_test.shape, len(emnist_labels)) # Test: k = 10 X_train = X_train[:X_train.shape[0] // k] y_train = y_train[:y_train.shape[0] // k] X_test = X_test[:X_test.shape[0] // k] y_test = y_test[:y_test.shape[0] // k] # Normalize X_train = X_train.astype(np.float32) X_train /= 255.0 X_test = X_test.astype(np.float32) X_test /= 255.0 x_train_cat = keras.utils.to_categorical(y_train, len(emnist_labels)) y_test_cat = keras.utils.to_categorical(y_test, len(emnist_labels)) # Set a learning rate reduction learning_rate_reduction = keras.callbacks.ReduceLROnPlateau(monitor='val_acc', patience=3, verbose=1, factor=0.5, min_lr=0.00001) # Required for learning_rate_reduction: keras.backend.get_session().run(tf.global_variables_initializer()) model.fit(X_train, x_train_cat, validation_data=(X_test, y_test_cat), callbacks=[learning_rate_reduction], batch_size=64, epochs=30) print("Training done, dT:", time.time() - t_start) def emnist_predict(model, image_file): img = keras.preprocessing.image.load_img(image_file, target_size=(28, 28), color_mode='grayscale') emnist_predict_img(model, img) def emnist_predict_img(model, img): img_arr = np.expand_dims(img, axis=0) img_arr = 1 - img_arr/255.0 img_arr[0] = np.rot90(img_arr[0], 3) img_arr[0] = np.fliplr(img_arr[0]) img_arr = img_arr.reshape((1, 28, 28, 1)) result = model.predict_classes([img_arr]) return chr(emnist_labels[result[0]]) def letters_extract(image_file: str, out_size=28): img = cv2.imread(image_file) gray = cv2.cvtColor(img, cv2.COLOR_BGR2GRAY) ret, thresh = cv2.threshold(gray, 0, 255, cv2.THRESH_BINARY) img_erode = cv2.erode(thresh, np.ones((3, 3), np.uint8), iterations=1) # Get contours contours, hierarchy = cv2.findContours(img_erode, cv2.RETR_TREE, cv2.CHAIN_APPROX_NONE) output = img.copy() letters = [] for idx, contour in enumerate(contours): (x, y, w, h) = cv2.boundingRect(contour) # print("R", idx, x, y, w, h, cv2.contourArea(contour), hierarchy[0][idx]) # hierarchy[i][0]: the index of the next contour of the same level # hierarchy[i][1]: the index of the previous contour of the same level # hierarchy[i][2]: the index of the first child # hierarchy[i][3]: the index of the parent if hierarchy[0][idx][3] == 0: cv2.rectangle(output, (x, y), (x + w, y + h), (70, 0, 0), 1) letter_crop = gray[y:y + h, x:x + w] # print(letter_crop.shape) # Resize letter canvas to square size_max = max(w, h) letter_square = 255 * np.ones(shape=[size_max, size_max], dtype=np.uint8) if w > h: # Enlarge image top-bottom # ------ # ====== # ------ y_pos = size_max//2 - h//2 letter_square[y_pos:y_pos + h, 0:w] = letter_crop elif w < h: # Enlarge image left-right # --||-- x_pos = size_max//2 - w//2 letter_square[0:h, x_pos:x_pos + w] = letter_crop else: letter_square = letter_crop # Resize letter to 28x28 and add letter and its X-coordinate letters.append((x, w, cv2.resize(letter_square, (out_size, out_size), interpolation=cv2.INTER_AREA))) # Sort array in place by X-coordinate letters.sort(key=lambda x: x[0], reverse=False) # cv2.imshow("Input", img) # # cv2.imshow("Gray", thresh) # cv2.imshow("Enlarged", img_erode) # cv2.imshow("Output", output) # cv2.imshow("0", letters[0][2]) # cv2.imshow("1", letters[1][2]) # cv2.imshow("2", letters[2][2]) # cv2.imshow("3", letters[3][2]) # cv2.imshow("4", letters[4][2]) # cv2.waitKey(0) return letters def img_to_str(model: Any, image_file: str): letters = letters_extract(image_file) s_out = "" for i in range(len(letters)): dn = letters[i+1][0] - letters[i][0] - letters[i][1] if i < len(letters) - 1 else 0 s_out += emnist_predict_img(model, letters[i][2]) if (dn > letters[i][1]/4): s_out += ' ' return s_out if __name__ == "__main__": # model = emnist_model() # emnist_train(model) # model.save('emnist_letters.h5') model = keras.models.load_model('emnist_letters.h5') s_out = img_to_str(model, "hello_world.png") print(s_out) 


كالعادة ، كل التجارب الناجحة.

Source: https://habr.com/ru/post/ar466565/


All Articles