في هذا المنشور أردت أن أجري عرضًا تجريبيًا لـ Nginx VTS + Prometheus + Grafana. بالنسبة إلى العرض التوضيحي ، كان من الضروري أن يقوم المنبع بإصدار رموز http مختلفة. يمكن للمشاريع التالية القيام بذلك: Mockify ، مكتوب بلغة Golang ، و WireMock ، مكتوب بلغة Java.
جدول صغير من المحتويات
- تركيب وتكوين Nginx VTS + Prometheus + Grafana ؛
- Mockify هو واجهة برمجة تطبيقات مضاهاة وخفيفة الوزن قابلة للتهيئة مكتوبة بلغة Golang ؛
- مقارنة بين استخدام وحدة المعالجة المركزية لـ Mockify ، مكتوب بلغة Golang ، و WireMock ، مكتوب بلغة Java.
اختبار موقف الجهاز الظاهري:
inxi CPU: 8x Single Core Intel Xeon E312xx (Sandy Bridge) (-SMP-) speed: 2594 MHz Kernel: 3.10.0-957.1.3.el7.x86_64 x86_64 Up: 58m Mem: 474.9/32011.6 MiB (1.5%) Storage: 80.00 GiB (2.7% used) Procs: 149 Shell: bash 4.2.46 inxi: 3.0.35
التكوين بروميثيوس:
global: scrape_interval: 5s # Set the scrape interval to every 15 seconds. Default is every 1 minute. evaluation_interval: 5s # Evaluate rules every 15 seconds. The default is every 1 minute. # scrape_timeout is set to the global default (10s). # Alertmanager configuration alerting: alertmanagers: - static_configs: - targets: # - alertmanager:9093 # Load rules once and periodically evaluate them according to the global 'evaluation_interval'. rule_files: # - "first_rules.yml" # - "second_rules.yml" scrape_configs: - job_name: 'prometheus' static_configs: - targets: ['localhost:9090'] - job_name: 'nginx_vts_exporter' static_configs: - targets: ['localhost:9913']
التكوين غرافانا القياسية. معرف لوحة المعلومات 2949.
بالنسبة إلى Nginx VTS ، تحتاج إلى ترجمة nginx مع الوحدة النمطية nginx-module-vts. نحن نفعل هذا باستخدام Nginx باني . التكوين له:
nginx_version: 1.16.1 output_package: rpm modules: - module: name: nginx-module-vts git_url: https://github.com/vozlt/nginx-module-vts.git git_tag: v0.1.18
تثبيت nginx تجميعها. فيما يلي التكوين الرئيسي (لا تنس تحديد vhost_traffic_status_zone؛):
user nginx; worker_processes auto; worker_rlimit_nofile 40960; error_log /var/log/nginx/error.log warn; pid /var/run/nginx.pid; events { use epoll; worker_connections 1024; multi_accept on; } http { vhost_traffic_status_zone; include /etc/nginx/mime.types; default_type application/octet-stream; log_format main '$remote_addr - $remote_user [$time_local] "$request" ' '$status $body_bytes_sent "$http_referer" ' '"$http_user_agent" "$http_x_forwarded_for"'; #access_log /var/log/nginx/access.log main; access_log off; sendfile on; tcp_nodelay on; tcp_nopush on; keepalive_timeout 65; include /etc/nginx/conf.d/*.conf; open_file_cache max=200000 inactive=20s; open_file_cache_valid 30s; open_file_cache_min_uses 2; open_file_cache_errors on; }
إنشاء تكوينات المضيف الظاهري:
touch vhost1.conf vhost2.conf vhost3.conf vhost4.conf vhost5.conf
محتوياتها:
vhost1.conf:
server { listen 80; server_name vhost1; location / { proxy_pass http://127.0.0.1:8001/102; } }
vhost2.conf:
server { listen 80; server_name vhost2; location / { proxy_pass http://127.0.0.1:8001/204; } }
vhost3.conf:
server { listen 80; server_name vhost3; location / { proxy_pass http://localhost:8001/304; } }
vhost4.conf:
server { listen 80; server_name vhost4; location / { proxy_pass http://localhost:8001/403; } }
vhost5.conf:
server { listen 80; server_name vhost5; location / { proxy_pass http://localhost:8001/503; } }
تثبيت nginx-vts-source:
wget https://github.com/hnlq715/nginx-vts-exporter/releases/download/v0.10.3/nginx-vts-exporter-0.10.3.linux-amd64.tar.gz tar zxvf nginx-vts-exporter-0.10.3.linux-amd64.tar.gz cp nginx-vts-exporter-0.10.3.linux-amd64/nginx-vts-exporter /usr/local/bin/nginx-vts-exporter
قم بإنشاء الملف /etc/systemd/system/nginx_vts_exporter.service:
[Unit] Description=Nginx vts exporter Wants=network-online.target After=network-online.target [Service] ExecStart=/usr/local/bin/nginx-vts-exporter -nginx.scrape_uri=http://localhost:7070/status/format/json Restart=always RestartSec=3 [Install] WantedBy=default.target
قم بإنشاء ملف تكوين VTS /etc/nginx/conf.d/vts-exporter.conf
server { listen 7070; listen [::]:7070; location / { } location /status { vhost_traffic_status_display; vhost_traffic_status_display_format html; } }
أضف DNS للمضيفين الظاهريين إلى / etc / hosts:
127.0.0.1 vhost1 127.0.0.1 vhost2 127.0.0.1 vhost3 127.0.0.1 vhost4 127.0.0.1 vhost5
نقوم بتحسين النواة للاختبار ، حيث أن مهلة السلك قد انتهت مهلة مع عدد كبير من الاتصالات. الآن قد لا يكون ذلك ضروريًا ، لأنه قلل من عدد الاتصالات عند بدء تشغيل معيار apache. قم بإنشاء الملف /etc/sysctl.d/90-nginx.conf مع المحتويات:
fs.file-max=100000 net.netfilter.nf_conntrack_max=1548576 net.ipv4.ip_local_port_range=10000 65000 net.ipv4.tcp_tw_reuse=1 net.core.somaxconn=15600 net.ipv4.tcp_fin_timeout=15 net.ipv4.tcp_tw_recycle=1 net.core.rmem_default=31457280 net.core.rmem_max=12582912 net.core.wmem_default=31457280 net.core.wmem_max=12582912 net.core.netdev_max_backlog=65536 net.core.optmem_max=25165824 net.ipv4.tcp_rmem=8192 87380 16777216 net.ipv4.udp_rmem_min=16384 net.ipv4.tcp_wmem=8192 65536 16777216
تطبيق الإعدادات
sysctl -p /etc/sysctl.d/90-nginx.conf
تثبيت mockify-دورة في الدقيقة
yum -y install yum-plugin-copr yum copr enable antonpatsev/mockify-rpm yum -y install mockify systemctl start mockify
تثبيت Apache Benchmark:
yum install -y httpd-tools
نبدأ اختبار nginx قليلاً:
while true; do ab -c 1 -n 1 -t 1 http://vhost1/; sleep 2; done while true; do ab -c 1 -n 1 -t 1 http://vhost2/; sleep 2; done while true; do ab -c 1 -n 1 -t 1 http://vhost3/; sleep 2; done while true; do ab -c 1 -n 1 -t 1 http://vhost4/; sleep 2; done while true; do ab -c 1 -n 1 -t 1 http://vhost5/; sleep 2; done
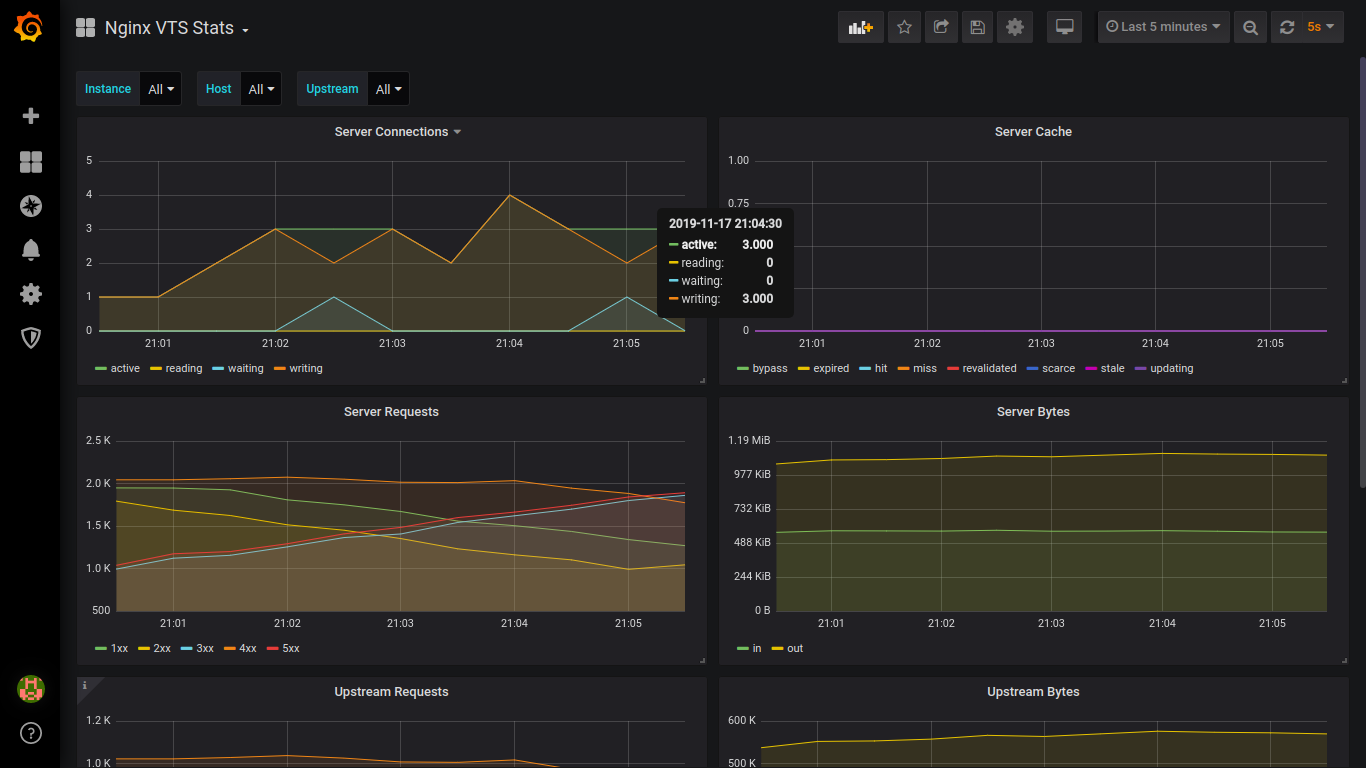
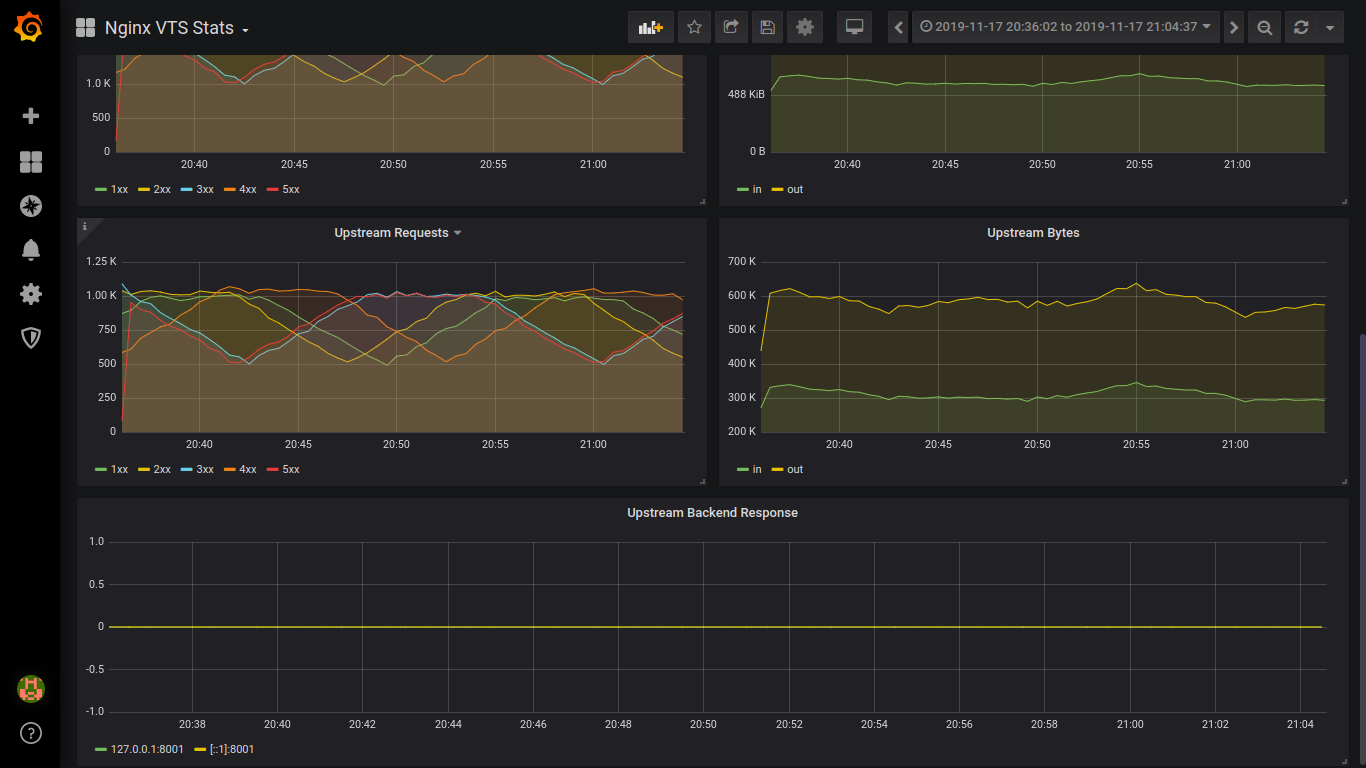
لقطات:


تثبيت wiremock:
yum -y install yum-plugin-copr yum copr enable antonpatsev/wiremock-rpm yum -y install wiremock wiremock-popular-json systemctl start wiremock
أيضًا في ملفات vhost1-vhost5 في nginx ، تحتاج إلى تغيير المنفذ من 8001 إلى 8080.
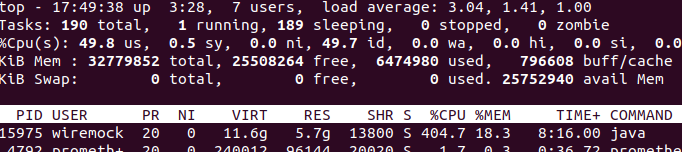
أعتذر عن لقطات الشاشة المسننة.
أدناه هو وحدة المعالجة المركزية و MEM يستهزئ الحمل عند اختبار vhost1-vhost5

أدناه هو وحدة المعالجة المركزية تحميل و MEM wiremock عند اختبار vhost1

أدناه هو وحدة المعالجة المركزية تحميل و MEM wiremock عند اختبار vhost1-vhost2

أدناه هو تحميل wiremock وحدة المعالجة المركزية و MEM عند اختبار vhost1-vhost3

أدناه هو وحدة المعالجة المركزية تحميل و MEM wiremock عند اختبار vhost1-vhost4

يوجد أدناه وحدة تحميل wiremock CPU و MEM عند اختبار vhost1-vhost5. في بعض الأحيان نما الحمل على وحدة المعالجة المركزية يصل إلى 700 ٪.
الاستنتاجات:
وفقًا لـ Nginx VTS ، أود الحصول على مزيد من المقاييس دون تحرير التهيئة
بواسطة Wiremock vs Mockify: استخدم Mockify. ويستخدم أقل وحدة المعالجة المركزية و MEM.
وأخيرًا ، تجميع تطبيقات Golang في Fedora Copr باستخدام مثال Mockify.
استخدم مستودع https://github.com/patsevanton/mockify-rpm كمثال.