In diesem Beitrag wollte ich eine Demo von Nginx VTS + Prometheus + Grafana machen. Für die Demo war es notwendig, dass der Upstream unterschiedliche http-Codes ausgeben konnte. Die folgenden Projekte könnten dies tun: Mockify , geschrieben in Golang, und WireMock , geschrieben in Java.
Ein kleines Inhaltsverzeichnis
- Installation und Konfiguration von Nginx VTS + Prometheus + Grafana;
- Mockify ist eine kompakte, konfigurierbare Emulations-API, die in Golang geschrieben wurde.
- Vergleich der CPU-Auslastung für Mockify in Golang und WireMock in Java.
Virtuelle Maschine des Prüfstands:
inxi CPU: 8x Single Core Intel Xeon E312xx (Sandy Bridge) (-SMP-) speed: 2594 MHz Kernel: 3.10.0-957.1.3.el7.x86_64 x86_64 Up: 58m Mem: 474.9/32011.6 MiB (1.5%) Storage: 80.00 GiB (2.7% used) Procs: 149 Shell: bash 4.2.46 inxi: 3.0.35
Config prometheus:
global: scrape_interval: 5s # Set the scrape interval to every 15 seconds. Default is every 1 minute. evaluation_interval: 5s # Evaluate rules every 15 seconds. The default is every 1 minute. # scrape_timeout is set to the global default (10s). # Alertmanager configuration alerting: alertmanagers: - static_configs: - targets: # - alertmanager:9093 # Load rules once and periodically evaluate them according to the global 'evaluation_interval'. rule_files: # - "first_rules.yml" # - "second_rules.yml" scrape_configs: - job_name: 'prometheus' static_configs: - targets: ['localhost:9090'] - job_name: 'nginx_vts_exporter' static_configs: - targets: ['localhost:9913']
Grafana Standard konfigurieren. Dashboard-ID 2949.
Für Nginx VTS müssen Sie nginx mit dem Modul nginx-module-vts kompilieren. Wir machen das mit dem Nginx-Builder . Seine Konfig:
nginx_version: 1.16.1 output_package: rpm modules: - module: name: nginx-module-vts git_url: https://github.com/vozlt/nginx-module-vts.git git_tag: v0.1.18
Installieren Sie den zusammengebauten Nginx. Hier ist die Hauptkonfiguration (vergessen Sie nicht, vhost_traffic_status_zone anzugeben;):
user nginx; worker_processes auto; worker_rlimit_nofile 40960; error_log /var/log/nginx/error.log warn; pid /var/run/nginx.pid; events { use epoll; worker_connections 1024; multi_accept on; } http { vhost_traffic_status_zone; include /etc/nginx/mime.types; default_type application/octet-stream; log_format main '$remote_addr - $remote_user [$time_local] "$request" ' '$status $body_bytes_sent "$http_referer" ' '"$http_user_agent" "$http_x_forwarded_for"'; #access_log /var/log/nginx/access.log main; access_log off; sendfile on; tcp_nodelay on; tcp_nopush on; keepalive_timeout 65; include /etc/nginx/conf.d/*.conf; open_file_cache max=200000 inactive=20s; open_file_cache_valid 30s; open_file_cache_min_uses 2; open_file_cache_errors on; }
Erstellen Sie virtuelle Host-Konfigurationen:
touch vhost1.conf vhost2.conf vhost3.conf vhost4.conf vhost5.conf
Ihre Inhalte:
vhost1.conf:
server { listen 80; server_name vhost1; location / { proxy_pass http://127.0.0.1:8001/102; } }
vhost2.conf:
server { listen 80; server_name vhost2; location / { proxy_pass http://127.0.0.1:8001/204; } }
vhost3.conf:
server { listen 80; server_name vhost3; location / { proxy_pass http://localhost:8001/304; } }
vhost4.conf:
server { listen 80; server_name vhost4; location / { proxy_pass http://localhost:8001/403; } }
vhost5.conf:
server { listen 80; server_name vhost5; location / { proxy_pass http://localhost:8001/503; } }
Installieren Sie nginx-vts-exporter:
wget https://github.com/hnlq715/nginx-vts-exporter/releases/download/v0.10.3/nginx-vts-exporter-0.10.3.linux-amd64.tar.gz tar zxvf nginx-vts-exporter-0.10.3.linux-amd64.tar.gz cp nginx-vts-exporter-0.10.3.linux-amd64/nginx-vts-exporter /usr/local/bin/nginx-vts-exporter
Erstellen Sie die Datei /etc/systemd/system/nginx_vts_exporter.service:
[Unit] Description=Nginx vts exporter Wants=network-online.target After=network-online.target [Service] ExecStart=/usr/local/bin/nginx-vts-exporter -nginx.scrape_uri=http://localhost:7070/status/format/json Restart=always RestartSec=3 [Install] WantedBy=default.target
Erstellen Sie die VTS-Konfigurationsdatei /etc/nginx/conf.d/vts-exporter.conf
server { listen 7070; listen [::]:7070; location / { } location /status { vhost_traffic_status_display; vhost_traffic_status_display_format html; } }
Fügen Sie DNS von virtuellen Hosts zu / etc / hosts hinzu:
127.0.0.1 vhost1 127.0.0.1 vhost2 127.0.0.1 vhost3 127.0.0.1 vhost4 127.0.0.1 vhost5
Wir optimieren den Kernel zum Testen, da wiremock bei einer großen Anzahl von Verbindungen ein Timeout ausgegeben hat. Jetzt ist dies möglicherweise nicht mehr erforderlich, da die Anzahl der Verbindungen beim Starten des Apache-Benchmarks reduziert wurde. Erstellen Sie die Datei /etc/sysctl.d/90-nginx.conf mit dem Inhalt:
fs.file-max=100000 net.netfilter.nf_conntrack_max=1548576 net.ipv4.ip_local_port_range=10000 65000 net.ipv4.tcp_tw_reuse=1 net.core.somaxconn=15600 net.ipv4.tcp_fin_timeout=15 net.ipv4.tcp_tw_recycle=1 net.core.rmem_default=31457280 net.core.rmem_max=12582912 net.core.wmem_default=31457280 net.core.wmem_max=12582912 net.core.netdev_max_backlog=65536 net.core.optmem_max=25165824 net.ipv4.tcp_rmem=8192 87380 16777216 net.ipv4.udp_rmem_min=16384 net.ipv4.tcp_wmem=8192 65536 16777216
Einstellungen übernehmen
sysctl -p /etc/sysctl.d/90-nginx.conf
Installieren Sie mockify-rpm
yum -y install yum-plugin-copr yum copr enable antonpatsev/mockify-rpm yum -y install mockify systemctl start mockify
Installieren Sie Apache Benchmark:
yum install -y httpd-tools
Wir beginnen mit einem kleinen Nginx-Test:
while true; do ab -c 1 -n 1 -t 1 http://vhost1/; sleep 2; done while true; do ab -c 1 -n 1 -t 1 http://vhost2/; sleep 2; done while true; do ab -c 1 -n 1 -t 1 http://vhost3/; sleep 2; done while true; do ab -c 1 -n 1 -t 1 http://vhost4/; sleep 2; done while true; do ab -c 1 -n 1 -t 1 http://vhost5/; sleep 2; done
Screenshots:
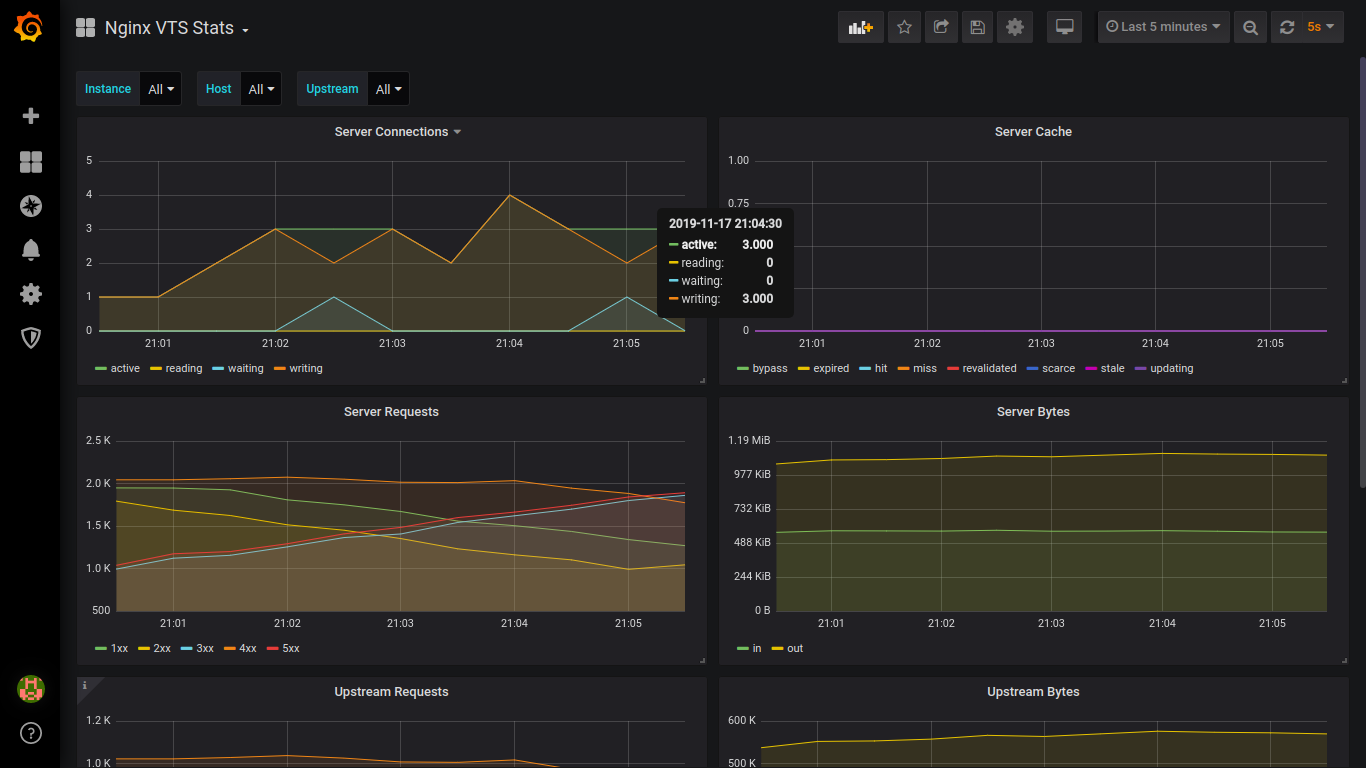


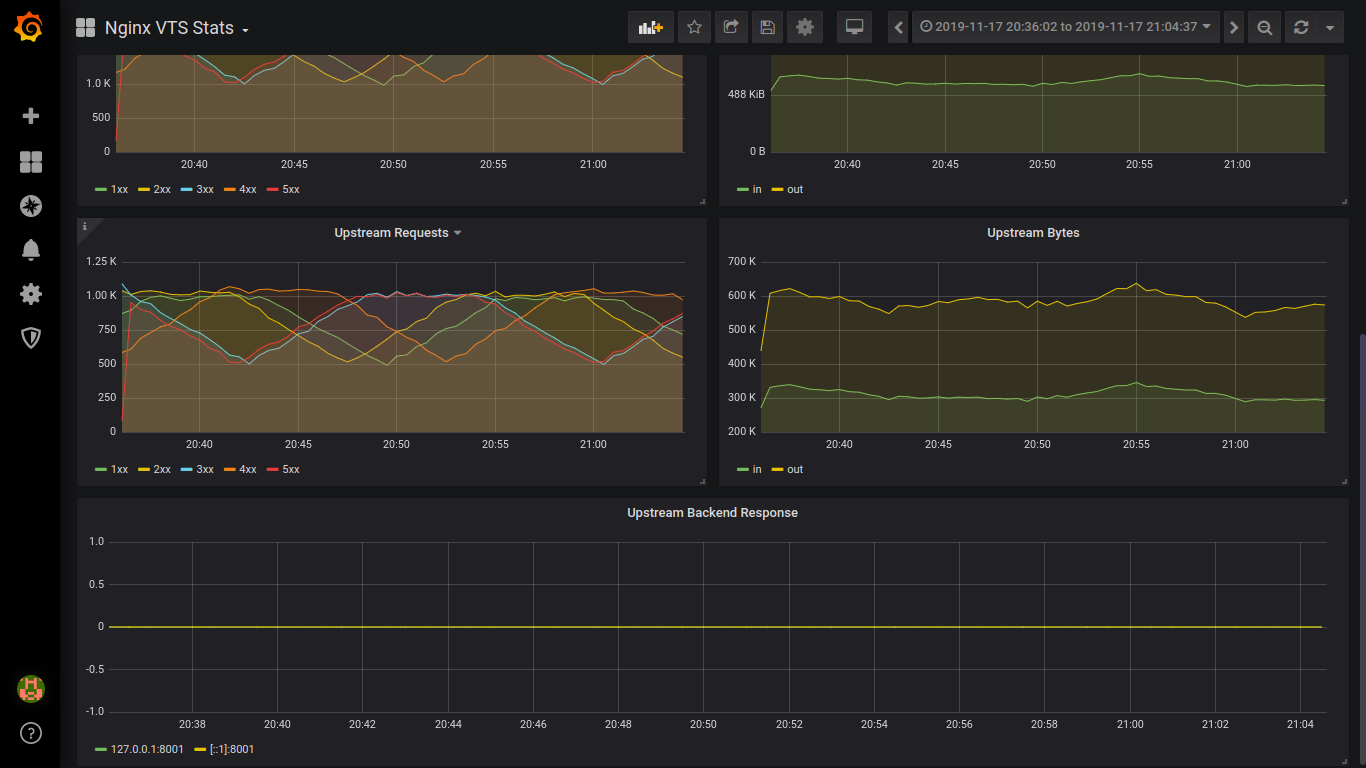
Installieren Sie wiremock:
yum -y install yum-plugin-copr yum copr enable antonpatsev/wiremock-rpm yum -y install wiremock wiremock-popular-json systemctl start wiremock
Auch in den Dateien vhost1-vhost5 in nginx müssen Sie den Port von 8001 auf 8080 ändern.
Ich entschuldige mich für die gezackten Screenshots.
Unten sehen Sie die CPU- und MEM-Mockify-Last beim Testen von vhost1-vhost5

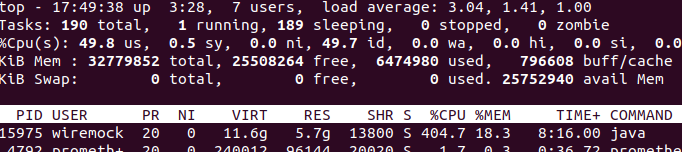
Unten ist die CPU-Auslastung und MEM-Wiremock beim Testen von vhost1 aufgeführt

Unten sehen Sie die CPU-Auslastung und den MEM-Wiremock beim Testen von vhost1-vhost2

Unten sehen Sie die CPU- und MEM-Wiremock-Last beim Testen von vhost1-vhost3

Unten sehen Sie die CPU-Auslastung und den MEM-Wiremock beim Testen von vhost1-vhost4

Unten sehen Sie die CPU- und MEM-Wiremock-Last beim Testen von vhost1-vhost5. Manchmal stieg die CPU-Last auf bis zu 700%.
Schlussfolgerungen:
Laut Nginx VTS hätte ich gerne mehr Metriken, ohne die Konfiguration zu bearbeiten.
By Wiremock vs Mockify: benutze Mockify. Es verbraucht weniger CPU und MEM.
Und schließlich die Zusammenstellung von Golang-Anwendungen in Fedora Copr am Beispiel von Mockify.
Verwenden Sie als Beispiel das Repository https://github.com/patsevanton/mockify-rpm .