Encontré una manera de hacer amigos con un aire acondicionado (u otro dispositivo controlado por un control remoto) y una casa inteligente, o hacer el control de este dispositivo, por ejemplo, desde un celular.
En teoría, solo conecte el esp8266 (alrededor de $ 2 del chino) al LED infrarrojo, complete el firmware y listo.

En la práctica, resultó ser algo más complicado, porque mi revisión esp-01 tuvo que soldar (algo
como esto ) el cableado a la pata de un microcircuito de 5 * 5 mm, con salida de un GPIO adicional. Recomiendo usar una revisión anterior, por ejemplo ESP-12.
Para los lectores que no estén familiarizados con esp8266, les sugiero que lean
este artículo .
Componentes y Módulos
*
Revisión Esp8266 esp-01*
FT232RL: Adaptador TTL USB a serie 232 + cables para conexión
*
Fotodetector Tsop 4838*
Regulador de 3.3v*
Transistor S9014* LED infrarrojo 5013IRAB (longitud de onda 940 nm)
* Resistencia de 330 ohmios
*
Junta de proyecto* Soldador, soldadura, fundente.
* Para trabajar con IR
se utiliza la notable
biblioteca IRremoteESP8266 . Autores Mark Szabo, Sebastien Warin, Ken Shirriff.
Códigos de ahorro
* Conecte el
fotodetector , VCC a +3.3, GND a cero, OUT a GPIO.
* Abra un ejemplo para descargar códigos de nuestra biblioteca \ IRremoteESP8266 \ examples \ IRrecvDump \ IRrecvDump.ino
* Si es necesario, cambie el número de pin al que conectamos la SALIDA del fotodetector (línea "int RECV_PIN = 2;").
* Rellene el firmware. Estamos conectados a la salida del módulo. Alternativamente, mantenga presionados los botones del control remoto para los códigos de volcado.
Para el respiradero Tion O2, obtuve los siguientes códigos:
Abajo
16711935
NEC decodificado: FF00FF (32 bits)
- arriba
16724175
NEC decodificado: FF30CF (32 bits)
- Establecer
16722135
NEC decodificado: FF28D7 (32 bits)
- poder
16720095
NEC decodificado: FF20DF (32 bits)
El fotodetector ya no es necesario hasta que necesite "tomar" el código de otro control remoto.
Gestión de dispositivos
* Conecte el LED IR de acuerdo con el esquema.
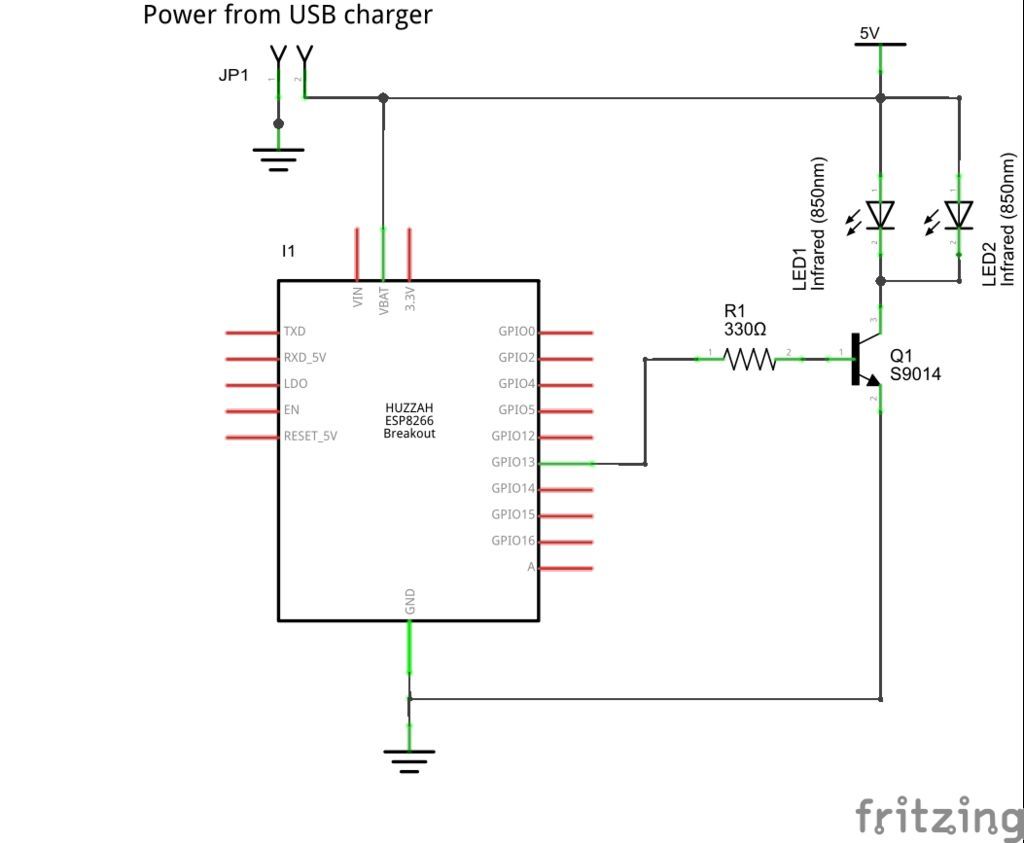
(Imagen tomada de Fritzing)
GPIO se puede usar de manera diferente. Desde un voltaje de 3.3v, el LED también funciona normalmente.
UPD: Como se señala correctamente en los comentarios, es aconsejable usar una
resistencia limitadora de corriente .
* El firmware de demostración con el servidor está aquí
\ IRremoteESP8266 \ examples \ IRServer \ IRServer.ino
* Cambie el nombre y la contraseña de su punto de acceso para que esp pueda conectarse a él. Y también la cantidad de GPIO utilizada
const char* ssid = ".....";
const char* password = ".....";
IRsend irsend(0);
* Módulo de firmware.
* Cuando se conecta a la consola, se mostrará la dirección IP asignada por esp.
Ahora puede enviar el código ingresando en el navegador una dirección del formulario
192.168.1.1/ir?code=16720095 (solo sustituya la IP y el código deseados).
Código de firmware de actualización de aire #include <ESP8266WiFi.h> #include <WiFiClient.h> #include <ESP8266WebServer.h> #include <ESP8266mDNS.h> #include <IRremoteESP8266.h> const char* ssid = "FFFF"; const char* password = "XXXX"; unsigned long last_cmd_send_time = 0; MDNSResponder mdns; ESP8266WebServer server(80); const char* serverIndex = "<form method='POST' action='/update' enctype='multipart/form-data'><input type='file' name='update'><input type='submit' value='Update'></form>"; // IRsend irsend(2); IRsend irsend(13); void handleRoot() { server.send(200, "text/html", "<html><head> <title>ESP8266 Demo (Web Update)</title></head><body><h1>Hello from ESP8266, you can send NEC encoded IR signals from here!</h1><p><a href=\"ir?code=16769055\">Send 0xFFE01F</a></p><p><a href=\"ir?code=16429347\">Send 0xFAB123</a></p><p><a href=\"ir?code=16771222\">Send 0xFFE896</a></p></body></html>"); } void handleIr(){ for (uint8_t i=0; i<server.args(); i++){ if(server.argName(i) == "code") { unsigned long code = server.arg(i).toInt(); irsend.sendNEC(code, 32); } } handleRoot(); } void handleSeq(){ unsigned long code = 0; unsigned long cnt = 0; unsigned long dl = 0; unsigned long nwt = 0; for (uint8_t i=0; i<server.args(); i++){ if(server.argName(i) == "code") { code = server.arg(i).toInt(); } if(server.argName(i) == "count") { cnt = server.arg(i).toInt(); } if(server.argName(i) == "delay") { dl = server.arg(i).toInt(); } if(server.argName(i) == "need_wait") { nwt = server.arg(i).toInt(); } } if (nwt > 0){ unsigned long wt = millis() - last_cmd_send_time; if (wt < nwt && wt > 0) { delay(nwt - wt); } } if (code != 0) { for (uint8_t i=0; i<cnt; i++){ irsend.sendNEC(code, 32); delay(dl); } } last_cmd_send_time = millis(); handleRoot(); } void handleNotFound(){ String message = "File Not Found\n\n"; message += "URI: "; message += server.uri(); message += "\nMethod: "; message += (server.method() == HTTP_GET)?"GET":"POST"; message += "\nArguments: "; message += server.args(); message += "\n"; for (uint8_t i=0; i<server.args(); i++){ message += " " + server.argName(i) + ": " + server.arg(i) + "\n"; } server.send(404, "text/plain", message); } void setup(void){ irsend.begin(); Serial.begin(115200); WiFi.mode(WIFI_AP_STA); WiFi.begin(ssid, password); Serial.println(""); // Wait for connection while (WiFi.status() != WL_CONNECTED) { delay(500); Serial.print("."); } Serial.println(""); Serial.print("Connected to "); Serial.println(ssid); Serial.print("IP address: "); Serial.println(WiFi.localIP()); if (mdns.begin("esp8266", WiFi.localIP())) { Serial.println("MDNS responder started"); } server.on("/", handleRoot); server.on("/ir", handleIr); server.on("/seq", handleSeq); server.on("/inline", [](){ server.send(200, "text/plain", "this works as well"); }); server.on("/update", HTTP_GET, [](){ server.sendHeader("Connection", "close"); server.sendHeader("Access-Control-Allow-Origin", "*"); server.send(200, "text/html", serverIndex); }); server.on("/update", HTTP_POST, [](){ server.sendHeader("Connection", "close"); server.sendHeader("Access-Control-Allow-Origin", "*"); server.send(200, "text/plain", (Update.hasError())?"FAIL":"OK"); ESP.restart(); },[](){ HTTPUpload& upload = server.upload(); if(upload.status == UPLOAD_FILE_START){ Serial.setDebugOutput(true); WiFiUDP::stopAll(); Serial.printf("Update: %s\n", upload.filename.c_str()); uint32_t maxSketchSpace = (ESP.getFreeSketchSpace() - 0x1000) & 0xFFFFF000; if(!Update.begin(maxSketchSpace)){//start with max available size Update.printError(Serial); } } else if(upload.status == UPLOAD_FILE_WRITE){ if(Update.write(upload.buf, upload.currentSize) != upload.currentSize){ Update.printError(Serial); } } else if(upload.status == UPLOAD_FILE_END){ if(Update.end(true)){ //true to set the size to the current progress Serial.printf("Update Success: %u\nRebooting...\n", upload.totalSize); } else { Update.printError(Serial); } Serial.setDebugOutput(false); } yield(); }); server.onNotFound(handleNotFound); server.begin(); Serial.println("HTTP server started"); } void loop(void){ server.handleClient(); }
Hice esta página para la conveniencia de administrar mi respiración.
brizer.html <html> <head> <script> function sendIR(str) { if (str.length == 0) { </script> </head> <body> <div id="demo"> <button type="button" onclick="sendIR('ir?code=16724175')">Up</button> <button type="button" onclick="sendIR('ir?code=16711935')">Down</button> <button type="button" onclick="sendIR('ir?code=16722135')">Set</button> <button type="button" onclick="sendIR('ir?code=16720095')">Power</button> <button type="button" onclick="sendIR('seq?need_wait=11000&code=16722135&count=2&delay=20');sendIR('seq?code=16711935&count=50&delay=20');sendIR('seq?code=16724175&count=21&delay=20')">day</button> <button type="button" onclick="sendIR('seq?need_wait=11000&code=16722135&count=2&delay=20');sendIR('seq?code=16711935&count=50&delay=20');sendIR('seq?code=16724175&count=35&delay=20')">night</button> <a href="http://192.168.0.193/update">update</a> </div> </body> </html>
Específicamente, en mi caso, el respirador funciona con el control remoto de manera inusual, la primera vez que "se despierta", enciende la luz de fondo y solo después de eso comienza a recibir comandos. Cuando vale la pena considerar la automatización.
Espero que esta instrucción sea útil para alguien. Por favor comparta el firmware actualizado.