1. Reequipamiento
1.1. ¿Qué es la modificación?
Retrofit es un cliente REST para Java y Android. Facilita la obtención y carga de JSON (u otros datos estructurados) a través de un servicio web basado en REST. En Retrofit, configura qué convertidor se utiliza para serializar datos. Por lo general, GSon se usa para JSON, pero puede agregar sus propios convertidores para procesar XML u otros protocolos. Retrofit usa la biblioteca OkHttp para solicitudes HTTP.
Puede crear objetos Java basados en JSON utilizando la siguiente herramienta: www.jsonschema2pojo.org Esto puede ser útil para crear estructuras de datos Java complejas a partir de JSON existentes.
1.2. Usando Retrofit
Para trabajar con Retrofit, necesitará las siguientes tres clases:
- Clase de modelo que se usa como modelo JSON
- Interfaces que identifican posibles operaciones HTTP
- La clase Retrofit.Builder es una instancia que utiliza la interfaz y la API de Builder para definir una definición de punto final de URL para operaciones HTTP.
Cada método de interfaz representa una de las posibles llamadas a la API. Debe tener una anotación HTTP (GET, POST, etc.) para indicar el tipo de solicitud y la URL relativa. El valor de retorno completa la respuesta en el objeto Llamar con el tipo de resultado esperado.
@GET("users") Call<List<User>> getUsers();
Puede usar los bloques de reemplazo y los parámetros de consulta para configurar la URL. El bloque de reemplazo se agrega a la URL relativa usando {}. Usando la anotación @ Path para un parámetro de método, el valor de este parámetro está vinculado a un bloque de reemplazo específico.
@GET("users/{name}/commits") Call<List<Commit>> getCommitsByName(@Path("name") String name);
Los parámetros de consulta se agregan utilizando la anotación @ Consulta al parámetro del método. Se agregan automáticamente al final de la URL.
@GET("users") Call<User> getUserById(@Query("id") Integer id);
La anotación @ Body para el parámetro del método le dice a Retrofit que use el objeto como el cuerpo de la solicitud para llamar.
@POST("users") Call<User> postUser(@Body User user)
2. Prerrequisitos
Los siguientes ejemplos usan el IDE de Eclipse con el sistema de compilación Gradle.
Este ejercicio supone que está familiarizado con
Gradle y
con Gradle con Eclipse .
Otros entornos de desarrollo, como Visual Studio Code o IntelliJ, hacen lo mismo, por lo que puede usar su herramienta favorita.
3. Ejercicio: primer cliente de modificación
En este ejercicio, creará un cliente REST independiente. Las respuestas son generadas por el servidor Mock.
3.1. Crear y configurar un proyecto
Cree un nuevo proyecto de Gradle llamado com.vogella.retrofitgerrit. Agregue un nuevo paquete a src / main / java llamado com.vogella.retrofitgerrit.
Agregue las siguientes dependencias al archivo build.gradle.
// retrofit implementation 'com.squareup.retrofit2:retrofit:2.1.0' implementation 'com.squareup.retrofit2:converter-gson:2.1.0' // Junit testImplementation("org.junit.jupiter:junit-jupiter-api:5.0.0") testRuntime("org.junit.jupiter:junit-jupiter-engine:5.0.0") // to run JUnit 3/4 tests: testImplementation("junit:junit:4.12") testRuntime("org.junit.vintage:junit-vintage-engine:4.12.0")
3.2. Definir API y Adaptador de actualización
En la respuesta JSON de Gerrit, solo nos interesa la cuestión de los cambios. Por lo tanto, cree la siguiente clase de datos en el paquete predeterminado agregado anteriormente.
package com.vogella.java.retrofitgerrit; public class Change { String subject; public String getSubject() { return subject; } public void setSubject(String subject) { this.subject = subject; } }
Defina la API REST para Retrofit a través de la siguiente interfaz.
package com.vogella.java.retrofitgerrit; import java.util.List; import retrofit2.Call; import retrofit2.http.GET; import retrofit2.http.Query; public interface GerritAPI { @GET("changes/") Call<List<Change>> loadChanges(@Query("q") String status); }
Cree la siguiente clase de controlador. Esta clase crea un cliente Retrofit, llama a la API de Gerrit y procesa el resultado (imprime el resultado de la llamada a la consola).
package com.vogella.java.retrofitgerrit; import java.util.List; import com.google.gson.Gson; import com.google.gson.GsonBuilder; import retrofit2.Call; import retrofit2.Callback; import retrofit2.Response; import retrofit2.Retrofit; import retrofit2.converter.gson.GsonConverterFactory; public class Controller implements Callback<List<Change>> { static final String BASE_URL = "https://git.eclipse.org/r/"; public void start() { Gson gson = new GsonBuilder() .setLenient() .create(); Retrofit retrofit = new Retrofit.Builder() .baseUrl(BASE_URL) .addConverterFactory(GsonConverterFactory.create(gson)) .build(); GerritAPI gerritAPI = retrofit.create(GerritAPI.class); Call<List<Change>> call = gerritAPI.loadChanges("status:open"); call.enqueue(this); } @Override public void onResponse(Call<List<Change>> call, Response<List<Change>> response) { if(response.isSuccessful()) { List<Change> changesList = response.body(); changesList.forEach(change -> System.out.println(change.subject)); } else { System.out.println(response.errorBody()); } } @Override public void onFailure(Call<List<Change>> call, Throwable t) { t.printStackTrace(); } }
Cree una clase con un método principal para iniciar el controlador.
package com.vogella.java.retrofitgerrit; public class Main { public static void main(String[] args) { Controller controller = new Controller(); controller.start(); } }
4. Adaptadores y convertidores de adaptación
4.1. Convertidores de modificación
La actualización se puede configurar para usar un convertidor específico. Este convertidor maneja (des) serialización de datos. Varios convertidores ya están disponibles para varios formatos de serialización.
- Para convertir a JSON y viceversa:
- Gson: com.squareup.retrofit: converter-gson
- Jackson: com.squareup.retrofit: converter-jackson
- Moshi: com.squareup.retrofit: converter-moshi
- Para convertir a Buffers de protocolo y viceversa:
- Protobuf: com.squareup.retrofit: converter-protobuf
- Wire: com.squareup.retrofit: converter-wire
- Para convertir a XML y viceversa:
- XML simple: com.squareup.retrofit: converter-simplexml
Además de los convertidores enumerados, también puede crear los suyos para procesar otros protocolos extendiendo la clase Converter.Factory.
4.2. Adaptadores de retroadaptación
La actualización también se puede ampliar con adaptadores para interactuar con otras bibliotecas como RxJava 2.x, Java 8 y Guava.
Puede encontrar una descripción general de los adaptadores disponibles en Github
square / retrofit / retrofit-adapters / .
Por ejemplo, el adaptador RxJava 2.x se puede conectar usando Gradle:
compile 'com.squareup.retrofit2:adapter-rxjava2:latest.version'
o usando Apache Maven:
<dependency> <groupId>com.squareup.retrofit2</groupId> <artifactId>adapter-rxjava2</artifactId> <version>latest.version</version> </dependency>
Para agregar un adaptador, debe usar el método retrofit2.Retrofit.Builder.addCallAdapterFactory (Factory).
Retrofit retrofit = new Retrofit.Builder() .baseUrl("https://api.example.com/") .addCallAdapterFactory(RxJava2CallAdapterFactory.create()) .build();
Usando este adaptador, las interfaces de Retrofit pueden devolver tipos RxJava 2.x, por ejemplo, Observable, Flowable o Single, etc.
@GET("users") Observable<List<User>> getUsers();
5. Autenticación de modificación
Retrofit admite llamadas API que requieren autenticación. La autenticación se puede hacer usando un nombre de usuario y contraseña (autenticación básica HTTP) o un token API.
Hay dos formas de administrar la autenticación. El primer método es administrar el encabezado de la solicitud mediante anotaciones. Otra forma es usar un interceptor OkHttp para esto.
5.1. Autenticación con anotaciones
Suponga que desea solicitar información sobre un usuario para el que se requiere autenticación. Puede hacer esto agregando un nuevo parámetro a la definición de API, por ejemplo:
@GET("user") Call<UserDetails> getUserDetails(@Header("Authorization") String credentials)
Usando la anotación @ Encabezado ("Autorización"), le dice a Retrofit que agregue el encabezado de Autorización a la solicitud con el valor que está pasando.
Para generar credenciales para la autenticación básica, puede usar la clase de credenciales OkHttps con su método base (String, String). El método acepta un nombre de usuario y una contraseña y devuelve las credenciales de autenticación para el esquema Http Basic.
Credentials.basic("ausername","apassword");
Si desea usar el token API y no usar el esquema básico, simplemente llame al método getUserDetails (String) con su token.
5.2. Autenticación con interceptores OkHttp.
El método anterior agrega credenciales solo si solicita datos de usuario. Si tiene más llamadas que requieren autenticación, puede usar un interceptor para hacer esto. Se utiliza un interceptor para modificar cada solicitud antes de que se ejecute y establece el encabezado de la solicitud. La ventaja es que no necesita agregar @ Header ("Autorización") a cada definición de método de API.
Para agregar un interceptor, debe usar el método okhttp3.OkHttpClient.Builder.addInterceptor (Interceptor) en OkHttp Builder.
OkHttpClient okHttpClient = new OkHttpClient().newBuilder().addInterceptor(new Interceptor() { @Override public okhttp3.Response intercept(Chain chain) throws IOException { Request originalRequest = chain.request(); Request.Builder builder = originalRequest.newBuilder().header("Authorization", Credentials.basic("aUsername", "aPassword")); Request newRequest = builder.build(); return chain.proceed(newRequest); } }).build();
El cliente creado por OkHttp debe agregarse a su cliente Retrofit utilizando el método retrofit2.Retrofit.Builder.client (OkHttpClient).
Retrofit retrofit = new Retrofit.Builder() .baseUrl("https://api.example.com/") .client(okHttpClient) .build();
Como habrás notado, la clase Credenciales se usa aquí para la autorización básica.
Nuevamente, si desea usar el token API, solo use el token.
6. Ejercicio: uso de Retrofit para solicitar Gerrit en Java
La siguiente sección describe cómo crear una aplicación Java mínima que utiliza Retrofit para recuperar objetos abiertos de cambio de la API de Gerrit. Los resultados se imprimen en la consola.
6.1. Crear y configurar un proyecto
Este ejercicio asume que está familiarizado con
Gradle y
Buildship para Eclipse .
Cree un nuevo proyecto de Gradle llamado com.vogella.java.retrofitgerrit. Agregue un nuevo paquete a src / main / java llamado com.vogella.java.retrofitgerrit.
Agregue las siguientes dependencias al archivo build.gradle.
// retrofit implementation 'com.squareup.retrofit2:retrofit:2.1.0' implementation 'com.squareup.retrofit2:converter-gson:2.1.0' // Junit testImplementation("org.junit.jupiter:junit-jupiter-api:5.0.0") testRuntime("org.junit.jupiter:junit-jupiter-engine:5.0.0") // to run JUnit 3/4 tests: testImplementation("junit:junit:4.12") testRuntime("org.junit.vintage:junit-vintage-engine:4.12.0")
6.2. Definir API y Adaptador de actualización
En la respuesta JSON de Gerrit, solo nos interesa la cuestión de los cambios. Por lo tanto, cree la siguiente clase de datos en el paquete predeterminado agregado anteriormente.
package com.vogella.java.retrofitgerrit; public class Change { String subject; public String getSubject() { return subject; } public void setSubject(String subject) { this.subject = subject; } }
Defina la API REST para Retrofit utilizando la siguiente interfaz.
package com.vogella.java.retrofitgerrit; import java.util.List; import retrofit2.Call; import retrofit2.http.GET; import retrofit2.http.Query; public interface GerritAPI { @GET("changes/") Call<List<Change>> loadChanges(@Query("q") String status); }
Cree la siguiente clase de controlador. Esta clase crea un cliente Retrofit, llama a la API de Gerrit y procesa el resultado (imprime el resultado de la llamada a la consola).
package com.vogella.java.retrofitgerrit; import java.util.List; import com.google.gson.Gson; import com.google.gson.GsonBuilder; import retrofit2.Call; import retrofit2.Callback; import retrofit2.Response; import retrofit2.Retrofit; import retrofit2.converter.gson.GsonConverterFactory; public class Controller implements Callback<List<Change>> { static final String BASE_URL = "https://git.eclipse.org/r/"; public void start() { Gson gson = new GsonBuilder() .setLenient() .create(); Retrofit retrofit = new Retrofit.Builder() .baseUrl(BASE_URL) .addConverterFactory(GsonConverterFactory.create(gson)) .build(); GerritAPI gerritAPI = retrofit.create(GerritAPI.class); Call<List<Change>> call = gerritAPI.loadChanges("status:open"); call.enqueue(this); } @Override public void onResponse(Call<List<Change>> call, Response<List<Change>> response) { if(response.isSuccessful()) { List<Change> changesList = response.body(); changesList.forEach(change -> System.out.println(change.subject)); } else { System.out.println(response.errorBody()); } } @Override public void onFailure(Call<List<Change>> call, Throwable t) { t.printStackTrace(); } }
Cree una clase con un método principal para iniciar el controlador.
package com.vogella.java.retrofitgerrit; public class Main { public static void main(String[] args) { Controller controller = new Controller(); controller.start(); } }
7. Ejercicio: uso de Retrofit para convertir una respuesta XML de una fuente RSS
Esta sección describe cómo usar Retrofit para transformar una respuesta XML usando SimpleXMLConverter.
Se crea una aplicación Java mínima que solicita el feed RSS de Vogella (
http://vogella.com/article.rss ) e imprime el nombre del canal, el título y los enlaces del artículo.
7.1. Crear y configurar un proyecto
Este ejercicio asume que está familiarizado con
Gradle y
Buildship para Eclipse .
Cree un nuevo proyecto de Gradle llamado com.vogella.java.retrofitxml. Agregue un nuevo paquete a src / main / java llamado com.vogella.java.retrofitxml.
Agregue las siguientes dependencias al archivo build.gradle.
implementation 'com.squareup.retrofit2:retrofit:2.1.0' implementation 'com.squareup.retrofit2:converter-simplexml:2.1.0'
7.2. Definir una vista XML
Un feed RSS es el siguiente:
<?xml version="1.0" encoding="UTF-8"?> <rss version="2.0"> <channel> <title>Eclipse and Android Information</title> <link>http://www.vogella.com</link> <description>Eclipse and Android Information</description> <language>en</language> <copyright>Creative Commons Attribution-NonCommercial-ShareAlike 3.0 Germany (CC BY-NC-SA 3.0)</copyright> <pubDate>Tue, 03 May 2016 11:46:11 +0200</pubDate> <item> <title>Android user interface testing with Espresso - Tutorial</title> <description> This tutorial describes how to test Android applications with the Android Espresso testing framework.</description> <link>http://www.vogella.com/tutorials/AndroidTestingEspresso/article.html</link> <author>lars.vogel@vogella.com (Lars Vogel)</author> <guid>http://www.vogella.com/tutorials/AndroidTestingEspresso/article.html</guid> </item> <item> <title>Using the Gradle build system in the Eclipse IDE - Tutorial</title> <description>This article describes how to use the Gradle tooling in Eclipse</description> <link>http://www.vogella.com/tutorials/EclipseGradle/article.html</link> <author>lars.vogel@vogella.com (Lars Vogel)</author> <guid>http://www.vogella.com/tutorials/EclipseGradle/article.html</guid> </item> <item> <title>Unit tests with Mockito - Tutorial</title> <description>This tutorial explains testing with the Mockito framework for writting software tests.</description> <link>http://www.vogella.com/tutorials/Mockito/article.html</link> <author>lars.vogel@vogella.com (Lars Vogel)</author> <guid>http://www.vogella.com/tutorials/Mockito/article.html</guid> </item> </channel> </rss>
Además del encabezado XML, este archivo consta de varios elementos XML. Un elemento RSS contiene un elemento de canal que contiene otros elementos (por ejemplo, título, descripción, pubDate) y varios elementos de elementos (artículos).
Cree las siguientes dos clases de datos: RSSFeed y Article.
package com.vogella.java.retrofitxml; import org.simpleframework.xml.Element; import org.simpleframework.xml.Root; @Root(name = "item", strict = false) public class Article { @Element(name = "title") private String title; @Element(name = "link") private String link; public String getTitle() { return title; } public void setTitle(String title) { this.title = title; } public String getLink() { return link; } public void setLink(String link) { this.link = link; } }
package com.vogella.java.retrofitxml; import java.util.List; import org.simpleframework.xml.Element; import org.simpleframework.xml.ElementList; import org.simpleframework.xml.Path; import org.simpleframework.xml.Root; @Root(name="rss", strict=false) public class RSSFeed { @Element(name="title") @Path("channel") private String channelTitle; @ElementList(name="item", inline=true) @Path("channel") private List<Article> articleList; public String getChannelTitle() { return channelTitle; } public void setChannelTitle(String channelTitle) { this.channelTitle = channelTitle; } public List<Article> getArticleList() { return articleList; } public void setArticleList(List<Article> articleList) { this.articleList = articleList; } }
La clase Artículo representa un artículo y conserva solo el título y el enlace al artículo. Estos son los únicos campos que nos interesan.
Annotation @ Root marca una clase como sujeta a (des) serialización. Opcionalmente, puede especificar un nombre en la anotación @ Root que coincida con el nombre del elemento XML. Si no se especifica ningún nombre, el nombre de la clase se usa como el nombre del elemento XML. Dado que el nombre de la clase (RSSFeed) es diferente del nombre del elemento XML (rss), debemos especificar el nombre.
Cuando estricto se establece en falso, el análisis estricto está deshabilitado. Esto le dice al analizador que no interrumpa ni arroje una excepción si se encuentra un elemento o atributo XML para el que no se proporciona ninguna asignación. Como el elemento rss tiene un atributo de versión para el que no hay un campo correspondiente, la aplicación generará un error si el parámetro estricto no se establece en falso.
Usando la anotación @ Element, se representa un elemento XML. Si es necesario, puede especificar el nombre XML del elemento representado por este campo. Si no se especifica ningún nombre, se utiliza el nombre del campo.
El campo articleList se anota con @ ElementList. Esto muestra que este campo se utiliza para almacenar una colección (en nuestro caso: Lista) de elementos XML con el mismo nombre. Cuando en línea se establece en verdadero, esto significa que los elementos de la colección se enumeran uno tras otro inmediatamente dentro del elemento especificado y no tienen un elemento primario intermedio.
Usando la anotación @ Path, puede especificar la ruta a un elemento XML dentro del árbol XML. Esto es útil si no desea modelar un árbol XML completo con objetos Java. Para el nombre del canal y varios elementos-elemento, podemos apuntar directamente a elementos específicos en el elemento-canal.
7.3. Definición de una API y un adaptador de actualización
Defina la API REST para Retrofit a través de la siguiente interfaz.
package com.vogella.java.retrofitxml; import retrofit2.Call; import retrofit2.http.GET; public interface VogellaAPI { @GET("article.rss") Call<RSSFeed> loadRSSFeed(); }
Cree la siguiente clase de controlador. Esta clase crea un cliente Retrofit, llama a la API de Vogella y procesa el resultado.
package com.vogella.java.retrofitxml; import retrofit2.Call; import retrofit2.Callback; import retrofit2.Response; import retrofit2.Retrofit; import retrofit2.converter.simplexml.SimpleXmlConverterFactory; public class Controller implements Callback<RSSFeed> { static final String BASE_URL = "http://vogella.com/"; public void start() { Retrofit retrofit = new Retrofit.Builder().baseUrl(BASE_URL) .addConverterFactory(SimpleXmlConverterFactory.create()).build(); VogellaAPI vogellaAPI = retrofit.create(VogellaAPI.class); Call<RSSFeed> call = vogellaAPI.loadRSSFeed(); call.enqueue(this); } @Override public void onResponse(Call<RSSFeed> call, Response<RSSFeed> response) { if (response.isSuccessful()) { RSSFeed rss = response.body(); System.out.println("Channel title: " + rss.getChannelTitle()); rss.getArticleList().forEach( article -> System.out.println("Title: " + article.getTitle() + " Link: " + article.getLink())); } else { System.out.println(response.errorBody()); } } @Override public void onFailure(Call<RSSFeed> call, Throwable t) { t.printStackTrace(); } }
El último paso es crear una clase con un método principal para iniciar el controlador.
package com.vogella.java.retrofitxml; public class Application { public static void main(String[] args) { Controller ctrl = new Controller(); ctrl.start(); } }
8. Ejercicio: creación de una aplicación para solicitar StackOverflow
StackOverflow es un sitio popular para problemas relacionados con la programación. También proporciona una API REST, bien documentada en
la página de la API Stackoverflow .
En este ejercicio, utilizará la biblioteca REST Retrofit. Lo usará para consultar las preguntas de la etiqueta StackOverflow y sus respuestas.
En nuestro ejemplo, utilizamos la siguiente URL de solicitud. Abra esta URL en un navegador y mire la respuesta.
https://api.stackexchange.com/2.2/search?order=desc&sort=votes&tagged=android&site=stackoverflow
8.1. Crear y configurar un proyecto
Cree una aplicación de Android llamada com.vogella.android.stackoverflow. Use com.vogella.android.stackoverflow como nombre de un paquete de nivel superior.
Agregue las siguientes dependencias al archivo build.gradle.
compile "com.android.support:recyclerview-v7:25.3.1" compile 'com.google.code.gson:gson:2.8.1'
8.2. Crear un modelo de datos
Estamos interesados en preguntas y respuestas de Stackoverflow. Para este propósito, cree las siguientes dos clases de datos.
package com.vogella.android.stackoverflow; import com.google.gson.annotations.SerializedName; public class Question { public String title; public String body; @SerializedName("question_id") public String questionId; @Override public String toString() { return(title); } }
package com.vogella.android.stackoverflow; import com.google.gson.annotations.SerializedName; public class Answer { @SerializedName("answer_id") public int answerId; @SerializedName("is_accepted") public boolean accepted; public int score; @Override public String toString() { return answerId + " - Score: " + score + " - Accepted: " + (accepted ? "Yes" : "No"); } }
8.3. Crear actividad y maquetación
Establezca activity_main.xml para su actividad.
<?xml version="1.0" encoding="utf-8"?> <LinearLayout xmlns:android="http://schemas.android.com/apk/res/android" xmlns:tools="http://schemas.android.com/tools" android:id="@+id/activity_main" android:layout_width="match_parent" android:layout_height="match_parent" android:layout_margin="8dp" android:orientation="vertical" tools:context="com.vogella.android.stackoverflow.MainActivity"> <Spinner android:id="@+id/questions_spinner" android:layout_width="match_parent" android:layout_height="wrap_content" /> <android.support.v7.widget.RecyclerView android:id="@+id/list" android:layout_width="match_parent" android:layout_height="0dp" android:layout_weight="1" /> <Button android:id="@+id/authenticate_button" android:layout_width="match_parent" android:layout_height="wrap_content" android:onClick="onClick" android:text="Authenticate" /> </LinearLayout>
Agregue la clase de vista de reciclador de adaptador denominada RecyclerViewAdapter a su proyecto.
Una posible implementación es la siguiente.
package com.vogella.android.stackoverflow; import android.support.v7.widget.RecyclerView; import android.view.LayoutInflater; import android.view.View; import android.view.ViewGroup; import android.widget.TextView; import java.util.List; public class RecyclerViewAdapter extends RecyclerView.Adapter<RecyclerViewAdapter.ViewHolder> { private List<Answer> data; public class ViewHolder extends RecyclerView.ViewHolder { public TextView text; public ViewHolder(View v) { super(v); text = (TextView) v.findViewById(android.R.id.text1); } } public RecyclerViewAdapter(List<Answer> data) { this.data = data; } @Override public RecyclerViewAdapter.ViewHolder onCreateViewHolder(ViewGroup parent, int viewType) { View v; v = LayoutInflater.from(parent.getContext()).inflate(android.R.layout.simple_selectable_list_item, parent, false); return new ViewHolder(v); } @Override public void onBindViewHolder(RecyclerViewAdapter.ViewHolder holder, int position) { Answer answer = ((Answer) data.get(position)); holder.text.setText(answer.toString()); holder.itemView.setTag(answer.answerId); } @Override public int getItemCount() { return data.size(); } }
Modifique la clase MainActivity de la siguiente manera:
package com.vogella.android.stackoverflow; import android.app.Activity; import android.content.Intent; import android.os.Bundle; import android.support.v7.widget.LinearLayoutManager; import android.support.v7.widget.RecyclerView; import android.util.Log; import android.view.View; import android.widget.AdapterView; import android.widget.ArrayAdapter; import android.widget.Button; import android.widget.Spinner; import android.widget.Toast; import java.util.ArrayList; import java.util.List; public class MainActivity extends Activity implements View.OnClickListener { private String token; private Button authenticateButton; private Spinner questionsSpinner; private RecyclerView recyclerView; protected void onCreate(Bundle savedInstanceState) { super.onCreate(savedInstanceState); setContentView(R.layout.activity_main); questionsSpinner = (Spinner) findViewById(R.id.questions_spinner); questionsSpinner.setOnItemSelectedListener(new AdapterView.OnItemSelectedListener() { @Override public void onItemSelected(AdapterView<?> parent, View view, int position, long id) { Toast.makeText(MainActivity.this, "Spinner item selected", Toast.LENGTH_LONG).show(); } @Override public void onNothingSelected(AdapterView<?> parent) { } }); authenticateButton = (Button) findViewById(R.id.authenticate_button); recyclerView = (RecyclerView) findViewById(R.id.list); recyclerView.setHasFixedSize(true); recyclerView.setLayoutManager(new LinearLayoutManager(MainActivity.this)); } @Override protected void onResume() { super.onResume(); if (token != null) { authenticateButton.setEnabled(false); } } @Override public void onClick(View v) { switch (v.getId()) { case android.R.id.text1: if (token != null) {
8.4. Usar un proveedor de datos falsos
Cree un proveedor de datos falsos y llene la ruleta con preguntas falsas y la vista del reciclador con respuestas falsas (después de cambiar la selección en la ruleta).
package com.vogella.android.stackoverflow; import java.util.ArrayList; import java.util.List; public class FakeDataProvider { public static List<Question> getQuestions(){ List<Question> questions = new ArrayList<>(); for (int i = 0; i<10; i++) { Question question = new Question(); question.questionId = String.valueOf(i); question.title = String.valueOf(i); question.body = String.valueOf(i) + "Body"; questions.add(question); } return questions; } public static List<Answer> getAnswers(){ List<Answer> answers = new ArrayList<>(); for (int i = 0; i<10; i++) { Answer answer = new Answer(); answer.answerId = i; answer.accepted = false; answer.score = i; answers.add(answer); } return answers; } }
Ahora configure la vista giratoria y recicladora para usar estos datos falsos.
package com.vogella.android.stackoverflow; import android.app.Activity; import android.content.Intent; import android.os.Bundle; import android.support.v7.widget.LinearLayoutManager; import android.support.v7.widget.RecyclerView; import android.view.View; import android.widget.AdapterView; import android.widget.ArrayAdapter; import android.widget.Button; import android.widget.Spinner; import android.widget.Toast; import java.util.List; public class MainActivity extends Activity implements View.OnClickListener { private String token; private Button authenticateButton; private Spinner questionsSpinner; private RecyclerView recyclerView; protected void onCreate(Bundle savedInstanceState) { super.onCreate(savedInstanceState); setContentView(R.layout.activity_main); questionsSpinner = (Spinner) findViewById(R.id.questions_spinner); questionsSpinner.setOnItemSelectedListener(new AdapterView.OnItemSelectedListener() { @Override public void onItemSelected(AdapterView<?> parent, View view, int position, long id) { Toast.makeText(MainActivity.this, "Spinner item selected", Toast.LENGTH_LONG).show(); } @Override public void onNothingSelected(AdapterView<?> parent) { } }); List<Question> questions = FakeDataProvider.getQuestions(); ArrayAdapter<Question> arrayAdapter = new ArrayAdapter<Question>(MainActivity.this, android.R.layout.simple_spinner_dropdown_item, questions); questionsSpinner.setAdapter(arrayAdapter); authenticateButton = (Button) findViewById(R.id.authenticate_button); recyclerView = (RecyclerView) findViewById(R.id.list); recyclerView.setHasFixedSize(true); recyclerView.setLayoutManager(new LinearLayoutManager(MainActivity.this)); List<Answer> answers = FakeDataProvider.getAnswers(); RecyclerViewAdapter adapter = new RecyclerViewAdapter(answers); recyclerView.setAdapter(adapter); } @Override protected void onResume() { super.onResume(); if (token != null) { authenticateButton.setEnabled(false); } } @Override public void onClick(View v) { switch (v.getId()) { case android.R.id.text1: if (token != null) {
8.5. Agregar dependencias y permisos de Gradle
Agregue las siguientes dependencias al archivo build.gradle. implementation 'com.squareup.retrofit2:retrofit:2.1.0' implementation 'com.squareup.retrofit2:converter-gson:2.1.0'
Agregue permiso para acceder a Internet en el manifiesto. <?xml version="1.0" encoding="utf-8"?> <manifest xmlns:android="http://schemas.android.com/apk/res/android" package="com.vogella.android.stackoverflow"> <uses-permission android:name="android.permission.INTERNET"/> <application android:allowBackup="true" android:icon="@mipmap/ic_launcher" android:label="@string/app_name" android:supportsRtl="true" android:theme="@style/AppTheme"> <activity android:name=".MainActivity"> <intent-filter> <action android:name="android.intent.action.MAIN" /> <category android:name="android.intent.category.LAUNCHER" /> </intent-filter> </activity> </application> </manifest>
8.6. Definición de una API y un adaptador de actualización
La API de Stackoverflow envuelve respuestas o preguntas en un objeto JSON llamado elementos. Para manejar esto, cree la siguiente clase de datos llamada ListWrapper. Esto es necesario para procesar el contenedor de elementos Stackoverflow. Esta clase toma un parámetro de tipo y simplemente empaqueta una lista de objetos de este tipo. package com.vogella.android.stackoverflow; import java.util.List; public class ListWrapper<T> { List<T> items; }
Defina la API REST para Retrofit a través de la siguiente interfaz. package com.vogella.android.stackoverflow; import java.util.List; import okhttp3.ResponseBody; import retrofit2.http.Field; import retrofit2.http.FormUrlEncoded; import retrofit2.http.GET; import retrofit2.http.POST; import retrofit2.http.Path; import retrofit2.Call; public interface StackOverflowAPI { String BASE_URL = "https://api.stackexchange.com/"; @GET("/2.2/questions?order=desc&sort=votes&site=stackoverflow&tagged=android&filter=withbody") Call<ListWrapper<Question>> getQuestions(); @GET("/2.2/questions/{id}/answers?order=desc&sort=votes&site=stackoverflow") Call<ListWrapper<Answer>> getAnswersForQuestion(@Path("id") String questionId); }
8.7. Ajuste de la actividad
Cambie el código MainActivity de la siguiente manera. package com.vogella.android.stackoverflow; import android.app.Activity; import android.content.Intent; import android.os.Bundle; import android.support.v7.widget.LinearLayoutManager; import android.support.v7.widget.RecyclerView; import android.util.Log; import android.view.View; import android.widget.AdapterView; import android.widget.ArrayAdapter; import android.widget.Button; import android.widget.Spinner; import android.widget.Toast; import com.google.gson.Gson; import com.google.gson.GsonBuilder; import java.util.ArrayList; import java.util.List; import okhttp3.ResponseBody; import retrofit2.Call; import retrofit2.Callback; import retrofit2.Response; import retrofit2.Retrofit; import retrofit2.converter.gson.GsonConverterFactory; public class MainActivity extends Activity implements View.OnClickListener { private StackOverflowAPI stackoverflowAPI; private String token; private Button authenticateButton; private Spinner questionsSpinner; private RecyclerView recyclerView; protected void onCreate(Bundle savedInstanceState) { super.onCreate(savedInstanceState); setContentView(R.layout.activity_main); questionsSpinner = (Spinner) findViewById(R.id.questions_spinner); questionsSpinner.setOnItemSelectedListener(new AdapterView.OnItemSelectedListener() { @Override public void onItemSelected(AdapterView<?> parent, View view, int position, long id) { Question question = (Question) parent.getAdapter().getItem(position); stackoverflowAPI.getAnswersForQuestion(question.questionId).enqueue(answersCallback); } @Override public void onNothingSelected(AdapterView<?> parent) { } }); authenticateButton = (Button) findViewById(R.id.authenticate_button); recyclerView = (RecyclerView) findViewById(R.id.list); recyclerView.setHasFixedSize(true); recyclerView.setLayoutManager(new LinearLayoutManager(MainActivity.this)); createStackoverflowAPI(); stackoverflowAPI.getQuestions().enqueue(questionsCallback); } @Override protected void onResume() { super.onResume(); if (token != null) { authenticateButton.setEnabled(false); } } private void createStackoverflowAPI() { Gson gson = new GsonBuilder() .setDateFormat("yyyy-MM-dd'T'HH:mm:ssZ") .create(); Retrofit retrofit = new Retrofit.Builder() .baseUrl(StackOverflowAPI.BASE_URL) .addConverterFactory(GsonConverterFactory.create(gson)) .build(); stackoverflowAPI = retrofit.create(StackOverflowAPI.class); } @Override public void onClick(View v) { switch (v.getId()) { case android.R.id.text1: if (token != null) {
8.8. Opcional: obtener una imagen de perfil de usuario
Cambie el diseño de las líneas en la vista del reciclador para mostrar también la imagen de perfil del usuario. Extienda su modelo de datos para obtener una imagen de perfil del usuario que respondió la pregunta. Agregue un ImageView a las líneas de diseño y use la biblioteca Glide para cargar la imagen.8.9. Opcional: use diferentes diseños para líneas pares e impares
Cambie la implementación del adaptador para usar diferentes diseños para líneas pares e impares.Esto requiere la creación de diferentes diseños basados en el tipo de datos. Use getItemViewType () en el adaptador.8.10. Opcional: manejo de errores de red
Si experimenta una falla en la red, muestre el botón volver a solicitar en lugar de la interfaz de usuario principal.9. Ejercicio: uso de Retrofit para acceder a la API de GitHub en Android
Este ejercicio describe cómo enumerar todos los repositorios de GitHub para un usuario en una aplicación de Android usando Retrofit. Puede seleccionar el repositorio de la lista desplegable y especificar las discusiones relacionadas con el usuario para el repositorio seleccionado.Luego, puede seleccionar una discusión del campo desplegable adicional y publicar un comentario al respecto. DialogFragment se usará para ingresar credenciales para la autenticación.Asegúrese de tener una cuenta de Github, ya que esto es necesario para este ejercicio. Dado que Retrofit se usará con RxJava2 durante este ejercicio, también preste atención al Tutorial de RxJava2 .9.1. Configuración del proyecto
Crea una aplicación de Android llamada Retrofit Github. Use com.vogella.android.retrofitgithub como el nombre del paquete de nivel superior y use una plantilla vacía. Asegúrese de que la marca "Compatibilidad con versiones anteriores" esté marcada.Para usar Retrofit y RxJava2 CallAdapter , agregue las siguientes dependencias al archivo build.gradle implementation 'com.squareup.retrofit2:retrofit:2.3.0' implementation 'com.squareup.retrofit2:converter-gson:2.3.0' implementation 'com.squareup.retrofit2:adapter-rxjava2:2.3.0' implementation 'io.reactivex.rxjava2:rxandroid:2.0.1'
Agregue permiso para acceder a Internet en el manifiesto. <?xml version="1.0" encoding="utf-8"?> <manifest xmlns:android="http://schemas.android.com/apk/res/android" package="com.vogella.android.retrofitgithub"> <uses-permission android:name="android.permission.INTERNET"/> <application android:allowBackup="true" android:icon="@mipmap/ic_launcher" android:label="@string/app_name" android:supportsRtl="true" android:theme="@style/AppTheme"> <activity android:name="com.vogella.android.retrofitgithub.MainActivity"> <intent-filter> <action android:name="android.intent.action.MAIN" /> <category android:name="android.intent.category.LAUNCHER" /> </intent-filter> </activity> </application> </manifest>
9.2. Definición de API
Cree las siguientes dos clases de datos: GithubIssue y GithubRepo. package com.vogella.android.retrofitgithub; import com.google.gson.annotations.SerializedName; public class GithubIssue { String id; String title; String comments_url; @SerializedName("body") String comment; @Override public String toString() { return id + " - " + title; } }
package com.vogella.android.retrofitgithub; public class GithubRepo { String name; String owner; String url; @Override public String toString() { return(name + " " + url); } }
De la información del repositorio, solo el nombre del repositorio y la URL se mostrarán en la lista desplegable. También agregamos el propietario a la clase de datos, ya que se necesita el nombre del propietario para solicitar discusiones más adelante.Solo mostramos la identificación y el título de la discusión en el campo desplegable, por lo que creamos un campo para cada uno de ellos. Además, la respuesta de Github contiene una URL para publicar un comentario, que se almacena en el campo comments_url. Para publicar un nuevo comentario en la API de Github más tarde, agregue un campo llamado comentario. API de Githubindica que el contenido del comentario debe estar vinculado a un campo llamado cuerpo en la solicitud JSON. Como Retrofit (de) serializa todos los campos en función de su nombre, y dado que no queremos usar el cuerpo como el nombre del campo en nuestra clase GithubIssue, usamos la anotación @SerializedName. Con esta anotación, podemos cambiar el nombre con el que el campo se (des) serializa a JSON.Desafortunadamente, la clase GithubRepo no es suficiente para solicitar toda la información necesaria sobre el repositorio. Como veis aqui, el propietario del repositorio es un objeto JSON separado en la respuesta del repositorio y, por lo tanto, generalmente necesita la clase Java adecuada para (des) serializar. Afortunadamente, Retrofit le permite agregar su propio JSONDeserializer escrito para controlar la deserialización de un tipo específico. Cada vez que un objeto de cierto tipo necesita ser deserializado, se usa este deserializador personalizado.Para hacer esto, agregue la siguiente clase GithubRepoDeserialzer. package com.vogella.android.retrofitgithub; import com.google.gson.JsonDeserializationContext; import com.google.gson.JsonDeserializer; import com.google.gson.JsonElement; import com.google.gson.JsonObject; import com.google.gson.JsonParseException; import java.lang.reflect.Type; public class GithubRepoDeserializer implements JsonDeserializer<GithubRepo> { @Override public GithubRepo deserialize(JsonElement json, Type typeOfT, JsonDeserializationContext context) throws JsonParseException { GithubRepo githubRepo = new GithubRepo(); JsonObject repoJsonObject = json.getAsJsonObject(); githubRepo.name = repoJsonObject.get("name").getAsString(); githubRepo.url = repoJsonObject.get("url").getAsString(); JsonElement ownerJsonElement = repoJsonObject.get("owner"); JsonObject ownerJsonObject = ownerJsonElement.getAsJsonObject(); githubRepo.owner = ownerJsonObject.get("login").getAsString(); return githubRepo; } }
Defina la API REST para Retrofit a través de la siguiente interfaz: package com.vogella.android.retrofitgithub; import java.util.List; import io.reactivex.Single; import okhttp3.ResponseBody; import retrofit2.http.Body; import retrofit2.http.GET; import retrofit2.http.POST; import retrofit2.http.Path; import retrofit2.http.Url; public interface GithubAPI { String ENDPOINT = "https://api.github.com"; @GET("user/repos?per_page=100") Single<List<GithubRepo>> getRepos(); @GET("/repos/{owner}/{repo}/issues") Single<List<GithubIssue>> getIssues(@Path("owner") String owner, @Path("repo") String repository); @POST Single<ResponseBody> postComment(@Url String url, @Body GithubIssue issue); }
Es posible que tenga una pregunta sobre la anotación @ Url. Con esta anotación, podemos especificar la URL de esta solicitud. Esto nos permite cambiar la URL de cada solicitud de forma dinámica. Necesitamos esto para el campo comments_url de la clase GithubIssue.@ Las anotaciones de ruta vinculan el valor del parámetro a la variable correspondiente (llaves) en la URL de solicitud. Esto es necesario para indicar el propietario y el nombre del repositorio para el que se deben solicitar los debates.9.3. Cuadro de diálogo Crear credencial
Para dar al usuario la capacidad de almacenar sus credenciales en la aplicación, se utiliza DialogFragment. Así que cree la siguiente clase llamada CredentialsDialog, y también agregue un archivo de diseño llamado dialog_credentials.xml a la carpeta de diseño de recursos.El resultado debería parecerse a la siguiente captura de pantalla.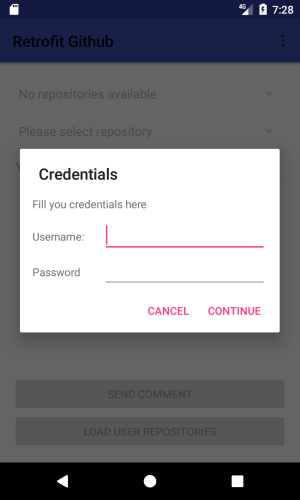
<?xml version="1.0" encoding="utf-8"?> <LinearLayout xmlns:android="http://schemas.android.com/apk/res/android" android:layout_width="match_parent" android:layout_height="match_parent" android:orientation="vertical"> <TextView android:layout_width="wrap_content" android:layout_height="wrap_content" android:layout_marginBottom="8dp" android:layout_marginLeft="16dp" android:layout_marginRight="16dp" android:layout_marginTop="16dp" android:text="Fill you credentials here" /> <LinearLayout android:layout_width="match_parent" android:layout_height="wrap_content" android:layout_marginLeft="16dp" android:layout_marginRight="16dp" android:orientation="horizontal"> <TextView android:layout_width="0dp" android:layout_height="wrap_content" android:layout_weight="0.3" android:text="Username:" /> <EditText android:id="@+id/username_edittext" android:layout_width="0dp" android:layout_height="wrap_content" android:layout_weight="0.7" /> </LinearLayout> <LinearLayout android:layout_width="match_parent" android:layout_height="wrap_content" android:layout_marginLeft="16dp" android:layout_marginRight="16dp" android:orientation="horizontal"> <TextView android:layout_width="0dp" android:layout_height="wrap_content" android:layout_weight="0.3" android:text="Password" /> <EditText android:id="@+id/password_edittext" android:layout_width="0dp" android:layout_height="wrap_content" android:layout_weight="0.7" android:inputType="textPassword" /> </LinearLayout> </LinearLayout>
package com.vogella.android.retrofitgithub; import android.app.Dialog; import android.content.Context; import android.content.DialogInterface; import android.os.Bundle; import android.support.annotation.NonNull; import android.support.v4.app.DialogFragment; import android.support.v7.app.AlertDialog; import android.view.View; import android.widget.EditText; import okhttp3.Credentials; public class CredentialsDialog extends DialogFragment { EditText usernameEditText; EditText passwordEditText; ICredentialsDialogListener listener; public interface ICredentialsDialogListener { void onDialogPositiveClick(String username, String password); } @Override public void onAttach(Context context) { super.onAttach(context); if (getActivity() instanceof ICredentialsDialogListener) { listener = (ICredentialsDialogListener) getActivity(); } } @NonNull @Override public Dialog onCreateDialog(Bundle savedInstanceState) { View view = getActivity().getLayoutInflater().inflate(R.layout.dialog_credentials, null); usernameEditText = (EditText) view.findViewById(R.id.username_edittext); passwordEditText = (EditText) view.findViewById(R.id.password_edittext); usernameEditText.setText(getArguments().getString("username")); passwordEditText.setText(getArguments().getString("password")); AlertDialog.Builder builder = new AlertDialog.Builder(getActivity()) .setView(view) .setTitle("Credentials") .setNegativeButton("Cancel", null) .setPositiveButton("Continue", new DialogInterface.OnClickListener() { @Override public void onClick(DialogInterface dialog, int which) { if (listener != null) { listener.onDialogPositiveClick(usernameEditText.getText().toString(), passwordEditText.getText().toString()); } } }); return builder.create(); } }
9.4. Crear actividad
Modifique activity_main.xml de la siguiente manera. <?xml version="1.0" encoding="utf-8"?> <LinearLayout xmlns:android="http://schemas.android.com/apk/res/android" xmlns:tools="http://schemas.android.com/tools" android:id="@+id/activity_main" android:layout_width="match_parent" android:layout_height="match_parent" android:orientation="vertical" tools:context="com.vogella.android.retrofitgithub.MainActivity"> <android.support.v7.widget.Toolbar android:id="@+id/my_toolbar" android:layout_width="match_parent" android:layout_height="?attr/actionBarSize" android:background="?attr/colorPrimary" android:elevation="4dp" /> <RelativeLayout android:layout_width="match_parent" android:layout_height="match_parent" android:paddingBottom="@dimen/activity_vertical_margin" android:paddingLeft="@dimen/activity_horizontal_margin" android:paddingRight="@dimen/activity_horizontal_margin" android:paddingTop="@dimen/activity_vertical_margin"> <Spinner android:id="@+id/repositories_spinner" android:layout_width="match_parent" android:layout_height="wrap_content" /> <Spinner android:id="@+id/issues_spinner" android:layout_width="match_parent" android:layout_height="wrap_content" android:layout_below="@id/repositories_spinner" /> <EditText android:id="@+id/comment_edittext" android:layout_width="match_parent" android:layout_height="wrap_content" android:layout_below="@id/issues_spinner" android:enabled="false" android:hint="Your comment" android:imeOptions="actionDone" android:inputType="text" android:maxLines="1" /> <Button android:id="@+id/loadRepos_button" android:layout_width="match_parent" android:layout_height="wrap_content" android:layout_alignParentBottom="true" android:enabled="false" android:gravity="center" android:onClick="onClick" android:text="Load user repositories" /> <Button android:id="@+id/send_comment_button" android:layout_width="match_parent" android:layout_height="wrap_content" android:layout_above="@id/loadRepos_button" android:enabled="false" android:onClick="onClick" android:text="Send comment" /> </RelativeLayout> </LinearLayout>
Dos botones (para descargar repositorios y enviar comentarios), dos Spinner (campo desplegable para mostrar repositorios y debates) y EditText (para escribir comentarios). Para iniciar CredentialsDialog, use el menú en la barra de herramientas de Android. Para crearlo, agregue un archivo xml de menú llamado menu_main.xml a la carpeta de recursos del menú (cree una carpeta si no existe). <?xml version="1.0" encoding="utf-8"?> <menu xmlns:android="http://schemas.android.com/apk/res/android"> <item android:id="@+id/menu_credentials" android:title="Credentials"/> </menu>
Como usamos el widget de la barra de herramientas, debe deshabilitar la barra de acción de forma predeterminada. Para hacer esto, modifique el archivo de estilo xml como se muestra a continuación. <resources> <style name="AppTheme" parent="Theme.AppCompat.Light.NoActionBar"> <item name="colorPrimary">@color/colorPrimary</item> <item name="colorPrimaryDark">@color/colorPrimaryDark</item> <item name="colorAccent">@color/colorAccent</item> </style> </resources>
Cambie su código de actividad a lo siguiente. package com.vogella.android.retrofitgithub; import android.os.Bundle; import android.support.v7.app.AppCompatActivity; import android.support.v7.widget.Toolbar; import android.view.Menu; import android.view.MenuItem; import android.view.View; import android.widget.AdapterView; import android.widget.ArrayAdapter; import android.widget.Button; import android.widget.EditText; import android.widget.Spinner; import android.widget.Toast; import com.google.gson.Gson; import com.google.gson.GsonBuilder; import java.io.IOException; import java.util.List; import io.reactivex.android.schedulers.AndroidSchedulers; import io.reactivex.disposables.CompositeDisposable; import io.reactivex.observers.DisposableSingleObserver; import io.reactivex.schedulers.Schedulers; import okhttp3.Credentials; import okhttp3.Interceptor; import okhttp3.OkHttpClient; import okhttp3.Request; import okhttp3.ResponseBody; import retrofit2.Call; import retrofit2.Retrofit; import retrofit2.adapter.rxjava2.RxJava2CallAdapterFactory; import retrofit2.converter.gson.GsonConverterFactory; public class MainActivity extends AppCompatActivity implements CredentialsDialog.ICredentialsDialogListener { GithubAPI githubAPI; String username; String password; Spinner repositoriesSpinner; Spinner issuesSpinner; EditText commentEditText; Button sendButton; Button loadReposButtons; private CompositeDisposable compositeDisposable = new CompositeDisposable(); @Override protected void onCreate(Bundle savedInstanceState) { super.onCreate(savedInstanceState); setContentView(R.layout.activity_main); Toolbar toolbar = (Toolbar) findViewById(R.id.my_toolbar); setSupportActionBar(toolbar); sendButton = (Button) findViewById(R.id.send_comment_button); repositoriesSpinner = (Spinner) findViewById(R.id.repositories_spinner); repositoriesSpinner.setEnabled(false); repositoriesSpinner.setAdapter(new ArrayAdapter<>(MainActivity.this, android.R.layout.simple_spinner_dropdown_item, new String[]{"No repositories available"})); repositoriesSpinner.setOnItemSelectedListener(new AdapterView.OnItemSelectedListener() { @Override public void onItemSelected(AdapterView<?> parent, View view, int position, long id) { if (parent.getSelectedItem() instanceof GithubRepo) { GithubRepo githubRepo = (GithubRepo) parent.getSelectedItem(); compositeDisposable.add(githubAPI.getIssues(githubRepo.owner, githubRepo.name) .subscribeOn(Schedulers.io()) .observeOn(AndroidSchedulers.mainThread()) .subscribeWith(getIssuesObserver())); } } @Override public void onNothingSelected(AdapterView<?> parent) { } }); issuesSpinner = (Spinner) findViewById(R.id.issues_spinner); issuesSpinner.setEnabled(false); issuesSpinner.setAdapter(new ArrayAdapter<>(MainActivity.this, android.R.layout.simple_spinner_dropdown_item, new String[]{"Please select repository"})); commentEditText = (EditText) findViewById(R.id.comment_edittext); loadReposButtons = (Button) findViewById(R.id.loadRepos_button); createGithubAPI(); } @Override protected void onStop() { super.onStop(); if (compositeDisposable != null && !compositeDisposable.isDisposed()) { compositeDisposable.dispose(); } } @Override public boolean onCreateOptionsMenu(Menu menu) { getMenuInflater().inflate(R.menu.menu_main, menu); return true; } @Override public boolean onOptionsItemSelected(MenuItem item) { switch (item.getItemId()) { case R.id.menu_credentials: showCredentialsDialog(); return true; } return super.onOptionsItemSelected(item); } private void showCredentialsDialog() { CredentialsDialog dialog = new CredentialsDialog(); Bundle arguments = new Bundle(); arguments.putString("username", username); arguments.putString("password", password); dialog.setArguments(arguments); dialog.show(getSupportFragmentManager(), "credentialsDialog"); } private void createGithubAPI() { Gson gson = new GsonBuilder() .setDateFormat("yyyy-MM-dd'T'HH:mm:ssZ") .registerTypeAdapter(GithubRepo.class, new GithubRepoDeserializer()) .create(); OkHttpClient okHttpClient = new OkHttpClient.Builder() .addInterceptor(new Interceptor() { @Override public okhttp3.Response intercept(Chain chain) throws IOException { Request originalRequest = chain.request(); Request.Builder builder = originalRequest.newBuilder().header("Authorization", Credentials.basic(username, password)); Request newRequest = builder.build(); return chain.proceed(newRequest); } }).build(); Retrofit retrofit = new Retrofit.Builder() .baseUrl(GithubAPI.ENDPOINT) .client(okHttpClient) .addCallAdapterFactory(RxJava2CallAdapterFactory.create()) .addConverterFactory(GsonConverterFactory.create(gson)) .build(); githubAPI = retrofit.create(GithubAPI.class); } public void onClick(View view) { switch (view.getId()) { case R.id.loadRepos_button: compositeDisposable.add(githubAPI.getRepos() .subscribeOn(Schedulers.io()) .observeOn(AndroidSchedulers.mainThread()) .subscribeWith(getRepositoriesObserver())); break; case R.id.send_comment_button: String newComment = commentEditText.getText().toString(); if (!newComment.isEmpty()) { GithubIssue selectedItem = (GithubIssue) issuesSpinner.getSelectedItem(); selectedItem.comment = newComment; compositeDisposable.add(githubAPI.postComment(selectedItem.comments_url, selectedItem) .subscribeOn(Schedulers.io()) .observeOn(AndroidSchedulers.mainThread()) .subscribeWith(getCommentObserver())); } else { Toast.makeText(MainActivity.this, "Please enter a comment", Toast.LENGTH_LONG).show(); } break; } } private DisposableSingleObserver<List<GithubRepo>> getRepositoriesObserver() { return new DisposableSingleObserver<List<GithubRepo>>() { @Override public void onSuccess(List<GithubRepo> value) { if (!value.isEmpty()) { ArrayAdapter<GithubRepo> spinnerAdapter = new ArrayAdapter<>(MainActivity.this, android.R.layout.simple_spinner_dropdown_item, value); repositoriesSpinner.setAdapter(spinnerAdapter); repositoriesSpinner.setEnabled(true); } else { ArrayAdapter<String> spinnerAdapter = new ArrayAdapter<>(MainActivity.this, android.R.layout.simple_spinner_dropdown_item, new String[]{"User has no repositories"}); repositoriesSpinner.setAdapter(spinnerAdapter); repositoriesSpinner.setEnabled(false); } } @Override public void onError(Throwable e) { e.printStackTrace(); Toast.makeText(MainActivity.this, "Can not load repositories", Toast.LENGTH_SHORT).show(); } }; } private DisposableSingleObserver<List<GithubIssue>> getIssuesObserver() { return new DisposableSingleObserver<List<GithubIssue>>() { @Override public void onSuccess(List<GithubIssue> value) { if (!value.isEmpty()) { ArrayAdapter<GithubIssue> spinnerAdapter = new ArrayAdapter<>(MainActivity.this, android.R.layout.simple_spinner_dropdown_item, value); issuesSpinner.setEnabled(true); commentEditText.setEnabled(true); sendButton.setEnabled(true); issuesSpinner.setAdapter(spinnerAdapter); } else { ArrayAdapter<String> spinnerAdapter = new ArrayAdapter<>(MainActivity.this, android.R.layout.simple_spinner_dropdown_item, new String[]{"Repository has no issues"}); issuesSpinner.setEnabled(false); commentEditText.setEnabled(false); sendButton.setEnabled(false); issuesSpinner.setAdapter(spinnerAdapter); } } @Override public void onError(Throwable e) { e.printStackTrace(); Toast.makeText(MainActivity.this, "Can not load issues", Toast.LENGTH_SHORT).show(); } }; } private DisposableSingleObserver<ResponseBody> getCommentObserver() { return new DisposableSingleObserver<ResponseBody>() { @Override public void onSuccess(ResponseBody value) { commentEditText.setText(""); Toast.makeText(MainActivity.this, "Comment created", Toast.LENGTH_LONG).show(); } @Override public void onError(Throwable e) { e.printStackTrace(); Toast.makeText(MainActivity.this, "Can not create comment", Toast.LENGTH_SHORT).show(); } }; } @Override public void onDialogPositiveClick(String username, String password) { this.username = username; this.password = password; loadReposButtons.setEnabled(true); } }
Aquí agregamos el GithubRepoDeserializer creado previamente como TypeAdapter en GsonBuilder. Para manejar la autenticación para cada llamada, se agregó un Interceptor a OkHttpClient. Para que los métodos API devuelvan los tipos RxJava2, agregamos el RxJava2 CallAdapter a nuestro cliente.10. Ejercicio: uso de Retrofit con OAuth para solicitar información de usuario de Twitter en Android
Este ejercicio describe cómo acceder a Twitter usando Retrofit en Android. Escribiremos una aplicación que pueda solicitar y mostrar datos de usuario para el nombre de usuario proporcionado. En este ejercicio, usamos la aplicación de autenticación de Twitter solo con OAuth 2 para la autorización. Para hacer este ejercicio, debe tener una cuenta de Twitter. Además, debe ir a las aplicaciones de Twitter y crear una nueva aplicación para obtener su clave de consumidor y su secreto de consumidor. Necesitaremos esto más adelante para solicitar nuestro token OAuth.10.1 Configuración del proyecto
Cree una aplicación de Android llamada Retrofit Twitter. Use com.vogella.android.retrofittwitter como el nombre de un paquete de nivel superior.Para usar Retrofit, agregue las siguientes líneas al archivo build.gradle implementation 'com.squareup.retrofit2:retrofit:2.1.0' implementation 'com.squareup.retrofit2:converter-gson:2.1.0'
Agregue permiso para acceder a Internet en el manifiesto. <?xml version="1.0" encoding="utf-8"?> <manifest xmlns:android="http://schemas.android.com/apk/res/android" package="com.vogella.android.retrofittwitter"> <uses-permission android:name="android.permission.INTERNET"/> <application android:allowBackup="true" android:icon="@mipmap/ic_launcher" android:label="@string/app_name" android:supportsRtl="true" android:theme="@style/AppTheme"> <activity android:name=".MainActivity"> <intent-filter> <action android:name="android.intent.action.MAIN" /> <category android:name="android.intent.category.LAUNCHER" /> </intent-filter> </activity> </application> </manifest>
10.2 Definición de API
Cree las siguientes dos clases de datos, llamadas OAuthToken y UserDetails. package com.vogella.android.retrofittwitter; import com.google.gson.annotations.SerializedName; public class OAuthToken { @SerializedName("access_token") private String accessToken; @SerializedName("token_type") private String tokenType; public String getAccessToken() { return accessToken; } public String getTokenType() { return tokenType; } public String getAuthorization() { return getTokenType() + " " + getAccessToken(); } }
package com.vogella.android.retrofittwitter; public class UserDetails { private String name; private String location; private String description; private String url; public String getName() { return name; } public void setName(String name) { this.name = name; } public String getLocation() { return location; } public void setLocation(String location) { this.location = location; } public String getDescription() { return description; } public void setDescription(String description) { this.description = description; } public String getUrl() { return url; } public void setUrl(String url) { this.url = url; } }
La clase OAuthToken se usa para almacenar el token de portador que solicitamos de Twitter, con nuestra clave y secreto. Usamos la anotación @ SerializedName para configurar el nombre Retrofit para (des) serializar campos.La clase UserDetails simplemente guarda varios campos de la respuesta de Twitter cuando solicita información del usuario. No mostramos todos los datos del usuario contenidos en la respuesta, solo el nombre, la ubicación, la URL y la descripción.Defina la API REST para Retrofit a través de la siguiente interfaz: package com.vogella.android.retrofittwitter; import retrofit2.Call; import retrofit2.http.Field; import retrofit2.http.FormUrlEncoded; import retrofit2.http.GET; import retrofit2.http.POST; import retrofit2.http.Query; public interface TwitterApi { String BASE_URL = "https://api.twitter.com/"; @FormUrlEncoded @POST("oauth2/token") Call<OAuthToken> postCredentials(@Field("grant_type") String grantType); @GET("/1.1/users/show.json") Call<UserDetails> getUserDetails(@Query("screen_name") String name); }
10.3 Crear actividad
Modifique el archivo activity_main.xml y la clase MainActivity correspondiente de la siguiente manera: <?xml version="1.0" encoding="utf-8"?> <RelativeLayout xmlns:android="http://schemas.android.com/apk/res/android" xmlns:tools="http://schemas.android.com/tools" android:id="@+id/activity_main" android:layout_width="match_parent" android:layout_height="match_parent" tools:context="com.vogella.android.retrofittwitter.MainActivity"> <LinearLayout android:id="@+id/username_container" android:layout_width="match_parent" android:layout_height="wrap_content" android:layout_alignParentTop="true" android:orientation="horizontal"> <TextView android:id="@+id/username_textview" android:layout_width="0dp" android:layout_height="match_parent" android:layout_weight="1" android:enabled="false" android:gravity="center_vertical" android:text="Username:" /> <EditText android:id="@+id/username_edittext" android:layout_width="0dp" android:layout_height="wrap_content" android:layout_weight="1" android:enabled="false" android:gravity="center" android:imeOptions="actionDone" android:inputType="text" android:maxLines="1" /> </LinearLayout> <Button android:id="@+id/request_token_button" android:layout_width="match_parent" android:layout_height="wrap_content" android:layout_alignParentBottom="true" android:onClick="onClick" android:text="Request token" /> <Button android:id="@+id/request_user_details_button" android:layout_width="match_parent" android:layout_height="wrap_content" android:layout_above="@id/request_token_button" android:enabled="false" android:onClick="onClick" android:text="Request user details" /> <LinearLayout android:layout_width="match_parent" android:layout_height="match_parent" android:layout_above="@id/request_user_details_button" android:layout_below="@id/username_container" android:gravity="center" android:orientation="vertical"> <LinearLayout android:layout_width="match_parent" android:layout_height="wrap_content" android:minHeight="50dp"> <TextView android:layout_width="0dp" android:layout_height="match_parent" android:layout_weight="1" android:gravity="center_vertical" android:text="Name:" /> <TextView android:id="@+id/name_textview" android:layout_width="0dp" android:layout_height="match_parent" android:layout_weight="1" android:gravity="center_vertical" android:text="---" /> </LinearLayout> <LinearLayout android:layout_width="match_parent" android:layout_height="wrap_content" android:minHeight="50dp"> <TextView android:layout_width="0dp" android:layout_height="match_parent" android:layout_weight="1" android:gravity="center_vertical" android:text="Location:" /> <TextView android:id="@+id/location_textview" android:layout_width="0dp" android:layout_height="match_parent" android:layout_weight="1" android:gravity="center_vertical" android:text="---" /> </LinearLayout> <LinearLayout android:layout_width="match_parent" android:layout_height="wrap_content" android:minHeight="50dp"> <TextView android:layout_width="0dp" android:layout_height="match_parent" android:layout_weight="1" android:gravity="center_vertical" android:text="Url:" /> <TextView android:id="@+id/url_textview" android:layout_width="0dp" android:layout_height="match_parent" android:layout_weight="1" android:gravity="center_vertical" android:text="---" /> </LinearLayout> <LinearLayout android:layout_width="match_parent" android:layout_height="wrap_content" android:minHeight="50dp"> <TextView android:layout_width="0dp" android:layout_height="match_parent" android:layout_weight="1" android:gravity="center_vertical" android:text="Description:" /> <TextView android:id="@+id/description_textview" android:layout_width="0dp" android:layout_height="match_parent" android:layout_weight="1" android:gravity="center_vertical" android:text="---" /> </LinearLayout> </LinearLayout> </RelativeLayout>
package com.vogella.android.retrofittwitter; import android.os.Bundle; import android.support.v7.app.AppCompatActivity; import android.util.Log; import android.view.View; import android.widget.Button; import android.widget.EditText; import android.widget.TextView; import android.widget.Toast; import java.io.IOException; import okhttp3.Credentials; import okhttp3.Interceptor; import okhttp3.OkHttpClient; import okhttp3.Request; import retrofit2.Call; import retrofit2.Callback; import retrofit2.Response; import retrofit2.Retrofit; import retrofit2.converter.gson.GsonConverterFactory; public class MainActivity extends AppCompatActivity { private String credentials = Credentials.basic("aConsumerKey", "aSecret"); Button requestTokenButton; Button requestUserDetailsButton; EditText usernameEditText; TextView usernameTextView; TextView nameTextView; TextView locationTextView; TextView urlTextView; TextView descriptionTextView; TwitterApi twitterApi; OAuthToken token; @Override protected void onCreate(Bundle savedInstanceState) { super.onCreate(savedInstanceState); setContentView(R.layout.activity_main); requestTokenButton = (Button) findViewById(R.id.request_token_button); requestUserDetailsButton = (Button) findViewById(R.id.request_user_details_button); usernameEditText = (EditText) findViewById(R.id.username_edittext); usernameTextView = (TextView) findViewById(R.id.username_textview); nameTextView = (TextView) findViewById(R.id.name_textview); locationTextView = (TextView) findViewById(R.id.location_textview); urlTextView = (TextView) findViewById(R.id.url_textview); descriptionTextView = (TextView) findViewById(R.id.description_textview); createTwitterApi(); } private void createTwitterApi() { OkHttpClient okHttpClient = new OkHttpClient.Builder().addInterceptor(new Interceptor() { @Override public okhttp3.Response intercept(Chain chain) throws IOException { Request originalRequest = chain.request(); Request.Builder builder = originalRequest.newBuilder().header("Authorization", token != null ? token.getAuthorization() : credentials); Request newRequest = builder.build(); return chain.proceed(newRequest); } }).build(); Retrofit retrofit = new Retrofit.Builder() .baseUrl(TwitterApi.BASE_URL) .client(okHttpClient) .addConverterFactory(GsonConverterFactory.create()) .build(); twitterApi = retrofit.create(TwitterApi.class); } public void onClick(View view) { switch (view.getId()) { case R.id.request_token_button: twitterApi.postCredentials("client_credentials").enqueue(tokenCallback); break; case R.id.request_user_details_button: String editTextInput = usernameEditText.getText().toString(); if (!editTextInput.isEmpty()) { twitterApi.getUserDetails(editTextInput).enqueue(userDetailsCallback); } else { Toast.makeText(this, "Please provide a username", Toast.LENGTH_LONG).show(); } break; } } Callback<OAuthToken> tokenCallback = new Callback<OAuthToken>() { @Override public void onResponse(Call<OAuthToken> call, Response<OAuthToken> response) { if (response.isSuccessful()) { requestTokenButton.setEnabled(false); requestUserDetailsButton.setEnabled(true); usernameTextView.setEnabled(true); usernameEditText.setEnabled(true); token = response.body(); } else { Toast.makeText(MainActivity.this, "Failure while requesting token", Toast.LENGTH_LONG).show(); Log.d("RequestTokenCallback", "Code: " + response.code() + "Message: " + response.message()); } } @Override public void onFailure(Call<OAuthToken> call, Throwable t) { t.printStackTrace(); } }; Callback<UserDetails> userDetailsCallback = new Callback<UserDetails>() { @Override public void onResponse(Call<UserDetails> call, Response<UserDetails> response) { if (response.isSuccessful()) { UserDetails userDetails = response.body(); nameTextView.setText(userDetails.getName() == null ? "no value" : userDetails.getName()); locationTextView.setText(userDetails.getLocation() == null ? "no value" : userDetails.getLocation()); urlTextView.setText(userDetails.getUrl() == null ? "no value" : userDetails.getUrl()); descriptionTextView.setText(userDetails.getDescription().isEmpty() ? "no value" : userDetails.getDescription()); } else { Toast.makeText(MainActivity.this, "Failure while requesting user details", Toast.LENGTH_LONG).show(); Log.d("UserDetailsCallback", "Code: " + response.code() + "Message: " + response.message()); } } @Override public void onFailure(Call<UserDetails> call, Throwable t) { t.printStackTrace(); } }; }
Reemplace aConsumerKey y aSecret con la clave de consumidor y el secreto recibido de Twitter.También eche un vistazo al interceptor que agregamos a nuestro cliente Retrofit. Debido a que usamos OAuth, nuestras credenciales son diferentes para cada llamada. El método postCredentials debe publicar las credenciales (clave y secreto del consumidor) en el esquema básico de Twitter. Como resultado, esta llamada devuelve un token de portador, que Retrofit se deserializa en nuestra clase OAuthToken, que luego se almacena en el campo de token. Cualquier otra solicitud ahora puede (y debería) usar este token como credenciales para la autorización. También se solicita información del usuario.11. Recursos de modernización
Tutorial de APIs consumidas con Retrofit
En la serie de blogs del departamento sobre Retrofit
APIs consumidoras con Retrofit