Bonjour, Habr! Tout le monde aime les applications réactives. Encore mieux quand ils ont des animations pertinentes. Dans cet article, je vais dire et montrer avec toute la "viande" comment montrer, cacher, tordre, faire tournoyer et tout faire correctement avec des écrans contextuels.
Au départ, je voulais écrire un article indiquant que sur iOS 10 un UIViewPropertyAnimator pratique UIViewPropertyAnimator apparu qui résout le problème des animations interrompues. Maintenant, ils peuvent être arrêtés, inversés, poursuivis ou annulés. Apple appelle cette interface fluide .
Mais j'ai réalisé: il est difficile de parler d'interrompre l'animation des contrôleurs sans décrire comment ces transitions sont correctement animées. Par conséquent, il y aura deux articles. Dans ce document, nous découvrirons comment afficher et masquer correctement l'écran, ainsi que les interruptions dans le prochain.
Comment fonctionnent-ils
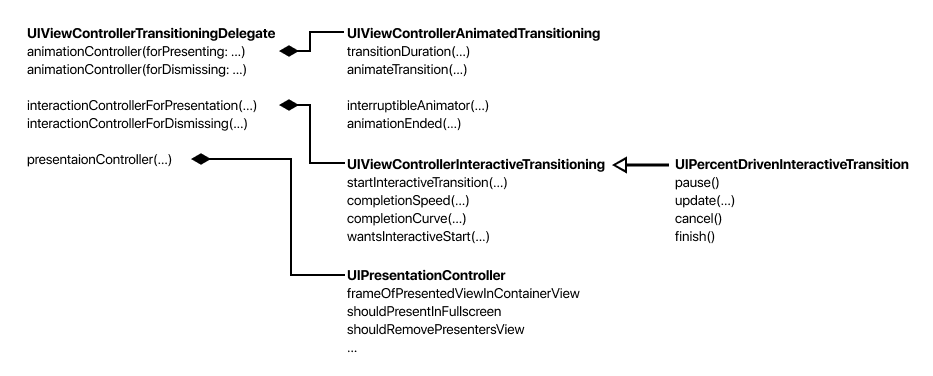
UIViewController a une propriété transitioningDelegate . Il s'agit d'un protocole avec différentes fonctions, chacune retourne un objet:
animationController pour l'animation,interactionController pour interrompre les animations,presentationController pour l'affichage: hiérarchie, cadre, etc.
Sur la base de tout cela, nous allons créer un panneau contextuel:

Contrôleurs de cuisson
Vous pouvez animer la transition pour les contrôleurs modaux et pour UINavigationController (fonctionne via UINavigationControllerDelegate ).
Nous considérerons les transitions modales. La configuration du contrôleur avant le spectacle est un peu inhabituelle:
class ParentViewController: UIViewController { private let transition = PanelTransition()
- Créez un objet qui décrit la transition.
transitioningDelegate marqué comme weak , vous devez donc stocker la transition séparément par strong lien strong . - Nous avons défini notre transition vers
transitioningDelegate . - Afin de contrôler la méthode d'affichage dans
presentationController vous devez spécifier .custom pour modalPresentationStyle. .
Le contrôleur illustré ne sait pas du tout comment il est affiché. Et c'est bien.
Afficher en demi-écran
Commençons le code pour PanelTransition avec presentationController . Vous l'avez UIPopoverController si vous avez créé des fenêtres contextuelles via UIPopoverController . PresentationController contrôle l'affichage du contrôleur: cadre, hiérarchie, etc. Il décide comment afficher les popovers sur l'iPad: avec quel cadre, de quel côté du bouton afficher, ajoute du flou à l'arrière-plan de la fenêtre et s'assombrit en dessous.

Notre structure est similaire: nous allons assombrir le fond, mettre le cadre pas en plein écran:

Pour commencer, dans la presentationController(forPresented:, presenting:, source:) , retournez la classe PresentationController :
class PanelTransition: NSObject, UIViewControllerTransitioningDelegate { func presentationController(forPresented presented: UIViewController, presenting: UIViewController?, source: UIViewController) -> UIPresentationController? { return presentationController = PresentationController(presentedViewController: presented, presenting: presenting ?? source) }
Pourquoi 3 contrôleurs sont-ils transmis et quelle est la source?Source est le contrôleur sur lequel nous avons appelé l'animation du spectacle. Mais le contrôleur qui participera à la tranche est le premier de la hiérarchie avec definesPresentationContext = true . Si le contrôleur change, alors le vrai contrôleur indicateur sera dans le paramètre de presenting.
Vous pouvez maintenant implémenter la classe PresentationController . Pour commencer, encadrons le futur contrôleur. Il existe une méthode frameOfPresentedViewInContainerView pour frameOfPresentedViewInContainerView . Laissez le contrôleur occuper la moitié inférieure de l'écran:
class PresentationController: UIPresentationController { override var frameOfPresentedViewInContainerView: CGRect { let bounds = containerView!.bounds let halfHeight = bounds.height / 2 return CGRect(x: 0, y: halfHeight, width: bounds.width, height: halfHeight) } }
Vous pouvez démarrer le projet et essayer d'afficher l'écran, mais rien ne se passera. En effet, nous gérons maintenant nous-mêmes la hiérarchie des vues et nous devons ajouter manuellement la vue du contrôleur:
Encore faut-il mettre un cadre pour presentedView . containerViewDidLayoutSubviews est le meilleur endroit, car de cette façon, nous pouvons répondre à la rotation de l'écran:
Vous pouvez maintenant courir. L'animation sera standard pour UIModalTransitionStyle.coverVertical , mais le cadre aura la moitié de la taille.
Assombrir l'arrière-plan
La tâche suivante consiste à assombrir le contrôleur d'arrière-plan pour se concentrer sur ce qui est affiché.
Nous hériterons de PresentationController et le remplacerons par une nouvelle classe dans le fichier PanelTransition . Dans la nouvelle classe, il n'y aura qu'un code de gradation.
class DimmPresentationController: PresentationController
Créez une vue que nous superposerons sur:
private lazy var dimmView: UIView = { let view = UIView() view.backgroundColor = UIColor(white: 0, alpha: 0.3) view.alpha = 0 return view }()
Nous changerons alpha vues alpha conformément à l'animation de transition. Il existe 4 méthodes:
presentationTransitionWillBeginpresentationTransitionDidEnddismissalTransitionWillBegindismissalTransitionDidEnd
Le premier est le plus difficile. Ajoutez dimmView à la hiérarchie, posez le cadre et démarrez l'animation:
override func presentationTransitionWillBegin() { super.presentationTransitionWillBegin() containerView?.insertSubview(dimmView, at: 0) performAlongsideTransitionIfPossible { [unowned self] in self.dimmView.alpha = 1 } }
L'animation est lancée à l'aide d'une fonction auxiliaire:
private func performAlongsideTransitionIfPossible(_ block: @escaping () -> Void) { guard let coordinator = self.presentedViewController.transitionCoordinator else { block() return } coordinator.animate(alongsideTransition: { (_) in block() }, completion: nil) }
Nous avons défini le cadre pour dimmView dans containerViewDidLayoutSubviews (comme la dernière fois):
override func containerViewDidLayoutSubviews() { super.containerViewDidLayoutSubviews() dimmView.frame = containerView!.frame }
L'animation peut être interrompue et annulée, et si elle est annulée, alors dimmView doit être supprimé de la hiérarchie:
override func presentationTransitionDidEnd(_ completed: Bool) { super.presentationTransitionDidEnd(completed) if !completed { self.dimmView.removeFromSuperview() } }
Le processus inverse démarre dans les méthodes de masquage. Mais maintenant, vous devez supprimer dimmView uniquement si l'animation est terminée.
override func dismissalTransitionWillBegin() { super.dismissalTransitionWillBegin() performAlongsideTransitionIfPossible { [unowned self] in self.dimmView.alpha = 0 } } override func dismissalTransitionDidEnd(_ completed: Bool) { super.dismissalTransitionDidEnd(completed) if completed { self.dimmView.removeFromSuperview() } }
Maintenant, le fond s'assombrit.
Nous contrôlons l'animation
Nous montrons le contrôleur par le bas
Nous pouvons maintenant animer l'apparence du contrôleur. Dans la classe PanelTransition , renvoyez la classe qui contrôlera l'animation d'apparence:
func animationController(forPresented presented: UIViewController, presenting: UIViewController, source: UIViewController) -> UIViewControllerAnimatedTransitioning? { return PresentAnimation() }
La mise en œuvre du protocole est simple:
extension PresentAnimation: UIViewControllerAnimatedTransitioning { func transitionDuration(using transitionContext: UIViewControllerContextTransitioning?) -> TimeInterval { return duration } func animateTransition(using transitionContext: UIViewControllerContextTransitioning) { let animator = self.animator(using: transitionContext) animator.startAnimation() } func interruptibleAnimator(using transitionContext: UIViewControllerContextTransitioning) -> UIViewImplicitlyAnimating { return self.animator(using: transitionContext) } }
Le code clé est un peu plus compliqué:
class PresentAnimation: NSObject { let duration: TimeInterval = 0.3 private func animator(using transitionContext: UIViewControllerContextTransitioning) -> UIViewImplicitlyAnimating {
UIViewPropertyAnimator ne fonctionne pas dans iOS 9La solution de contournement est assez simple: vous devez utiliser non pas l'animateur dans le code animateTransition , mais l'ancienne UIView.animate… Par exemple, comme ceci:
func animateTransition(using transitionContext: UIViewControllerContextTransitioning) { let to = transitionContext.view(forKey: .to)! let finalFrame = transitionContext.finalFrame(for: transitionContext.viewController(forKey: .to)!) to.frame = finalFrame.offsetBy(dx: 0, dy: finalFrame.height) UIView.animate(withDuration: duration, delay: 0, usingSpringWithDamping: 1, initialSpringVelocity: 0, options: [.curveEaseOut], animations: { to.frame = finalFrame }) { (_) in transitionContext.completeTransition(!transitionContext.transitionWasCancelled) } } , `interruptibleAnimator(using transitionContext:)`
Si vous ne rendez pas interruptible, la méthode interruptibleAnimator peut être omise. La discontinuité sera prise en compte dans le prochain article, abonnez-vous.
Cachez le contrôleur vers le bas
Tout est pareil, mais dans la direction opposée. Dans Panel Transition créez la classe DismissAnimation :
func animationController(forDismissed dismissed: UIViewController) -> UIViewControllerAnimatedTransitioning? { return DismissAnimation() }
Et nous le réalisons. Classe d' DismissAnimation :
class DismissAnimation: NSObject { let duration: TimeInterval = 0.3 private func animator(using transitionContext: UIViewControllerContextTransitioning) -> UIViewImplicitlyAnimating { let from = transitionContext.view(forKey: .from)! let initialFrame = transitionContext.initialFrame(for: transitionContext.viewController(forKey: .from)!) let animator = UIViewPropertyAnimator(duration: duration, curve: .easeOut) { from.frame = initialFrame.offsetBy(dx: 0, dy: initialFrame.height) } animator.addCompletion { (position) in transitionContext.completeTransition(!transitionContext.transitionWasCancelled) } return animator } } extension DismissAnimation: UIViewControllerAnimatedTransitioning { func transitionDuration(using transitionContext: UIViewControllerContextTransitioning?) -> TimeInterval { return duration } func animateTransition(using transitionContext: UIViewControllerContextTransitioning) { let animator = self.animator(using: transitionContext) animator.startAnimation() } func interruptibleAnimator(using transitionContext: UIViewControllerContextTransitioning) -> UIViewImplicitlyAnimating { return self.animator(using: transitionContext) } }
À cet endroit, vous pouvez expérimenter avec les parties:
- un scénario alternatif peut apparaître ci-dessous;
- à droite - navigation rapide dans le menu;
- ci-dessus - message d'information:
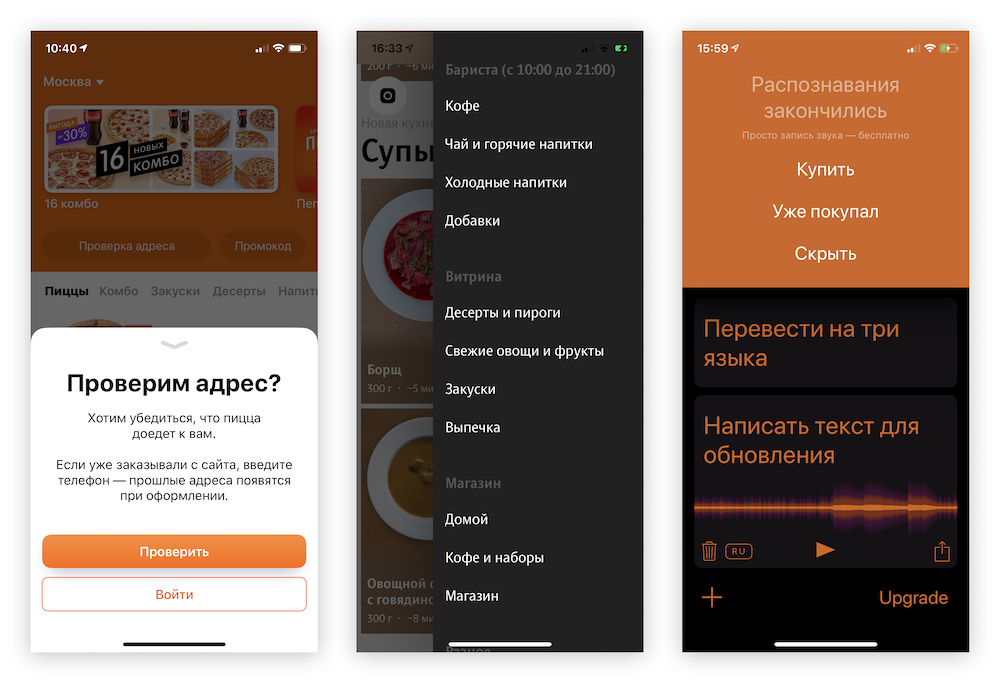
Pizza Dodo , Snack et Savey
La prochaine fois, nous ajoutons une fermeture interactive avec un geste, puis nous interrompons son animation. Si vous ne pouvez pas attendre, le projet complet est déjà sur le github.
Et voici que la deuxième partie de l'article est arrivée.
Abonnez-vous à la chaîne Dodo Pizza Mobile.