D3.js इनपुट डेटा के आधार पर दस्तावेजों में हेरफेर करने के लिए जावास्क्रिप्ट लाइब्रेरी है। कोणीय एक ढांचा है जो उच्च प्रदर्शन डेटा बाइंडिंग का दावा करता है।
नीचे मैं इस सारी शक्ति का उपयोग करने के लिए एक अच्छे दृष्टिकोण को देखूंगा। डी 3 सिमुलेशन से एसवीजी इंजेक्शन और टेम्पलेट सिंटैक्स का उपयोग।
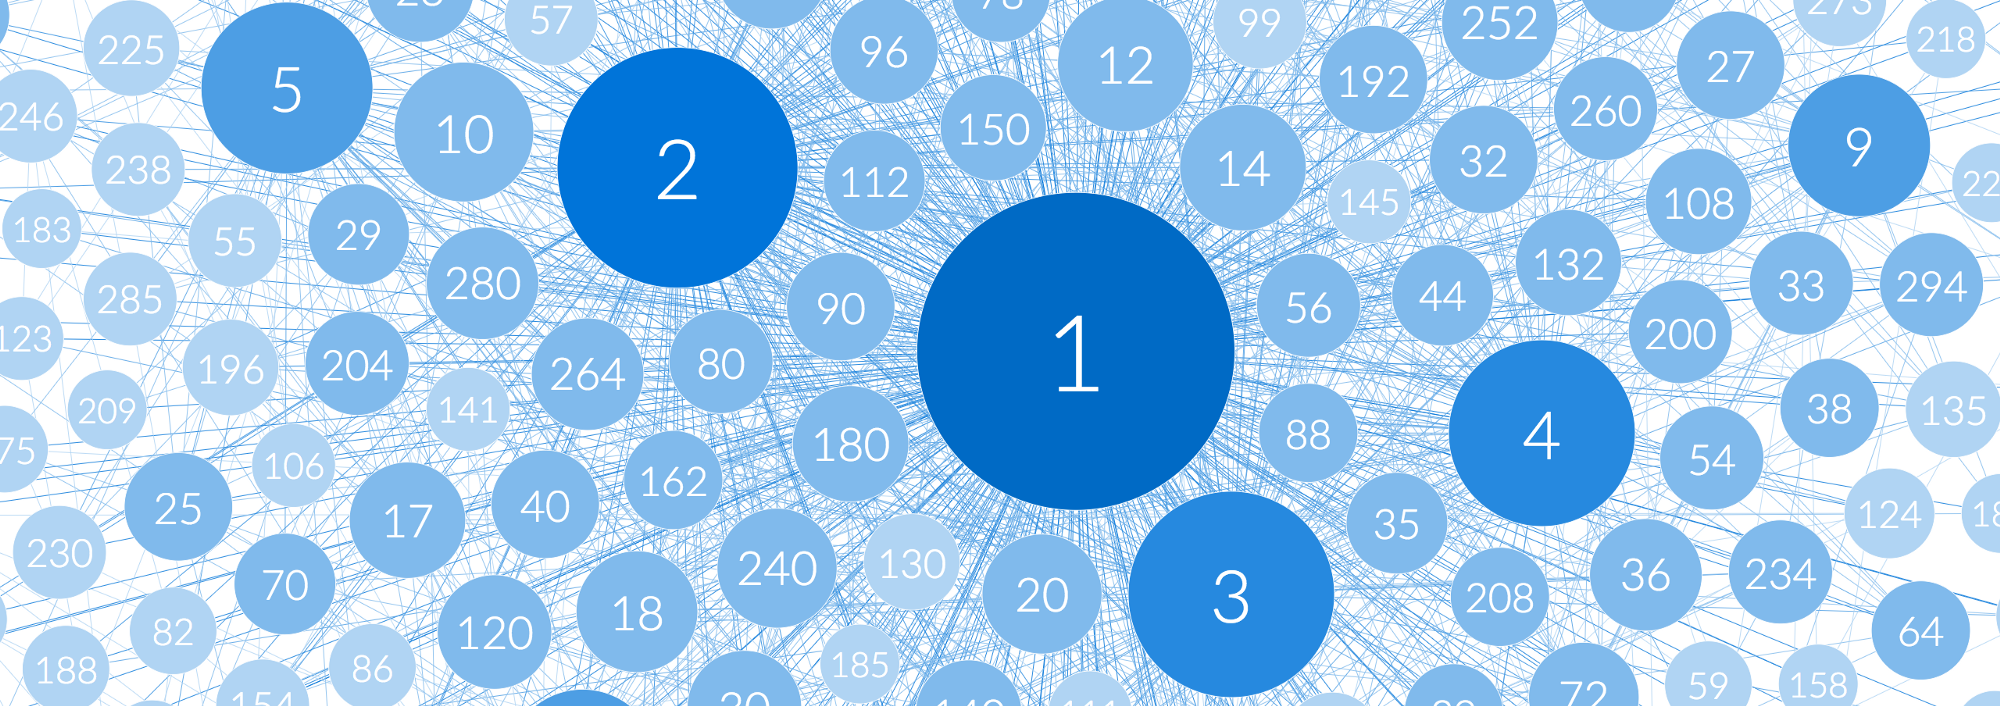 डेमो: 300 तक सकारात्मक संख्या उनके भाजक के साथ जुड़ा हुआ है।
कुल्हकारों के लिए जो इस लेख को नहीं पढ़ेंगे, उदाहरण कोड के साथ भंडार का लिंक नीचे है। अन्य सभी मध्य किसानों के लिए (बेशक, यह आप नहीं है) इस लेख में कोड पठनीयता के लिए सरल है।
स्रोत कोड (हाल ही में अद्यतित कोणीय 5)
डेमोकैसे आसानी से इस तरह के शांत nishtyaki बनाने के लिए
नीचे मैं एंगुलर + डी 3 का उपयोग करने के लिए एक दृष्टिकोण पेश करूंगा। हम निम्नलिखित चरणों से गुजरेंगे:
- प्रोजेक्ट इनिशियलाइजेशन
- कोणीय के लिए d3 इंटरफेस बनाना
- सिमुलेशन पीढ़ी
- एक दस्तावेज़ को कोणीय के माध्यम से सिमुलेशन डेटा बांधना
- एक ग्राफ के लिए उपयोगकर्ता बातचीत बंधन
- परिवर्तन का पता लगाने के माध्यम से प्रदर्शन अनुकूलन
- कोणीय संस्करण रणनीति के बारे में पोस्ट करना और रोना
तो, अपना टर्मिनल खोलें, कोड संपादकों को शुरू करें और क्लिपबोर्ड को भड़काना न भूलें, हम कोड में विसर्जन शुरू करते हैं।
अनुप्रयोग संरचना
हम d3 और svg से जुड़े कोड को अलग कर देंगे। मैं अधिक विस्तार से वर्णन करूंगा कि आवश्यक फाइलें कब बनाई जाएंगी, लेकिन अभी के लिए, हमारे भविष्य के एप्लिकेशन की संरचना यहां है:
d3 |- models |- directives |- d3.service.ts visuals |- graph |- shared
एक कोणीय अनुप्रयोग की शुरुआत
एंगुलर एप्लिकेशन प्रोजेक्ट लॉन्च करें। कोणीय 5, 4 या 2 हमारे कोड को सभी तीन संस्करणों पर परीक्षण किया गया है।
यदि आपके पास अभी तक कोणीय-क्ली नहीं है, तो जल्दी से इसे स्थापित करें
npm install -g @angular/cli
फिर एक नया प्रोजेक्ट तैयार करें:
ng new angular-d3-example
आपका एप्लिकेशन
angular-d3-example फ़ोल्डर में बनाया जाएगा। इस निर्देशिका के मूल से
ng serve कमांड चलाएँ, आवेदन
localhost:4200 पर उपलब्ध होगा
localhost:4200 ।
आरंभीकरण डी 3
स्थापित करने के लिए याद रखें और इसके टाइपसेक्टिप्ट विज्ञापन।
npm install --save d3 npm install --save-dev @types/d3
कोणीय के लिए d3 इंटरफेस बनाना
ढांचे के अंदर d3 (या किसी अन्य लाइब्रेरी) के सही उपयोग के लिए, कस्टम इंटरफ़ेस के माध्यम से बातचीत करना सबसे अच्छा है, जिसे हम कक्षाओं, कोणीय सेवाओं और निर्देशों के माध्यम से परिभाषित करते हैं। ऐसा करने में, हम मुख्य कार्यक्षमता को उन घटकों से अलग करेंगे जो इसका उपयोग करेंगे। यह हमारे एप्लिकेशन की संरचना को अधिक लचीला और स्केलेबल बनाएगा, और बग्स को अलग करेगा।
डी 3 के साथ हमारे फ़ोल्डर में निम्नलिखित संरचना होगी:
d3 |- models |- directives |- d3.service.ts
models प्रकार की सुरक्षा प्रदान करेंगे और डेटम ऑब्जेक्ट प्रदान करेंगे।
directives तत्वों को बताएंगे कि डी 3 कार्यक्षमता का उपयोग कैसे करें।
d3.service.ts d3 मॉडल, निर्देश और अनुप्रयोग के बाहरी घटकों का उपयोग करने के लिए सभी तरीके प्रदान करेगा।
इस सेवा में कम्प्यूटेशनल मॉडल और व्यवहार शामिल होंगे।
getForceDirectedGraph विधि एक निर्देशित ग्राफ़ का एक उदाहरण
getForceDirectedGraph ।
applyZoomableBehaviour और
applyDraggableBehaviour आपको अपने संबंधित व्यवहारों के साथ उपयोगकर्ता इंटरैक्शन को जोड़ने की अनुमति देती हैं।
// path : d3/d3.service.ts import { Injectable } from '@angular/core'; import * as d3 from 'd3'; @Injectable() export class D3Service { constructor() {} applyZoomableBehaviour() {} applyDraggableBehaviour() {} getForceDirectedGraph() {} }
ओरिएंटेड ग्राफ़
हम उन्मुख ग्राफ और संबंधित मॉडल का एक वर्ग बनाने के लिए आगे बढ़ते हैं। हमारे ग्राफ में नोड्स और लिंक शामिल हैं, आइए इसी मॉडल को परिभाषित करते हैं।
// path : d3/models/index.ts export * from './node'; export * from './link'; // To be implemented in the next gist export * from './force-directed-graph';
// path : d3/models/link.ts import { Node } from './'; // Implementing SimulationLinkDatum interface into our custom Link class export class Link implements d3.SimulationLinkDatum<Node> { // Optional - defining optional implementation properties - required for relevant typing assistance index?: number; // Must - defining enforced implementation properties source: Node | string | number; target: Node | string | number; constructor(source, target) { this.source = source; this.target = target; } }
// path : d3/models/node.ts // Implementing SimulationNodeDatum interface into our custom Node class export class Node extends d3.SimulationNodeDatum { // Optional - defining optional implementation properties - required for relevant typing assistance index?: number; x?: number; y?: number; vx?: number; vy?: number; fx?: number | null; fy?: number | null; id: string; constructor(id) { this.id = id; } }
मुख्य मॉडलों को ग्राफ हेरफेर के रूप में घोषित करने के बाद, चलो ग्राफ के मॉडल को ही घोषित करते हैं।
// path : d3/models/force-directed-graph.ts import { EventEmitter } from '@angular/core'; import { Link } from './link'; import { Node } from './node'; import * as d3 from 'd3'; const FORCES = { LINKS: 1 / 50, COLLISION: 1, CHARGE: -1 } export class ForceDirectedGraph { public ticker: EventEmitter<d3.Simulation<Node, Link>> = new EventEmitter(); public simulation: d3.Simulation<any, any>; public nodes: Node[] = []; public links: Link[] = []; constructor(nodes, links, options: { width, height }) { this.nodes = nodes; this.links = links; this.initSimulation(options); } initNodes() { if (!this.simulation) { throw new Error('simulation was not initialized yet'); } this.simulation.nodes(this.nodes); } initLinks() { if (!this.simulation) { throw new Error('simulation was not initialized yet'); } // Initializing the links force simulation this.simulation.force('links', d3.forceLink(this.links) .strength(FORCES.LINKS) ); } initSimulation(options) { if (!options || !options.width || !options.height) { throw new Error('missing options when initializing simulation'); } if (!this.simulation) { const ticker = this.ticker; // Creating the force simulation and defining the charges this.simulation = d3.forceSimulation() .force("charge", d3.forceManyBody() .strength(FORCES.CHARGE) ); // Connecting the d3 ticker to an angular event emitter this.simulation.on('tick', function () { ticker.emit(this); }); this.initNodes(); this.initLinks(); } this.simulation.force("centers", d3.forceCenter(options.width / 2, options.height / 2)); this.simulation.restart(); } }
चूंकि हमने अपने मॉडल परिभाषित किए हैं, इसलिए
getForceDirectedGraph पद्धति को
D3Service में भी अपडेट करें
getForceDirectedGraph(nodes: Node[], links: Link[], options: { width, height} ) { let graph = new ForceDirectedGraph(nodes, links, options); return graph; }
ForceDirectedGraph का एक उदाहरण बनाने से अगली वस्तु वापस आ जाएगी
ForceDirectedGraph { ticker: EventEmitter, simulation: Object }
इस ऑब्जेक्ट में हमारे द्वारा पास किए गए डेटा के साथ
simulation प्रॉपर्टी है, साथ ही
ticker प्रॉपर्टी में इवेंट एमिटर है जो सिमुलेशन के हर टिक के साथ फायर करता है। यहाँ हम इसका उपयोग कैसे करेंगे:
graph.ticker.subscribe((simulation) => {});
डी 3
D3Service क्लास के शेष तरीकों को बाद में परिभाषित किया
D3Service , लेकिन अब हम दस्तावेज़ में
simulation ऑब्जेक्ट के डेटा को बांधने की कोशिश करेंगे।
अनुकरण बंधन
हमारे पास ForceDirectedGraph ऑब्जेक्ट का एक उदाहरण है, इसमें लगातार कोने (नोड) और आर्क्स (लिंक) के अपडेट किए गए डेटा शामिल हैं। आप इस डेटा को d3- जैसे डॉक्यूमेंट में बांध सकते हैं (जैसे एक सैवेज):
function ticked() { node .attr("cx", function(d) { return dx; }) .attr("cy", function(d) { return dy; }); }<source> , 21 , , . Angular . <h3><i>: SVG Angular</i></h3> <h3>SVG Angular</h3> SVG, svg html . Angular SVG Angular ( <code>svg</code>). SVG : <ol> <li> <code>svg</code>.</li> <li> “svg”, Angular', <code><svg:line></code></li> </ol> <source lang="xml"> <svg> <line x1="0" y1="0" x2="100" y2="100"></line> </svg>
app.component.html
<svg:line x1="0" y1="0" x2="100" y2="100"></svg:line>
लिंक-example.component.html
एंगुलर में एसवीजी घटक
एसवीजी नाम स्थान पर आने वाले घटकों के लिए चयनकर्ताओं को असाइन करना हमेशा की तरह काम नहीं करेगा। उन्हें केवल विशेषता चयनकर्ता के माध्यम से लागू किया जा सकता है।
<svg> <g [lineExample]></g> </svg>
app.component.html
import { Component } from '@angular/core'; @Component({ selector: '[lineExample]', template: `<svg:line x1="0" y1="0" x2="100" y2="100"></svg:line>` }) export class LineExampleComponent { constructor() {} }
लिंक-example.component.ts
घटक टेम्पलेट में svg उपसर्ग पर ध्यान देंबग़ल का अंत
सिमुलेशन बाइंडिंग - दृश्य भाग
एसवीजी के प्राचीन ज्ञान के साथ सशस्त्र, हम उन घटकों को बनाना शुरू कर सकते हैं जो हमारे डेटा की नकल करेंगे।
visuals फ़ोल्डर में उन्हें अलग करने के बाद, हम
shared फ़ोल्डर बनाएंगे (जहां हम उन घटकों को रखेंगे जिन्हें अन्य प्रकार के ग्राफ़ द्वारा उपयोग किया जा सकता है) और मुख्य
graph फ़ोल्डर, जिसमें उन्मुख ग्राफ़ (फ़ोर्स डायरेक्टेड ग्राफ़) को प्रदर्शित करने के लिए आवश्यक सभी कोड होंगे।
visuals |- graph |- shared
ग्राफ दृश्य
आइए अपना मूल घटक बनाएं, जो एक ग्राफ़ उत्पन्न करेगा और इसे दस्तावेज़ में बाँध देगा। हम घटक के इनपुट विशेषताओं के माध्यम से नोड और लिंक पास करते हैं।
<graph [nodes]="nodes" [links]="links"></graph>
घटक
nodes और
links गुणों को स्वीकार करता है और
ForceDirectedGraph वर्ग को
ForceDirectedGraph // path : visuals/graph/graph.component.ts import { Component, Input } from '@angular/core'; import { D3Service, ForceDirectedGraph, Node } from '../../d3'; @Component({ selector: 'graph', template: ` <svg #svg [attr.width]="_options.width" [attr.height]="_options.height"> <g> <g [linkVisual]="link" *ngFor="let link of links"></g> <g [nodeVisual]="node" *ngFor="let node of nodes"></g> </g> </svg> `, styleUrls: ['./graph.component.css'] }) export class GraphComponent { @Input('nodes') nodes; @Input('links') links; graph: ForceDirectedGraph; constructor(private d3Service: D3Service) { } ngOnInit() { this.graph = this.d3Service.getForceDirectedGraph(this.nodes, this.links, this.options); } ngAfterViewInit() { this.graph.initSimulation(this.options); } private _options: { width, height } = { width: 800, height: 600 }; get options() { return this._options = { width: window.innerWidth, height: window.innerHeight }; } }
घटक NodeVisual
अगला, चलो वर्टेक्स (नोड) रेंडर करने के लिए एक घटक जोड़ते हैं, यह वर्टेक्स की आईडी के साथ एक सर्कल प्रदर्शित करेगा।
// path : visuals/shared/node-visual.component.ts import { Component, Input } from '@angular/core'; import { Node } from '../../../d3'; @Component({ selector: '[nodeVisual]', template: ` <svg:g [attr.transform]="'translate(' + node.x + ',' + node.y + ')'"> <svg:circle cx="0" cy="0" r="50"> </svg:circle> <svg:text> {{node.id}} </svg:text> </svg:g> ` }) export class NodeVisualComponent { @Input('nodeVisual') node: Node; }
LinkVisual घटक
और यहाँ चाप (लिंक) को देखने के लिए घटक है:
// path : visuals/shared/link-visual.component.ts import { Component, Input } from '@angular/core'; import { Link } from '../../../d3'; @Component({ selector: '[linkVisual]', template: ` <svg:line [attr.x1]="link.source.x" [attr.y1]="link.source.y" [attr.x2]="link.target.x" [attr.y2]="link.target.y" ></svg:line> ` }) export class LinkVisualComponent { @Input('linkVisual') link: Link; }
व्यवहार
आइए आवेदन के डी 3 हिस्से पर वापस जाएं, सेवा के लिए निर्देश और तरीके बनाना शुरू करें, जो हमें ग्राफ के साथ बातचीत करने के लिए शांत तरीके देगा।
व्यवहार - ज़ूम
ज़ूम फ़ंक्शन के लिए बाइंडिंग जोड़ें, ताकि बाद में इसे आसानी से उपयोग किया जा सके:
<svg #svg> <g [zoomableOf]="svg"></g> </svg>
// path : d3/d3.service.ts // ... export class D3Service { applyZoomableBehaviour(svgElement, containerElement) { let svg, container, zoomed, zoom; svg = d3.select(svgElement); container = d3.select(containerElement); zoomed = () => { const transform = d3.event.transform; container.attr("transform", "translate(" + transform.x + "," + transform.y + ") scale(" + transform.k + ")"); } zoom = d3.zoom().on("zoom", zoomed); svg.call(zoom); } // ... }
// path : d3/directives/zoomable.directive.ts import { Directive, Input, ElementRef } from '@angular/core'; import { D3Service } from '../d3.service'; @Directive({ selector: '[zoomableOf]' }) export class ZoomableDirective { @Input('zoomableOf') zoomableOf: ElementRef; constructor(private d3Service: D3Service, private _element: ElementRef) {} ngOnInit() { this.d3Service.applyZoomableBehaviour(this.zoomableOf, this._element.nativeElement); } }
व्यवहार - खींचें और ड्रॉप
ड्रैग और ड्रॉप को जोड़ने के लिए, हमें सिमुलेशन ऑब्जेक्ट तक पहुंच की आवश्यकता है ताकि हम खींचते समय ड्राइंग को रोक सकें।
<svg #svg> <g [zoomableOf]="svg"> <g [nodeVisual]="node" *ngFor="let node of nodes" [draggableNode]="node" [draggableInGraph]="graph"> </g> </g> </svg>
// path : d3/d3.service.ts // ... export class D3Service { applyDraggableBehaviour(element, node: Node, graph: ForceDirectedGraph) { const d3element = d3.select(element); function started() { /** Preventing propagation of dragstart to parent elements */ d3.event.sourceEvent.stopPropagation(); if (!d3.event.active) { graph.simulation.alphaTarget(0.3).restart(); } d3.event.on("drag", dragged).on("end", ended); function dragged() { node.fx = d3.event.x; node.fy = d3.event.y; } function ended() { if (!d3.event.active) { graph.simulation.alphaTarget(0); } node.fx = null; node.fy = null; } } d3element.call(d3.drag() .on("start", started)); } // ... }
// path : d3/directives/draggable.directives.ts import { Directive, Input, ElementRef } from '@angular/core'; import { Node, ForceDirectedGraph } from '../models'; import { D3Service } from '../d3.service'; @Directive({ selector: '[draggableNode]' }) export class DraggableDirective { @Input('draggableNode') draggableNode: Node; @Input('draggableInGraph') draggableInGraph: ForceDirectedGraph; constructor(private d3Service: D3Service, private _element: ElementRef) { } ngOnInit() { this.d3Service.applyDraggableBehaviour(this._element.nativeElement, this.draggableNode, this.draggableInGraph); } }
तो आखिरकार हमारे पास क्या है:
- डी 3 के माध्यम से ग्राफ पीढ़ी और सिमुलेशन
- कोणीय डेटा का उपयोग कर दस्तावेज़ को बाइंड डेटा को बांधें
- D3 के माध्यम से ग्राफ के साथ उपयोगकर्ता की बातचीत
अब आप शायद सोचते हैं: "मेरा सिमुलेशन डेटा लगातार बदल रहा है, कोणीय लगातार परिवर्तन का पता लगाने के लिए दस्तावेज़ में इस डेटा को बदलता है, लेकिन मुझे ऐसा क्यों करना चाहिए, मैं सिमुलेशन के प्रत्येक टिक के बाद ग्राफ को खुद अपडेट करना चाहता हूं।"
ठीक है, आप आंशिक रूप से सही हैं, मैंने ट्रैकिंग परिवर्तनों के लिए विभिन्न तंत्रों के साथ प्रदर्शन परीक्षणों के परिणामों की तुलना की और यह पता चला कि निजी तौर पर परिवर्तनों को लागू करते समय, हमें एक अच्छा प्रदर्शन लाभ मिलता है।
कोणीय, डी 3 और परिवर्तन ट्रैकिंग (परिवर्तन का पता लगाने)
हम ऑनपश विधि में परिवर्तन ट्रैकिंग सेट करेंगे (परिवर्तन केवल तभी ट्रैक किए जाएंगे जब ऑब्जेक्ट्स के लिंक पूरी तरह से बदल दिए जाएं)।
वर्टिकल और आर्क्स की वस्तुओं के संदर्भ में परिवर्तन नहीं होता है; तदनुसार, परिवर्तनों को ट्रैक नहीं किया जाएगा। यह महान है! अब हम परिवर्तन ट्रैकिंग को नियंत्रित कर सकते हैं और सिमुलेशन के प्रत्येक टिक पर चेक के लिए इसे चिह्नित कर सकते हैं (टिकर के ईवेंट एमिटर का उपयोग करके जो हमने स्थापित किया था)।
import { Component, ChangeDetectorRef, ChangeDetectionStrategy } from '@angular/core'; @Component({ selector: 'graph', changeDetection: ChangeDetectionStrategy.OnPush, template: `<!-- svg, nodes and links visuals -->` }) export class GraphComponent { constructor(private ref: ChangeDetectorRef) { } ngOnInit() { this.graph = this.d3Service.getForceDirectedGraph(...); this.graph.ticker.subscribe((d) => { this.ref.markForCheck(); }); } }
अब एंगुलर प्रत्येक टिक पर ग्राफ को अपडेट करेगा, यह वही है जो हमें चाहिए।
वह सब है!
आप इस लेख से बच गए और एक शांत, स्केलेबल दृश्य बनाया। मुझे आशा है कि सब कुछ स्पष्ट और उपयोगी था। यदि नहीं, तो मुझे बताएं!
पढ़ने के लिए धन्यवाद!
लिरन शिरर