
एक पिछले लेख में, हमने बॉटमऐपबार की मूल बातें पर चर्चा की, जिसे हमने हाल ही में एंड्रॉइड के लिए सामग्री घटकों के भाग के रूप में Google I / O 2018 में पेश किया था। हमने बॉटमऐपबार को लागू करने का एक तरीका देखा और इसकी विशेषताओं का अध्ययन किया। बॉटमऐपबार मेन्यू आइटम और नेविगेशन ड्राअर कंट्रोल भी दिखा सकता है, जिसका उपयोग हम टूलबार में करते थे।
अब मेनू आइटम और नेविगेशन ड्रावर कंट्रोल बॉटमऐपबार का हिस्सा होना चाहिए। अब देखते हैं कि बॉटमऐपबार के साथ मेनू और नेविगेशन ड्रावर का उपयोग कैसे करें।
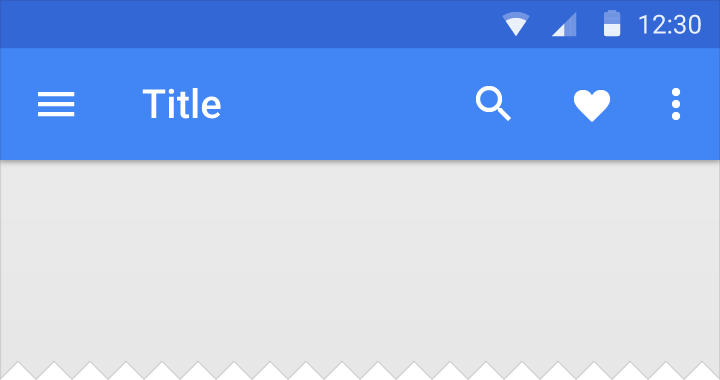
बॉटमऐपबार मेनू
सबसे पहले आपको मेनू आइटम के लिए रेस / मेनू निर्देशिका में एक .xml फ़ाइल बनाने की आवश्यकता है जिसे बॉटमऐपबार में प्रदर्शित किया जाना चाहिए। यहाँ मेरा bottomappbar_menu.xml फ़ाइल है:
<?xml version="1.0" encoding="utf-8"?> <menu xmlns:tools="http://schemas.android.com/tools" xmlns:app="http://schemas.android.com/apk/res-auto" xmlns:android="http://schemas.android.com/apk/res/android"> <item android:id="@+id/app_bar_fav" android:icon="@drawable/baseline_favorite_white_24" android:title="@string/action_favorite" app:showAsAction="ifRoom"/> <item android:id="@+id/app_bar_search" android:icon="@drawable/baseline_search_white_24" android:title="@string/action_search" app:showAsAction="ifRoom"/> <item android:id="@+id/app_bar_settings" android:title="@string/action_settings" app:showAsAction="never"/> </menu>
MainActivity में, जिसमें आप setSupportActionBar कहते हैं (bottom_app_bar) , निम्न कोड को विधि में जोड़ें:
override fun onCreateOptionsMenu(menu: Menu): Boolean { val inflater = menuInflater inflater.inflate(R.menu.bottomappbar_menu, menu) return true }
मेनू आइटम अब बॉटमऐपबार में दिखाई देने चाहिए।
मेन्यू आइटम पर क्लिक को हैंडल करना
मेनू आइटम पर क्लिक को संसाधित करने के लिए, आपको मुख्य कोड को मुख्यता में जोड़ना होगा:
override fun onOptionsItemSelected(item: MenuItem?): Boolean { when (item!!.itemId) { R.id.app_bar_fav -> toast("Fav menu item is clicked!") R.id.app_bar_search -> toast("Search menu item is clicked!") R.id.app_bar_settings -> toast("Settings item is clicked!") } return true }
अब बॉटमऐपबार में मेनू कॉन्फ़िगर किया गया है और इसे सही ढंग से काम करना चाहिए:

बॉटमऐपबार में नेविगेशन ड्रॉअर कंट्रोल
आमतौर पर नेविगेशन ड्रावर को एप्लिकेशन के बाईं ओर स्थित नेविगेशन व्यू का उपयोग करके कार्यान्वित किया जाता है। बॉटमऐपबार के साथ नेविगेशन ड्रावर का व्यवहार बदल गया है। अब नेविगेशन ड्रावर एप्लिकेशन के निचले भाग में एक मोडल विंडो है ।

सबसे पहले आपको स्वयं मोडल विंडो बनाने की आवश्यकता है:
fragment_bottomsheet.xml
<?xml version="1.0" encoding="utf-8"?> <androidx.constraintlayout.widget.ConstraintLayout xmlns:app="http://schemas.android.com/apk/res-auto" xmlns:tools="http://schemas.android.com/tools" xmlns:android="http://schemas.android.com/apk/res/android" android:layout_width="match_parent" android:layout_height="wrap_content"> <com.google.android.material.navigation.NavigationView android:id="@+id/navigation_view" android:layout_width="match_parent" android:layout_height="wrap_content" android:layout_gravity="bottom" android:layout_marginStart="8dp" android:layout_marginTop="8dp" android:layout_marginEnd="8dp" app:layout_constraintEnd_toEndOf="parent" app:layout_constraintStart_toStartOf="parent" app:layout_constraintTop_toTopOf="parent" app:menu="@menu/bottom_nav_drawer_menu"/> </androidx.constraintlayout.widget.ConstraintLayout>
नेविगेशन ड्रॉअर के लिए मेनू फ़ाइल को रिस / मेनू में भी स्थित होना चाहिए।
bottom_nav_drawer_menu.xml
<?xml version="1.0" encoding="utf-8"?> <menu xmlns:android="http://schemas.android.com/apk/res/android" xmlns:app="http://schemas.android.com/apk/res-auto"> <group android:checkableBehavior="none"> <item android:id="@+id/nav1" android:icon="@drawable/baseline_exposure_plus_1_black_24" android:title="@string/nav_item1" /> <item android:id="@+id/nav2" android:icon="@drawable/baseline_replay_10_black_24" android:title="@string/nav_item2" /> <item android:id="@+id/nav3" android:icon="@drawable/baseline_forward_10_black_24" android:title="@string/nav_item3" /> </group> </menu>
फिर आपको एक ऐसा वर्ग बनाने की जरूरत है जो बॉटमशीटडायलॉगफ्रैगमेंट को बढ़ा दे, जो एक मोडल विंडो बनाएगा:
import android.os.Bundle import android.view.LayoutInflater import android.view.View import android.view.ViewGroup import com.google.android.material.bottomsheet.BottomSheetDialogFragment class BottomNavigationDrawerFragment: BottomSheetDialogFragment() { override fun onCreateView(inflater: LayoutInflater, container: ViewGroup?, savedInstanceState: Bundle?): View? { return inflater.inflate(R.layout.fragment_bottomsheet, container, false) } }
कोड की निम्न पंक्तियों को onOptionsItemSelected पद्धति में जोड़ा जाना चाहिए, जिसका उपयोग मेनू आइटम पर क्लिक को संसाधित करने के लिए किया जाता है। जब आप नेविगेशन आइकन पर क्लिक करते हैं, तो बॉटम नॅनविजेंसीवार्डफ्रेगमेंट ऑब्जेक्ट का एक उदाहरण बनाया जाएगा और नेविगेशन व्यू प्रदर्शित होगा।
android.R.id.home -> { val bottomNavDrawerFragment = BottomNavigationDrawerFragment() bottomNavDrawerFragment.show(supportFragmentManager, bottomNavDrawerFragment.tag) }
यहाँ MainActivity लेआउट कोड है:
activity_main.xml
<?xml version="1.0" encoding="utf-8"?> <androidx.constraintlayout.widget.ConstraintLayout xmlns:android="http://schemas.android.com/apk/res/android" xmlns:app="http://schemas.android.com/apk/res-auto" xmlns:tools="http://schemas.android.com/tools" android:layout_width="match_parent" android:layout_height="match_parent"> <TextView android:layout_width="wrap_content" android:layout_height="wrap_content" android:text="Hello World!" app:layout_constraintBottom_toBottomOf="parent" app:layout_constraintLeft_toLeftOf="parent" app:layout_constraintRight_toRightOf="parent" app:layout_constraintTop_toTopOf="parent" /> <androidx.coordinatorlayout.widget.CoordinatorLayout android:layout_width="match_parent" android:layout_height="match_parent"> <com.google.android.material.bottomappbar.BottomAppBar android:id="@+id/bottom_app_bar" android:layout_width="match_parent" android:layout_height="wrap_content" android:layout_gravity="bottom" app:backgroundTint="@color/colorPrimary" app:fabAlignmentMode="center" app:fabAttached="true" app:navigationIcon="@drawable/baseline_menu_white_24"/> <com.google.android.material.floatingactionbutton.FloatingActionButton android:id="@+id/fab" android:layout_width="wrap_content" android:layout_height="wrap_content" android:src="@drawable/baseline_add_white_24" app:layout_anchor="@id/bottom_app_bar" /> </androidx.coordinatorlayout.widget.CoordinatorLayout> </androidx.constraintlayout.widget.ConstraintLayout>
और नेविगेशन ड्रॉअर विंडो में तत्वों पर क्लिक के लिए, आप नीचे दिए गए कोड का उपयोग कर सकते हैं।
navigation_view.setNavigationItemSelectedListener { menuItem -> // Bottom Navigation Drawer menu item clicks when (menuItem!!.itemId) { R.id.nav1 -> context!!.toast(getString(R.string.nav1_clicked)) R.id.nav2 -> context!!.toast(getString(R.string.nav2_clicked)) R.id.nav3 -> context!!.toast(getString(R.string.nav3_clicked)) } true }

इस लेख के लिए पूर्ण स्रोत कोड Github पर पाया जा सकता है। इस विषय में रुचि रखने वालों के लिए, इस लेख के पिछले भाग और अगले भाग को पढ़ें।
B बॉटमऐपबार का कार्यान्वयन। भाग 1: Android के लिए सामग्री घटक
→ बॉटमऐपबार का कार्यान्वयन। भाग 3: Android के लिए व्यवहार