पायथन + ओपनसीवी + केर: आधे घंटे में पाठ की पहचान करें

हाय हमर।

60,000 हस्तलिखित संख्याओं के एक प्रसिद्ध आधार के साथ प्रयोग करने के बाद, MNIST, तार्किक सवाल उठता है कि क्या कुछ समान था, लेकिन न केवल संख्या के लिए समर्थन के साथ, बल्कि पत्रों के लिए भी। जैसा कि यह पता चला है, और ऐसा आधार कहा जाता है, जैसा कि आप अनुमान लगा सकते हैं, विस्तारित MNIST (EMNIST)।

अगर किसी को दिलचस्पी है कि इस डेटाबेस का उपयोग करके आप एक साधारण पाठ पहचान बना सकते हैं, तो बिल्ली का स्वागत करें।


नोट : यह उदाहरण प्रयोगात्मक और शैक्षिक है, मैं सिर्फ यह देखना चाहता था कि इसके बारे में क्या आता है। मैंने योजना नहीं बनाई और दूसरा फाइनरडर करने की योजना नहीं बनाई है, इसलिए यहां बहुत सी चीजें, निश्चित रूप से लागू नहीं होती हैं। इसलिए, "क्यों," "पहले से बेहतर है," आदि की शैली में दावे स्वीकार नहीं किए जाते हैं। संभवत: पहले से ही अजगर के लिए तैयार ओसीआर पुस्तकालय हैं, लेकिन यह स्वयं करना दिलचस्प था। वैसे, जो लोग यह देखना चाहते हैं कि असली फ़ाइनरडर कैसे बनाया गया था, उनके ब्लॉग में 2014 के हेबर पर दो लेख हैं: 1 और 2 (लेकिन निश्चित रूप से, स्रोत कोड और विवरण के बिना, किसी भी कॉर्पोरेट ब्लॉग में)। ठीक है, चलो शुरू हो जाओ, यहाँ सब कुछ खुला है और सब कुछ खुला स्रोत है।

एक उदाहरण के लिए हम सादा पाठ लेंगे। यहाँ एक है:

हेलो वर्ल्ड


और देखते हैं कि इसके साथ क्या किया जा सकता है।

अक्षरों में पाठ को तोड़ना


पहला कदम पाठ को अलग-अलग अक्षरों में तोड़ना है। OpenCV इसके लिए उपयोगी है, और अधिक सटीक रूप से इसके खोज कार्य।

छवि खोलें (cv2.imread), इसे b / w (cv2.cvtColor + cv2.threshold) में अनुवाद करें, थोड़ा बढ़ाएं (cv2.erode) और रूपरेखा खोजें।

image_file = "text.png" img = cv2.imread(image_file) gray = cv2.cvtColor(img, cv2.COLOR_BGR2GRAY) ret, thresh = cv2.threshold(gray, 0, 255, cv2.THRESH_BINARY) img_erode = cv2.erode(thresh, np.ones((3, 3), np.uint8), iterations=1) # Get contours contours, hierarchy = cv2.findContours(img_erode, cv2.RETR_TREE, cv2.CHAIN_APPROX_NONE) output = img.copy() for idx, contour in enumerate(contours): (x, y, w, h) = cv2.boundingRect(contour) # print("R", idx, x, y, w, h, cv2.contourArea(contour), hierarchy[0][idx]) # hierarchy[i][0]: the index of the next contour of the same level # hierarchy[i][1]: the index of the previous contour of the same level # hierarchy[i][2]: the index of the first child # hierarchy[i][3]: the index of the parent if hierarchy[0][idx][3] == 0: cv2.rectangle(output, (x, y), (x + w, y + h), (70, 0, 0), 1) cv2.imshow("Input", img) cv2.imshow("Enlarged", img_erode) cv2.imshow("Output", output) cv2.waitKey(0) 

हमें कंट्रोवर्सीज (पैरामीटर cv2.RETR_TREE) का एक श्रेणीबद्ध पेड़ मिलता है। सबसे पहले तस्वीर की सामान्य रूपरेखा, फिर अक्षरों की आकृति, फिर आंतरिक आकृति आती है। हमें केवल अक्षरों की रूपरेखा की आवश्यकता है, इसलिए मैं जांचता हूं कि "रूपरेखा" समग्र रूपरेखा है। यह एक सरलीकृत दृष्टिकोण है, और वास्तविक स्कैन के लिए यह काम नहीं कर सकता है, हालांकि स्क्रीनशॉट को पहचानना महत्वपूर्ण नहीं है।

परिणाम:


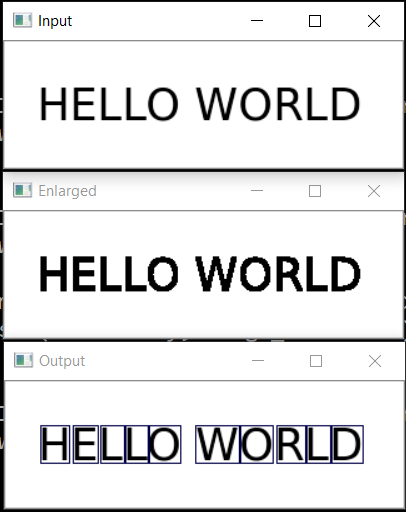
अगला चरण प्रत्येक अक्षर को सहेजना है, पहले इसे 28x28 वर्ग तक बढ़ाया है (यह इस प्रारूप में है कि MNIST डेटाबेस संग्रहीत है)। OpenCV को खसखस ​​के आधार पर बनाया गया है, ताकि हम फसल और स्केलिंग के लिए सरणियों के साथ काम करने के कार्यों का उपयोग कर सकें।

 def letters_extract(image_file: str, out_size=28) -> List[Any]: img = cv2.imread(image_file) gray = cv2.cvtColor(img, cv2.COLOR_BGR2GRAY) ret, thresh = cv2.threshold(gray, 0, 255, cv2.THRESH_BINARY) img_erode = cv2.erode(thresh, np.ones((3, 3), np.uint8), iterations=1) # Get contours contours, hierarchy = cv2.findContours(img_erode, cv2.RETR_TREE, cv2.CHAIN_APPROX_NONE) output = img.copy() letters = [] for idx, contour in enumerate(contours): (x, y, w, h) = cv2.boundingRect(contour) # print("R", idx, x, y, w, h, cv2.contourArea(contour), hierarchy[0][idx]) # hierarchy[i][0]: the index of the next contour of the same level # hierarchy[i][1]: the index of the previous contour of the same level # hierarchy[i][2]: the index of the first child # hierarchy[i][3]: the index of the parent if hierarchy[0][idx][3] == 0: cv2.rectangle(output, (x, y), (x + w, y + h), (70, 0, 0), 1) letter_crop = gray[y:y + h, x:x + w] # print(letter_crop.shape) # Resize letter canvas to square size_max = max(w, h) letter_square = 255 * np.ones(shape=[size_max, size_max], dtype=np.uint8) if w > h: # Enlarge image top-bottom # ------ # ====== # ------ y_pos = size_max//2 - h//2 letter_square[y_pos:y_pos + h, 0:w] = letter_crop elif w < h: # Enlarge image left-right # --||-- x_pos = size_max//2 - w//2 letter_square[0:h, x_pos:x_pos + w] = letter_crop else: letter_square = letter_crop # Resize letter to 28x28 and add letter and its X-coordinate letters.append((x, w, cv2.resize(letter_square, (out_size, out_size), interpolation=cv2.INTER_AREA))) # Sort array in place by X-coordinate letters.sort(key=lambda x: x[0], reverse=False) return letters 

अंत में, हम अक्षरों को एक्स-समन्वय द्वारा सॉर्ट करते हैं, जैसा कि आप देख सकते हैं, हम परिणाम को टपल (एक्स, डब्ल्यू, पत्र) के रूप में सहेजते हैं, ताकि अक्षरों के बीच के रिक्त स्थान से रिक्त स्थान का चयन किया जा सके।

सुनिश्चित करें कि सब कुछ काम करता है:

 cv2.imshow("0", letters[0][2]) cv2.imshow("1", letters[1][2]) cv2.imshow("2", letters[2][2]) cv2.imshow("3", letters[3][2]) cv2.imshow("4", letters[4][2]) cv2.waitKey(0) 


पत्र मान्यता के लिए तैयार हैं, हम उन्हें एक दृढ़ नेटवर्क का उपयोग करके पहचानेंगे - इस प्रकार के नेटवर्क इस तरह के कार्यों के लिए अच्छी तरह से अनुकूल हैं।

मान्यता के लिए तंत्रिका नेटवर्क (CNN)


EMNIST डेटासेट के स्रोत में 62 विभिन्न वर्ण (A..Z, 0..9, आदि) हैं:

 emnist_labels = [48, 49, 50, 51, 52, 53, 54, 55, 56, 57, 65, 66, 67, 68, 69, 70, 71, 72, 73, 74, 75, 76, 77, 78, 79, 80, 81, 82, 83, 84, 85, 86, 87, 88, 89, 90, 97, 98, 99, 100, 101, 102, 103, 104, 105, 106, 107, 108, 109, 110, 111, 112, 113, 114, 115, 116, 117, 118, 119, 120, 121, 122] 

एक तंत्रिका नेटवर्क, तदनुसार, 62 आउटपुट हैं, इनपुट पर इसे 28x28 छवियां प्राप्त होंगी, मान्यता के बाद "1" इसी नेटवर्क आउटपुट पर होगा।

एक नेटवर्क मॉडल बनाएं।

 from tensorflow import keras from keras.models import Sequential from keras import optimizers from keras.layers import Convolution2D, MaxPooling2D, Dropout, Flatten, Dense, Reshape, LSTM, BatchNormalization from keras.optimizers import SGD, RMSprop, Adam from keras import backend as K from keras.constraints import maxnorm import tensorflow as tf def emnist_model(): model = Sequential() model.add(Convolution2D(filters=32, kernel_size=(3, 3), padding='valid', input_shape=(28, 28, 1), activation='relu')) model.add(Convolution2D(filters=64, kernel_size=(3, 3), activation='relu')) model.add(MaxPooling2D(pool_size=(2, 2))) model.add(Dropout(0.25)) model.add(Flatten()) model.add(Dense(512, activation='relu')) model.add(Dropout(0.5)) model.add(Dense(len(emnist_labels), activation='softmax')) model.compile(loss='categorical_crossentropy', optimizer='adadelta', metrics=['accuracy']) return model 

जैसा कि आप देख सकते हैं, यह एक क्लासिक कन्वेन्शनल नेटवर्क है जो इमेज के कुछ फीचर्स (फिल्टर 32 और 64 की संख्या) पर प्रकाश डालता है, जिनमें से "आउटपुट" को "रैखिक" एमएलपी नेटवर्क से जोड़ा जाता है, जो अंतिम परिणाम बनाता है।

तंत्रिका नेटवर्क प्रशिक्षण


हम सबसे लंबे समय तक चरण - नेटवर्क प्रशिक्षण पास करते हैं। ऐसा करने के लिए, हम EMNIST डेटाबेस लेते हैं, जिसे लिंक (संग्रह आकार 536Mb) से डाउनलोड किया जा सकता है।

डेटाबेस को पढ़ने के लिए, idx2numpy लाइब्रेरी का उपयोग करें। हम प्रशिक्षण और सत्यापन के लिए डेटा तैयार करेंगे।

 import idx2numpy emnist_path = '/home/Documents/TestApps/keras/emnist/' X_train = idx2numpy.convert_from_file(emnist_path + 'emnist-byclass-train-images-idx3-ubyte') y_train = idx2numpy.convert_from_file(emnist_path + 'emnist-byclass-train-labels-idx1-ubyte') X_test = idx2numpy.convert_from_file(emnist_path + 'emnist-byclass-test-images-idx3-ubyte') y_test = idx2numpy.convert_from_file(emnist_path + 'emnist-byclass-test-labels-idx1-ubyte') X_train = np.reshape(X_train, (X_train.shape[0], 28, 28, 1)) X_test = np.reshape(X_test, (X_test.shape[0], 28, 28, 1)) print(X_train.shape, y_train.shape, X_test.shape, y_test.shape, len(emnist_labels)) k = 10 X_train = X_train[:X_train.shape[0] // k] y_train = y_train[:y_train.shape[0] // k] X_test = X_test[:X_test.shape[0] // k] y_test = y_test[:y_test.shape[0] // k] # Normalize X_train = X_train.astype(np.float32) X_train /= 255.0 X_test = X_test.astype(np.float32) X_test /= 255.0 x_train_cat = keras.utils.to_categorical(y_train, len(emnist_labels)) y_test_cat = keras.utils.to_categorical(y_test, len(emnist_labels)) 

हमने प्रशिक्षण और सत्यापन के लिए दो सेट तैयार किए हैं। वर्ण स्वयं सामान्य सरणियाँ हैं जिन्हें प्रदर्शित करना आसान है:


हम प्रशिक्षण (पैरामीटर k) के लिए डेटासेट का केवल 1/10 उपयोग करते हैं, अन्यथा प्रक्रिया में कम से कम 10 घंटे लगेंगे।

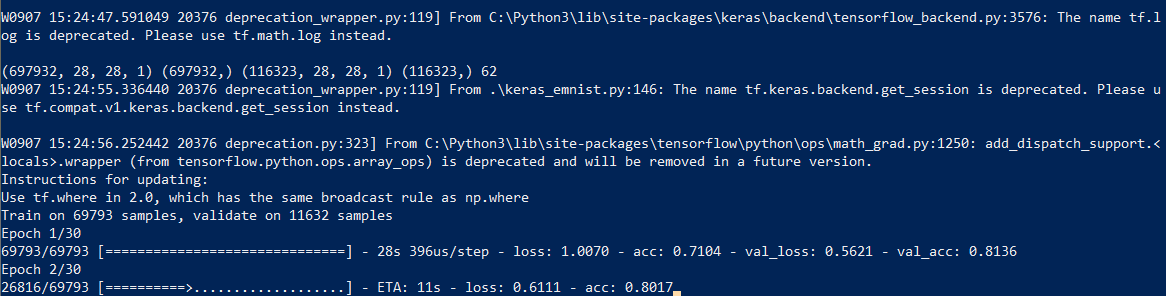
हम नेटवर्क प्रशिक्षण शुरू करते हैं, प्रक्रिया के अंत में हम प्रशिक्षित मॉडल को डिस्क पर सहेजते हैं।

 # Set a learning rate reduction learning_rate_reduction = keras.callbacks.ReduceLROnPlateau(monitor='val_acc', patience=3, verbose=1, factor=0.5, min_lr=0.00001) # Required for learning_rate_reduction: keras.backend.get_session().run(tf.global_variables_initializer()) model.fit(X_train, x_train_cat, validation_data=(X_test, y_test_cat), callbacks=[learning_rate_reduction], batch_size=64, epochs=30) model.save('emnist_letters.h5') 

सीखने की प्रक्रिया में ही लगभग आधा घंटा लग जाता है:


इसे केवल एक बार करने की आवश्यकता है, फिर हम पहले से सहेजे गए मॉडल फ़ाइल का उपयोग करेंगे। जब प्रशिक्षण समाप्त हो जाता है, तो सब कुछ तैयार है, आप पाठ को पहचान सकते हैं।

मान्यता


मान्यता के लिए, हम मॉडल को लोड करते हैं और कॉल करने के लिए predict_classes फ़ंक्शन।

 model = keras.models.load_model('emnist_letters.h5') def emnist_predict_img(model, img): img_arr = np.expand_dims(img, axis=0) img_arr = 1 - img_arr/255.0 img_arr[0] = np.rot90(img_arr[0], 3) img_arr[0] = np.fliplr(img_arr[0]) img_arr = img_arr.reshape((1, 28, 28, 1)) result = model.predict_classes([img_arr]) return chr(emnist_labels[result[0]]) 

जैसा कि यह निकला, शुरुआत में डेटासेट्स को घुमाया गया था, इसलिए हमें मान्यता से पहले छवि को घुमाना होगा।

अंतिम फ़ंक्शन, जो इनपुट पर एक छवि के साथ एक फ़ाइल प्राप्त करता है और आउटपुट पर एक लाइन देता है, कोड की केवल 10 लाइनें लेता है:

 def img_to_str(model: Any, image_file: str): letters = letters_extract(image_file) s_out = "" for i in range(len(letters)): dn = letters[i+1][0] - letters[i][0] - letters[i][1] if i < len(letters) - 1 else 0 s_out += emnist_predict_img(model, letters[i][2]) if (dn > letters[i][1]/4): s_out += ' ' return s_out 

यहाँ हम रिक्त स्थान को जोड़ने के लिए पहले से सहेजे गए वर्ण चौड़ाई का उपयोग करते हैं यदि अक्षरों के बीच का अंतर वर्ण के 1/4 से अधिक हो।

उपयोग उदाहरण:
 model = keras.models.load_model('emnist_letters.h5') s_out = img_to_str(model, "hello_world.png") print(s_out) 

परिणाम:


एक मजेदार विशेषता यह है कि तंत्रिका नेटवर्क "O" अक्षर "O" और संख्या "0" है, जो, हालांकि, आश्चर्यचकित नहीं है EMNIST के मूल सेट में हस्तलिखित अक्षर और संख्याएँ होती हैं जो मुद्रित लोगों की तरह नहीं होते हैं। आदर्श रूप से, स्क्रीन ग्रंथों को पहचानने के लिए, आपको स्क्रीन फोंट के आधार पर एक अलग सेट तैयार करने की आवश्यकता है, और पहले से ही इस पर एक तंत्रिका नेटवर्क को प्रशिक्षित करना होगा।

निष्कर्ष


जैसा कि आप देख सकते हैं, यह देवता नहीं हैं जो बर्तन जलाते हैं, और जो एक बार आधुनिक पुस्तकालयों की मदद से "जादू" लग रहा था, उसे काफी सरल बना दिया गया है।

चूंकि पायथन क्रॉस-प्लेटफॉर्म है, इसलिए कोड हर जगह विंडोज, लिनक्स और ओएसएक्स पर काम करेगा। जैसे केरस को iOS / Android पर पोर्ट किया जाता है, इसलिए सैद्धांतिक रूप से, प्रशिक्षित मॉडल का उपयोग मोबाइल उपकरणों पर भी किया जा सकता है

जो लोग अपने दम पर प्रयोग करना चाहते हैं, उनके लिए स्रोत कोड स्पॉइलर है।

keras_emnist.py
 # Code source: dmitryelj@gmail.com import os # Force CPU # os.environ["CUDA_VISIBLE_DEVICES"] = "-1" # Debug messages # 0 = all messages are logged (default behavior) # 1 = INFO messages are not printed # 2 = INFO and WARNING messages are not printed # 3 = INFO, WARNING, and ERROR messages are not printed os.environ['TF_CPP_MIN_LOG_LEVEL'] = '3' import cv2 import imghdr import numpy as np import pathlib from tensorflow import keras from keras.models import Sequential from keras import optimizers from keras.layers import Convolution2D, MaxPooling2D, Dropout, Flatten, Dense, Reshape, LSTM, BatchNormalization from keras.optimizers import SGD, RMSprop, Adam from keras import backend as K from keras.constraints import maxnorm import tensorflow as tf from scipy import io as spio import idx2numpy # sudo pip3 install idx2numpy from matplotlib import pyplot as plt from typing import * import time # Dataset: # https://www.nist.gov/node/1298471/emnist-dataset # https://www.itl.nist.gov/iaui/vip/cs_links/EMNIST/gzip.zip def cnn_print_digit(d): print(d.shape) for x in range(28): s = "" for y in range(28): s += "{0:.1f} ".format(d[28*y + x]) print(s) def cnn_print_digit_2d(d): print(d.shape) for y in range(d.shape[0]): s = "" for x in range(d.shape[1]): s += "{0:.1f} ".format(d[x][y]) print(s) emnist_labels = [48, 49, 50, 51, 52, 53, 54, 55, 56, 57, 65, 66, 67, 68, 69, 70, 71, 72, 73, 74, 75, 76, 77, 78, 79, 80, 81, 82, 83, 84, 85, 86, 87, 88, 89, 90, 97, 98, 99, 100, 101, 102, 103, 104, 105, 106, 107, 108, 109, 110, 111, 112, 113, 114, 115, 116, 117, 118, 119, 120, 121, 122] def emnist_model(): model = Sequential() model.add(Convolution2D(filters=32, kernel_size=(3, 3), padding='valid', input_shape=(28, 28, 1), activation='relu')) model.add(Convolution2D(filters=64, kernel_size=(3, 3), activation='relu')) model.add(MaxPooling2D(pool_size=(2, 2))) model.add(Dropout(0.25)) model.add(Flatten()) model.add(Dense(512, activation='relu')) model.add(Dropout(0.5)) model.add(Dense(len(emnist_labels), activation='softmax')) model.compile(loss='categorical_crossentropy', optimizer='adadelta', metrics=['accuracy']) return model def emnist_model2(): model = Sequential() # In Keras there are two options for padding: same or valid. Same means we pad with the number on the edge and valid means no padding. model.add(Convolution2D(filters=32, kernel_size=(3, 3), activation='relu', padding='same', input_shape=(28, 28, 1))) model.add(MaxPooling2D((2, 2))) model.add(Convolution2D(64, (3, 3), activation='relu', padding='same')) model.add(MaxPooling2D((2, 2))) model.add(Convolution2D(128, (3, 3), activation='relu', padding='same')) model.add(MaxPooling2D((2, 2))) # model.add(Conv2D(128, (3, 3), activation='relu', padding='same')) # model.add(MaxPooling2D((2, 2))) ## model.add(Dropout(0.25)) model.add(Flatten()) model.add(Dense(512, activation='relu')) model.add(Dropout(0.5)) model.add(Dense(len(emnist_labels), activation='softmax')) model.compile(loss='categorical_crossentropy', optimizer='adadelta', metrics=['accuracy']) return model def emnist_model3(): model = Sequential() model.add(Convolution2D(filters=32, kernel_size=(3, 3), padding='same', input_shape=(28, 28, 1), activation='relu')) model.add(Convolution2D(filters=32, kernel_size=(3, 3), padding='same', activation='relu')) model.add(MaxPooling2D(pool_size=(2, 2))) model.add(Dropout(0.25)) model.add(Convolution2D(filters=64, kernel_size=(3, 3), padding='same', activation='relu')) model.add(Convolution2D(filters=64, kernel_size=(3, 3), padding='same', activation='relu')) model.add(MaxPooling2D(pool_size=(2, 2), strides=(2, 2))) model.add(Dropout(0.25)) model.add(Flatten()) model.add(Dense(512, activation="relu")) model.add(Dropout(0.5)) model.add(Dense(len(emnist_labels), activation="softmax")) model.compile(loss='categorical_crossentropy', optimizer=RMSprop(lr=0.001, rho=0.9, epsilon=1e-08, decay=0.0), metrics=['accuracy']) return model def emnist_train(model): t_start = time.time() emnist_path = 'D:\\Temp\\1\\' X_train = idx2numpy.convert_from_file(emnist_path + 'emnist-byclass-train-images-idx3-ubyte') y_train = idx2numpy.convert_from_file(emnist_path + 'emnist-byclass-train-labels-idx1-ubyte') X_test = idx2numpy.convert_from_file(emnist_path + 'emnist-byclass-test-images-idx3-ubyte') y_test = idx2numpy.convert_from_file(emnist_path + 'emnist-byclass-test-labels-idx1-ubyte') X_train = np.reshape(X_train, (X_train.shape[0], 28, 28, 1)) X_test = np.reshape(X_test, (X_test.shape[0], 28, 28, 1)) print(X_train.shape, y_train.shape, X_test.shape, y_test.shape, len(emnist_labels)) # Test: k = 10 X_train = X_train[:X_train.shape[0] // k] y_train = y_train[:y_train.shape[0] // k] X_test = X_test[:X_test.shape[0] // k] y_test = y_test[:y_test.shape[0] // k] # Normalize X_train = X_train.astype(np.float32) X_train /= 255.0 X_test = X_test.astype(np.float32) X_test /= 255.0 x_train_cat = keras.utils.to_categorical(y_train, len(emnist_labels)) y_test_cat = keras.utils.to_categorical(y_test, len(emnist_labels)) # Set a learning rate reduction learning_rate_reduction = keras.callbacks.ReduceLROnPlateau(monitor='val_acc', patience=3, verbose=1, factor=0.5, min_lr=0.00001) # Required for learning_rate_reduction: keras.backend.get_session().run(tf.global_variables_initializer()) model.fit(X_train, x_train_cat, validation_data=(X_test, y_test_cat), callbacks=[learning_rate_reduction], batch_size=64, epochs=30) print("Training done, dT:", time.time() - t_start) def emnist_predict(model, image_file): img = keras.preprocessing.image.load_img(image_file, target_size=(28, 28), color_mode='grayscale') emnist_predict_img(model, img) def emnist_predict_img(model, img): img_arr = np.expand_dims(img, axis=0) img_arr = 1 - img_arr/255.0 img_arr[0] = np.rot90(img_arr[0], 3) img_arr[0] = np.fliplr(img_arr[0]) img_arr = img_arr.reshape((1, 28, 28, 1)) result = model.predict_classes([img_arr]) return chr(emnist_labels[result[0]]) def letters_extract(image_file: str, out_size=28): img = cv2.imread(image_file) gray = cv2.cvtColor(img, cv2.COLOR_BGR2GRAY) ret, thresh = cv2.threshold(gray, 0, 255, cv2.THRESH_BINARY) img_erode = cv2.erode(thresh, np.ones((3, 3), np.uint8), iterations=1) # Get contours contours, hierarchy = cv2.findContours(img_erode, cv2.RETR_TREE, cv2.CHAIN_APPROX_NONE) output = img.copy() letters = [] for idx, contour in enumerate(contours): (x, y, w, h) = cv2.boundingRect(contour) # print("R", idx, x, y, w, h, cv2.contourArea(contour), hierarchy[0][idx]) # hierarchy[i][0]: the index of the next contour of the same level # hierarchy[i][1]: the index of the previous contour of the same level # hierarchy[i][2]: the index of the first child # hierarchy[i][3]: the index of the parent if hierarchy[0][idx][3] == 0: cv2.rectangle(output, (x, y), (x + w, y + h), (70, 0, 0), 1) letter_crop = gray[y:y + h, x:x + w] # print(letter_crop.shape) # Resize letter canvas to square size_max = max(w, h) letter_square = 255 * np.ones(shape=[size_max, size_max], dtype=np.uint8) if w > h: # Enlarge image top-bottom # ------ # ====== # ------ y_pos = size_max//2 - h//2 letter_square[y_pos:y_pos + h, 0:w] = letter_crop elif w < h: # Enlarge image left-right # --||-- x_pos = size_max//2 - w//2 letter_square[0:h, x_pos:x_pos + w] = letter_crop else: letter_square = letter_crop # Resize letter to 28x28 and add letter and its X-coordinate letters.append((x, w, cv2.resize(letter_square, (out_size, out_size), interpolation=cv2.INTER_AREA))) # Sort array in place by X-coordinate letters.sort(key=lambda x: x[0], reverse=False) # cv2.imshow("Input", img) # # cv2.imshow("Gray", thresh) # cv2.imshow("Enlarged", img_erode) # cv2.imshow("Output", output) # cv2.imshow("0", letters[0][2]) # cv2.imshow("1", letters[1][2]) # cv2.imshow("2", letters[2][2]) # cv2.imshow("3", letters[3][2]) # cv2.imshow("4", letters[4][2]) # cv2.waitKey(0) return letters def img_to_str(model: Any, image_file: str): letters = letters_extract(image_file) s_out = "" for i in range(len(letters)): dn = letters[i+1][0] - letters[i][0] - letters[i][1] if i < len(letters) - 1 else 0 s_out += emnist_predict_img(model, letters[i][2]) if (dn > letters[i][1]/4): s_out += ' ' return s_out if __name__ == "__main__": # model = emnist_model() # emnist_train(model) # model.save('emnist_letters.h5') model = keras.models.load_model('emnist_letters.h5') s_out = img_to_str(model, "hello_world.png") print(s_out) 


हमेशा की तरह, सभी सफल प्रयोग।

Source: https://habr.com/ru/post/hi466565/


All Articles