Dalam posting ini saya ingin membuat demo Nginx VTS + Prometheus + Grafana. Untuk demo, hulu perlu mengeluarkan kode http yang berbeda. Proyek-proyek berikut dapat melakukan ini: Mockify , ditulis dalam Golang, dan WireMock , ditulis dalam Java.
Daftar isi yang kecil
- instalasi dan konfigurasi Nginx VTS + Prometheus + Grafana;
- Mockify adalah API emulasi yang ringan dan dapat dikonfigurasi, ditulis dalam Golang;
- Perbandingan penggunaan CPU untuk Mockify, ditulis dalam Golang, dan WireMock, ditulis dalam Java.
Mesin virtual test stand:
inxi CPU: 8x Single Core Intel Xeon E312xx (Sandy Bridge) (-SMP-) speed: 2594 MHz Kernel: 3.10.0-957.1.3.el7.x86_64 x86_64 Up: 58m Mem: 474.9/32011.6 MiB (1.5%) Storage: 80.00 GiB (2.7% used) Procs: 149 Shell: bash 4.2.46 inxi: 3.0.35
Konfigurasi prometheus:
global: scrape_interval: 5s # Set the scrape interval to every 15 seconds. Default is every 1 minute. evaluation_interval: 5s # Evaluate rules every 15 seconds. The default is every 1 minute. # scrape_timeout is set to the global default (10s). # Alertmanager configuration alerting: alertmanagers: - static_configs: - targets: # - alertmanager:9093 # Load rules once and periodically evaluate them according to the global 'evaluation_interval'. rule_files: # - "first_rules.yml" # - "second_rules.yml" scrape_configs: - job_name: 'prometheus' static_configs: - targets: ['localhost:9090'] - job_name: 'nginx_vts_exporter' static_configs: - targets: ['localhost:9913']
Konfigurasi Grafana standar. ID Dashboard 2949.
Untuk Nginx VTS, Anda perlu mengkompilasi nginx dengan modul nginx-module-vts. Kami melakukan ini menggunakan Nginx-builder . Konfigurasi nya:
nginx_version: 1.16.1 output_package: rpm modules: - module: name: nginx-module-vts git_url: https://github.com/vozlt/nginx-module-vts.git git_tag: v0.1.18
Instal nginx yang telah dirakit. Ini adalah konfigurasi utamanya (jangan lupa untuk menentukan vhost_traffic_status_zone;):
user nginx; worker_processes auto; worker_rlimit_nofile 40960; error_log /var/log/nginx/error.log warn; pid /var/run/nginx.pid; events { use epoll; worker_connections 1024; multi_accept on; } http { vhost_traffic_status_zone; include /etc/nginx/mime.types; default_type application/octet-stream; log_format main '$remote_addr - $remote_user [$time_local] "$request" ' '$status $body_bytes_sent "$http_referer" ' '"$http_user_agent" "$http_x_forwarded_for"'; #access_log /var/log/nginx/access.log main; access_log off; sendfile on; tcp_nodelay on; tcp_nopush on; keepalive_timeout 65; include /etc/nginx/conf.d/*.conf; open_file_cache max=200000 inactive=20s; open_file_cache_valid 30s; open_file_cache_min_uses 2; open_file_cache_errors on; }
Buat konfigurasi host virtual:
touch vhost1.conf vhost2.conf vhost3.conf vhost4.conf vhost5.conf
Isinya:
vhost1.conf:
server { listen 80; server_name vhost1; location / { proxy_pass http://127.0.0.1:8001/102; } }
vhost2.conf:
server { listen 80; server_name vhost2; location / { proxy_pass http://127.0.0.1:8001/204; } }
vhost3.conf:
server { listen 80; server_name vhost3; location / { proxy_pass http://localhost:8001/304; } }
vhost4.conf:
server { listen 80; server_name vhost4; location / { proxy_pass http://localhost:8001/403; } }
vhost5.conf:
server { listen 80; server_name vhost5; location / { proxy_pass http://localhost:8001/503; } }
Instal nginx-vts-eksportir:
wget https://github.com/hnlq715/nginx-vts-exporter/releases/download/v0.10.3/nginx-vts-exporter-0.10.3.linux-amd64.tar.gz tar zxvf nginx-vts-exporter-0.10.3.linux-amd64.tar.gz cp nginx-vts-exporter-0.10.3.linux-amd64/nginx-vts-exporter /usr/local/bin/nginx-vts-exporter
Buat file /etc/systemd/system/nginx_vts_exporter.service:
[Unit] Description=Nginx vts exporter Wants=network-online.target After=network-online.target [Service] ExecStart=/usr/local/bin/nginx-vts-exporter -nginx.scrape_uri=http://localhost:7070/status/format/json Restart=always RestartSec=3 [Install] WantedBy=default.target
Buat file konfigurasi VTS /etc/nginx/conf.d/vts-exporter.conf
server { listen 7070; listen [::]:7070; location / { } location /status { vhost_traffic_status_display; vhost_traffic_status_display_format html; } }
Tambahkan DNS host virtual ke / etc / hosts:
127.0.0.1 vhost1 127.0.0.1 vhost2 127.0.0.1 vhost3 127.0.0.1 vhost4 127.0.0.1 vhost5
Kami mengoptimalkan kernel untuk pengujian, karena wiremock memberikan timeout dengan sejumlah besar koneksi. Sekarang mungkin tidak perlu, karena mengurangi jumlah koneksi ketika memulai tolok ukur apache. Buat file /etc/sysctl.d/90-nginx.conf dengan konten:
fs.file-max=100000 net.netfilter.nf_conntrack_max=1548576 net.ipv4.ip_local_port_range=10000 65000 net.ipv4.tcp_tw_reuse=1 net.core.somaxconn=15600 net.ipv4.tcp_fin_timeout=15 net.ipv4.tcp_tw_recycle=1 net.core.rmem_default=31457280 net.core.rmem_max=12582912 net.core.wmem_default=31457280 net.core.wmem_max=12582912 net.core.netdev_max_backlog=65536 net.core.optmem_max=25165824 net.ipv4.tcp_rmem=8192 87380 16777216 net.ipv4.udp_rmem_min=16384 net.ipv4.tcp_wmem=8192 65536 16777216
Terapkan pengaturan
sysctl -p /etc/sysctl.d/90-nginx.conf
Instal mockify-rpm
yum -y install yum-plugin-copr yum copr enable antonpatsev/mockify-rpm yum -y install mockify systemctl start mockify
Pasang Tolok Ukur Apache:
yum install -y httpd-tools
Kami memulai pengujian nginx kecil:
while true; do ab -c 1 -n 1 -t 1 http://vhost1/; sleep 2; done while true; do ab -c 1 -n 1 -t 1 http://vhost2/; sleep 2; done while true; do ab -c 1 -n 1 -t 1 http://vhost3/; sleep 2; done while true; do ab -c 1 -n 1 -t 1 http://vhost4/; sleep 2; done while true; do ab -c 1 -n 1 -t 1 http://vhost5/; sleep 2; done
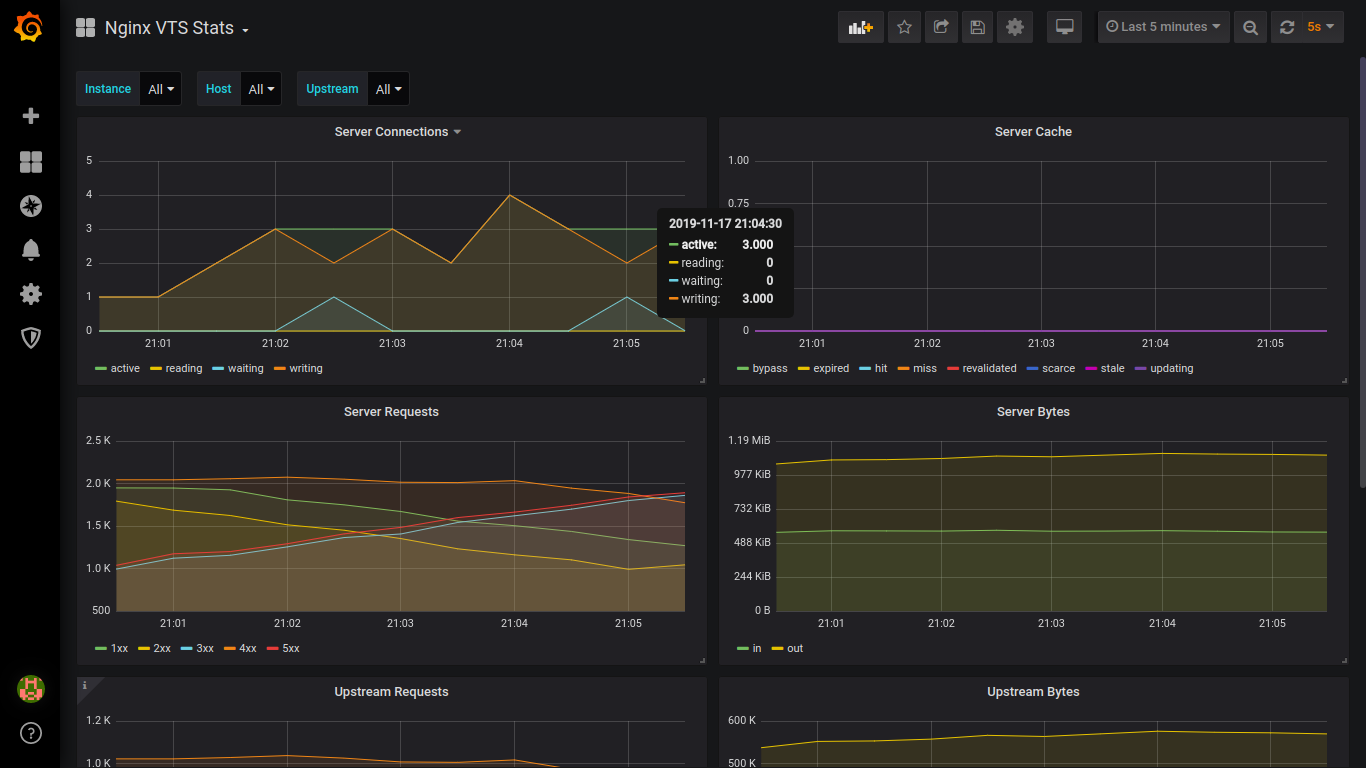
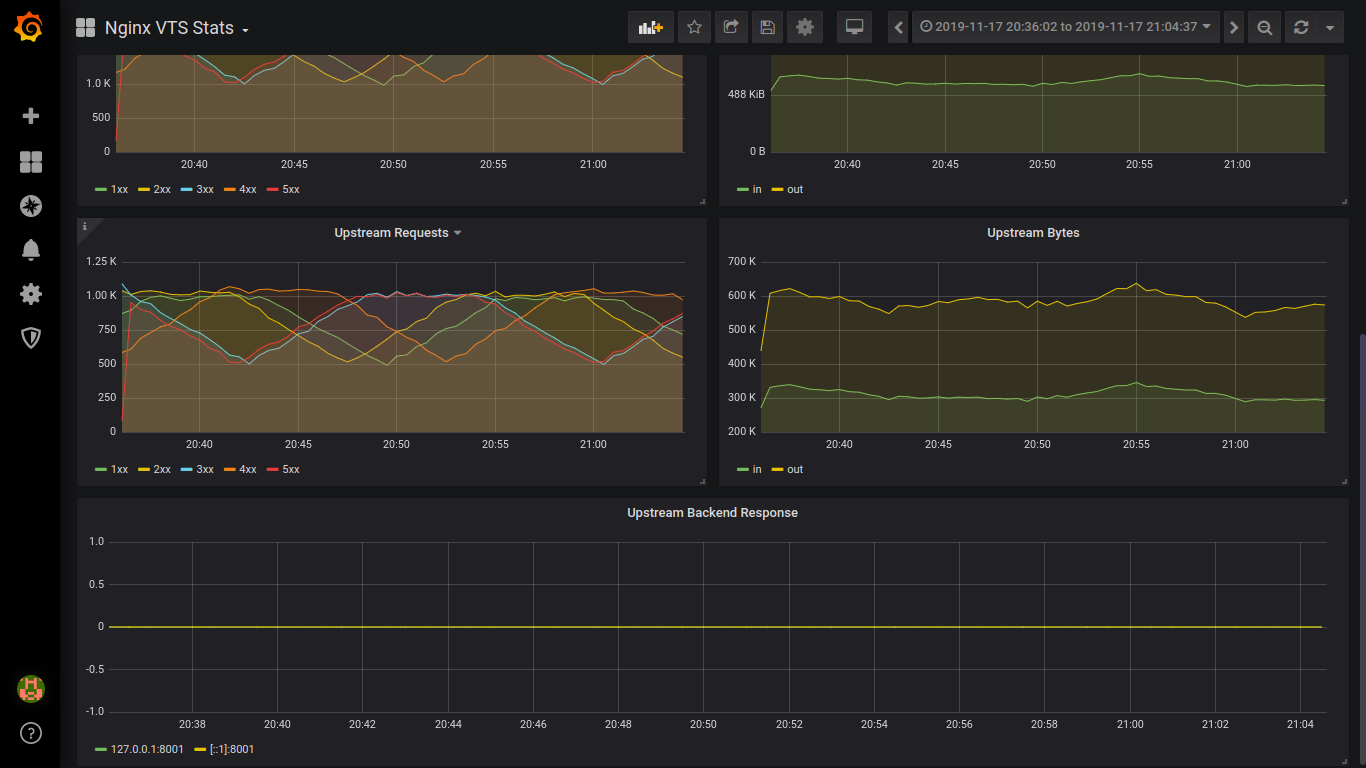
Tangkapan layar:


Instal wiremock:
yum -y install yum-plugin-copr yum copr enable antonpatsev/wiremock-rpm yum -y install wiremock wiremock-popular-json systemctl start wiremock
Juga di file vhost1-vhost5 di nginx Anda perlu mengubah port dari 8001 ke 8080.
Saya minta maaf atas tangkapan layar yang bergerigi.
Di bawah ini adalah CPU dan MEM mockify memuat saat menguji vhost1-vhost5

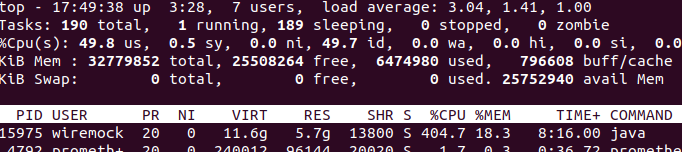
Di bawah ini adalah beban CPU dan MEM wiremock saat menguji vhost1

Di bawah ini adalah beban CPU dan MEM wiremock saat menguji vhost1-vhost2

Di bawah ini adalah CPU dan MEM wiremock memuat saat menguji vhost1-vhost3

Di bawah ini adalah beban CPU dan MEM wiremock saat menguji vhost1-vhost4

Di bawah ini adalah CPU dan MEM wiremock memuat saat menguji vhost1-vhost5. Terkadang beban pada CPU tumbuh hingga 700%.
Kesimpulan:
Menurut Nginx VTS, saya ingin lebih banyak metrik tanpa mengedit konfigurasi.
Oleh Wiremock vs Mockify: gunakan Mockify. Ini menggunakan lebih sedikit CPU dan MEM.
Dan akhirnya, perakitan aplikasi Golang di Fedora Copr menggunakan contoh Mockify.
Gunakan repositori https://github.com/patsevanton/mockify-rpm sebagai contoh.