近年来,显示CO 2含量的小工具以及指示如何将CO 2监视器变成连接到计算机的传感器的文章也很流行。另一方面,我想展示解决问题的方法。与老式的CO 2传感器不同,MH-Z19不需要特定的电压或高功率,可以通过UART和PWM传输数据。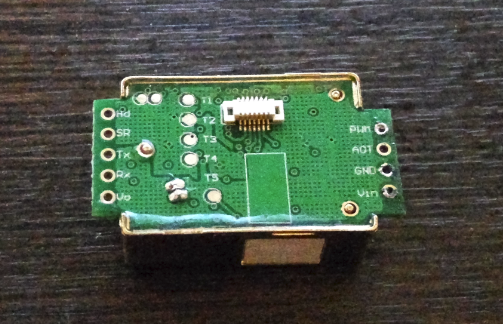
- Hd — , Hd 7 LOW. .
- SR —
- Tx — — 3.3
- Rx — 3.3 ( 5, )
- Vo — 3.3, 10
- PWM, : 1004, 2 HIGH, — LOW, «» CO2 0 — 5000ppm ( 2000ppm ).
Cppm = 5000 * (Thigh — 2ms)/(Thigh + Tlow — 4ms)
, PWM — , 3.3.
- AOT —
- Gnd —
- Vin — 3.6 — 5.5 ( 3.3, )
, PWM, . UART CO
2 . . 9600 (8 bit, stop — 1, parity — none) :
• 0xFF —
• 0x01 — ( )
• 0x86 —
• 0x00, 0x00, 0x00, 0x00, 0x00 —
• 0x79 — .
- :
• 0xFF —
• 0x86 —
• 0x01, 0xC1 — (256 * 0x01 + 0xC1 = 449)
• 0x3C, 0x04, 0x3C, 0xC1 — , - 0x47, 0x00, 0x00, 0x00, .
• 0x7B — .
: 7 ( ), , , 1: 0x86 + 0x01… + 0xC1 = 0x85, 0x85 xor 0xFF = 0x7A, 0x7A + 1 = 0x7B.
, . 5000ppm, 400ppm. .
CO
2大约延迟一分钟。如果您超过5000ppm的浓度(例如,您在上面呼吸了一分钟),它会在一段时间内提供错误数据,低估了CO 2的含量-这就是我达到80ppm的方式。这未在文档中反映出来,但是您不应该每隔10秒就请求UART数据,否则传感器会发出一些奇怪的信息。是时候拍照了。通过软件串行,A0 / A1中的TX / RX,5V电源,Gnd接地将传感器连接到Arduino Uno:
借来的草图,其中添加了校验和验证#include <SoftwareSerial.h>;
SoftwareSerial mySerial(A0, A1);
byte cmd[9] = {0xFF,0x01,0x86,0x00,0x00,0x00,0x00,0x00,0x79};
unsigned char response[9];
void setup() {
Serial.begin(9600);
mySerial.begin(9600);
}
void loop()
{
mySerial.write(cmd, 9);
memset(response, 0, 9);
mySerial.readBytes(response, 9);
int i;
byte crc = 0;
for (i = 1; i < 8; i++) crc+=response[i];
crc = 255 - crc;
crc++;
if ( !(response[0] == 0xFF && response[1] == 0x86 && response[8] == crc) ) {
Serial.println("CRC error: " + String(crc) + " / "+ String(response[8]));
} else {
unsigned int responseHigh = (unsigned int) response[2];
unsigned int responseLow = (unsigned int) response[3];
unsigned int ppm = (256*responseHigh) + responseLow;
Serial.println(ppm);
}
delay(10000);
}
每次测量间隔为10秒。当我离开传感器时,值停止跳跃。 现在,让传感器移动。为此,您需要具有OTG的设备和DroidTerm之类的应用程序。有一个微妙之处:为了建立连接,您需要重新启动Arduino。
 确保一切正常后,我们将移除Arduino,将其替换为FTDI FT232RL。
 连接后应给传感器通电,以确保连接没有问题。我使用RealTerm通过COM端口发送二进制数据:
 可能值得通过DTR添加电源管理,以便可以重新启动传感器。有用的链接:MH-Z19传感器手册PWM的连接图和代码与另一种传感器的比较GT上有关MH-Z19和ESP8266的文章,我只有一个传感器,我真的不喜欢拆解曾经做过的事情,因此建议您选择。