下午好,亲爱的哈布拉切特里!上周五,在我们的实验室中,有一个关于ROS平台的实践研讨会-ROS研讨会。该研讨会是为希望了解这一平台的布尔诺工业大学信息技术学院的学生而组织的。与往年不同(研讨会已举办了4年),这次ROS研讨会的重点是独立的实践工作。在本文中,我将讨论为研讨会参与者设置的任务。谁在乎,请在猫下。
问题陈述
参与者的任务是实施安全的机器人控制,并在障碍物前停下来。任务的目标是控制机器人向前的速度。机器人从深度传感器(在我们的示例中为turtlebot_gazebo仿真器中的ASUS Xtion)接收数据,找到运动方向上最近的障碍物并确定三个区域:- 安全-机器人处于安全距离,无减速移动
- 警告-机器人接近障碍物,发出警告信号(例如音频信号)并减速
- 危险-障碍物非常近,机器人会停止
实作
我立即注意到,在研讨会上,使用Ubuntu 14.04上的ROS Indigo来完成任务。我还将ROS Indigo用于实验。因此,让我们开始吧!使用依赖项roscpp,pcl_ros,pcl_conversions,sensor_msgs和geometry_msgs创建一个包:cd ~/catkin_ws/src
catkin_create_pkg safety_control_cloud roscpp pcl_ros pcl_conversions sensor_msgs geometry_msgs
cd ~/catkin_ws
将PCL库添加到package.xml中,具体取决于:<build_depend>libpcll-all-dev</build_depend>
...
<run_depend>libpcl-all</run_depend>
并在CMakeLists.txt中:find_package(PCL REQUIRED)
...
include_directories(${PCL_INCLUDE_DIRS})
将safety_control.cpp脚本添加到src文件夹:safety_control.cpp#include "ros/ros.h"
#include "pcl_conversions/pcl_conversions.h"
#include <pcl/pcl_base.h>
#include <sstream>
#include <sensor_msgs/PointCloud2.h>
#include <pcl/filters/passthrough.h>
#include <pcl/common/common.h>
#include <geometry_msgs/Twist.h>
typedef pcl::PointXYZ PointType;
typedef pcl::PointCloud<PointType> PointCloud;
typedef PointCloud::Ptr PointCloudPtr;
ros::Publisher pcd_pub_, cmd_vel_pub_;
void pcd_cb(const sensor_msgs::PointCloud2ConstPtr& pcd) {
ROS_INFO_STREAM_ONCE("Point cloud arrived");
PointCloudPtr pcd_pcl = PointCloudPtr(new PointCloud), pcd_filtered = PointCloudPtr(new PointCloud);
PointType pt_min, pt_max;
pcl::fromROSMsg(*pcd, *pcd_pcl);
    pcl::PassThrough<PointType> pass;
    pass.setInputCloud(pcd_pcl);
    pass.setFilterFieldName("y");
    pass.setFilterLimits(-0.25,0.20);
    pass.filter(*pcd_filtered);
pass.setInputCloud(pcd_filtered);
pass.setFilterFieldName("x");
pass.setFilterLimits(-0.3,0.3);
pass.filter(*pcd_pcl);
pcl::getMinMax3D(*pcd_pcl, pt_min, pt_max);
geometry_msgs::Twist vel;
if (pt_min.z > 1.0) {
vel.linear.x = 0.2;
ROS_INFO_STREAM("Safe zone");
} else if (pt_min.z > 0.5) {
vel.linear.x = 0.1;
ROS_INFO_STREAM("Warning zone");
} else {
vel.linear.x = 0.0;
ROS_INFO_STREAM("Danger zone");
}
cmd_vel_pub_.publish(vel);
sensor_msgs::PointCloud2 pcd_out;
pcl::toROSMsg(*pcd_pcl, pcd_out);
pcd_pub_.publish(pcd_out);
}
int main(int argc, char **argv)
{
ros::init(argc, argv, "safety_control_cloud");
ros::NodeHandle n;
ros::Subscriber pcd_sub = n.subscribe("/camera/depth/points", 1, pcd_cb);
pcd_pub_ = n.advertise<sensor_msgs::PointCloud2>("/output", 1);
cmd_vel_pub_ = n.advertise<geometry_msgs::Twist>("/cmd_vel_mux/input/teleop", 1);
ros::spin();
return 0;
}
将safety_control.cpp脚本添加到CMakeLists.txt:add_executable(safety_control_node src/safety_control.cpp)
target_link_libraries(safety_control_node ${catkin_LIBRARIES} ${PCL_LIBRARIES})
在节点逻辑中,我们订阅主题/相机/深度/点中的数据,获取点云,计算到点云中距离深度传感器最近的点的坐标,并根据情况,将线性速度(例如geometry_msgs / Twister)发布到主题/ cmd_vel_mux /输入/伸缩。我们还需要在一定范围内沿多个轴切割点云,以提高处理效率。在以下几行中:
pcl::PassThrough<PointType> pass;
pass.setInputCloud(pcd_pcl);
pass.setFilterFieldName("y");
pass.setFilterLimits(-0.25,0.20);
pass.filter(*pcd_filtered);
使用PassThrough方法从深度传感器坐标系的原点(沿y轴)向下25厘米,向上20厘米修剪云。在行中:
pass.setInputCloud(pcd_filtered);
pass.setFilterFieldName("x");
pass.setFilterLimits(-0.3,0.3);
pass.filter(*pcd_pcl);
我们在传感器坐标系原点(z轴)的左侧和右侧裁剪0.3 m(30 cm)的云。然后,我们沿着z轴(从深度传感器的中心到视线的轴)在点云中寻找最近的点-这将是最近的对象的点:
pcl::getMinMax3D(*pcd_pcl, pt_min, pt_max);
速度还将发布在主题/ mobile_base /命令/速度上。编译软件包:cd ~/catkin_ws
catkin_make
source devel/setup.bash
在凉亭的Turtle Bot模拟器中进行测试
第二项任务是使用Gazebo中的TurtleBot模拟器测试机器人控制逻辑。为此,请使用apt-get 设置turtlebot_gazebo:sudo apt-get install ros-indigo-turtlebot*
在这里,您可以找到有关使用模拟器的一些有用的教程。当您想研究ROS中的导航包并且手边没有真正的机器人时,模拟器可以是一个很好的解决方案。运行模拟器:roslaunch turtlebot_gazebo turtlebot_world.launch
凉亭窗口将如图所示打开: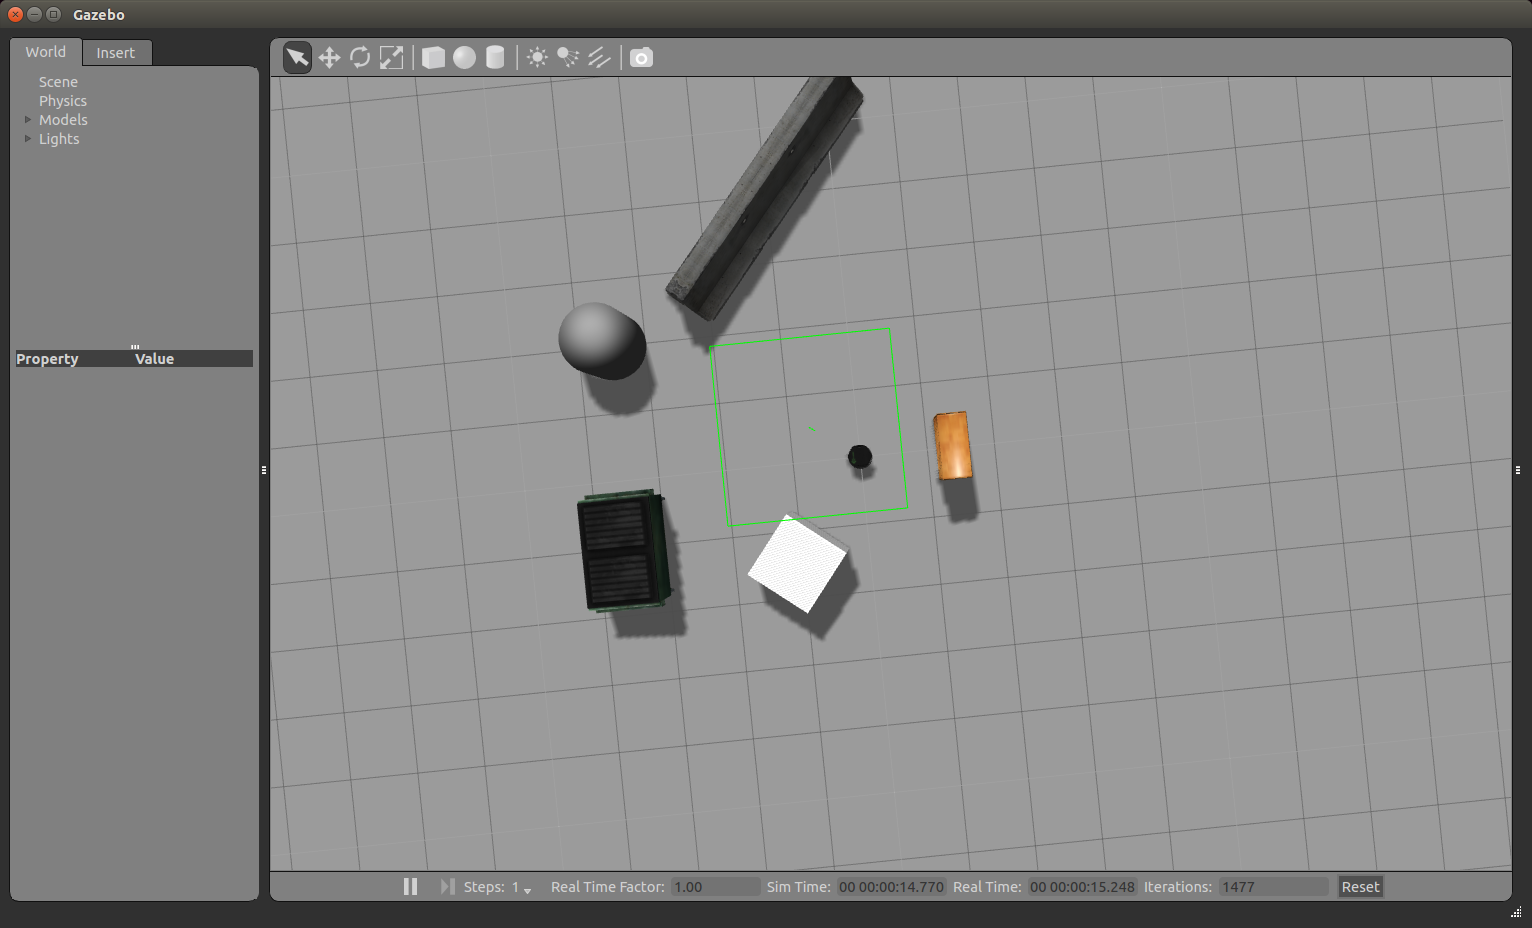 我们可以使用鼠标滚轮放大和缩小图片。使用鼠标左键和光标,我们可以左右,上下移动图片。使用固定的鼠标滚轮和光标,可以更改垂直视角。现在转动机器人,使其直接对准机柜。在模拟查看窗口上方的工具的上一行中,选择第三个图标:然后点击它。我们将看到类似的情况
 ,通过单击并拉动蓝色弧线来旋转机器人。我们得到以下图片:
 运行rviz:
rosrun rviz rviz
如文章中所述,添加一个RobotModel显示。添加PointCloud2显示器,然后选择主题/相机/深度/点。结果,我们得到以下图片: 对于PointCloud2显示,在Color Transformer字段中选择RGB8。我们得到了一个彩色的点云:
 运行我们的safety_control_node节点:
rosrun safety_control_cloud safety_control_node
终端中的输出将如下所示:[ INFO] [1479229421.537897080, 2653.960000000]: Point cloud arrived
[ INFO] [1479229421.572338588, 2654.000000000]: Warning zone
[ INFO] [1479229421.641967924, 2654.070000000]: Warning zone
让我们列出主题:rostopic list
在这些主题中,我们将看到:/cmd_vel_mux/input/teleop
...
/mobile_base/commands/velocity
在主题/ mobile_base /命令/速度中显示消息:rostopic echo /mobile_base/commands/velocity
获取机器人的速度:linear:
x: 0.1
y: 0.0
z: 0.0
angular:
x: 0.0
y: 0.0
z: 0.0
---
机器人将移向机柜,最后在危险区域中停在机柜旁。在Gazebo中,我们将看到机器人的完全停止: 在safety_control_node节点的输出中,我们将看到以下消息:
[ INFO] [1479229426.604300460, 2658.980000000]: Danger zone
[ INFO] [1479229426.717093096, 2659.100000000]: Danger zone
在主题/ mobile_base /命令/速度中,现在将发布零速度的消息:linear:
x: 0.0
y: 0.0
z: 0.0
angular:
x: 0.0
y: 0.0
z: 0.0
---
将带有/输出主题的PointCloud2类型的显示添加到rviz。对于Color Transformer显示,在Color字段中选择FlatColor和green。这是我们从safety_control_node节点开始的点云部分:让我们 进一步移动机器人,使其距障碍物一段安全距离。为此,请单击顶部的第二个图标:并通过使用光标拖动它来移动机器人:
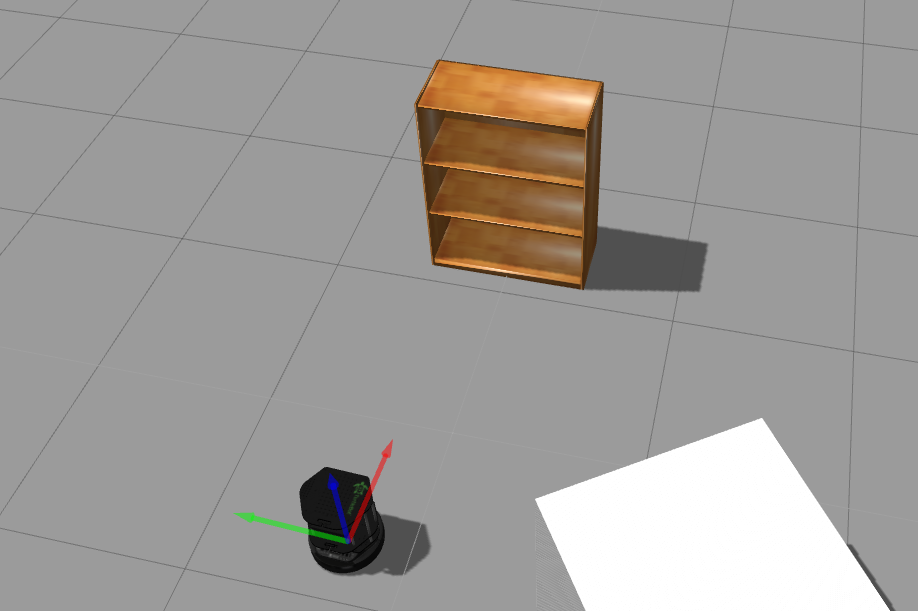 在rviz中,我们将看到以下内容:
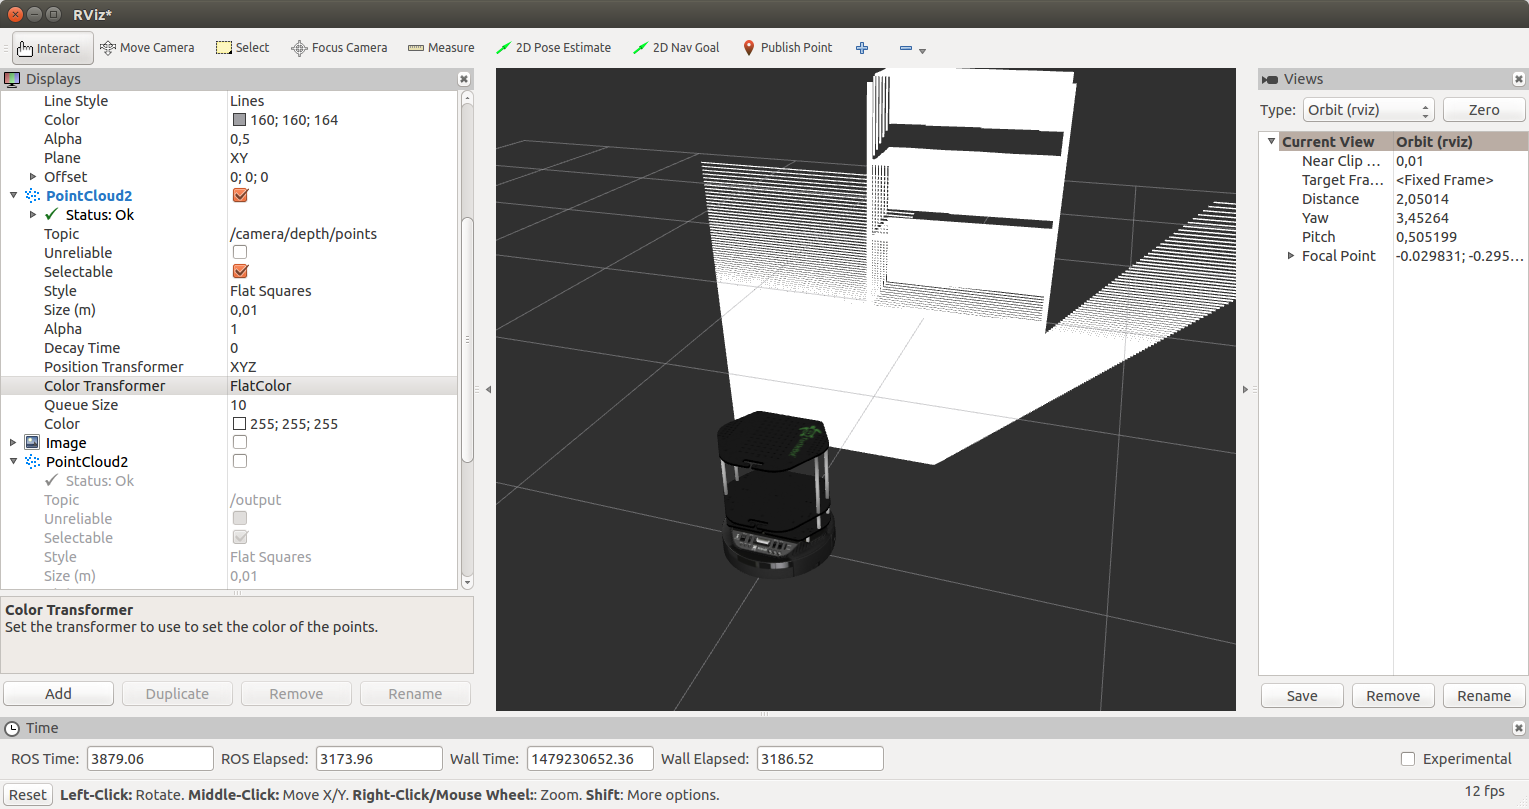 我们将从节点接收到此类消息:
[ INFO] [1479230429.902116395, 3658.000000000]: Safe zone
[ INFO] [1479230429.992468971, 3658.090000000]: Safe zone
机器人的速度将如下所示:---
linear:
x: 0.2
y: 0.0
z: 0.0
angular:
x: 0.0
y: 0.0
z: 0.0
---
此外,将重复上述所有操作:在警告区域中减速并在机柜附近停止。现在,我们的TurtleBot能够停在深度传感器可以检测到的任何障碍物的前面(在ROS Indigo中为ASUS Xtion)。您可以在配备有传感器(例如Microsoft Kinect)的真实机器人上尝试控制程序。仅此而已。我们编写了一个简单的程序,使用深度传感器(点云)的数据来控制机器人向前的速度,并在凉亭的TurtleBot机器人模拟器上对其进行了测试。在实验中祝您好运,很快再见!