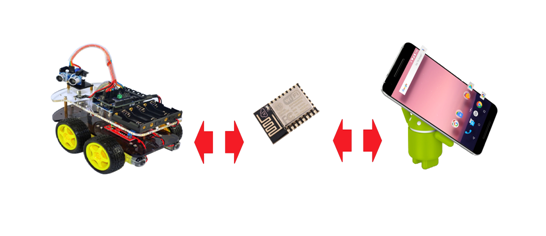
亲爱的GeekTimes读者,我为您提供了另一篇有关将ESP8266芯片用作AVR微控制器的无线网桥的文章,以Arduino Uno(Nano)硬件平台为例。 这次,
为了飞往月球以控制平台,我们使用了基于ANDROID的设备,而不是计算机。 好吧,例如智能手机。
裁切细节:
对于我们的工作,我们将使用前一篇文章中介绍的工具-ESP8266中传输的BABUINO无线编程器和MPDE(用于编程和数据交换的模块)模块。
从用户的反馈中可以看出,程序员本人通常会出庭,甚至有些人甚至可以成功使用他。 好吧,基本上,事情真的很方便。 我在Windows下启动了该应用程序,从所需的文件夹中选择了hex文件,仅此而已-几秒钟之内,正确的设备中的程序就没有了电线。 另一件事是,我徒劳无功,以极大的热情攻击了使用Wiring C编写并使用ARDUINO IDE及其草图和库的ARDUINO软件用户。 当然,无论是在Arduin Wiring C还是AVR工作室的C中,每个人都为他做方便的事情。 但是最后,一些用户出于某种原因立即决定该编程器与ARDUINO软件完全不兼容。
实际上,当然不存在兼容性问题。 绝对也可以在方便的地方编译您的草图以获取十六进制文件的状态,并像通过无线编程器将其轻松发送到Arduino UNO或NANO一样方便。
在ARDUINO软件下进行数据交换也不会引起任何问题。 写下神奇的话:
Serial.begin(9600);然后是这样的:
receiveByte = Serial.read(); //从缓冲区读取字节
或:
Serial.write(receiveByte); //字节记录
而且您可以非常轻松地通过WI-FI交换字节流。 对于AVR微控制器,它通过串行UART端口发送到ESP8266并从那里接收字节,正如我们所看到的那样,任何人道主义人员都可以在Arduino中配置与之协作的工作。
现在回到本文的主题。 为了通过智能手机控制机器人,您必须为此智能手机编写适当的应用程序。
作为一个月前非常模糊地提出这一程序的人,我现在可以毫无责任地宣布此事本质上并不复杂。 当然,除非您至少具有Java领域的一些基本知识。
对于编写Android应用程序,源代码是用Java编写的,然后使用传统的Java工具编译成标准Java字节码。 然后,代码中发生了其他有趣的事情,但是我们在这里不需要这些细节。
对于臭名昭著的铁杆工作者,似乎仍然有可能用纳秒级的分数来编写C应用程序,并且在某处有某种包可以将您的代码从Python转换出来,但是我在这里无法透露任何信息,因为我做了很长时间的正确选择。
因此,Java和Android Studio软件包-一个集成开发环境(IDE),可与基于JetBrains的IntelliJ IDEA软件的Android平台一起使用,JetBrains是Android应用程序的官方开发工具。
如果您已经在使用IntelliJ IDEA软件,熟悉的界面将使您感到惊喜。
我从B. Phillips和C. Stewart的书中熟悉了构建应用程序的基础-专业人士的“ ANDROID”编程。“据我所知,专业人士认为读者至少对Java SE有点熟悉。这本书有点复杂我没有发现,对于我们的目的,本书的前十章已经足够了,幸运的是,在使用上述Android Studio时,本书中给出了所有代码示例。
通过将其切换为“开发人员模式”,可以在软件仿真器上或直接在智能手机上执行调试应用程序。
在上一篇文章中,描述了通过Windows上的Windows应用程序进行小车控制。 也就是说,理论上已经存在用于创建HTTP和UDP连接的所有代码以及控制逻辑。 因此,采用了Oracle的口号“在一个地方编写,它可以在任何地方使用”,我们只需将这些类转移到适用于Android应用程序的新程序中即可。 但是GUI是图形用户界面,出于明显的原因,您必须离开原位置。 但另一方面,在Android上,所有操作都非常相似且非常快速,因此我们不会陷入失败者的行列。
将手指戳入屏幕
因此,我们在Android Studio中创建了一个新项目“ FourWheelRobotControl”。
这是一个简单的应用程序,它将包含活动
类MainActivity.javaimport android.content.Context; import android.hardware.Sensor; import android.support.v7.app.AppCompatActivity; import android.os.Bundle; import android.view.MotionEvent; import android.view.View; import android.widget.ImageButton; import android.widget.TextView; import android.widget.Toast; public class MainActivity extends AppCompatActivity { private ImageButton mButtonUP; private ImageButton mButtonDOWN; private ImageButton mButtonLEFT; private ImageButton mButtonRIGHT; public static byte direction = 100; @Override protected void onCreate(Bundle savedInstanceState) { super.onCreate(savedInstanceState); setContentView(R.layout.activity_main); new HTTP_client(40000); new Udp_client(); mButtonUP = (ImageButton) findViewById(R.id.imageButtonUP); mButtonUP.setOnTouchListener(new View.OnTouchListener() { @Override public boolean onTouch(View v, MotionEvent event) { if (event.getAction() == MotionEvent.ACTION_DOWN) { direction = 3; } } if (event.getAction() == MotionEvent.ACTION_UP) { direction = 100; } return false; } }); mButtonDOWN = (ImageButton) findViewById(R.id.imageButtonDown); mButtonDOWN.setOnTouchListener(new View.OnTouchListener() { @Override public boolean onTouch(View v, MotionEvent event) { if (event.getAction() == MotionEvent.ACTION_DOWN) { direction = 4; Toast.makeText(MainActivity.this, " " + direction, Toast.LENGTH_SHORT).show(); } if (event.getAction() == MotionEvent.ACTION_UP) { direction = 100; } return false; } }); mButtonLEFT = (ImageButton) findViewById(R.id.imageButtonLeft); mButtonLEFT.setOnTouchListener(new View.OnTouchListener() { @Override public boolean onTouch(View v, MotionEvent event) { if (event.getAction() == MotionEvent.ACTION_DOWN) { direction = 1; Toast.makeText(MainActivity.this, " " + direction, Toast.LENGTH_SHORT).show(); } if (event.getAction() == MotionEvent.ACTION_UP) { direction = 100; } return false; } }); mButtonRIGHT = (ImageButton) findViewById(R.id.imageButtonRight); mButtonRIGHT.setOnTouchListener(new View.OnTouchListener() { @Override public boolean onTouch(View v, MotionEvent event) { if (event.getAction() == MotionEvent.ACTION_DOWN) { direction = 2; Toast.makeText(MainActivity.this, " " + direction, Toast.LENGTH_SHORT).show(); } if (event.getAction() == MotionEvent.ACTION_UP) { direction = 100; } return false; } }); }
和布局:
布局图 /spoiler/ activity_main.xml <?xml version="1.0" encoding="utf-8"?> <android.support.constraint.ConstraintLayout xmlns:android="http://schemas.android.com/apk/res/android" xmlns:app="http://schemas.android.com/apk/res-auto" xmlns:tools="http://schemas.android.com/tools" android:layout_width="match_parent" android:layout_height="match_parent" tools:context="mikhail_akhmetov.fourweelsrobotcontrol.MainActivity"> <ImageButton android:id="@+id/imageButtonRight" style="@android:style/Widget.Holo.ImageButton" android:layout_width="52dp" android:layout_height="52dp" android:layout_marginEnd="8dp" android:layout_marginLeft="8dp" android:layout_marginRight="8dp" android:layout_marginStart="8dp" android:background="@android:color/holo_orange_dark" app:layout_constraintBottom_toTopOf="@+id/linearLayout" app:layout_constraintHorizontal_bias="0.417" app:layout_constraintLeft_toRightOf="@+id/imageButtonLeft" app:layout_constraintRight_toRightOf="parent" app:layout_constraintTop_toTopOf="parent" app:layout_constraintVertical_bias="0.513" app:srcCompat="@android:drawable/ic_media_ff"/> <ImageButton android:id="@+id/imageButtonUP" style="@android:style/Widget.ImageButton" android:layout_width="52dp" android:layout_height="52dp" android:layout_marginBottom="8dp" android:layout_marginTop="8dp" android:background="@android:color/holo_orange_dark" app:layout_constraintBottom_toTopOf="@+id/imageButtonDown" app:layout_constraintLeft_toLeftOf="parent" app:layout_constraintRight_toRightOf="parent" app:layout_constraintTop_toTopOf="parent" app:layout_constraintVertical_bias="0.486" app:srcCompat="@android:drawable/arrow_up_float"/> <ImageButton android:id="@+id/imageButtonDown" style="@android:style/Widget.ImageButton" android:layout_width="52dp" android:layout_height="52dp" android:layout_marginBottom="57dp" android:layout_marginLeft="8dp" android:background="@android:color/holo_orange_dark" android:fadingEdge="horizontal" app:layout_constraintBottom_toTopOf="@+id/linearLayout" app:layout_constraintHorizontal_bias="0.487" app:layout_constraintLeft_toLeftOf="parent" app:layout_constraintRight_toRightOf="parent" app:srcCompat="@android:drawable/arrow_down_float" android:layout_marginStart="8dp"/> <ImageButton android:id="@+id/imageButtonLeft" style="@android:style/Widget.ImageButton" android:layout_width="52dp" android:layout_height="52dp" android:layout_marginLeft="94dp" android:layout_marginStart="94dp" android:background="@android:color/holo_orange_dark" app:layout_constraintBottom_toTopOf="@+id/linearLayout" app:layout_constraintLeft_toLeftOf="parent" app:layout_constraintTop_toTopOf="parent" app:layout_constraintVertical_bias="0.513" app:srcCompat="@android:drawable/ic_media_rew" /> <LinearLayout android:id="@+id/linearLayout" android:layout_width="368dp" android:layout_height="227dp" android:layout_marginBottom="11dp" android:layout_marginEnd="8dp" android:layout_marginLeft="8dp" android:layout_marginRight="8dp" android:layout_marginStart="8dp" android:orientation="vertical" android:weightSum="1" app:layout_constraintBottom_toBottomOf="parent" app:layout_constraintHorizontal_bias="1.0" app:layout_constraintLeft_toLeftOf="parent" app:layout_constraintRight_toRightOf="parent"> <TextView android:id="@+id/textViewX" android:layout_width="match_parent" android:layout_height="wrap_content" android:layout_weight="0.28" /> <TextView android:id="@+id/textViewY" android:layout_width="match_parent" android:layout_height="wrap_content" android:layout_weight="0.28" /> <TextView android:id="@+id/textViewZ" android:layout_width="match_parent" android:layout_height="wrap_content" android:layout_weight="0.23" /> </LinearLayout> </android.support.constraint.ConstraintLayout>
无需用笔书写,它是在编辑器中创建后自动生成的。
现在,我们只需从上一篇文章中给出的程序中转移两个类:
HTTP_client.java import java.io.BufferedReader; import java.io.InputStreamReader; import java.io.OutputStreamWriter; import java.io.PrintWriter; import java.net.InetAddress; import java.net.Socket; public class HTTP_client extends Thread{ int port; String s; public static String host_address="192.168.1.138";
Udp_clent.java import java.net.DatagramPacket; import java.net.DatagramSocket; import java.net.InetAddress; public class Udp_client extends Thread { int i =0; byte [] data = {0}; int udp_port=50000; InetAddress addr; DatagramSocket ds; public Udp_client() { try { ds = new DatagramSocket(); addr = InetAddress.getByName(HTTP_client.host_address); } catch (Exception e) { } start(); } public void run() { while (true) { byte temp = MainActivity.direction; String s = "" + MainActivity.direction; data = s.getBytes(); if(temp!=100 ) { DatagramPacket pack = new DatagramPacket(data, data.length, addr, udp_port); try { ds.send(pack); i=0; Thread.sleep(200); } catch (Exception e) { } } else { if(i==0) { s = "" + 0; data = s.getBytes(); DatagramPacket pack = new DatagramPacket(data, data.length, addr, udp_port); try { ds.send(pack); Thread.sleep(200); } catch (Exception e) { } } i=1;
该程序的本质保持不变。 MainActivity首先启动HTTP和UDP客户端,然后捕获按钮的按下和按下,发送方向推送代码以形成UDP数据包。 从那里开始,一切已经就绪-“前进”,“后退”,“左”,“右”,当您按“停止”时,它们通过WI-FI离开购物车。
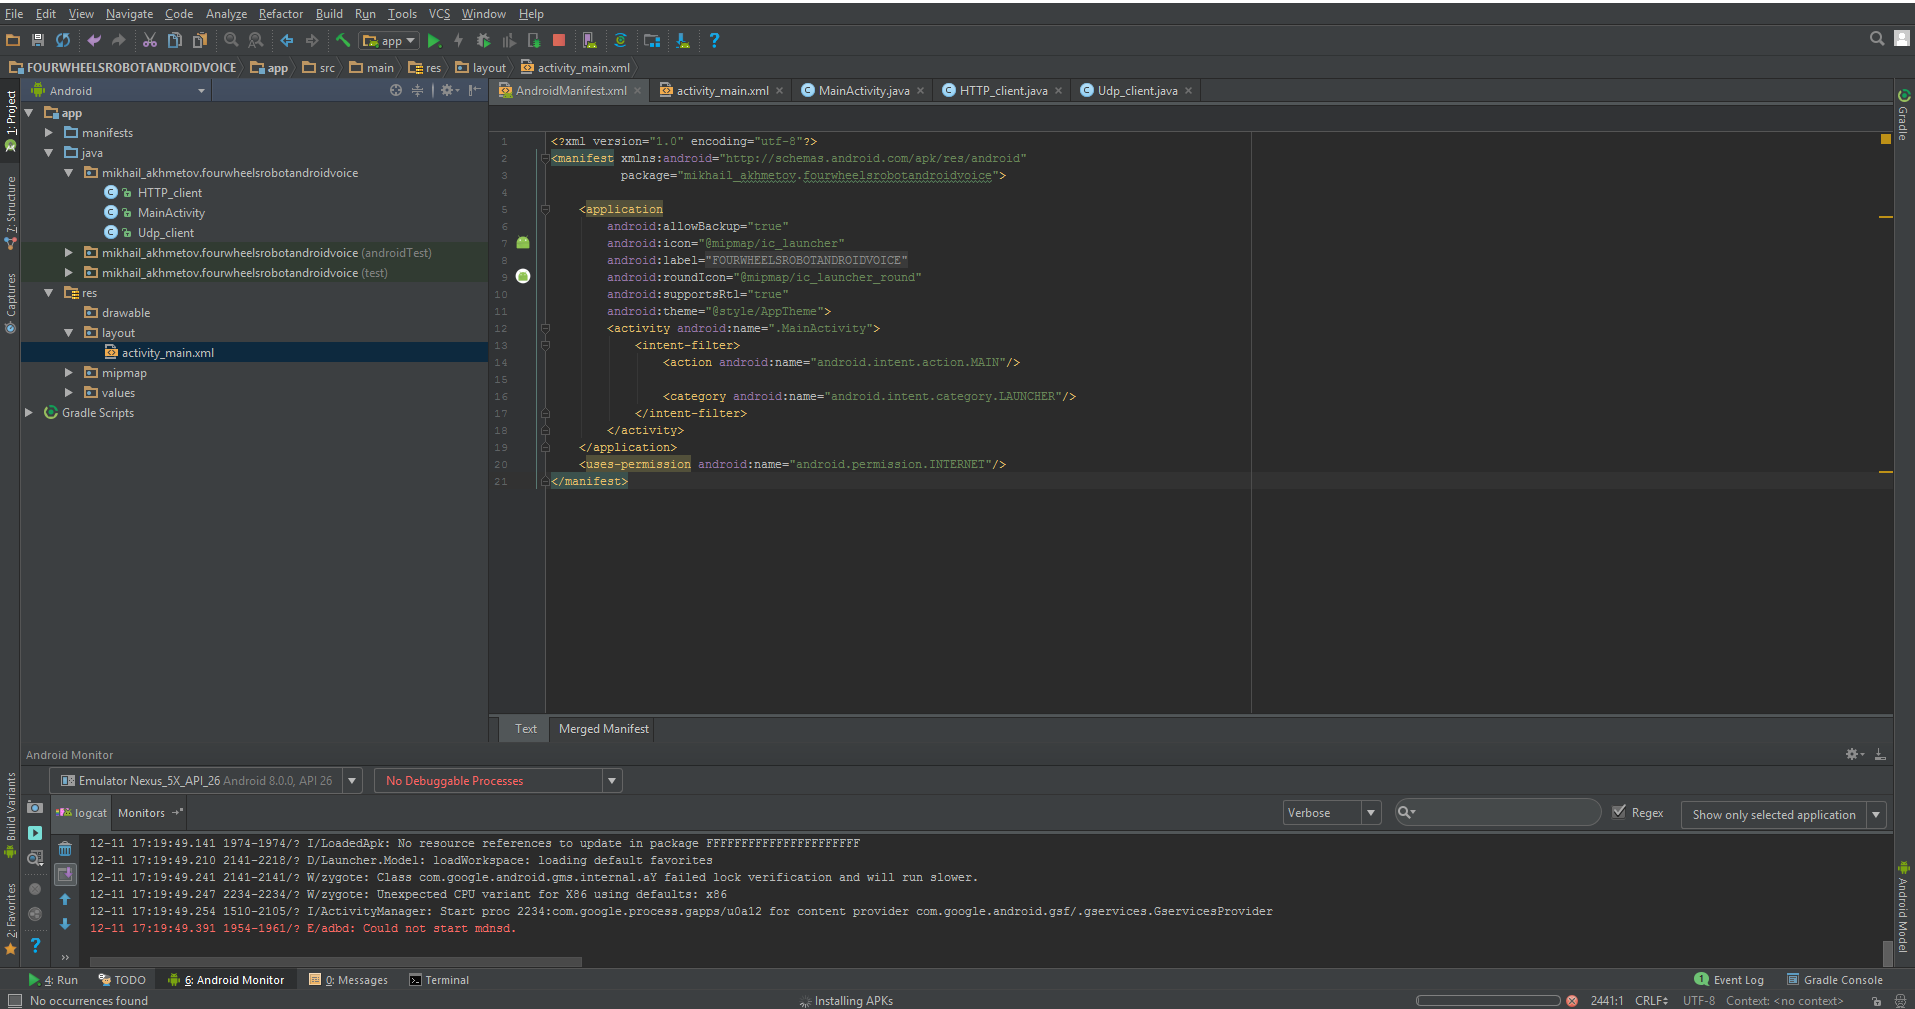
除了所有这些之外,我们还需要稍微修改所谓的清单文件,该清单同样主要由其自身生成。
清单是带有描述您的Android应用程序的元数据的XML文件。 清单文件始终称为AndroidManifest.xml,位于项目的app /清单目录中。
没错,对我们来说工作很少。
禁止屏幕旋转:
android:screenOrientation="portrait"
我们允许在Internet上进行工作:
<uses-permission android:name="android.permission.INTERNET"/>
这就是全部。
AndroidManifest.xml <?xml version="1.0" encoding="utf-8"?> <manifest xmlns:android="http://schemas.android.com/apk/res/android" package="mikhail_akhmetov.fourweelsrobotcontrol"> <application android:allowBackup="true" android:icon="@mipmap/ic_launcher" android:label="@string/app_name" android:roundIcon="@mipmap/ic_launcher_round" android:supportsRtl="true" android:theme="@style/AppTheme" > <activity android:name=".MainActivity" android:screenOrientation="portrait" > <intent-filter> <action android:name="android.intent.action.MAIN" /> <category android:name="android.intent.category.LAUNCHER" /> </intent-filter> </activity> </application> <uses-permission android:name="android.permission.INTERNET"/> </manifest>
在启动时,我们应该看到类似以下内容:
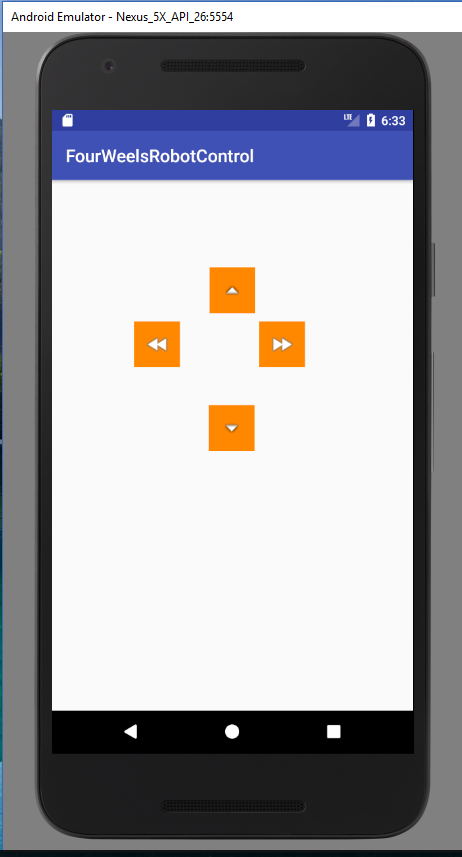
基本上就是全部。 现在,可以通过手机控制手推车。 该应用程序非常简单,因为它是一个演示应用程序,没有任何“吹口哨”,例如在家庭网络上搜索购物车,连接,断开连接以及其他有用的功能,这些功能使生活更轻松,但使代码难以理解。
另一方面,使用屏幕上的按钮进行操作是相同的
“如何喝伏特加酒,甚至是从脖子喝的伏特加酒,除了精神和大惊小怪之外,别无其他。”
Venya Erofeev当然是正确的。
例如,在同一部智能手机的标准加速度计的帮助下操纵小车会更加有趣。
此外,还通过所谓的意图非常简单地实现了此功能。 没错,创建自己的意图比使用现成的意图更加困难。 幸运的是,没有人禁止使用现成的产品。
质量加速计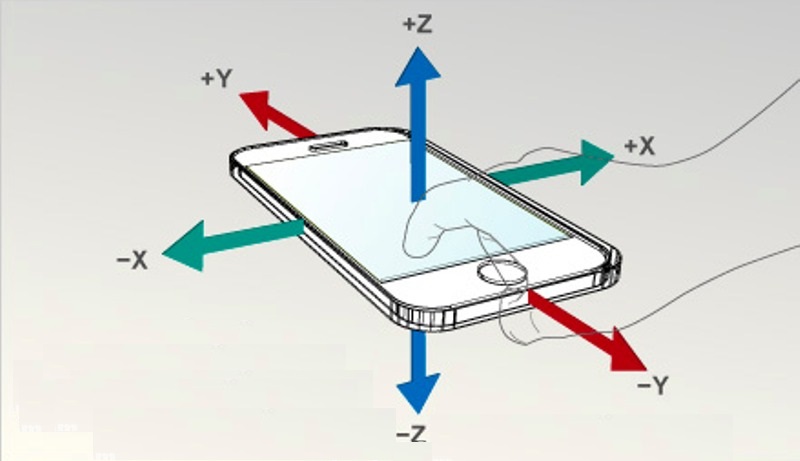
因此,我们在MainActivity中(且仅在其中)的代码将发生最小的变化。
为加速度计添加变量:
private SensorManager mSensorManager; private Sensor mOrientation; private float xy_angle; private float xz_angle;
我们从系统获取传感器本身,并将其注册为侦听器。
mSensorManager = (SensorManager) getSystemService(Context.SENSOR_SERVICE);
我们实现监听器接口本身:
public class MainActivity implements SensorEventListener
我们将编写四种强制性方法,其中仅使用最后一种。 一种在更改加速度计读数时有效的方法。 实际上,我想亲自询问加速度计,就像正常的外围设备一样,周期大约为100毫秒,因为有人怀疑(由于名称为onChanged)该方法实施得太频繁了。 但是,所有内容都是私有的,并且您将获得接口的无花果。
@Override public void onAccuracyChanged(Sensor sensor, int accuracy) {
结果,MainActivity.java将采用以下形式 import android.hardware.SensorEvent; import android.hardware.SensorEventListener; import android.hardware.SensorManager; import android.content.Context; import android.hardware.Sensor; import android.support.v7.app.AppCompatActivity; import android.os.Bundle; import android.widget.ImageButton; import android.widget.TextView; public class MainActivity extends AppCompatActivity implements SensorEventListener { private ImageButton mButtonUP; private ImageButton mButtonDOWN; private ImageButton mButtonLEFT; private ImageButton mButtonRIGHT; public static byte direction = 100; private SensorManager mSensorManager; private Sensor mOrientation; private float xy_angle; private float xz_angle; private int x; private int y; private TextView xyView; private TextView xzView; private TextView zyView; @Override protected void onCreate(Bundle savedInstanceState) { super.onCreate(savedInstanceState); setContentView(R.layout.activity_main); new HTTP_client(40000); new Udp_client(); mSensorManager = (SensorManager) getSystemService(Context.SENSOR_SERVICE);
该程序在智能手机的屏幕上在两个轴上显示传感器。 代替未使用的第三轴,显示方向变量“ direction”。 同样的数据以字节流的形式流向购物车。 但是,由于该流是纯字节的事实,因此很难确定“转发”或“停止”命令的位置。 因此,我的行为很简单:每个方向和倾斜角度都有自己的数字范围。 大致来说,1-20是“前进”速度,而21-40是“后退”,依此类推。 当然,有可能通过UDP传输纯数据,并且控制命令本身应通过TCP协议进行设置,这肯定会更正确。 但是为此,您需要在ESP8266本身上编辑程序,我现在还不想要。
因此,购物车在公寓周围滚动,对我的GalaxyS7的斜坡敏感地做出反应,但是,正如臭名昭著的Venya曾经说过的那样,仍然不是那样。
“现在,我为您提供最好的。 正如诗人所说,“劳动之冠首先是回报。” 简而言之,我为您提供“ Offal Off”鸡尾酒,这种饮料使一切黯然失色。 这不再是饮料,而是领域的音乐。 „
在Siri和Alexa的这个时代,有什么可以转动的吗? 让语音控制服从!
现在听我说!
我引用:
实际上,在Android中使用语音识别和语音合成非常简单。 我们将所有复杂的计算隐藏在一个具有简单API的优雅库中。 即使您非常了解Android编程,也可以精通本课程。
实际上,一切对我来说都很笨拙,但这很可能是因为我使用了最简单的选项,并且没有正确研究此API。 一切也都通过意图来完成,借助这些意图,我们求助于Google语音引擎,即语音识别功能。 因此,您需要一个正常工作的Internet。
再次,只有MainActivity.java进行了更改,尽管我对布局进行了一些更改(现在四个按钮在那里完全没有用,一个就足够了)。
以下内容已添加到MainActivity.java中:
相同的意图:
Intent intent = new Intent(RecognizerIntent.ACTION_RECOGNIZE_SPEECH); intent.putExtra(RecognizerIntent.EXTRA_LANGUAGE_MODEL, RecognizerIntent.LANGUAGE_MODEL_FREE_FORM); intent.putExtra(RecognizerIntent.EXTRA_PROMPT, ", , -??? "); startActivityForResult(intent, Print_Words);
以及返回的内容:
@Override protected void onActivityResult(int requestCode, int resultCode, Intent data) {
然后,他以各种形式的方括号和逗号返回了一系列类似的词语,并且形式相当“垃圾化”。 您只需要选择一个与您说的单词相似的单词即可。 好吧,因此,如果抓住了“前进”一词,那么我们前进;如果“正确”,那么我们前进至右边,依此类推。 当然,我们必须考虑到通过“ E”在何处附加了多余的逗号(我砍掉了括号,但是对于逗号没有足够的强度)。
总的来说,MainActivity.java本身的文本变为 import android.support.v7.app.AppCompatActivity; import android.os.Bundle; import android.view.MotionEvent; import android.view.View; import android.widget.ImageButton; import android.widget.TextView; import java.util.ArrayList; import android.content.Intent; import android.speech.RecognizerIntent; public class MainActivity extends AppCompatActivity { private ImageButton mButtonUP; public static byte direction = 100; public String stroka_otveta; private static final int Print_Words = 100; private TextView EnteredText1; private TextView EnteredText2; public static TextView EnteredText3; private boolean slovo_raspoznano =false; @Override protected void onCreate(Bundle savedInstanceState) { super.onCreate(savedInstanceState); setContentView(R.layout.activity_main); new Udp_client(); new HTTP_client(40000); EnteredText1 = (TextView) findViewById(R.id.textViewX);
好吧,直到使用一个按钮的堆布局
activity_main.xml。 <?xml version="1.0" encoding="utf-8"?> <android.support.constraint.ConstraintLayout xmlns:android="http://schemas.android.com/apk/res/android" xmlns:app="http://schemas.android.com/apk/res-auto" xmlns:tools="http://schemas.android.com/tools" android:layout_width="match_parent" android:layout_height="match_parent" tools:context="mikhail_akhmetov.fourwheelsrobotandroidvoice.MainActivity"> <ImageButton android:id="@+id/imageButtonUP" style="@android:style/Widget.ImageButton" android:layout_width="160dp" android:layout_height="146dp" android:layout_marginTop="8dp" android:background="@android:color/holo_orange_dark" app:layout_constraintLeft_toLeftOf="parent" app:layout_constraintRight_toRightOf="parent" app:layout_constraintTop_toTopOf="parent" app:srcCompat="@android:drawable/arrow_up_float" android:layout_marginBottom="8dp" app:layout_constraintBottom_toTopOf="@+id/linearLayout"/> <LinearLayout android:id="@+id/linearLayout" android:layout_width="368dp" android:layout_height="227dp" android:layout_marginBottom="11dp" android:layout_marginEnd="8dp" android:layout_marginLeft="8dp" android:layout_marginRight="8dp" android:layout_marginStart="8dp" android:orientation="vertical" android:weightSum="1" app:layout_constraintBottom_toBottomOf="parent" app:layout_constraintHorizontal_bias="1.0" app:layout_constraintLeft_toLeftOf="parent" app:layout_constraintRight_toRightOf="parent"> <TextView android:id="@+id/textViewTitle" android:layout_width="match_parent" android:layout_height="wrap_content" android:text=" " android:textColor="@android:color/holo_red_dark"/> <TextView android:id="@+id/textViewX" android:layout_width="match_parent" android:layout_height="wrap_content" android:layout_weight="0.28" /> <TextView android:id="@+id/textViewY" android:layout_width="match_parent" android:layout_height="wrap_content" android:layout_weight="0.28" /> <TextView android:id="@+id/textViewZ" android:layout_width="match_parent" android:layout_height="wrap_content" android:layout_weight="0.23" /> </LinearLayout> </android.support.constraint.ConstraintLayout>
最令人惊讶的是,它确实可以骑乘并聆听声音(通常)。 但是,当然是制动接口; 当您说时,直到它被识别并返回; 简而言之,预先选择较小的速度,否则房间反之亦然。
今天就这些,如果我喜欢的话,我会很高兴。