在有关WSL的烤面包机问题上,我被提示写这篇文章。 大约六个月前,我在Linux内核上使用系统数年后,转而使用家用PC上的Windows 10。 在我的工作中,对终端和Linux环境的依赖几乎立即使我想到了一个问题:安装虚拟机还是尝试WSL。 我选择了第二个,对此感到非常满意。
在这本书的指导下,我将告诉您如何安装和配置WSL,遇到的问题和限制,如何从Windows运行Linux应用程序(反之亦然)以及如何将Xfce环境元素集成到Windows桌面环境中。
我从没想过有一天我会回到Windows,但是由于种种情况,我才有理由尝试:远离IT的我妻子几乎每次需要使用计算机时都会拉扯她;而我的妻子则不愿再使用Windows。 唤醒了一场比赛的怀旧之情,但她不想在酒下充分工作; 然后他们给了我一盒装的Windows 10 Pro。 我在安装系统后几乎立即安装了WSL,玩了几个晚上,我意识到该产品适合我的任务,但是我想要一个更熟悉的终端机和一般的便利设施。
安装WSL和发行版
立即进行预订,在Internet上,您可以通过在命令行或PowerShell控制台上运行lxrun /install命令来找到安装说明。 此方法不再起作用(在稳定版本中发布WSL之后)。 据我所知,现在只能从Microsoft Store和您的首选发行版一起安装WSL。
我还注意到,当我完成安装时,可以选择OpenSUSE,SUSE Linux Enterprise和Ubuntu 16.04发行版-我安装的最后一个发行版。 Ubuntu 18.04,Debian 9和Kali Linux也已上市,并且可能会出现其他发行版。 安装步骤可能会有所不同。 此外,文章中描述的一些问题可能已经解决。
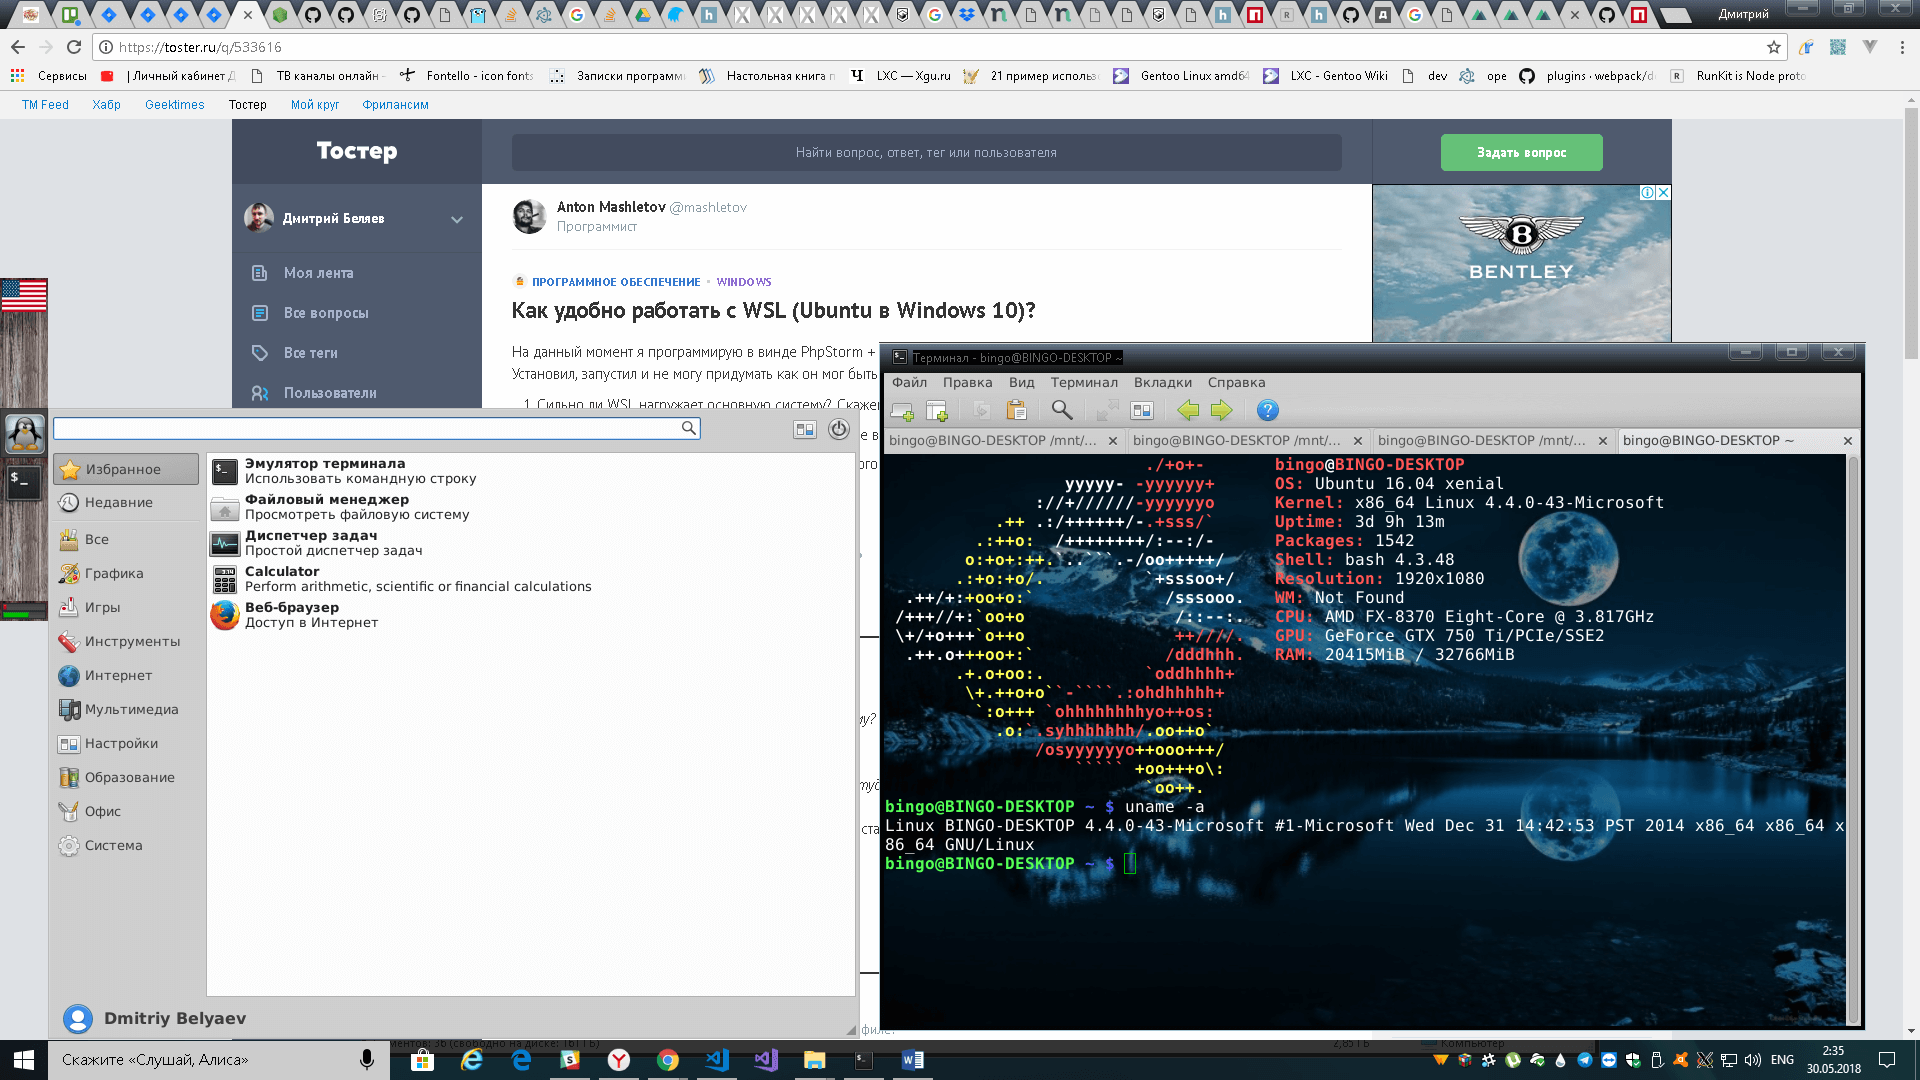
我们在商店中找到所需的发行版并进行安装。 安装将很快,因为它将仅下载Linux内核仿真器和用于启动子系统的实用程序,它将在以下三个实例的系统文件夹中:wsl.exe,bash.exe和ubuntu.exe(将使用发行套件的名称代替ubuntu)。 它们都是等效的,并且做同样的事情-它们运行自己的终端仿真器,在Linux'ovy bash中在内核仿真器下工作。 第一次开始时,将要求我们为用户提供默认的用户名和密码,然后将直接安装发行版。 作为默认用户,请指定root用户而不提供密码-后续步骤将需要此密码。 此外,在准备本文的材料时,安全性不会受到影响,在英语教程中,我遇到了这样的信息,即新版本的WSL现在无需密码即可成为默认的root用户,而不会出现不必要的问题。
我们正在等待安装。 接下来,第一件事是为下一个更新apt镜像。 为此,您需要一个CLI文本编辑器。 仅包含vi,但我更喜欢nano,因此我将其表示为:
apt install nano
不需要sudo,因为我们已经是root了。 编辑文件/etc/apt/sources.list:
nano /etc/apt/sources.list
Yandex镜像最适合我,因此我的文件如下所示:
deb http://mirror.yandex.ru/ubuntu/ xenial main universe restricted deb-src http://mirror.yandex.ru/ubuntu/ xenial main universe restricted deb http://mirror.yandex.ru/ubuntu/ xenial-security main universe restricted deb-src http://mirror.yandex.ru/ubuntu/ xenial-security main universe restricted deb http://mirror.yandex.ru/ubuntu/ xenial-updates main universe restricted deb-src http://mirror.yandex.ru/ubuntu/ xenial-updates main universe restricted
按Ctrl + O保存,按Ctrl + X退出。 现在,您可以将系统更新为当前状态:
apt update && apt upgrade
更新后,您可以创建我们的主要用户。 在本文中,我将其称为user1,但是您可以指定通常的名称:
addgroup --gid 1000 user1 adduser --home /home/user1 --shell /bin/bash --uid 1000 -G user1,sudo user1
接下来,转到用户的文件夹,在其下面,设置密码并编辑〜/ .bashrc文件:
cd /home/user1 su user1 passwd nano .bashrc
子系统的所有内容都可以使用...几乎...
安装X Server,Xfce和其他GUI应用程序
我遇到的第一个问题-拟议的终端仿真器中的bash-completion可以正常地,错误地进行工作。 此外,该仿真器不知道如何使用制表符,并且它的每个实例都使用单独的init(顺便说一下,不能替换)在新的进程空间中启动所有操作。 我想要一个普通的终端仿真器,一些其他GUI应用程序以及一个套接字来快速启动它们。
当我搜索这个问题时,我遇到了很多问题,例如需要将dbus转换为tcp协议。 目前,尚无此类问题。 Unix域套接字在子系统中正常工作,并且所有内容都通过它们平静地通信。
首先,我们需要在主系统(在Windows中)中安装X服务器。 就个人而言,我为此使用VcXsrv-Windows上的X11端口。 关于该实用程序本身的大约官方站点现在不提供它,因此我们在安装程序中用Google搜索并默认安装所有程序。
在安装过程中,我们返回到WSL终端,并使用exit命令返回到根目录。 首先,配置俄语语言环境:
locale-gen ru_RU locale-gen ru_RU.UTF-8 update-locale
接下来,安装一些Xfce组件。 当然,您可以完全从meta软件包安装它,但是我们不需要大多数组件,并且Xfce的模块化体系结构仅允许我们提供必要的组件:
apt install -y xfce4-session xfce4-notifyd xfce4-appfinder xfce4-panel xfce4-quicklauncher-plugin xfce4-whiskermenu-plugin xfce4-xkb-plugin xfce4-settings xfce4-terminal xfce4-taskmanager mousepad
每次都用双手运行环境不是很方便,所以我使此过程自动化。 为此,请在主系统中的一个方便我们的位置创建一个文件夹,并在其中运行3个文件:
- config.xlaunch -VcXsrv的设置文件
<?xml version="1.0" encoding="UTF-8"?> <XLaunch WindowMode="MultiWindow" ClientMode="NoClient" LocalClient="False" Display="0" LocalProgram="xcalc" RemoteProgram="xterm" RemotePassword="" PrivateKey="" RemoteHost="" RemoteUser="" XDMCPHost="" XDMCPBroadcast="False" XDMCPIndirect="False" Clipboard="True" ClipboardPrimary="True" ExtraParams="" Wgl="True" DisableAC="False" XDMCPTerminate="False" />
x-run.vbs -WSL始终从其终端仿真器开始;如果关闭它,则其所有子进程将结束。 为了使该窗口不会让人眼花call乱,最好将其隐藏运行。 幸运的是,Windows具有内置的VBScript解释器,使您可以在一行中完成此操作:
WScript.CreateObject("Shell.Application").ShellExecute "wsl", "cd /home/user1; DISPLAY=:0 LANG=ru_RU.UTF-8 su user1 -c xfce4-session", "", "open", 0
让我解释一下这里发生了什么。 我们告诉VBscript使用cd /home/user1; DISPLAY=:0 LANG=ru_RU.UTF-8 su user1 -c xfce4-session执行wsl应用程序cd /home/user1; DISPLAY=:0 LANG=ru_RU.UTF-8 su user1 -c xfce4-session cd /home/user1; DISPLAY=:0 LANG=ru_RU.UTF-8 su user1 -c xfce4-session ,开始文件夹对我们来说并不重要,因此空行,打开操作-开始,0-隐藏模式。 我们给wsl本身执行以下命令:转到用户文件夹,然后设置环境变量DISPLAY(X服务器显示)和LANG(使用的语言环境),我们代表用户user1运行xfce4-session(感谢su命令)
- start.bat-要运行的批处理文件,可以选择将其启动
start config.xlaunch wscript x-run.vbs
接下来,我们可以运行start.bat并为自己配置Xfce面板。 我注意到这里遇到了另一个问题-面板完美地显示在所有窗口的顶部,但是它不能像Windows桌面上的面板那样为自己分配位置。 如果有人知道该问题的解决方案,请分享评论。
好了,在本部分的最后,是我的桌面的屏幕截图:
Windows环境与Linux子系统环境的交互
您可以通过bash,wsl或ubuntu这3个命令从Windows直接运行Linux应用程序。 不要忘记默认情况下启动是从根启动的,因此您应该通过su降低特权,还应该记住如果应用程序需要X服务器,则传递环境变量DISPLAY =:0。 您还需要在WSL中通过cd更改应用程序从中使用的文件夹。 例如,让我们使用Linux md5sum为D盘上的file.txt计算md5:
wsl md5sum < d:\file.txt
也可以访问Linux文件系统,它位于%localappdata%\Packages\CanonicalGroupLimited.UbuntuonWindows_79rhkp1fndgsc\LocalState\rootfs 。 您可以通过这种方式读取文件,但建议不要写入;可以破坏文件系统。 我认为问题在于Windows无法与Linux文件系统的权利和所有者一起使用。
从Linux,您还可以运行Windows应用程序。 只需运行exe-shnik,它将在主系统中运行。
Windows驱动器根据其小写字母安装在/mnt 。 例如,驱动器D将安装在/mnt/d 。 在Linux上,您可以自由读写Windows文件。 您可以在它们上建立符号链接。 此类文件的权限将始终为0777,所有者将为root。
子系统的网络堆栈在Windows中很常见。 Linux上引发的服务器将在Windows上的localhost上可用,反之亦然。 但是,用于Windows的unix-domain-socket只是一个空文件,您只能在Linux内部使用它。 如果防火墙没有禁止,Linux也可以访问外部网络,包括侦听端口。
Linux上的ifconfig和Windows上的ipconfig提供有关网络接口的相同信息。
在Windows任务管理器中,您可以安全地击败Linux子系统内部的进程。 但是,Linux仅会看到其进程。
功能,局限性和陷阱
WSL中的Linux内核不是真实的。 这只是一个仿真器层,Linux特定任务的一部分执行自身,一部分代理直接到达winNT内核。 大多数api是在其中实现的,但不是全部。 您将无法组装内核,也无法连接内核模块(.ko,内核对象)。
WSL初始化过程也是它自己的,例如,用system.d替换它是行不通的。 我一直渴望在运行时编写一个守护程序管理器,该守护程序可以与system.d单元文件一起使用并提供类似的界面,但无法动弹。
不支持openFUSE;因此,装入虚拟或远程文件系统将失败。 从文件进行挂载也是不可能的,挂载除了绑定在这里似乎无能为力。
也没有办法将Linux文件系统划分为几个分区/磁盘。
实际上几乎没有直接接触铁的途径。 都一样,我们在Windows沙箱中,而不是在完整的Linux中。 / dev和/ sys明显为空,它们仅包含虚拟设备。 以任何方式只能直接通过X服务器访问GPU,因此您将不得不在Windows中训练神经网络。
在JS开发中,我遇到了electronic.js拒绝在WSL中运行的事实,我不得不在Windows上复制node.js环境。
总结
原来这篇文章很长,我希望它也将对您有用。
对于我个人而言,WSL可以说是一个完全可用的工具,可以解决我的问题 全栈 后端开发人员。 六个月以来,不需要使用Linux的虚拟机。 总体感觉是Windows + WSL比Linux + Wine具有更多的功能。
在写文章时,我发现带有Debian 9.3的WSL程序集出现在Microsoft Store中,这种发行版比Ubuntu发行版对我来说更漂亮,因此我将尝试安装它。