在本文中,我们将开发一个插件,该插件会将插件设置保存在Jira中。 我们将使用大豆,requirejs,主干js库来显示用户界面。 大豆,requirejs,骨干js是Jira中的内置库。
本文的目的是展示如何使用Jira的内置工具来开发用户界面。
开发的插件将包含一个Webwork模块,用于在Jira中保存插件参数。 参数将在两个屏幕上输入(每个屏幕上两个参数)。 此外,参数将打包在json中,并存储在Jira中。 插件的源代码可以在
这里找到。
创建一个插件框架
打开终端并执行以下命令:
atlas-create-jira-plugin我们将在终端中回答以下问题:
Define value for groupId: : ru.matveev.alexey.jira.tutorial.webworkui Define value for artifactId: : webwork-soy-require-backbone Define value for version: 1.0.0-SNAPSHOT: : Define value for package: ru.matveev.alexey.jira.tutorial.webworkui: : Y: : Y
对pom.xml进行更改
创建插件框架后,您需要进行更改以使
atlassian-spring-scanner 2正常工作。
在2.0.0中安装atlassian-spring-scanner版本:
<atlassian.spring.scanner.version>2.0.0</atlassian.spring.scanner.version>
将atlassian-spring-scanner-annotation依赖项的范围从compile更改为提供:
<dependency> <groupId>com.atlassian.plugin</groupId> <artifactId>atlassian-spring-scanner-annotation</artifactId> <version>${atlassian.spring.scanner.version}</version> <scope>provided</scope> </dependency>
删除atlassian-spring-scanner-runtime依赖项。
创建用于接收和保存插件设置的服务
首先,创建一个用于管理插件设置的界面。
src / main / java / ru / matveev / alexey / jira /教程/ webworkui / api / PluginSettingService.java package ru.matveev.alexey.jira.tutorial.webworkui.api; public interface PluginSettingService { String getConfigJson(); void setConfigJson(String json); }
现在让我们实现接口。
src / main / java / ru / matveev / alexey / jira /教程/ webworkui / impl / PluginSettingServiceImpl.java package ru.matveev.alexey.jira.tutorial.webworkui.impl; import com.atlassian.plugin.spring.scanner.annotation.imports.ComponentImport; import com.atlassian.sal.api.pluginsettings.PluginSettings; import com.atlassian.sal.api.pluginsettings.PluginSettingsFactory; import ru.matveev.alexey.jira.tutorial.webworkui.api.PluginSettingService; import javax.inject.Inject; import javax.inject.Named; @Named public class PluginSettingServiceImpl implements PluginSettingService { public final PluginSettings pluginSettings; private static final String PLUGIN_STORAGE_KEY = "ru.matveev.alexey.jira.tutorial.webworkui."; private static final String CONFIG_JSON = "configjson"; @Inject public PluginSettingServiceImpl(@ComponentImport PluginSettingsFactory pluginSettingsFactory) { this.pluginSettings = pluginSettingsFactory.createGlobalSettings(); } private void setSettingValue(String settingKey, String settingValue) { this.pluginSettings.put(PLUGIN_STORAGE_KEY + settingKey, settingValue != null?settingValue:""); } private String getSettingValue(String settingKey) { return pluginSettings.get(PLUGIN_STORAGE_KEY + settingKey) != null?pluginSettings.get(PLUGIN_STORAGE_KEY + settingKey).toString():""; } @Override public String getConfigJson() { return getSettingValue(CONFIG_JSON); } @Override public void setConfigJson(String json) { setSettingValue(CONFIG_JSON, json); } }
getConfigJson和setConfigJson方法负责以json格式接收和保存参数。
创建用于管理插件设置的网络
在plugin文件夹中打开终端并执行以下命令:
create-atlas-jira-plugin-module我们在终端中回答以下问题:
Choose a number (1/2/3/4/5/6/7/8/9/10/11/12/13/14/15/16/17/18/19/20/21/22/23/24/25/26/27/28/29/30/31/32/33/34): 31 Enter Plugin Module Name My Webwork Module: : Config Show Advanced Setup? (Y/y/N/n) N: : Y Module Key config: : webwork-config Module Description The Config Plugin: : i18n Name Key config.name: : i18n Description Key config.description: : Enter Action Classname MyActionClass: : ConfigWebwork Enter Package Name ru.matveev.alexey.jira.tutorial.webworkui.jira.webwork: :Enter Alias ConfigWebwork: : Enter View Name success: : success.soy Enter Template Path /templates/webwork-config/configwebwork/success.soy.vm: : /templates/webwork-config/configwebwork/success.soy Add Another View? (Y/y/N/n) N: : N Add Another Action? (Y/y/N/n) N: : N Add Another Plugin Module? (Y/y/N/n) N: : N
结果,将创建文件src / main / java / ru / matveev / alexey / jira / tutorial / webworkui / jira / webwork / ConfigWebwork.java。 该文件需要像这样更改:
src / main / java / ru / matveev / alexey / jira /教程/ webworkui / jira / webwork / ConfigWebwork.java package ru.matveev.alexey.jira.tutorial.webworkui.jira.webwork; import org.slf4j.Logger; import org.slf4j.LoggerFactory; import com.atlassian.jira.web.action.JiraWebActionSupport; import ru.matveev.alexey.jira.tutorial.webworkui.api.PluginSettingService; import javax.inject.Inject; public class ConfigWebwork extends JiraWebActionSupport { private static final Logger log = LoggerFactory.getLogger(ConfigWebwork.class); private final PluginSettingService pluginSettingService; private String configJson; @Inject public ConfigWebwork(PluginSettingService pluginSettingService) { this.pluginSettingService = pluginSettingService; } @Override public String execute() throws Exception { super.execute(); return SUCCESS; } public void doSave() { pluginSettingService.setConfigJson(configJson); } @ActionViewData public String getConfigJson() { return pluginSettingService.getConfigJson().isEmpty()?"{}":pluginSettingService.getConfigJson(); } public void setConfigJson(String json) { this.configJson = json; } }
@ActionViewData批注对于configJson参数在大豆模板中可用是必需的。
创建Web部分和Web项目
我们添加了网络。 现在,添加将从中启动网络的菜单项。
打开终端并执行以下命令:
create-atlas-jira-plugin-module我们回答以下问题:
Choose a number (1/2/3/4/5/6/7/8/9/10/11/12/13/14/15/16/17/18/19/20/21/22/23/24/25/26/27/28/29/30/31/32/33/34): 30 Enter Plugin Module Name My Web Section: : Webwork Config Section Enter Location (eg system.admin/mynewsection): admin_plugins_menu Show Advanced Setup? (Y/y/N/n) N: : N Add Another Plugin Module? (Y/y/N/n) N: : Y Choose a number (1/2/3/4/5/6/7/8/9/10/11/12/13/14/15/16/17/18/19/20/21/22/23/24/25/26/27/28/29/30/31/32/33/34): 25 Enter Plugin Module Name My Web Item: : Webwork Config Item Enter Section (eg system.admin/globalsettings): admin_plugins_menu/webwork-config-section Enter Link URL (eg /secure/CreateIssue!default.jspa): /secure/ConfigWebwork.jspa? Show Advanced Setup? (Y/y/N/n) N: : N Add Another Plugin Module? (Y/y/N/n) N: : N
结果,我们在“加载项”页面上创建了一个菜单项。
创建一个大豆模板
有关大豆模板的详细信息,请参见
此处 。
我们将创建一个文件
src / main /资源/模板/ webwork-config / configwebwork / success.soy。
src /主/资源/模板/ webwork-config / configwebwork / success.soy {namespace webwork.config} /** * This template is needed for drawing the formview. */ {template .formview} {@param configJson: string} {webResourceManager_requireResource('ru.matveev.alexey.jira.tutorial.webworkui.webwork-soy-require-backbone:webwork-soy-require-backbone-resources')} <html> <head> <meta charset="utf-8"/> <meta name="decorator" content="atl.admin"> <meta name="admin.active.section" content="admin_plugins_menu/telegram-config-section"> <meta name="admin.active.tab" content="telegram-general-config-item"> <title>my page page</title> </head> <body> <div id="container"> <form class="aui" action="ConfigWebwork!save.jspa" method="POST"> <div class="field-group"> <label for="configJson">Json</label> <input class="text long-field" type="text" id="configJson" name="configJson" placeholder="Json String" value="{$configJson}"> <div class="description">the configJson Parameter</div> </div> <div class="buttons-container"> <div class="buttons"> <input class="button submit" type="submit" value="Save" id="config-save-button"> <a class="cancel" href="#">Cancel</a> </div> </div> </form> </div> </body> </html> {/template}
在atlassian-plugin.xml文件中,添加指向在web-resource标签中创建的大豆模板的链接:
<resource type="soy" name="webwork-config" location="/templates/webwork-config/configwebwork/success.soy"/>
现在,我们将对atlassian-plugin.xml进行更改,以便当我们访问网络时,将显示创建的大豆模板:
<view name="success" type="soy">:webwork-soy-require-backbone-resources/webwork.config.formview</view>
webwork-soy-require-backbone-resources是web-resource标记中的name属性,在其中我们向大豆模板添加了链接。
webwork.config.formview-大豆文件中模板的名称空间和名称。
测试插件
在plugin文件夹中打开终端并执行以下命令:
atlas-runJira启动后,使用以下链接转到浏览器:
本地主机 :2990 / jira /安全/ ConfigWebwork.jspa
屏幕将如下所示:
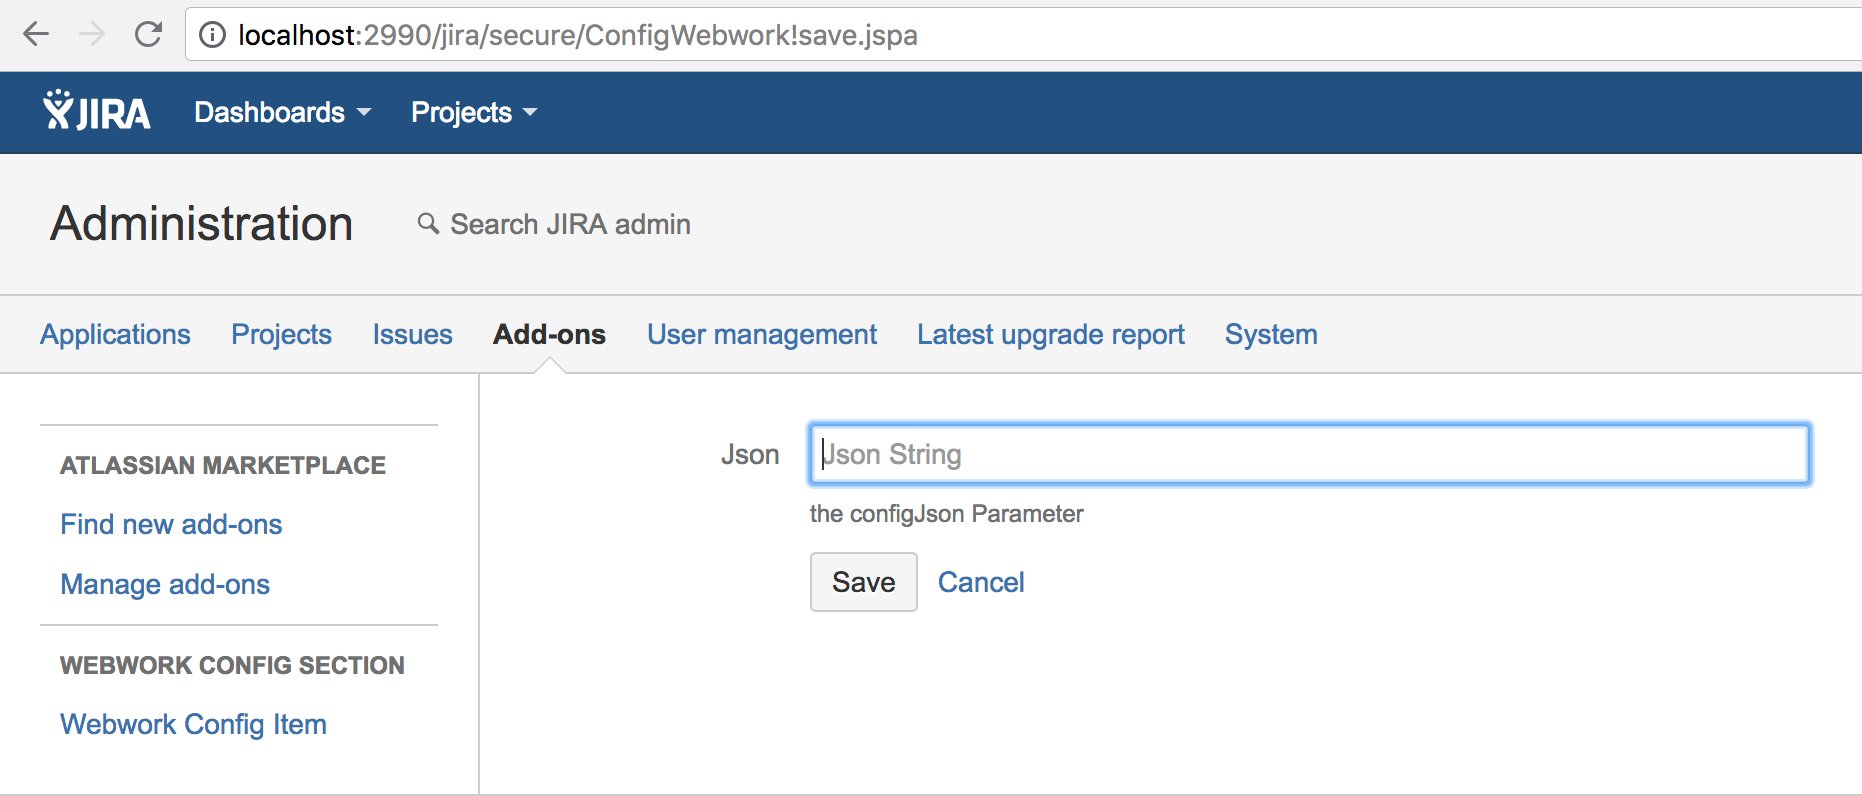
您可以尝试在“ Json”字段中输入数据并保存。 网络工程。
现在,我们需要确保有两个屏幕可用于填充参数,在最后一个屏幕上,“保存”按钮应将所有参数转换为json格式并保存在插件设置中。
为了控制屏幕移动和将参数强制转换为json格式的逻辑,我们将使用主干js。 您可以
在此处阅读有关骨干js的
信息 。
创建骨干模型
src /主/资源/ js / webwork-config-model.js定义(“网络/配置/模型”,[
'jquery',
“骨干”,
“下划线”
],函数($,主干网,_){
var WebConfigModel = Backbone.Model.extend({
默认值:{
参数1:“”,
parameter2:“”,
parameter3:“”,
参数4:”
}
});
返回{
型号:WebConfigModel
};
})
为了使模型在加载大豆模板时可用,必须将具有模型的文件添加到web-resource标签中的atlassian-plugin.xml中:
<resource type="download" name="webwork-config-model.js" location="/js/webwork-config-model.js"/>
创建骨干视图
我在代码中写了一些重要点的注释。
src /主/资源/ js / webwork-config-view.js// define是requirejs指令,并将模型定义为webwork / config / view模块。 这使我们可以在模型上的其他文件中定义依赖关系。
定义(“网络/配置/视图”,[
'jquery',
“骨干”,
“下划线”
],函数($,主干网,_){
“使用严格”;
var AppView = Backbone.View.extend({
事件:{
“单击#config-save-button”:“ saveConfig”,
“单击#next-button”:“ nextButton”,
“单击#后退按钮”:“ prevButton”
},
//通过“保存”按钮起作用的函数。 将参数从屏幕保存到模型,并将参数转换为json格式
saveConfig:函数(){
this.model.set(“ parameter3”,$(“#parameter3”)。val());
this.model.set(“ parameter4”,$(“#parameter4”)。val());
$(“#configJson”)。val(JSON.stringify(this.model));
},
//通过第一个屏幕上的“下一步”按钮起作用的功能。 将参数从第一个屏幕保存到模型并绘制第二个屏幕
nextButton:function(){
this.model.set(“ parameter1”,$(“#parameter1”)。val());
this.model.set(“ parameter2”,$(“#parameter2”)。val());
var template = webwork.config.page2({configJson:$(“#configJson”)。val(),参数3:this.model.get('parameter3'),参数4:this.model.get('parameter4')} );
$(“#container”)。replaceWith(模板);
$(“#configJson”)。val(JSON.stringify(this.model));
},
//通过第二个屏幕上的“后退”按钮起作用的功能。 将参数从第二个屏幕保存到模型并绘制第一个屏幕
prevButton:function(){
this.model.set(“ parameter3”,$(“#parameter3”)。val());
this.model.set(“ parameter4”,$(“#parameter4”)。val());
var template = webwork.config.page1({configJson:$(“#configJson”)。val(),参数1:this.model.get('parameter1'),参数2:this.model.get('parameter2')} );
$(“#container”)。replaceWith(模板);
$(“#configJson”)。val(JSON.stringify(this.model));
},
初始化:功能(){
this.render();
},
渲染:功能(){
var template = webwork.config.page1({configJson:$(“#configJson”)。val(),参数1:this.model.get('parameter1'),参数2:this.model.get('parameter2')} );
$(“#container”)。replaceWith(模板);
},
//这是到主容器的链接。 该视图将捕获该元素下方元素中的所有事件。
el:“#maincontainer”
});
返回{
查看:AppView
};
})
为了使视图在加载大豆模板时可用,必须将包含视图的文件添加到web-resource标签中的atlassian-plugin.xml中:
<resource type="download" name="webwork-config-view.js" location="/js/webwork-config-view.js"/>
创建一个js文件以自定义主干模型并查看
src /主/资源/ js / webwork-soy-require-backbone.js要求([
“网络/配置/视图”,
“网络/配置/模型”,
'jquery',
“骨干”,
“下划线”
],函数(webworkConfigView,webworkConfigModel,$,Backbone,_){
var webworkConfigModel = new webworkConfigModel.Model(JSON.parse($(“#configJson”)。val()));
var actionsView = new webworkConfigView.View({model:webworkConfigModel});
})
我们的js文件使用requirejs。 require指令使您可以确保仅在下载所有依赖项之后才下载文件。 我们为文件定义了以下依赖关系:webwork / config / view,webwork / config / model,查询,主干网,下划线。
添加大豆模板工作所需的参数。
在atlassian-plugin.xml文件中的web-resource标签中,添加:
<transformation extension="soy"> <transformer key="soyTransformer"/> </transformation> <resource name="success-soy.js" type="download" location="/templates/webwork-config/configwebwork/success.soy"/>
这些参数允许您访问js文件中的大豆模板。
改变成功
我在要点上添加了评论
src /主/资源/模板/ webwork-config / configwebwork / success.soy {namespace webwork.config} /** * webwork. json . page1. , json backbone model. */ {template .formview} {@param configJson: string} {webResourceManager_requireResource('ru.matveev.alexey.jira.tutorial.webworkui.webwork-soy-require-backbone:webwork-soy-require-backbone-resources')} <html> <head> <meta charset="utf-8"/> <meta name="decorator" content="atl.admin"> <meta name="admin.active.section" content="admin_plugins_menu/telegram-config-section"> <meta name="admin.active.tab" content="telegram-general-config-item"> <title>my page page</title> </head> <body> <div id="maincontainer"> <div id="container"> <input class="text long-field hidden" type="text" id="configJson" name="configJson" placeholder="Json String" value="{$configJson}"> </div> </div> </body> </html> {/template} /** * . parameter1 parameter2. */ {template .page1} {@param configJson: string} {@param parameter1: string} {@param parameter2: string} <div id="container"> <form class="aui"> <div class="field-group"> <label for="parameter1">Parameter 1</label> <input class="text long-field" type="text" id="parameter1" name="parameter1" placeholder="Parameter1 value" value="{$parameter1}"> <div class="description">Value of Parameter 1</div> </div> <div class="field-group"> <label for="parameter2">Parameter 2</label> <input class="text long-field" type="text" id="parameter2" name="parameter2" placeholder="Parameter2 value" value="{$parameter2}"> <div class="description">Value of Parameter 2</div> </div> <div class="field-group"> <input class="text long-field hidden" type="text" id="configJson" name="configJson" placeholder="Json String" value="{$configJson}"> </div> <div class="buttons-container"> <div class="buttons"> <a class="cancel" href="#">Cancel</a> <input class="button submit" type="submit" value="Next" id="next-button"> </div> </div> </form> </div> {/template} /** * . parameter3 parameter4. */ {template .page2} {@param configJson: string} {@param parameter3: string} {@param parameter4: string} <div id="container"> <form class="aui" action="ConfigWebwork!save.jspa" method="POST"> <div class="field-group"> <label for="parameter1">Parameter 3</label> <input class="text long-field" type="text" id="parameter3" name="parameter3" placeholder="Parameter3 value" value="{$parameter3}"> <div class="description">Value of Parameter 3</div> </div> <div class="field-group"> <label for="parameter4">Parameter 4</label> <input class="text long-field" type="text" id="parameter4" name="parameter4" placeholder="Parameter4 value" value="{$parameter4}"> <div class="description">Value of Parameter 4</div> </div> <div class="field-group"> <input class="text long-field hidden" type="text" id="configJson" name="configJson" placeholder="Json String" value="{$configJson}"> </div> <div class="buttons-container"> <div class="buttons"> <input class="button submit" type="submit" value="Back" id="back-button"> <input class="button submit" type="submit" value="Save" id="config-save-button"> </div> </div> </form> </div> {/template}
测试应用程序
在plugin文件夹中打开终端并运行:
atlas-runJira启动后,使用链接打开浏览器:
http://localhost:2990/jira/secure/ConfigWebwork.jspa您将看到以下屏幕:
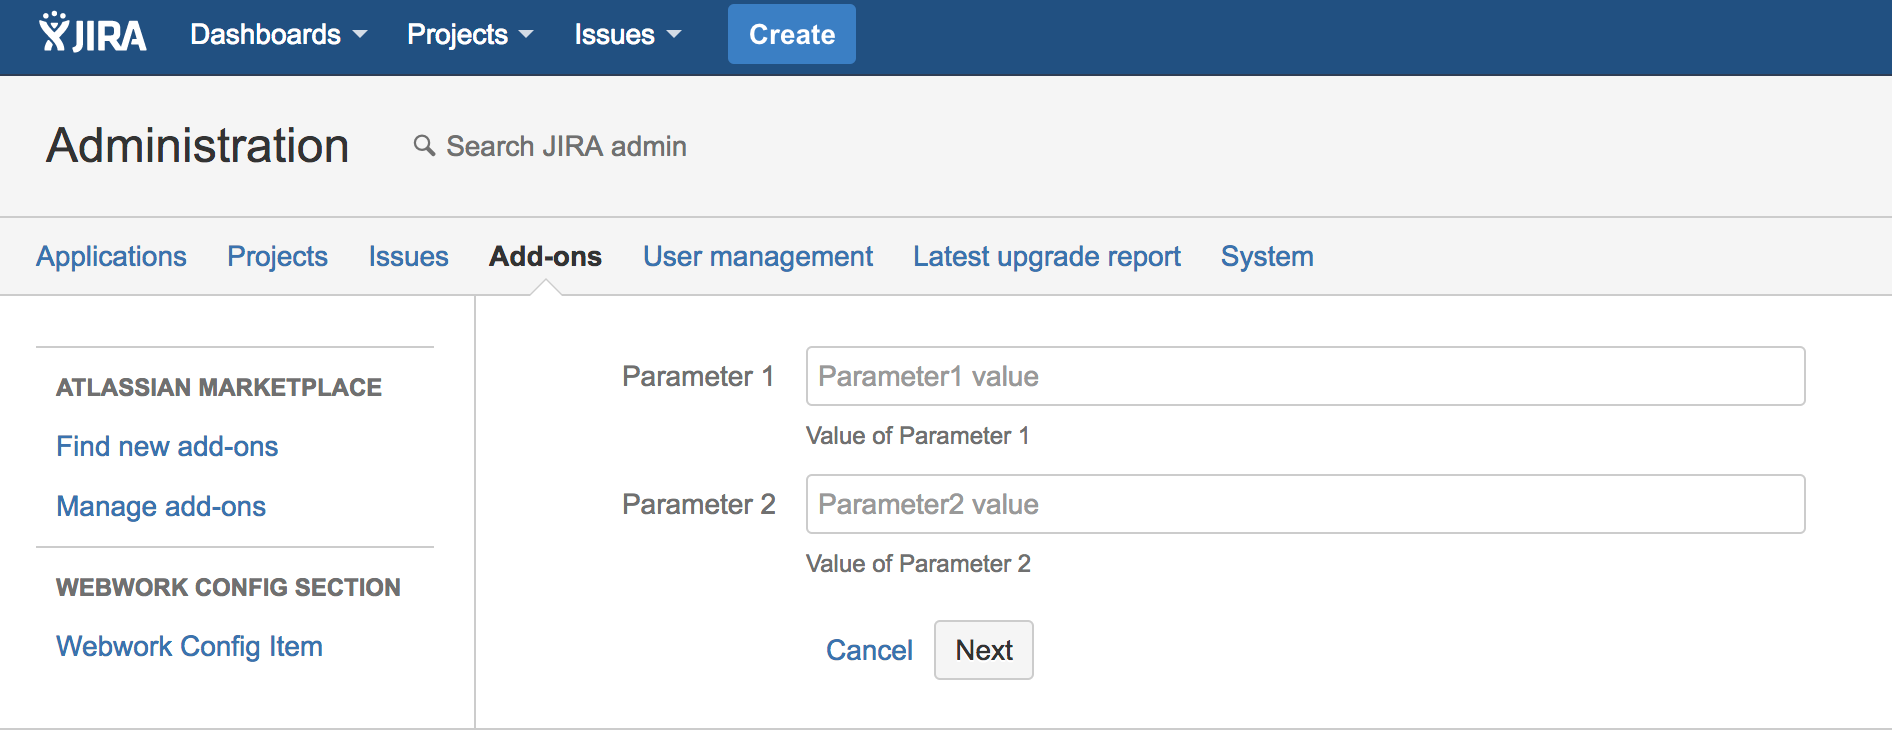
填写参数,然后单击下一步按钮。 将出现以下屏幕:
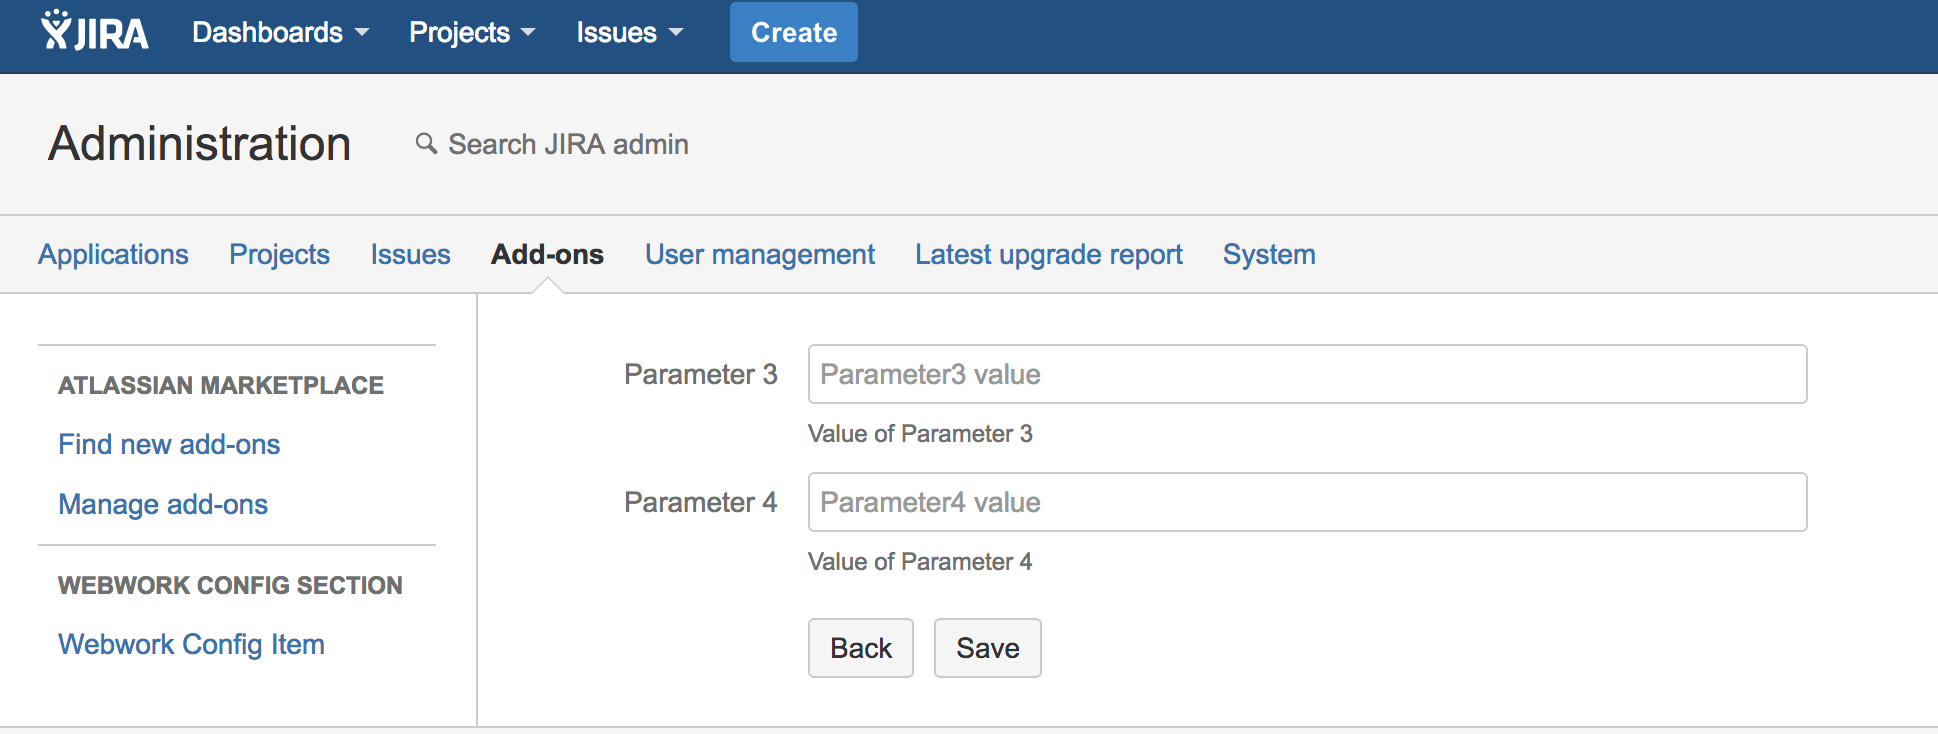
填写参数3和4,然后单击“保存”按钮。 参数将以Json格式保存。 您可以单击“后退”按钮,您将进入第一个屏幕。
我们的插件有效。