
我被提供去熟悉GraphQL。 看看您是否可以申请工作。 搜索之后,我意识到大多数信息都是英文的,而且部分是旧的,该库有3个版本,已经有5个版本。 我想填补这个空白。 在此选项中,将有一个关于servlet的示例,即 没有弹簧,没有弹簧靴。
理论部分:
GraphQL-API的新外观。 VladimirZaets的 第1部分REST和 GraphQL的 完美对比我将立即向您显示代码,因为GraphQL是一种抽象。 如果长时间讨论抽象,您可能会迷路。 原来在
这里 。
我更改了代码,因为 较新的版本没有某些类。
创建一个空的Maven项目。 将依赖项添加到野餐:
<dependency> <groupId>com.graphql-java</groupId> <artifactId>graphql-java</artifactId> <version>8.0</version> </dependency> <dependency> <groupId>com.graphql-java</groupId> <artifactId>graphql-java-tools</artifactId> <version>5.0.0</version> </dependency> <dependency> <groupId>com.graphql-java</groupId> <artifactId>graphql-java-servlet</artifactId> <version>5.0.0</version> </dependency> <dependency> <groupId>javax.servlet</groupId> <artifactId>javax.servlet-api</artifactId> <version>3.0.1</version> <scope>provided</scope> </dependency>
为了不考虑服务器,请采取码头行动:
<plugin> <groupId>org.eclipse.jetty</groupId> <artifactId>jetty-maven-plugin</artifactId> <version>9.4.6.v20170531</version> </plugin>
与本教程的区别:
- 现在已“弃用”从SimpleGraphQLServlet调用构造函数的继承,您必须使用builder,而继承是不可能的,请使用组合。
- 在Servlet中,您可以创建一个SimpleGraphQLServlet对象。
- GraphQLRootResolver-不再,您可以使用特定的:GraphQLMutationResolver和GraphQLQueryResolver
基金会已准备就绪。 我们将根据教程进行操作,而无需spring或JAX-RS。 通常,常规servlet:
@WebServlet(urlPatterns = "/graphql") public class GraphQLEndpoint extends HttpServlet { private SimpleGraphQLServlet graph; public GraphQLEndpoint() { graph = SimpleGraphQLServlet.builder(buildSchema()).build(); } private static GraphQLSchema buildSchema() { LinkRepository linkRepository = new LinkRepository(); return SchemaParser.newParser() .file("schema.graphqls") .resolvers(new Query(linkRepository), new Mutation(linkRepository)) .build() .makeExecutableSchema(); } @Override protected void service(HttpServletRequest req, HttpServletResponse resp) throws ServletException, IOException { graph.service(req, resp); } }
在其中,服务方法将数据传递到SimpleGraphQLServlet。 我们业务的一切都结束了。
常规代码(链接和链接存储库) public class Link { private final String url; private final String description; public Link(String url, String description) { this.url = url; this.description = description; } public String getUrl() { return url; } public String getDescription() { return description; } }
public class LinkRepository { private final List<Link> links; public LinkRepository() { links = new ArrayList<>();
现在,请求代码(REST中的GET请求)和变异(更改请求) import com.coxautodev.graphql.tools.GraphQLQueryResolver; public class Query implements GraphQLQueryResolver { private final LinkRepository linkRepository; public Query(LinkRepository linkRepository) { this.linkRepository = linkRepository; } public List<Link> allLinks() { return linkRepository.getAllLinks(); } }
import com.coxautodev.graphql.tools.GraphQLMutationResolver; public class Mutation implements GraphQLMutationResolver { private final LinkRepository linkRepository; public Mutation(LinkRepository linkRepository) { this.linkRepository = linkRepository; } public Link createLink(String url, String description) { Link newLink = new Link(url, description); linkRepository.saveLink(newLink); return newLink; } }
我们从码头开始:奔跑,然后抛出请求:
http://localhost:8080/graphql?query={allLinks{url}}
我们得到答案:
{"data": {"allLinks": [ {"url":"http://howtographql.com"}, {"url":"http://graphql.org/learn/"} ] } }
这是第一个要点:我们有2个字段,即url和description,并且仅收到url作为响应。 没错,因为我们只在请求中使用url并要求{allLinks {url}}。 如果您将请求更改为:
http://localhost:8080/graphql?query={allLinks{url,description}}
答案是:
{"data": {"allLinks": [ { "url":"http://howtographql.com", "description":"Your favorite GraphQL page" }, { "url":"http://graphql.org/learn/", "description":"The official docks" } ] } }
现在我们有了网址和描述。 都是因为我们问了他们。
请求更改数据。
UI实用程序有点复杂,使用起来也容易得多。
1.我们去的
地址2.复制整个index.html文件
3.替换2行:
这些是:
<link rel="stylesheet" href="./node_modules/graphiql/graphiql.css" /> <script src="./node_modules/graphiql/graphiql.js"></script>
在这些:
<link rel="stylesheet" href="//cdn.jsdelivr.net/npm/graphiql@0.11.2/graphiql.css" /> <script src="//cdn.jsdelivr.net/npm/graphiql@0.11.2/graphiql.js"></script>
4.用刚刚注销的项目替换项目中的index.html ... \ src \ main \ webapp \ index.html。
我们重新启动项目,转到
localhost:8080并转到这样的页面

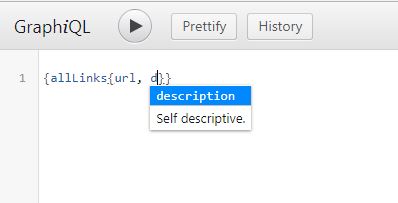
第一个好处:左侧是“文档”按钮,该按钮隐藏了项目的现成文档。 可以请求的字段,可以调用的方法以及要传递的内容数量不多。

它还提供了您最喜欢的汽车。
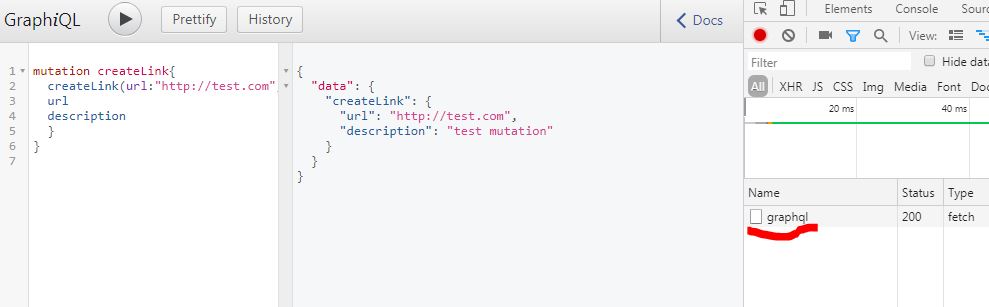
现在,我们将发送一个变异请求。 我们有一个变异,即“添加链接”。

查询文字: mutation createLink{ createLink(url:"http://test.com", description:"test mutation"){ url description } }
过了一会儿,我发现变词这个词就足够了(不需要写后创建链接)
mutation { createLink(url:"http://test.com", description:"test mutation"){ url description } }
即 我们只是通过名称来调用该方法并将参数传递给它。 您还可以出卖我们想获得的信息。
如何查看突变请求1.打开F12开发人员选项卡并打开网络,我们发送请求。
2.在提交的请求中,RMB->复制->复制为cURL(bash)
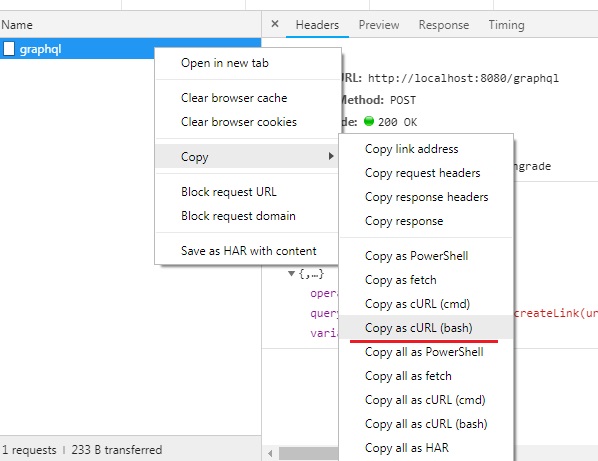
2.1。 对于那些使用curl的人来说,这就足够了,对于那些希望看到邮递员走得更远的人
3.打开邮递员,然后单击左上角的导入。

4.在打开的窗口中,选择“粘贴原始文本”,然后将复制的curl请求粘贴到此处

我们可以看到请求正文:
{"query":"mutation createLink{\n createLink(url:\"http://test.com\", description:\"test mutation\"){\n\t\turl\n description\n }\n}","variables":null,"operationName":"createLink"} “\n”.
在此阶段,已经有一个简单的服务器,那里有存储,我们为请求设置了URL。
我喜欢这个主意。 前台本身可以确定当前需要什么信息,以及如何节省流量。 当添加新功能时,旧功能将继续工作,前端将仅接收其需要的内容,仅此而已。
Github示例代码
2个分支:
大师-如何在官方
教程中完成update_version是更新版本,具有新版本的依赖关系。
参考文献:
1.
码头2.
官方教程(针对不同语言)3.
初步了解的
视频