哈Ha! 我向您介绍了文章“ 在ASP.NET Core中创建简单的API网关 ”的翻译。
10分钟阅读
在上一篇文章.NET中的针对微服务的JWT身份验证中 ,我介绍了为用户身份验证创建微服务的过程。 在系统的其他组件中执行任何操作之前,这可用于验证用户的身份。
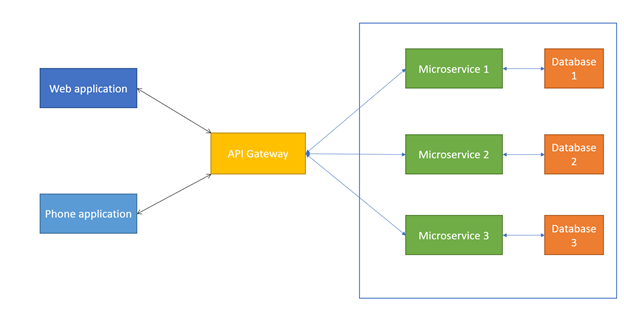
该产品正常工作的另一个重要组成部分是API网关-应用程序和后端之间的系统,该系统首先将传入的请求路由到相应的微服务,然后对用户进行授权。
有许多框架可用于创建API网关,例如,.NET核心中的Ocelot或Java中的Netflix Zuul。 但是,在本文中,我将介绍在.NET Core中从头开始创建简单API网关的过程。
项目创建
首先,通过在项目创建窗口中选择ASP.NET Core Web Application并以Empty作为模板来创建一个新应用程序。


该项目将包含Startup和Program类。 对我们来说,最重要的部分是Startup类的Configure方法。 在这里,我们可以处理传入的HTTP请求并对其进行响应。 也许下面的代码将在Configure方法中:
app.Run(async (context) => { await context.Response.WriteAsync("Hello, World!"); });
拼写路由器
由于将在Configure方法中处理请求,因此我们将编写必要的逻辑:
Router router = new Router("routes.json"); app.Run(async (context) => { var content = await router.RouteRequest(context.Request); await context.Response.WriteAsync(await content.Content.ReadAsStringAsync()); });
首先,我们创建一个Router类型的对象。 他的任务包括存储现有路由,根据路由验证和发送请求。 为了使代码更整洁,我们将从JSON文件加载路由。
结果是以下逻辑:请求到达网关后,它将被重定向到路由器,路由器再将其发送到相应的微服务。
在编写Router类之前,请创建一个route.json文件。 在此文件中,我们指示路由的列表,每个路由都将包含一个外部地址(端点)和一个目的地址(目的地)。 同样,我们将添加一个标志,指示在重定向之前需要授权用户。
该文件可能如下所示:
{ "routes": [ { "endpoint": "/movies", "destination": { "uri": "http://localhost:8090/movies/", "requiresAuthentication": "true" } }, { "endpoint": "/songs", "destination": { "uri": "http://localhost:8091/songs/", "requiresAuthentication": "false" } } ], "authenticationService": { "uri": "http://localhost:8080/api/auth/" } }
创建目标类别
现在我们知道每个Route必须具有endpoint和destination ,并且每个Destination必须具有uri和requiresAuthentication字段。
现在让我们编写Destination类,记住这一点。 我将添加两个字段,两个构造函数和一个不带参数的私有构造函数,以进行JSON反序列化。
public class Destination { public string Uri { get; set; } public bool RequiresAuthentication { get; set; } public Destination(string uri, bool requiresAuthentication) { Uri = path; RequiresAuthentication = requiresAuthentication; } public Destination(string uri) :this(uri, false) { } private Destination() { Uri = "/"; RequiresAuthentication = false; } }
同样,在此类中编写SendRequest方法是正确的。 这将显示Destination类的每个对象将负责发送请求。 此方法将使用HttpRequest类型的对象,该对象描述传入的请求,从中取出所有必需的信息,然后将请求发送到目标URI。 为此,我们编写了一个辅助方法CreateDestinationUri ,它将把行与地址以及来自客户端的地址行的参数(查询字符串)连接起来。
private string CreateDestinationUri(HttpRequest request) { string requestPath = request.Path.ToString(); string queryString = request.QueryString.ToString(); string endpoint = ""; string[] endpointSplit = requestPath.Substring(1).Split('/'); if (endpointSplit.Length > 1) endpoint = endpointSplit[1]; return Uri + endpoint + queryString; }
现在,我们可以编写一个SendRequest方法,该方法将发送对微服务的请求并接收回响应。
public async Task<HttpResponseMessage> SendRequest(HttpRequest request) { string requestContent; using (Stream receiveStream = request.Body) { using (StreamReader readStream = new StreamReader(receiveStream, Encoding.UTF8)) { requestContent = readStream.ReadToEnd(); } } HttpClient client = new HttpClient(); HttpRequestMessage newRequest = new HttpRequestMessage(new HttpMethod(request.Method), CreateDestinationUri(request)); HttpResponseMessage response = await client.SendAsync(newRequest); return response; }
创建一个JSON解析器。
在编写Router类之前,我们需要创建逻辑以使用路由反序列化JSON文件。 我将为此创建一个帮助器类,其中将有两种方法:一种用于从JSON文件创建对象,另一种用于反序列化。
public class JsonLoader { public static T LoadFromFile<T>(string filePath) { using (StreamReader reader = new StreamReader(filePath)) { string json = reader.ReadToEnd(); T result = JsonConvert.DeserializeObject<T>(json); return result; } } public static T Deserialize<T>(object jsonObject) { return JsonConvert.DeserializeObject<T>(Convert.ToString(jsonObject)); } }
类路由器。
在编写Router之前,我们要做的最后一件事是描述路由模型:
public class Route { public string Endpoint { get; set; } public Destination Destination { get; set; } }
现在,通过在其中添加字段和构造函数来编写Router类。
public class Router { public List<Route> Routes { get; set; } public Destination AuthenticationService { get; set; } public Router(string routeConfigFilePath) { dynamic router = JsonLoader.LoadFromFile<dynamic>(routeConfigFilePath); Routes = JsonLoader.Deserialize<List<Route>>( Convert.ToString(router.routes) ); AuthenticationService = JsonLoader.Deserialize<Destination>( Convert.ToString(router.authenticationService) ); } }
我使用动态类型从JSON读取并将对象属性写入其中。
现在,所有内容都可以描述API网关的主要功能:路由和用户授权,这将在RouteRequest方法中进行。 我们需要从请求对象中解压缩外部地址的基本部分(基本端点)。 例如,对于地址/movies/add基础将是/movies/ 。 之后,我们需要检查是否有此路线的描述。 如果是这样,则授权用户并发送请求,否则我们将返回错误。 为了方便起见,我还创建了ConstructErrorMessage类。
对于授权,我更喜欢采用以下方式:我们从请求标头中提取令牌,并将其作为请求参数发送。 另一个选择是可能的:将令牌保留在标头中,然后用于请求的微服务应已将其提取。
public async Task<HttpResponseMessage> RouteRequest(HttpRequest request) { string path = request.Path.ToString(); string basePath = '/' + path.Split('/')[1]; Destination destination; try { destination = Routes.First(r => r.Endpoint.Equals(basePath)).Destination; } catch { return ConstructErrorMessage("The path could not be found."); } if (destination.RequiresAuthentication) { string token = request.Headers["token"]; request.Query.Append(new KeyValuePair<string, StringValues>("token", new StringValues(token))); HttpResponseMessage authResponse = await AuthenticationService.SendRequest(request); if (!authResponse.IsSuccessStatusCode) return ConstructErrorMessage("Authentication failed."); } return await destination.SendRequest(request); } private HttpResponseMessage ConstructErrorMessage(string error) { HttpResponseMessage errorMessage = new HttpResponseMessage { StatusCode = HttpStatusCode.NotFound, Content = new StringContent(error) }; return errorMessage; }
结论
创建基本的API网关不需要太多的工作,但是它没有提供适当的功能。 如果需要负载平衡器,则可以查看提供用于路由请求的库的现有框架或平台。
GitHub存储库中提供了本文中的所有代码。