大约一年前,我们公司开始将Magento 1上的巨大整体分离为微服务。 他们只选择了发布时发布的Symfony 4作为基础,在此期间,我在此框架上开发了多个项目,但是我特别发现开发捆绑包和可重复使用的Symfony组件很有趣。 在猫的帮助下,有关开发HealthCheck软件包的循序渐进指南,以获取Syfmony 4.1下微服务的状态/运行状况,在其中我尝试介绍了最有趣,最复杂的时刻(对我而言)。
在我们公司中,例如,此捆绑包用于获取ElasticSearch中产品重新索引的状态-当前数据包含在Elastic中的产品数量,以及需要索引的产品数量。
创建捆绑骨架
在Symfony 3中,有一个方便的捆绑包可用于生成捆绑包骨架,但是在Symfony 4中不再受支持,因此您必须自己创建骨架。 我通过组建一个团队来开始每个新项目的开发
composer create-project symfony/skeleton health-check
请注意,Symfony 4支持PHP 7.1+,因此,如果在以下版本上运行此命令,则将获得Symfony 3的项目框架。
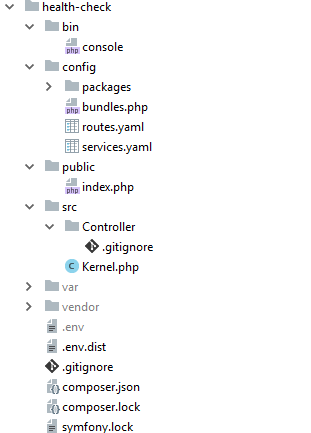
此命令使用以下结构创建一个新的Symfony 4.1项目:
原则上来说,这不是必需的,因为最终创建的文件并不需要那么多,但是比起我自己创建必要的文件,对于我来说,清理不需要的所有内容要方便得多。
composer.json
下一步是根据需要编辑composer.json 。 首先,您需要将项目type的类型更改为symfony-bundle这将有助于Symfony Flex确定在向项目添加捆绑包时,它确实是一个Symfony捆绑包,自动将其连接并安装配方(稍后会介绍更多内容)。 接下来,请确保添加name和description字段。 name也很重要,因为它确定vendor捆绑软件放置在vendor内部的哪个文件夹中。
"name": "niklesh/health-check", "description": "Health check bundle",
接下来的重要步骤是编辑autoload部分,该部分负责加载bundle类。 autoload用于工作环境, autoload-dev用于工作环境。
"autoload": { "psr-4": { "niklesh\\HealthCheckBundle\\": "src" } }, "autoload-dev": { "psr-4": { "niklesh\\HealthCheckBundle\\Tests\\": "tests" } },
scripts部分可以删除。 它包含用于在执行composer install和composer update命令后组装资产和清除缓存的脚本,但是,我们的捆绑软件不包含任何资产或缓存,因此这些命令无用。
最后一步是编辑require和require-dev部分。 结果,我们得到以下信息:
"require": { "php": "^7.1.3", "ext-ctype": "*", "ext-iconv": "*", "symfony/flex": "^1.0", "symfony/framework-bundle": "^4.1", "sensio/framework-extra-bundle": "^5.2", "symfony/lts": "^4@dev", "symfony/yaml": "^4.1" }
我注意到当bundle连接到工作草案时,将安装require的依赖项。
运行composer update -这取决于安装。
不必要的清洁
因此,从收到的文件中,您可以安全地删除以下文件夹:
- bin-包含运行Symfony命令所需的
console文件 - config-包含用于路由,连接的捆绑包,
服务等 index.php包含index.php应用程序的入口点- var-日志和
cache存储在此处
我们还将删除src/Kernel.php , .env和.env.dist
我们不需要所有这些,因为我们正在开发捆绑软件,而不是应用程序。
创建捆绑结构
因此,我们添加了必要的依赖项并清除了捆绑软件中不需要的所有内容。 现在该创建必要的文件和文件夹,以将捆绑软件成功连接到项目了。
首先,在src文件夹中,使用以下内容创建文件HealthCheckBundle.php :
<?php namespace niklesh\HealthCheckBundle; use Symfony\Component\HttpKernel\Bundle\Bundle; class HealthCheckBundle extends Bundle { }
这样的类应该在您创建的每个包中。 他将config/bundles.php在主项目的config/bundles.php 。 另外,他可以影响捆绑软件的“构建”。
所需的下一个捆绑软件组件是DependencyInjection部分。 创建具有2个文件的同名文件夹:
src/DependencyInjection/Configuration.php
<?php namespace niklesh\HealthCheckBundle\DependencyInjection; use Symfony\Component\Config\Definition\Builder\TreeBuilder; use Symfony\Component\Config\Definition\ConfigurationInterface; class Configuration implements ConfigurationInterface { public function getConfigTreeBuilder() { $treeBuilder = new TreeBuilder(); $treeBuilder->root('health_check'); return $treeBuilder; } }
该文件负责从Yaml或xml文件中解析和验证捆绑包配置。 我们稍后将对其进行修改。
src/DependencyInjection/HealthCheckExtension.php
<?php namespace niklesh\HealthCheckBundle\DependencyInjection; use Symfony\Component\Config\FileLocator; use Symfony\Component\DependencyInjection\ContainerBuilder; use Symfony\Component\HttpKernel\DependencyInjection\Extension; use Symfony\Component\DependencyInjection\Loader; class HealthCheckExtension extends Extension { public function load(array $configs, ContainerBuilder $container) { $configuration = new Configuration(); $this->processConfiguration($configuration, $configs); $loader = new Loader\YamlFileLoader($container, new FileLocator(__DIR__ . '/../Resources/config')); $loader->load('services.yaml'); } }
此文件负责加载捆绑包配置文件,创建和注册“定义”服务,将参数加载到容器等。
这个阶段的最后一步是添加src/Resources/services.yaml文件,其中将包含对捆绑软件服务的描述。 现在将其留空。
健康界面
我们软件包的主要任务是返回有关使用它的项目的数据。 但是信息的收集是服务本身的工作,我们的捆绑包只能指示服务应向其传输的信息的格式以及接收该信息的方法。 在我的实现中,收集信息的所有服务(可能有几种)应该使用两种方法来实现HealthInterface接口: getName和getHealthInfo 。 后者必须返回一个对象实现接口HealthDataInterface 。
首先,创建src/Entity/HealthDataInterface.php数据接口:
<?php namespace niklesh\HealthCheckBundle\Entity; interface HealthDataInterface { public const STATUS_OK = 1; public const STATUS_WARNING = 2; public const STATUS_DANGER = 3; public const STATUS_CRITICAL = 4; public function getStatus(): int; public function getAdditionalInfo(): array; }
数据必须包含整数状态和其他信息(顺便说一句,该信息可能为空)。
由于此接口的实现很可能是大多数后代的典型操作,因此我决定将其添加到src/Entity/CommonHealthData.php :
<?php namespace niklesh\HealthCheckBundle\Entity; class CommonHealthData implements HealthDataInterface { private $status; private $additionalInfo = []; public function __construct(int $status) { $this->status = $status; } public function setStatus(int $status) { $this->status = $status; } public function setAdditionalInfo(array $additionalInfo) { $this->additionalInfo = $additionalInfo; } public function getStatus(): int { return $this->status; } public function getAdditionalInfo(): array { return $this->additionalInfo; } }
最后,为src/Service/HealthInterface.php数据收集服务添加接口:
<?php namespace niklesh\HealthCheckBundle\Service; use niklesh\HealthCheckBundle\Entity\HealthDataInterface; interface HealthInterface { public function getName(): string; public function getHealthInfo(): HealthDataInterface; }
控制者
控制器将仅通过一条路径就提供有关项目的数据。 但是对于使用此捆绑包的所有项目,此路线都是相同的: /health
但是,控制器的任务不仅是提供数据,而且还要从实现HealthInterface的服务中获取数据;因此,控制器必须存储指向每个服务的链接。 addHealthService方法将负责向控制器添加服务
添加控制器src/Controller/HealthController.php :
<?php namespace niklesh\HealthCheckBundle\Controller; use niklesh\HealthCheckBundle\Service\HealthInterface; use Symfony\Bundle\FrameworkBundle\Controller\AbstractController; use Symfony\Component\HttpFoundation\JsonResponse; use Symfony\Component\Routing\Annotation\Route; class HealthController extends AbstractController { private $healthServices = []; public function addHealthService(HealthInterface $healthService) { $this->healthServices[] = $healthService; } public function getHealth(): JsonResponse { return $this->json(array_map(function (HealthInterface $healthService) { $info = $healthService->getHealthInfo(); return [ 'name' => $healthService->getName(), 'info' => [ 'status' => $info->getStatus(), 'additional_info' => $info->getAdditionalInfo() ] ]; }, $this->healthServices)); } }
合编
Symfony可以对实现特定接口的服务执行某些操作。 您可以调用特定的方法,添加标签,但是不能将所有此类服务插入到另一个服务(即控制器)中。 此问题分为四个阶段解决:
我们为实现HealthInterface标签的每个HealthInterface添加了内容。
将TAG常量添加到接口:
interface HealthInterface { public const TAG = 'health.service'; }
接下来,您需要将此标签添加到每个服务。 对于项目配置,这可以是
在文件中实现config/services.yaml部分_instanceof 。 就我们而言
该条目将如下所示:
serivces: _instanceof: niklesh\HealthCheckBundle\Service\HealthInterface: tags: - !php/const niklesh\HealthCheckBundle\Service\HealthInterface::TAG
而且,原则上,如果您将捆绑软件的配置分配给用户,它将起作用,但是我认为这不是正确的方法,捆绑软件本身必须正确连接,并且在添加到项目中时必须以最少的用户干预进行配置。 可能有人记得我们在捆绑包中有我们自己的services.yaml ,但没有,它对我们没有帮助。 此设置仅在项目文件中有效,而在捆绑软件中无效。
我不知道这是错误还是功能,但是现在我们有了。 因此,我们将不得不渗透捆绑包的编译过程。
转到src/HealthCheckBundle.php并重新定义build方法:
<?php namespace niklesh\HealthCheckBundle; use niklesh\HealthCheckBundle\Service\HealthInterface; use Symfony\Component\DependencyInjection\ContainerBuilder; use Symfony\Component\HttpKernel\Bundle\Bundle; class HealthCheckBundle extends Bundle { public function build(ContainerBuilder $container) { parent::build($container); $container->registerForAutoconfiguration(HealthInterface::class)->addTag(HealthInterface::TAG); } }
现在,将对每个实现HealthInterface类进行标记。
将控制器注册为服务
在下一步中,我们将需要在编译捆绑包的阶段将控制器作为服务联系。 在使用项目的情况下,默认情况下所有类都注册为服务,但是在使用捆绑软件的情况下,我们必须明确确定哪些类将成为服务,为它们设置参数,并指出它们是否将是公共的。
打开src/Resources/config/services.yaml文件并添加以下内容
services: niklesh\HealthCheckBundle\Controller\HealthController: autoconfigure: true
我们已将控制器明确注册为服务,现在可以在编译阶段对其进行访问。
向控制器添加服务。
在编译容器和捆绑包的阶段,我们只能使用服务定义进行操作。 在此阶段,我们需要对HealthController进行定义,并指出在其创建之后,有必要向其添加所有用我们的标记标记的服务。 对于捆绑中的此类操作,实现接口的类负责
Symfony\Component\DependencyInjection\Compiler\CompilerPassInterface
创建以下src/DependencyInjection/Compiler/HealthServicePath.php :
<?php namespace niklesh\HealthCheckBundle\DependencyInjection\Compiler; use niklesh\HealthCheckBundle\Controller\HealthController; use niklesh\HealthCheckBundle\Service\HealthInterface; use Symfony\Component\DependencyInjection\Compiler\CompilerPassInterface; use Symfony\Component\DependencyInjection\ContainerBuilder; use Symfony\Component\DependencyInjection\Reference; class HealthServicesPath implements CompilerPassInterface { public function process(ContainerBuilder $container) { if (!$container->has(HealthController::class)) { return; } $controller = $container->findDefinition(HealthController::class); foreach (array_keys($container->findTaggedServiceIds(HealthInterface::TAG)) as $serviceId) { $controller->addMethodCall('addHealthService', [new Reference($serviceId)]); } } }
如您所见,我们首先使用findDefinition方法findDefinition获取控制器,然后-按标记使用所有服务,然后在循环中,对找到的每个服务添加对addHealthService方法的调用,然后将链接传递给该服务。
使用CompilerPath
最后一步是将HealthServicePath添加到捆绑包编译过程中。 让我们回到HealthCheckBundle类,并进一步更改build方法。 结果,我们得到:
<?php namespace niklesh\HealthCheckBundle; use niklesh\HealthCheckBundle\DependencyInjection\Compiler\HealthServicesPath; use niklesh\HealthCheckBundle\Service\HealthInterface; use Symfony\Component\DependencyInjection\ContainerBuilder; use Symfony\Component\HttpKernel\Bundle\Bundle; class HealthCheckBundle extends Bundle { public function build(ContainerBuilder $container) { parent::build($container); $container->addCompilerPass(new HealthServicesPath()); $container->registerForAutoconfiguration(HealthInterface::class)->addTag(HealthInterface::TAG); } }
基本上,在这个阶段我们的捆绑包可以使用了。 它可以找到信息收集服务,与他们合作并在访问/health时给出答案(您只需要在连接时添加路由设置即可),但我决定让它不仅具有根据请求发送信息的能力,而且还提供向用户发送此信息的能力。或者,例如,使用POST请求或通过队列管理器。
HealthSender接口
该接口旨在描述负责在某处发送数据的类。 在src/Service/HealthSenderInterface创建它
<?php namespace niklesh\HealthCheckBundle\Service; use niklesh\HealthCheckBundle\Entity\HealthDataInterface; interface HealthSenderInterface { public function send(array $data): void; public function getDescription(): string; public function getName(): string; }
如您所见, send方法将以某种方式处理来自所有实现HealthInterface类的接收到的数据数组,然后将其发送到需要的地方。
仅在运行控制台命令时才需要getDescription和getName来显示信息。
发送数据命令
开始向第三方资源发送数据将是控制台命令SendDataCommand 。 它的任务是收集要分发的数据,然后在每个分发服务上调用send方法。 显然,此命令将部分重复控制器的逻辑,但并非全部重复。
<?php namespace niklesh\HealthCheckBundle\Command; use niklesh\HealthCheckBundle\Entity\HealthDataInterface; use niklesh\HealthCheckBundle\Service\HealthInterface; use niklesh\HealthCheckBundle\Service\HealthSenderInterface; use Symfony\Component\Console\Command\Command; use Symfony\Component\Console\Input\InputInterface; use Symfony\Component\Console\Output\OutputInterface; use Symfony\Component\Console\Style\SymfonyStyle; use Throwable; class SendDataCommand extends Command { public const COMMAND_NAME = 'health:send-info'; private $senders; private $healthServices; private $io; public function __construct(HealthSenderInterface... $senders) { parent::__construct(self::COMMAND_NAME); $this->senders = $senders; } public function addHealthService(HealthInterface $healthService) { $this->healthServices[] = $healthService; } protected function configure() { parent::configure(); $this->setDescription('Send health data by senders'); } protected function initialize(InputInterface $input, OutputInterface $output) { parent::initialize($input, $output); $this->io = new SymfonyStyle($input, $output); } protected function execute(InputInterface $input, OutputInterface $output) { $this->io->title('Sending health info'); try { $data = array_map(function (HealthInterface $service): HealthDataInterface { return $service->getHealthInfo(); }, $this->healthServices); foreach ($this->senders as $sender) { $this->outputInfo($sender); $sender->send($data); } $this->io->success('Data is sent by all senders'); } catch (Throwable $exception) { $this->io->error('Exception occurred: ' . $exception->getMessage()); $this->io->text($exception->getTraceAsString()); } } private function outputInfo(HealthSenderInterface $sender) { if ($name = $sender->getName()) { $this->io->writeln($name); } if ($description = $sender->getDescription()) { $this->io->writeln($description); } } }
HealthServicesPath ,向团队编写其他数据收集服务。
<?php namespace niklesh\HealthCheckBundle\DependencyInjection\Compiler; use niklesh\HealthCheckBundle\Command\SendDataCommand; use niklesh\HealthCheckBundle\Controller\HealthController; use niklesh\HealthCheckBundle\Service\HealthInterface; use Symfony\Component\DependencyInjection\Compiler\CompilerPassInterface; use Symfony\Component\DependencyInjection\ContainerBuilder; use Symfony\Component\DependencyInjection\Reference; class HealthServicesPath implements CompilerPassInterface { public function process(ContainerBuilder $container) { if (!$container->has(HealthController::class)) { return; } $controller = $container->findDefinition(HealthController::class); $commandDefinition = $container->findDefinition(SendDataCommand::class); foreach (array_keys($container->findTaggedServiceIds(HealthInterface::TAG)) as $serviceId) { $controller->addMethodCall('addHealthService', [new Reference($serviceId)]); $commandDefinition->addMethodCall('addHealthService', [new Reference($serviceId)]); } } }
如您所见,构造函数中的命令接受一个发件人数组。 在这种情况下,您将无法使用依赖项自动绑定功能;我们需要自己创建和注册团队。 唯一的问题是要添加到该命令的发送者服务。 我们将在捆绑包配置中指明其ID,如下所示:
health_check: senders: - '@sender.service1' - '@sender.service2'
我们的捆绑包仍然不知道如何处理这样的配置,我们将教它。 转到Configuration.php并添加配置树:
<?php namespace niklesh\HealthCheckBundle\DependencyInjection; use Symfony\Component\Config\Definition\Builder\TreeBuilder; use Symfony\Component\Config\Definition\ConfigurationInterface; class Configuration implements ConfigurationInterface { public function getConfigTreeBuilder() { $treeBuilder = new TreeBuilder(); $rootNode = $treeBuilder->root('health_check'); $rootNode ->children() ->arrayNode('senders') ->scalarPrototype()->end() ->end() ->end() ; return $treeBuilder; } }
此代码确定根节点将是health_check节点,该节点将包含senders数组senders ,而后者又将包含一定数量的行。 就是这样,现在我们的捆绑软件知道了如何处理配置,如上所述。 现在是时候注册团队了。 为此,请转到HealthCheckExtension并添加以下代码:
<?php namespace niklesh\HealthCheckBundle\DependencyInjection; use niklesh\HealthCheckBundle\Command\SendDataCommand; use Symfony\Component\Config\FileLocator; use Symfony\Component\DependencyInjection\ContainerBuilder; use Symfony\Component\DependencyInjection\Definition; use Symfony\Component\HttpKernel\DependencyInjection\Extension; use Symfony\Component\DependencyInjection\Loader; use Symfony\Component\DependencyInjection\Reference; class HealthCheckExtension extends Extension { public function load(array $configs, ContainerBuilder $container) { $configuration = new Configuration(); $config = $this->processConfiguration($configuration, $configs); $loader = new Loader\YamlFileLoader($container, new FileLocator(__DIR__ . '/../Resources/config')); $loader->load('services.yaml');
就是这样,我们的团队决心。 现在,将捆绑软件添加到项目中后,
bin/console我们将看到命令列表,包括我们的命令: health:send-info ,您可以用相同的方式调用它: bin/console health:send-info
我们的捆绑包已准备就绪。 是时候在项目上对其进行测试了。 创建一个空项目:
composer create-project symfony/skeleton health-test-project
向其中添加新鲜出炉的捆绑包,为此,我们在composer.json添加repositories部分:
"repositories": [ { "type": "vcs", "url": "https://github.com/HEKET313/health-check" } ]
并执行命令:
composer require niklesh/health-check
另外,为了最快起步,请在我们的项目中添加一个Symphony服务器:
composer req
捆绑包已连接,Symfony Flex会自动将其连接到config/bundles.php ,但是要自动创建配置文件,您需要创建一个配方。 关于食谱的详细信息,请参见此处的另一篇文章: https : //habr.com/post/345382/-因此,请画出如何创建食谱等。 我不会在这里,而且这个捆绑包还没有食谱。
尽管如此,仍需要配置文件,因此请使用句柄创建它们:
config/routes/niklesh_health.yaml
health_check: resource: "@HealthCheckBundle/Controller/HealthController.php" prefix: / type: annotation
config/packages/hiklesh_health.yaml
health_check: senders: - 'App\Service\Sender'
现在,您需要实现团队的信息发送类和信息收集类
src/Service/DataCollector.php
这里的一切都非常简单。
<?php namespace App\Service; use niklesh\HealthCheckBundle\Entity\CommonHealthData; use niklesh\HealthCheckBundle\Entity\HealthDataInterface; use niklesh\HealthCheckBundle\Service\HealthInterface; class DataCollector implements HealthInterface { public function getName(): string { return 'Data collector'; } public function getHealthInfo(): HealthDataInterface { $data = new CommonHealthData(HealthDataInterface::STATUS_OK); $data->setAdditionalInfo(['some_data' => 'some_value']); return $data; } }
在这里,它甚至更容易
<?php namespace App\Service; use niklesh\HealthCheckBundle\Entity\HealthDataInterface; use niklesh\HealthCheckBundle\Service\HealthSenderInterface; class Sender implements HealthSenderInterface { public function send(array $data): void { print "Data sent\n"; } public function getDescription(): string { return 'Sender description'; } public function getName(): string { return 'Sender name'; } }
做完了! 清除缓存并启动服务器
bin/console cache:clear bin/console server:start
现在,您可以尝试我们的团队了:
bin/console health:send-info
我们得出这样一个漂亮的结论:
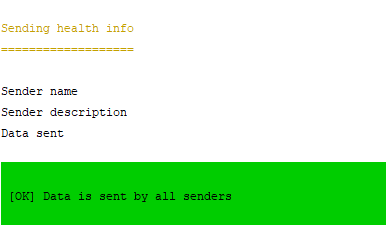
最后,我们敲开了路线http://127.0.0.1:8000/health ,得到了一个不太漂亮的结论,但也得出了以下结论:
[{"name":"Data collector","info":{"status":1,"additional_info":{"some_data":"some_value"}}}]
仅此而已! 我希望这个简单易懂的教程可以帮助人们了解为Symfony 4编写捆绑软件的基础。
PS 源代码可在此处获得 。