我怀疑用于调试处理器的德州仪器(TI)JTAG仿真器是一种如此广泛的设备,以至于有人重新启动它会很有趣。 但是,对于那些试图在资源和信息有限的情况下尝试基于单卡Linux系统恢复某些内容的人来说,本文可能会很有用。 您可以将其视为U-Boot的一些实际工作。
而不是前言
调试嵌入式系统程序的任何人都知道您需要使用特殊的设备才能连接到处理器。 德州仪器(TI)处理器系列使用称为JTAG仿真器的适配器。
有很多,并且来自不同的制造商。 在我的公园中, 出现了Blackhawk USB560v2 。 我必须承认,不是最便宜的一块铁。 有一天,她无故停止工作。
病征
一切都发生在一天之内,该设备刚刚停止加载并通过USB检测到。 LED闪烁,但未进入“准备使用”状态。
该设备有一个有趣的文档记录模式:10-15次下载失败后,应该已经切换到特殊模式(安全模式),可以重新刷新该设备。 但是,我的设备拒绝切换到此模式,没有进入USB编号阶段,因此无法使用标准实用程序进行刷新。 与支持服务的通信并没有带来任何好处:他们拒绝向我提供技术设备方面的帮助,只愿意(自费)向美国发送设备以进行诊断和维修。
别无选择,只能开始独立维修。
Ubuntu安装在主机上,一些使用的实用程序包含在发行版中,一些通过apt安装。
外部检查
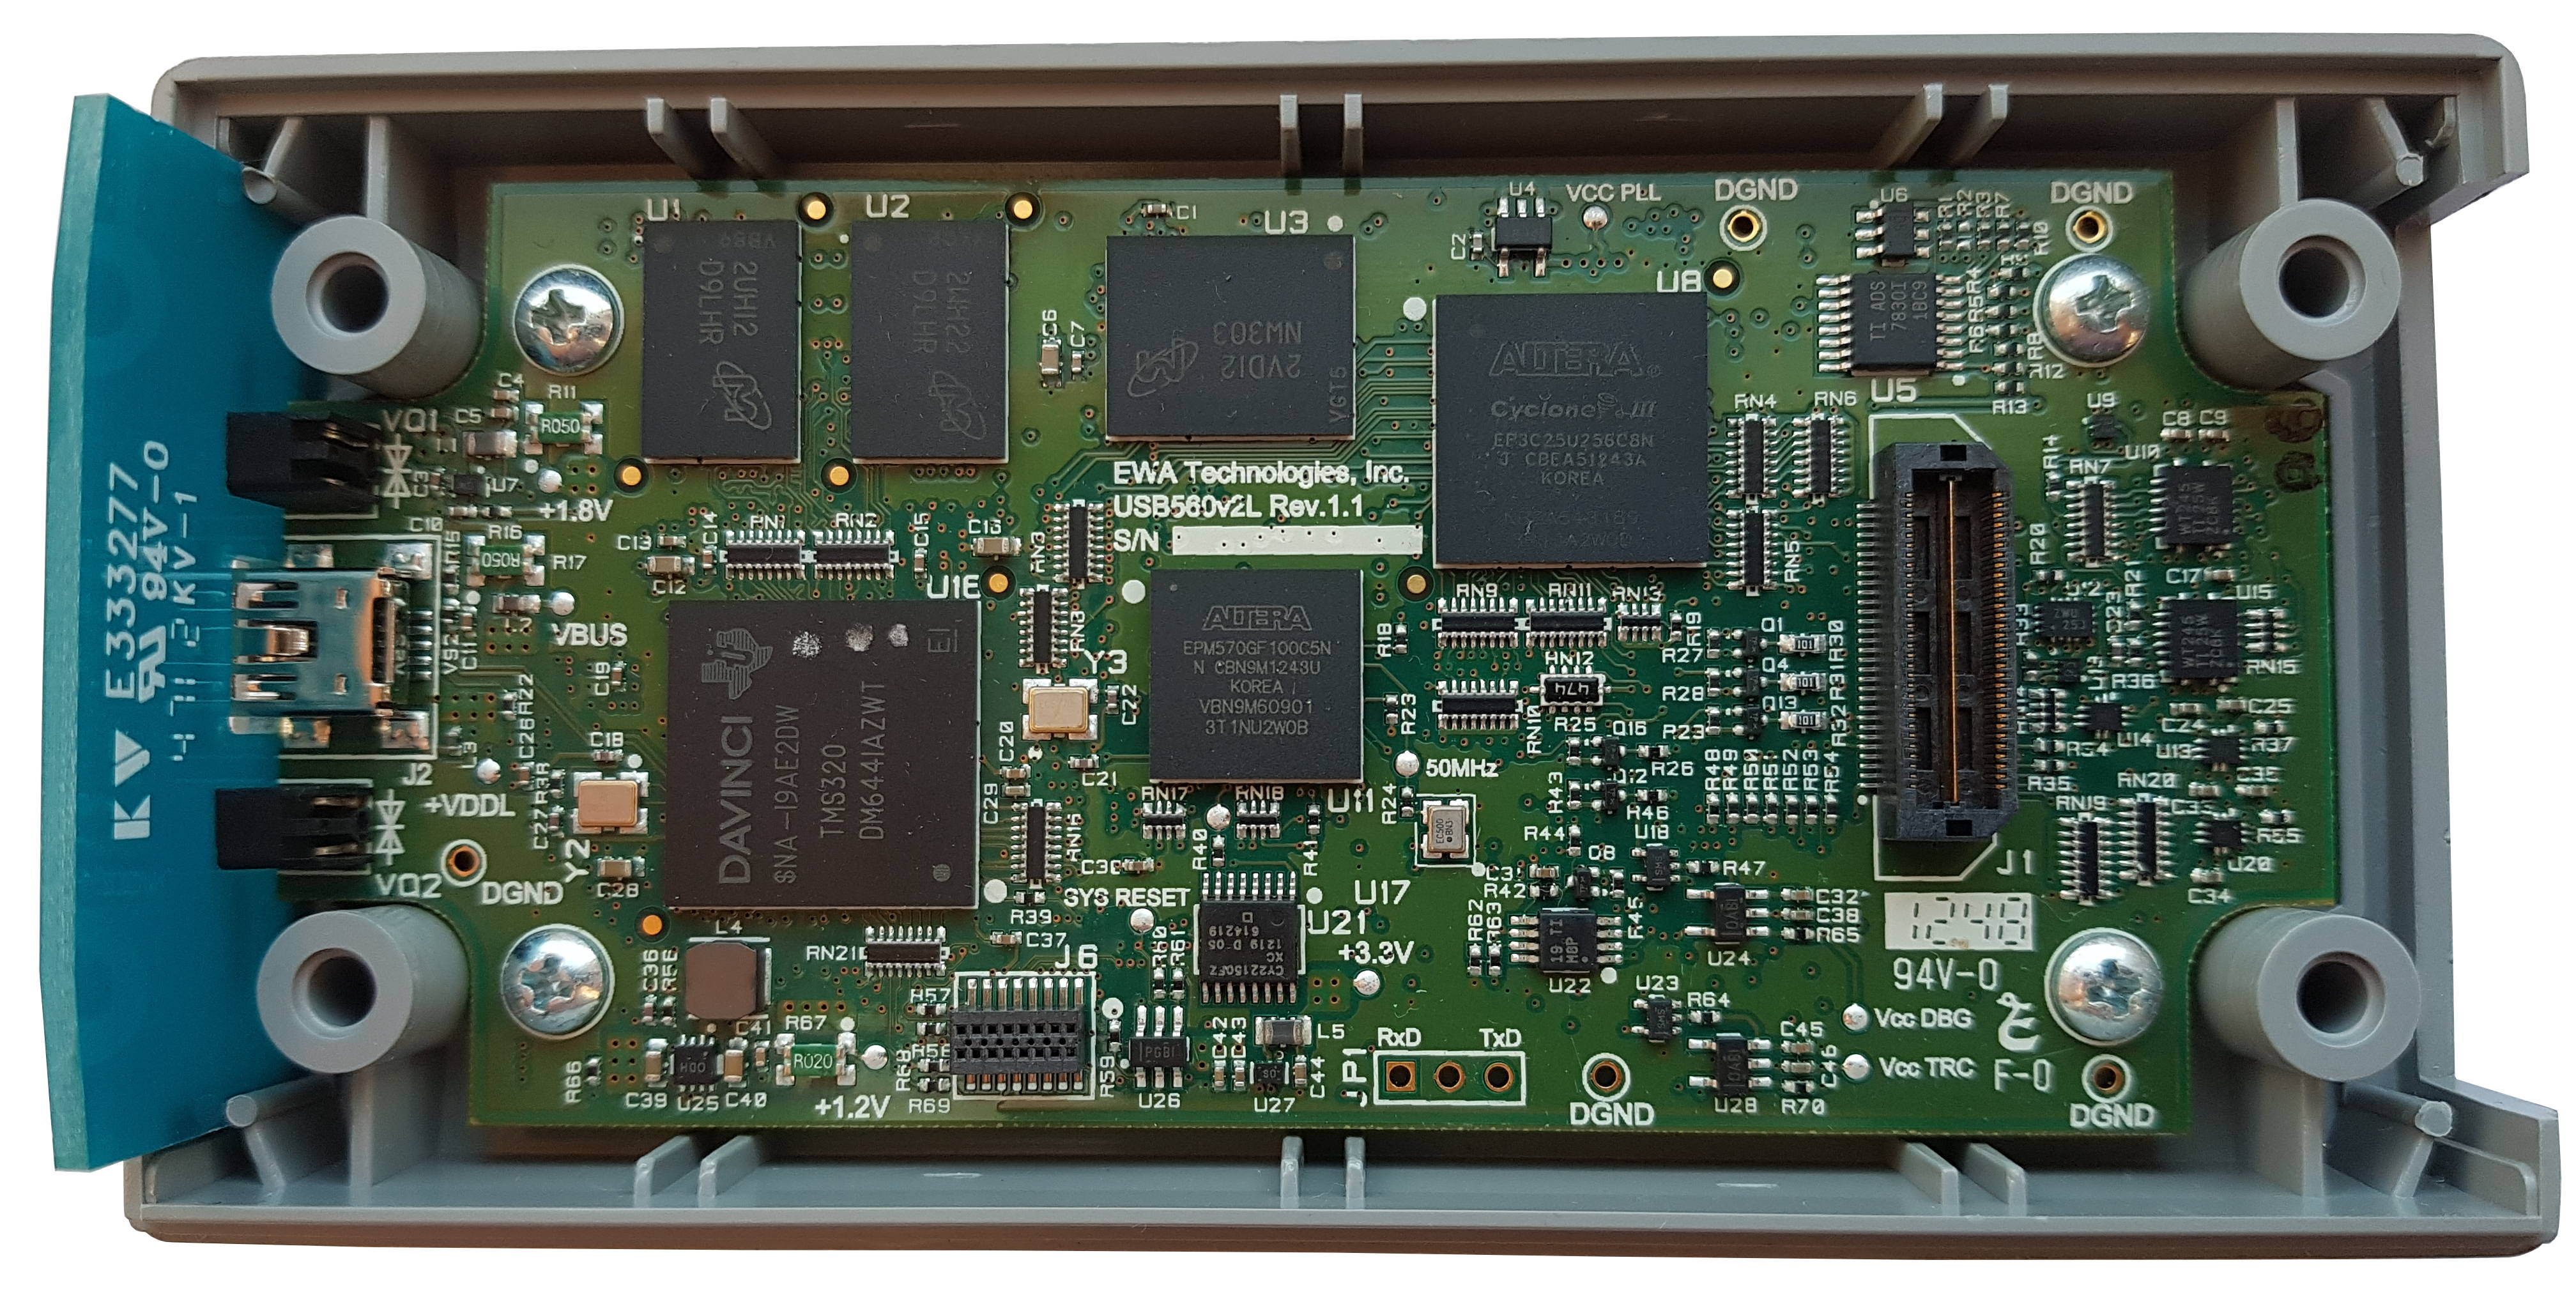
我们拆解一下,看一下木板。 板上有:
我对精心磨损的UART连接器感到特别满意,而且该连接器是为2.54 mm的标准梳子精心培育的,因此对触点进行了签名。 我已经很长时间没有看到这种情况了,板上最多有五个斑点,甚至还有诸如TP1等微不足道的标记。
让我们开始吧
我们连接了USB-UART(不要忘记它的电平,这里是3.3 V)。 我们启动minicom,我们收到:
TI UBL Version: 1.13, Flash type: NAND Booting PSP Boot Loader PSPBootMode = NAND Starting NAND Copy... Initializing NAND flash... Manufacturer ID = 0x0000002C Device ID = 0x000000A1 Pages Per Block = 0x00000040 Number of Blocks = 0x00000400 Bytes Per Page = 0x00000800 Valid MagicNum found at block 0x00000001, page 0x00000008 NAND Boot success. DONE U-Boot 2010.12 (May 09 2012 - 13:10:23) Cores: ARM 257 MHz, DSP 513 MHz DDR: 162 MHz I2C: ready DRAM: 256 MiB NAND: 128 MiB MMC: Bad block table found at page 65472, version 0x01 Bad block table found at page 65408, version 0x01 In: serial Out: serial Err: serial Read USBID pin : DEVICE Read boot progress legacy : 0 Read boot progress : 0 Write boot progress legacy : 0 Write boot progress : 0 Hit any key to stop autoboot: 0 Loading from NAND 128MiB 1,8V 8-bit, offset 0x60000 Image Name: Linux-2.6.10_mvl401-xds560 Image Type: ARM Linux Kernel Image (uncompressed) Data Size: 1236292 Bytes = 1.2 MiB Load Address: 80008000 Entry Point: 80008000 NAND read from offset 60000 failed -74 ** Read error
如您所见,该序列非常标准:首先加载引导加载程序(TI UBL),然后加载U-Boot,后者又加载Linux内核。
根据日志,很明显内部NAND闪存中已经发生了某些事情,当加载Linux内核时,校验和不会收敛。 但是,您可以中断下载并进入U-Boot控制台。
看一下可用的命令:
有很多 U-Boot > help ? - alias for 'help' askenv - get environment variables from stdin base - print or set address offset boot - boot default, ie, run 'bootcmd' bootd - boot default, ie, run 'bootcmd' bootm - boot application image from memory cmp - memory compare coninfo - print console devices and information cp - memory copy crc32 - checksum calculation echo - echo args to console editenv - edit environment variable eeprom - EEPROM sub-system env - environment handling commands exit - exit script false - do nothing, unsuccessfully fatinfo - print information about filesystem fatload - load binary file from a dos filesystem fatls - list files in a directory (default /) go - start application at address 'addr' help - print command description/usage i2c - I2C sub-system iminfo - print header information for application image imxtract- extract a part of a multi-image itest - return true/false on integer compare loadb - load binary file over serial line (kermit mode) loads - load S-Record file over serial line loady - load binary file over serial line (ymodem mode) loop - infinite loop on address range md - memory display mdc - memory display cyclic mii - MII utility commands mm - memory modify (auto-incrementing address) mmc - MMC sub system mmcinfo - display MMC info mtest - simple RAM read/write test mw - memory write (fill) mwc - memory write cyclic nand - NAND sub-system nboot - boot from NAND device nm - memory modify (constant address) printenv- print environment variables reset - Perform RESET of the CPU run - run commands in an environment variable saveenv - save environment variables to persistent storage saves - save S-Record file over serial line setenv - set environment variables showvar - print local hushshell variables sleep - delay execution for some time source - run script from memory test - minimal test like /bin/sh true - do nothing, successfully usb - USB sub-system usbboot - boot from USB device version - print monitor version
让我们看看环境变量:
U-Boot > printenv autokern=0x60000 autoroot=/dev/mtdblock3 baudrate=115200 bootcmd=nboot 80700000 0 ${autokern}; run setbootargsnand; bootm setbootargsnand=setenv bootargs mem=64M console=ttyS0,${baudrate}n8 root=${autoroot} rw rootfstype=jffs2 ip=off stderr=serial stdin=serial stdout=serial ver=U-Boot 2010.12 (May 09 2012 - 13:10:23) Environment size: 338/16380 bytes
我尝试的第一件事是使用U-Boot命令关闭检查并启动。
U-Boot > setenv verify n U-Boot > boot
往前移一点,但幅度不大:
进一步该设备挂起。
从环境变量可以看出,内核映像位于偏移量为0x60000的NAND Flash中,加载后将其复制到地址0x80700000(根据处理器的内存映射,这是外部DRAM的地址空间)并被加载。 从日志中可以看到,内核映像的大小为1236292字节。 我尝试手动执行此操作。 我们假设图像以uImage格式存储,因此我们在标头上抛出64个字节,得到1236356个字节= 0x12DD84:
U-Boot > nand read 80700000 60000 12dd84 U-Boot > iminfo
接下来,我想将图像转储输出到计算机上进行播放。 除了在屏幕上将内存的输出写入控制台日志,然后将其转换为二进制文件之外,我没有想到其他任何更好的方法。
使用日志运行minicom:
minicom -C orig-uImage.txt
我们在屏幕上显示内存的内容:
U-Boot > md.b 80700000 12dd84
我们退出minicom,编辑日志,删除多余的行,然后将其转换为二进制文件:
xxd -r -seek -0x80700000 orig-uImage.txt orig-uImage
我想重新包装图像,以免产生校验和错误。 删除前64个字节,然后创建一个新的uImage:
mkimage -A arm -T kernel -C none -a 80008000 -e 80008000 -n "Linux-2.6.10_mvl401-xds560" -d orig-uImage patched-uImage
使用YModem协议回填生成的文件:
U-Boot > loady
我们尝试引导,但在解压缩内核的阶段也挂起了:
U-Boot > bootm
可以预料的是,这里会有什么希望。 但是至少他们上传了文件共享工作流程,还不错。
我们所拥有的只是制造商网站 USB560v2_firmware_5.0.573.0.bin的固件文件。 我假设此文件包含一个内核映像,但是可以合理预期该文件至少使用一个简单的密钥进行了加密。 因此,我承认,我崩溃了,写信给制造商,要求我提供完整的uImage以便将其上传到设备并从中启动,然后我就可以通过USB使用标准实用程序重新刷新设备了。 他甚至提到了GPL(Linux在其下分发)的术语,根据该术语,另外提供内核源代码也不会受到损害。
发送请求后,我立即决定仍然尝试将固件文件解压缩为简单的存档。 而且,瞧,原来如此!
tar -xf USB560v2_firmware_5.0.573.0.bin
解rootfs.tar.gz后,出现了两个文件: uImage和rootfs.tar.gz 。 医生规定的是内核映像和根文件系统。
仍然需要使用YModem将uImage填充到设备的内存中并启动,就像我所做的那样。 设备成功启动进入相同的安全模式,我挂断了这些。 厂商的支持,并以为我下次可以买到该设备,所以我冷静地上床睡觉。
第二系列
但是,第二天,一个不愉快的惊喜在等待着我。 设备已成功停止加载。 我刚才没有尝试的东西,我得到了一个错误:
INIT: PANIC: segmentation violation! sleeping for 30 seconds.
长内核启动日志 Starting kernel ... Uncompressing Linux................................................................................. done, booting thelLinux version 2.6.10_mvl2 CPU: ARM926EJ-Sid(wb) [41069265] revision 5 (ARMv5TEJ) CPU0: D VIVT write-back cache CPU0: I cache: 16384 bytes, associativity 4, 32 byte lines, 128 sets CPU0: D cache: 8192 bytes, associativity 4, 32 byte lines, 64 sets Machine: DaVinci EVM Memory policy: ECC disabled, Data cache writeback Built 1 zonelists Kernel command line: mem=64M console=ttyS0,115200n8 root=/dev/mtdblock3 rw rootfstype=jffs2 ip=off PID hash table entries: 512 (order: 9, 8192 bytes) Console: colour dummy device 80x30 Dentry cache hash table entries: 16384 (order: 4, 65536 bytes) Inode-cache hash table entries: 8192 (order: 3, 32768 bytes) Memory: 64MB = 64MB total Memory: 62080KB available (2118K code, 448K data, 136K init) Mount-cache hash table entries: 512 (order: 0, 4096 bytes) CPU: Testing write buffer coherency: ok spawn_desched_task(00000000) desched cpu_callback 3/00000000 ksoftirqd started up. desched cpu_callback 2/00000000 desched thread 0 started up. NET: Registered protocol family 16 Registering platform device 'nor_davinci.0'. Parent at platform Registering platform device 'nand_davinci.0'. Parent at platform DaVinci I2C DEBUG: 12:46:30 Mar 29 2012 Registering platform device 'i2c'. Parent at platform musb_hdrc: version 2.2a/db-0.4.8 [cppi-dma] [peripheral] [debug=0] Registering platform device 'musb_hdrc'. Parent at platform musb_hdrc: USB Peripheral mode controller at c4800000 using DMA, IRQ 12 JFFS2 version 2.2. (NAND) (C) 2001-2003 Red Hat, Inc. yaffs Mar 29 2012 12:46:15 Installing. Registering platform device 'davincifb.0'. Parent at platform Console: switching to colour frame buffer device 90x30 Serial: 8250/16550 driver $Revision: 1.90 $ 2 ports, IRQ sharing disabled Registering platform device 'serial8250'. Parent at platform ttyS0 at MMIO 0x1c20000 (irq = 40) is a 16550A io scheduler noop registered io scheduler anticipatory registered RAMDISK driver initialized: 1 RAM disks of 32768K size 1024 blocksize Registering platform device 'ti_davinci_emac'. Parent at platform TI DaVinci EMAC: MAC address is 00:00:00:04:12:64 TI DaVinci EMAC Linux version updated 4.0 TI DaVinci EMAC: Installed 1 instances. netconsole: not configured, aborting i2c /dev entries driver elevator: using anticipatory as default io scheduler NAND device: Manufacturer ID: 0x2c, Chip ID: 0xa1 (Unknown NAND 128MiB 1,8V 8-bit) Scanning device for bad blocks Creating 8 MTD partitions on "nand_davinci.0": 0x00000000-0x00020000 : "params" 0x00020000-0x00060000 : "bootloader" 0x00060000-0x00260000 : "safekernel" 0x00260000-0x01260000 : "saferootfs" 0x01260000-0x01460000 : "kernel" 0x01460000-0x02860000 : "rootfs" 0x02860000-0x03860000 : "application" 0x03860000-0x03c60000 : "logging" nand_davinci: hardware revision: 2.1 mice: PS/2 mouse device common for all mice NET: Registered protocol family 2 IP: routing cache hash table of 512 buckets, 4Kbytes TCP: Hash tables configured (established 4096 bind 8192) NET: Registered protocol family 1 NET: Registered protocol family 17 jffs2_scan_eraseblock(): Magic bitmask 0x1985 not found at 0x0000016c: 0xffef instead Empty flash at 0x00a237fc ends at 0x00a23800 Empty flash at 0x00c3b7d8 ends at 0x00c3b800 mtd->read(0x1f320 bytes from 0xec0ce0) returned ECC error mtd->read(0x1fb8c bytes from 0xf20474) returned ECC error VFS: Mounted root (jffs2 filesystem). Freeing init memory: 136K mtd->read(0x44 bytes from 0xf39da8) returned ECC error mtd->read(0x988 bytes from 0xf39420) returned ECC error mtd->read(0x44 bytes from 0xed8d20) returned ECC error jffs2_get_inode_nodes(): Data CRC failed on node at 0x00ed8d20: Read 0xa8462b94, calculated 0xa03c90e8 mtd->read(0xa7e bytes from 0xed82a0) returned ECC error jffs2_get_inode_nodes(): Data CRC failed on node at 0x00c3ad78: Read 0x31ac7e30, calculated 0xa52ecb11 jffs2_get_inode_nodes(): Data CRC failed on node at 0x00a22d9c: Read 0x31ac7e30, calculated 0xe9f89c4c mtd->read(0x988 bytes from 0xf39420) returned ECC error mtd->read(0xa7e bytes from 0xed82a0) returned ECC error INIT: version 2.85 booting INIT: PANIC: segmentation violation! sleeping for 30 seconds. jffs2_get_inode_nodes(): Data CRC failed on node at 0x00a2ad10: Read 0x5fa921cc, calculated 0x5282f1d9 INIT: PANIC: segmentation violation! sleeping for 30 seconds.
我得出的结论是,根文件系统也已损坏。 好吧,那你也需要刷新它。
首先,将uImage写入NAND,以免每次都通过UART加载(我必须承认,即使以1兆字节的大小加载,也要以115200的速度加载明显的时间)。 以防万一,以防万一,我们将图像大小与NAND页面向上对齐(我在某处满足了这样的建议),并且页面大小为1024字节= 0x800(请参阅第一个日志)。
U-Boot > loady ... U-Boot > nand erase 60000 12DC00 U-Boot > nand write 80700000 60000 12DC00
从内核启动日志中,选择有用的信息:
Creating 8 MTD partitions on "nand_davinci.0": 0x00000000-0x00020000 : "params" 0x00020000-0x00060000 : "bootloader" 0x00060000-0x00260000 : "safekernel" 0x00260000-0x01260000 : "saferootfs" 0x01260000-0x01460000 : "kernel" 0x01460000-0x02860000 : "rootfs" 0x02860000-0x03860000 : "application" 0x03860000-0x03c60000 : "logging"
因此,根文件系统必须以0x260000的偏移量写入NAND。 仍然只有了解什么格式。 我们回想一下U-Boot环境变量,尤其是以下这一行:
setbootargsnand=setenv bootargs mem=64M console=ttyS0,${baudrate}n8 root=${autoroot} rw rootfstype=jffs2 ip=off
因此,我们需要将从固件文件中rootfs.tar.gz转换为JFFS2格式。 在德州仪器 ( TI)的Wiki提示下,我们执行了此操作( tar需要sudo ,因此在运行mknod命令时会产生错误):
mkdir rootfs sudo tar -xf rootfs.tar.gz -C rootfs mkfs.jffs2 -n -r rootfs -e 16 -o rootfs.jffs2
我们将生成的文件加载到设备的内存中,然后将其复制到所需的NAND部分(大小也四舍五入到页面):
U-Boot > loady ... U-Boot > nand erase 260000 39f000 U-Boot > nand write 80700000 260000 39f000
我们用手指交叉,重新启动,好了,现在一切都很好。
成功下载的完整日志很长 TI UBL Version: 1.13, Flash type: NAND Booting PSP Boot Loader PSPBootMode = NAND Starting NAND Copy... Initializing NAND flash... Manufacturer ID = 0x0000002C Device ID = 0x000000A1 Pages Per Block = 0x00000040 Number of Blocks = 0x00000400 Bytes Per Page = 0x00000800 Valid MagicNum found at block 0x00000001, page 0x00000008 NAND Boot success. DONE U-Boot 2010.12 (May 09 2012 - 13:10:23) Cores: ARM 257 MHz, DSP 513 MHz DDR: 162 MHz I2C: ready DRAM: 256 MiB NAND: 128 MiB MMC: Bad block table found at page 65472, version 0x01 Bad block table found at page 65408, version 0x01 In: serial Out: serial Err: serial Read USBID pin : DEVICE Read boot progress legacy : 3 Read boot progress : 10 Write boot progress legacy : 2 Write boot progress : 9 Hit any key to stop autoboot: 0 Loading from NAND 128MiB 1,8V 8-bit, offset 0x1260000 Image Name: Linux-2.6.10_mvl401-xds560 Image Type: ARM Linux Kernel Image (uncompressed) Data Size: 1235632 Bytes = 1.2 MiB Load Address: 80008000 Entry Point: 80008000
后记
是的,最终的过程证明不是很复杂;实际上,这里没有太多真正的逆向工程。 但是我在嵌入式Linux的启动过程中亲自学习了许多有关低级内容的新知识,学习了如何与U-Boot控制台一起使用。
对于Blackhawk USB560v2的所有者可以看出,这些家伙并没有为保护工作而烦恼。 引导Linux之后,控制台中会出现提示登录。 无需密码的root登录名使您可以使用管理访问权限登录,并且可以对设备执行任何操作。 最有趣的是在/usr/local/bin 。
但这是一个完全不同的故事。
我希望这很有趣。