地图
在
上一篇文章中,我研究了新的
Job系统是什么,它如何工作,如何创建任务,如何用数据填充它们并执行多线程计算,并且仅简要说明了在哪里可以使用此系统。 在本文中,我将尝试分析一个具体示例,说明可以在哪里使用此系统以获得更高的性能。
由于该系统最初是为处理数据而开发的,因此对于解决寻路任务非常有用。
Unity已经有了一个不错的
NavMesh路径查找器 ,但尽管在同一
资产上有很多现成的解决方案,但它不适用于2D项目。 好吧,我们将不仅尝试创建一个系统,该系统将在创建的地图上查找路径,而且使该地图非常动态,以便每次对其进行更改时,系统都将创建一个新地图,当然我们将使用一个新的任务系统,以免加载主线程。
在示例中,在地图上构建了一个网格,其中有一个机器人和一个障碍物。 每当我们更改地图的任何属性(无论大小或位置)时,都会重新构建网格。
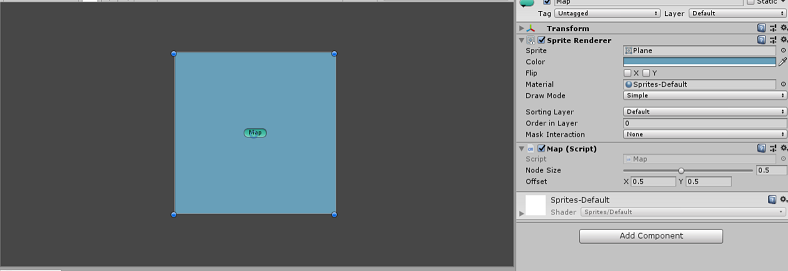
对于飞机,我使用了一个简单的
SpriteRenderer ,此组件具有出色的
bounds属性,通过它可以轻松找出地图的大小。
基本上这只是一个开始,但我们不会停下来立即着手开展业务。
让我们从脚本开始。 第一个是障碍物脚本。
障碍物public class Obstacle : MonoBehaviour { }
在
Obstacle类中,我们将捕获地图上障碍物的所有变化,例如,更改对象的位置或大小。
接下来,您可以创建将在其上构建网格的
Map map类,并从
Obstacle类继承它。
地图 public sealed class Map : Obstacle { }
Map类还将跟踪
地图上的所有更改,以便在必要时重建网格。
为此,用所有必需的变量和方法填充
Obstacle基类,以跟踪对象的变化。
障碍物 public class Obstacle : MonoBehaviour { public new SpriteRenderer renderer { get; private set;} private Vector2 tempSize; private Vector2 tempPos; protected virtual void Awake() { this.renderer = GetComponent<SpriteRenderer>(); this.tempSize = this.size; this.tempPos = this.position; } public virtual bool CheckChanges() { Vector2 newSize = this.size; float diff = (newSize - this.tempSize).sqrMagnitude; if (diff > 0.01f) { this.tempSize = newSize; return true; } Vector2 newPos = this.position; diff = (newPos - this.tempPos).sqrMagnitude; if (diff > 0.01f) { this.tempPos = newPos; return true; } return false; } public Vector2 size { get { return this.renderer.bounds.size;} } public Vector2 position { get { return this.transform.position;} } }
在这里,
renderer变量将引用
SpriteRenderer组件,并且
tempSize和
tempPos变量将用于跟踪对象的大小和位置的变化。
Awake虚拟方法将用于初始化变量,而
CheckChanges虚拟方法将跟踪对象大小和位置的当前变化并返回
布尔结果。
现在,让我们离开
Obstacle脚本,继续前进到
Map map脚本本身,在其中我们还为工作填充了必要的参数。
地图 public sealed class Map : Obstacle { [Range(0.1f, 1f)] public float nodeSize = 0.5f; public Vector2 offset = new Vector2(0.5f, 0.5f); }
nodeSize变量将指示地图上像元的大小,这里我将其大小限制为0.1到1,这样网格上的像元不会太小,但也太大。 构造网格时,
偏移量变量将用于缩进地图,以使网格不会沿地图的边缘生成。
由于现在在地图上有两个新变量,因此事实证明,还需要跟踪它们的更改。 为此,请添加几个变量,并在
Map类中重载
CheckChanges方法。
地图 public sealed class Map : Obstacle { [Range(0.1f, 1f)] public float nodeSize = 0.5f; public Vector2 offset = new Vector2(0.5f, 0.5f); private float tempNodeSize; private Vector2 tempOffset; protected override void Awake() { base.Awake(); this.tempNodeSize = this.nodeSize; this.tempOffset = this.offset; } public override bool CheckChanges() { float diff = Mathf.Abs(this.tempNodeSize - this.nodeSize); if (diff > 0.01f) { this.tempNodeSize = this.nodeSize; return true; } diff = (this.tempOffset - this.offset).sqrMagnitude; if (diff > 0.01f) { this.tempOffset = this.offset; return true; } return base.CheckChanges(); } }
做完了 现在,您可以在舞台上创建一个地图精灵,并在其上放置一个
地图脚本。
我们将在障碍物上做同样的事情-在舞台上创建一个简单的精灵,并在上面
放上Obstacle脚本。
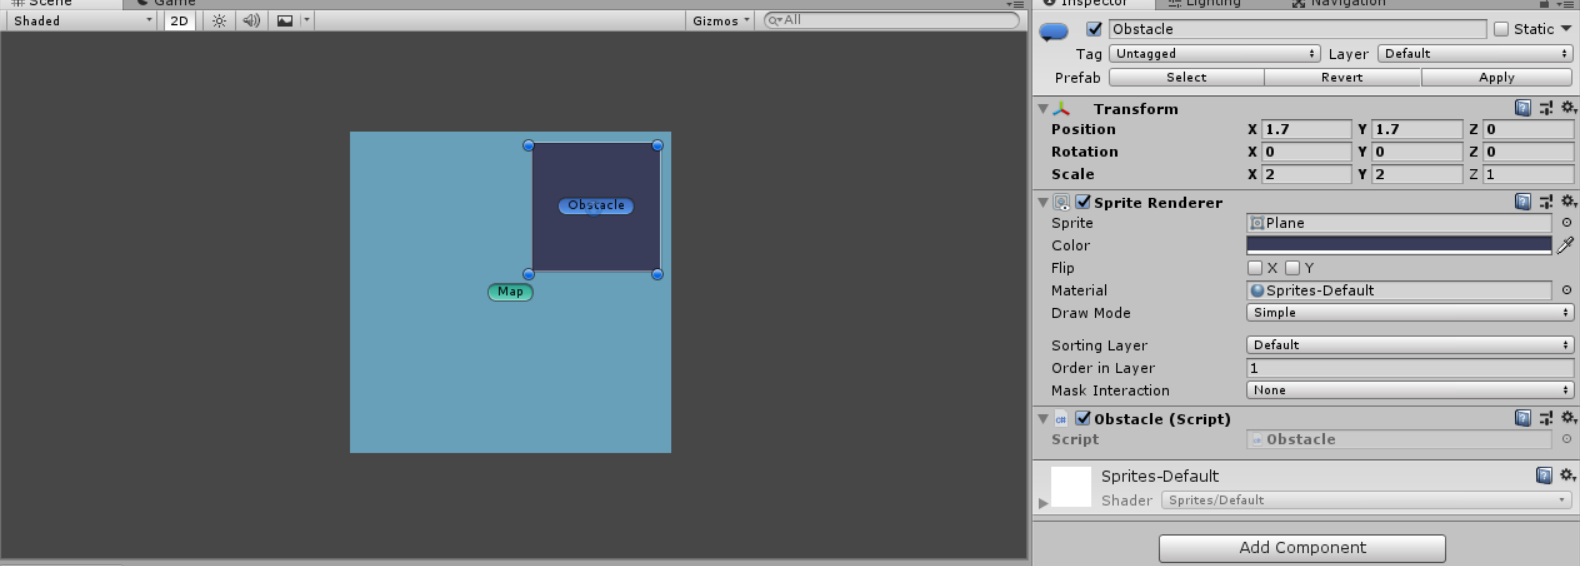
现在我们在舞台上有地图对象和障碍物。
Map脚本将负责跟踪地图上的所有更改,在
Update方法中,我们将检查每个框架的更改。
地图 public sealed class Map : Obstacle { private bool requireRebuild; private void Update() { UpdateChanges(); } private void UpdateChanges() { if (this.requireRebuild) { print(“ , !”); this.requireRebuild = false; } else { this.requireRebuild = CheckChanges(); } } }
因此,在
UpdateChanges方法中
,地图将仅跟踪到目前为止的更改。 您甚至可以立即开始游戏,并尝试更改地图的大小或
偏移偏移 ,以确保跟踪所有更改。
现在,您需要以某种方式在地图上跟踪障碍物本身的变化。 为此,我们将每个障碍物放置在地图上的列表中,该列表又将更新
Update方法中的每个帧。
在
Map类中,创建一个
地图上所有可能障碍物的列表以及一些用于注册它们的静态方法。
地图 public sealed class Map : Obstacle { private static Map ObjInstance; private List<Obstacle> obstacles = new List<Obstacle>(); public static bool RegisterObstacle(Obstacle obstacle) { if (obstacle == Instance) return false; else if (Instance.obstacles.Contains(obstacle) == false) { Instance.obstacles.Add(obstacle); Instance.requireRebuild = true; return true; } return false; } public static bool UnregisterObstacle(Obstacle obstacle) { if (Instance.obstacles.Remove(obstacle)) { Instance.requireRebuild = true; return true; } return false; } public static Map Instance { get { if (ObjInstance == null) ObjInstance = FindObjectOfType<Map>(); return ObjInstance; } } }
在静态
RegisterObstacle方法中,我们将在地图上注册一个新的
Obstacle障碍物并将其添加到列表中,但首先必须考虑到地图本身也是从
Obstacle类继承的,因此,我们需要检查是否要尝试将卡本身注册为障碍物。
相反,静态的
UnregisterObstacle方法从地图上消除了障碍物,并在我们允许销毁该障碍物时将其从列表中删除。
同时,每次我们在地图上添加或移除障碍物时,都必须重新创建地图本身,因此在执行这些静态方法后,将
requireRebuild变量设置为
true 。
另外,为了方便地从任何脚本访问
Map脚本,我创建了一个静态
Instance属性,该属性将返回给我
Map的这个实例。
现在,让我们回到
Obstacle脚本中,在地图上注册障碍物,为此,请添加几个
OnEnable和
OnDisable方法。
障碍物 public class Obstacle : MonoBehaviour { protected virtual void OnEnable() { Map.RegisterObstacle(this); } protected virtual void OnDisable() { Map.UnregisterObstacle(this); } }
每次我们在地图上玩游戏时创建一个新障碍物时,它将自动在
OnEnable方法中注册,在构建新网格时会考虑到它,并在销毁或禁用它时使用
OnDisable方法将自己从地图上
移开 。
它仅用于在重载的
CheckChanges方法中跟踪
Map脚本中障碍本身的变化。
地图 public sealed class Map : Obstacle { public override bool CheckChanges() { float diff = Mathf.Abs(this.tempNodeSize - this.nodeSize); if (diff > 0.01f) { this.tempNodeSize = this.nodeSize; return true; } diff = (this.tempOffset - this.offset).sqrMagnitude; if (diff > 0.01f) { this.tempOffset = this.offset; return true; } foreach(Obstacle obstacle in this.obstacles) { if (obstacle.CheckChanges()) return true; } return base.CheckChanges(); } }
现在,我们有了地图,遇到了障碍-一般来说,构建网格所需的一切,现在您可以继续进行最重要的事情。
网格划分
最简单的网格是点的二维数组。 要构建它,您需要知道地图的大小和其上的点的大小,经过一些计算,我们得到了水平和垂直的点数,这就是我们的网格。
有多种方法可以在网格上找到路径。 但是,在本文中,最主要的是要了解如何正确使用任务系统的功能,因此在这里,我将不考虑用于查找路径的各种选项,它们的优缺点,但是将采用最简单的搜索选项
A * 。
在这种情况下,除了位置之外,网格上的所有点都应具有坐标和通畅性。
有了通畅性,我认为一切都清楚为什么会需要它,但是坐标将指示点在网格上的顺序,这些坐标并不专门与点在空间中的位置相关。 下图显示了一个简单的网格,显示了与位置的坐标差异。
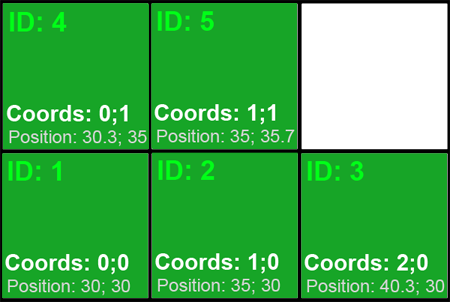 为什么要坐标?
事实是,为了统一表示一个对象在空间中的位置,
使用了一个非常不准确的简单
浮点 ,它可能是分数或负数,因此很难用它来在地图上实现路径搜索。 坐标以清晰的
int形式生成,该
int始终为正,并且在搜索相邻点时更容易使用。
首先,让我们定义一个点对象,这将是一个简单的
Node结构。
结点 public struct Node { public int id; public Vector2 position; public Vector2Int coords; }
该结构将包含
Vector2形式的
位置 ,其中使用此变量,我们将在空间中绘制一个点。
Vector2Int形式的
coords坐标
变量将指示地图上某个点的坐标,而
id变量(其数字帐号)将使用它来比较网格上的不同点并检查是否存在点。
该点的开放性将以其
boolean属性的形式表示,但是由于我们无法在任务系统中使用
可转换数据
类型 ,因此我们将以
int数的形式指示其开放性,为此,我使用了一个简单的枚举
NodeType ,其中:0不是可传递的点, 1是合格的。
NodeType和Node public enum NodeType { NonWalkable = 0, Walkable = 1 } public struct Node { public int id; public Vector2 position; public Vector2Int coords; private int nodeType; public bool isWalkable { get { return this.nodeType == (int)NodeType.Walkable;} } public Node(int id, Vector2 position, Vector2Int coords, NodeType type) { this.id = id; this.position = position; this.coords = coords; this.nodeType = (int)type; } }
另外,为了方便处理点,我将重载
Equals方法,以使其更容易比较点,并补充存在点的验证方法。
结点 public struct Node { public override bool Equals(object obj) { if (obj is Node) { Node other = (Node)obj; return this.id == other.id; } else return base.Equals(obj); } public static implicit operator bool(Node node) { return node.id > 0; } }
由于网格上点的
ID号以1个单位开头,因此我将检查点是否存在,以作为其
ID大于0的条件。
转到
Map类,我们将为创建地图做准备。
我们已经进行了更改地图参数的检查,现在我们需要确定如何执行构建网格的过程。 为此,创建一个新变量和几种方法。
地图 public sealed class Map : Obstacle { public bool rebuilding { get; private set; } public void Rebuild() {} private void OnRebuildStart() {} private void OnRebuildFinish() {} }
重建属性将指示
网格划分过程是否正在进行。
Rebuild方法将收集用于构建网格的数据和任务,然后
OnRebuildStart方法将启动网格构建过程,而
OnRebuildFinish方法将从任务中收集数据。
现在,让我们
稍微更改
UpdateChanges方法,以便考虑网格条件。
地图 public sealed class Map : Obstacle { public bool rebuilding { get; private set; } private void UpdateChanges() { if (this.rebuilding) { print(“ ...”); } else { if (this.requireRebuild) { print(“ , !”); Rebuild(); } else { this.requireRebuild = CheckChanges(); } } } public void Rebuild() { if (this.rebuilding) return; print(“ !”); OnRebuildStart(); } private void OnRebuildStart() { this.rebuilding = true; } private void OnRebuildFinish() { this.rebuilding = false; } }
如您现在所看到的,在
UpdateChanges方法中
存在一个条件,即在构建旧网格时不会开始开始构建新的网格,在
Rebuild方法中,第一个操作将检查网格划分过程是否已在进行中。
解决问题
现在介绍一下构建地图的过程。
由于我们将使用任务系统并并行构建网格来构建地图,因此我使用了
IJobParallelFor任务的类型,该任务将执行一定的次数。 为了不使用任何一个单独的任务加载构建过程,我们将使用打包到一个
JobHandle中的任务池。
通常,要构建网格,请使用彼此嵌套的两个循环来构建,例如水平和垂直。 在此示例中,我们还将先水平然后再垂直构建网格。 为此,我们在
Rebuild方法中计算水平点和垂直点的数量,然后在
Rebuild方法中沿着垂直点进行循环,然后在任务中并行构建水平点。 为了更好地想象构建过程,请看下面的动画。
垂直点的数量将指示任务的数量,依次,每个任务将仅水平构建点,完成所有任务后,将这些点汇总到一个列表中。 这就是为什么我需要使用类似
IJobParallelFor的任务来将网格上的点的索引水平传递到
Execute方法中的原因。
因此,我们有了点结构,现在您可以创建
Job任务的结构并从
IJobParallelFor接口继承它,这里的一切都很简单。
工作机会 public struct Job : IJobParallelFor { public void Execute(int index) {} }
返回到
Map类的
Rebuild方法,在此我们将为网格测量进行必要的计算。
地图 public sealed class Map : Obstacle { public void Rebuild() { if (this.rebuilding) return; print(“ !”); Vector2 mapSize = this.size - this.offset * 2f; int horizontals = Mathf.RoundToInt(mapSize.x / this.nodeSize); int verticals = Mathf.RoundToInt(mapSize.y / this.nodeSize); if (horizontals <= 0) { OnRebuildFinish(); return; } Vector2 center = this.position; Vector2 origin = center - (mapSize / 2f); OnRebuildStart(); } }
在
Rebuild方法中,我们考虑缩进来计算
mapSize地图的确切大小,然后在
垂直方向上垂直写入点数,在
水平方向上水平写入点数。 如果垂直点的数量为0,则我们停止构建地图,并调用
OnRebuildFinish方法以完成该过程。
origin变量将指示我们将开始构建网格的位置-在示例中,这是地图上的左下角。
现在,您可以转到任务本身,并用数据填充它们。
在构建网格的过程中,任务将需要一个将要放置点的
NativeArray数组,而且由于我们在地图上有障碍物,我们也需要将它们传递给任务,为此,我们将使用另一个
NativeArray数组,然后我们需要问题中点的大小,即我们将在其上构建点的初始位置以及序列的初始坐标。
工作机会 public struct Job : IJobParallelFor { [WriteOnly] public NativeArray<Node> array; [ReadOnly] public NativeArray<Rect> bounds; public float nodeSize; public Vector2 startPos; public Vector2Int startCoords; public void Execute(int index) {} }
我用属性
WriteOnly标记了点数组
,因为在任务中只需要将接收到的点“
写入 ”到数组中,相反,障碍物
边界的数组将用
ReadOnly属性标记,因为在任务中我们将仅从该数组中“
读取 ”数据。
好了,现在让我们稍后再进行点本身的计算。
现在回到
Map类,我们在其中表示任务中涉及的所有变量。
首先,我们需要一个全局
的任务
句柄 ,一个
NativeArray形式的障碍数组,一个任务列表,其中将包含在网格上接收到的所有点和在
字典上具有地图上所有坐标和点的所有点,以便以后搜索它们会更加方便。
地图 public sealed class Map : Obstacle { private JobHandle handle; private NativeArray<Rect> bounds; private HashSet<NativeArray<Node>> jobs = new HashSet<NativeArray<Node>>(); private Dictionary<Vector2Int, Node> nodes = new Dictionary<Vector2Int, Node>(); }
再一次,我们返回
Rebuild方法并继续构建网格。
首先,初始化障碍的
bounds数组以将其传递给任务。
改建 public void Rebuild() { Vector2 center = this.position; Vector2 origin = center - (mapSize / 2f); int count = this.obstacles.Count; if (count > 0) { this.bounds = new NativeArray<Rect>(count, Allocator.TempJob, NativeArrayOptions.UninitializedMemory); } OnRebuildStart(); }
在这里,我们通过带有三个参数的新构造函数创建
NativeArray的实例。 我在上一篇文章中检查了前两个参数,但是第三个参数将帮助我们节省创建数组的时间。 事实是,我们将在创建数组后立即将数据写入数组,这意味着我们无需确保将其清除。 此参数对
NativeArray很有用,它将仅在任务的
读取模式下使用。
因此,然后我们用数据填充
bounds数组。
改建 public void Rebuild() { Vector2 center = this.position; Vector2 origin = center - (mapSize / 2f); int count = this.obstacles.Count; if (count > 0) { this.bounds = new NativeArray<Rect>(count, Allocator.TempJob, NativeArrayOptions.UninitializedMemory); for(int i = 0; i < count; i++) { Obstacle obs = this.obstacles[i]; Vector2 position = obs.position; Rect rect = new Rect(Vector2.zero, obs.size); rect.center = position; this.bounds[i] = rect; } } OnRebuildStart(); }
现在我们可以继续创建任务,为此,我们将循环遍历网格的所有垂直行。
改建 public void Rebuild() { Vector2 center = this.position; Vector2 origin = center - (mapSize / 2f); int count = this.obstacles.Count; if (count > 0) { this.bounds = new NativeArray<Rect>(count, Allocator.TempJob, NativeArrayOptions.UninitializedMemory); for(int i = 0; i < count; i++) { Obstacle obs = this.obstacles[i]; Vector2 position = obs.position; Rect rect = new Rect(Vector2.zero, obs.size); rect.center = position; this.bounds[i] = rect; } } for (int i = 0; i < verticals; i++) { float xPos = origin.x; float yPos = origin.y + (i * this.nodeSize) + this.nodeSize / 2f; } OnRebuildStart(); }
首先,在
xPos和
yPos中,我们获得序列的初始水平位置。
改建 public void Rebuild() { Vector2 center = this.position; Vector2 origin = center - (mapSize / 2f); int count = this.obstacles.Count; if (count > 0) { this.bounds = new NativeArray<Rect>(count, Allocator.TempJob, NativeArrayOptions.UninitializedMemory); for(int i = 0; i < count; i++) { Obstacle obs = this.obstacles[i]; Vector2 position = obs.position; Rect rect = new Rect(Vector2.zero, obs.size); rect.center = position; this.bounds[i] = rect; } } for (int i = 0; i < verticals; i++) { float xPos = origin.x; float yPos = origin.y + (i * this.nodeSize) + this.nodeSize / 2f; NativeArray<Node> array = new NativeArray<Node>(horizontals, Allocator.Persistent); Job job = new Job(); job.startCoords = new Vector2Int(i * horizontals, i); job.startPos = new Vector2(xPos, yPos); job.nodeSize = this.nodeSize; job.bounds = this.bounds; job.array = array; } OnRebuildStart(); }
接下来,我们创建一个简单的
NativeArray ,在该位置将放置任务中的点,在此
数组中,您需要指定水平创建的点数和分配类型
Persistent ,因为该任务可能需要一帧以上的时间。
之后,创建
Job任务实例本身,将
startCoords系列的初始坐标,
startPos系列的初始位置,
nodeSize点的大小,障碍的
边界数组以及点本身的数组放在末尾。
仅保留将任务置于
句柄和全局任务列表中。
改建 public void Rebuild() { Vector2 center = this.position; Vector2 origin = center - (mapSize / 2f); int count = this.obstacles.Count; if (count > 0) { this.bounds = new NativeArray<Rect>(count, Allocator.TempJob, NativeArrayOptions.UninitializedMemory); for(int i = 0; i < count; i++) { Obstacle obs = this.obstacles[i]; Vector2 position = obs.position; Rect rect = new Rect(Vector2.zero, obs.size); rect.center = position; this.bounds[i] = rect; } } for (int i = 0; i < verticals; i++) { float xPos = origin.x; float yPos = origin.y + (i * this.nodeSize) + this.nodeSize / 2f; NativeArray<Node> array = new NativeArray<Node>(horizontals, Allocator.Persistent); Job job = new Job(); job.startCoords = new Vector2Int(i * horizontals, i); job.startPos = new Vector2(xPos, yPos); job.nodeSize = this.nodeSize; job.bounds = this.bounds; job.array = array; this.handle = job.Schedule(horizontals, 3, this.handle); this.jobs.Add(array); } OnRebuildStart(); }
做完了 我们有一个任务及其公共
句柄的列表,现在我们可以
通过在
OnRebuildStart方法中调用其
Complete方法来运行此
句柄 。
Onrebuildstart private void OnRebuildStart() { this.rebuilding = true; this.handle.Complete(); }
由于
重建变量将指示
网格划分过程正在进行中,因此
UpdateChanges方法
本身也必须指定此过程将使用
handle及其
IsCompleted属性结束的条件。
更新变更 private void UpdateChanges() { if (this.rebuilding) { print(“ ...”); if (this.handle.IsCompleted) OnRebuildFinish(); } else { if (this.requireRebuild) { print(“ , !”); Rebuild(); } else { this.requireRebuild = CheckChanges(); } } }
完成任务后,将调用
OnRebuildFinish方法,在
该方法中,我们已经将接收到的点收集到一个常规
Dictionary列表中,最重要的是,清除了占用的资源。
OnRebuildFinish private void OnRebuildFinish() { this.nodes.Clear(); foreach (NativeArray<Node> array in this.jobs) { foreach (Node node in array) this.nodes.Add(node.coords, node); array.Dispose(); } this.jobs.Clear(); if (this.bounds.IsCreated) this.bounds.Dispose(); this.requireRebuild = this.rebuilding = false; }
首先,我们从之前的点中清除节点字典,然后使用foreach循环对从任务中接收到的所有点进行排序,然后将它们放入节点字典中,其中键是点的坐标(不是位置!),而值是点本身。有了这本词典的帮助,我们将可以更轻松地在地图上搜索相邻点。填充后,我们使用Dispose方法清除数组数组,最后清除作业任务列表本身。如果它是先前创建的,则还需要清除障碍的边界数组。完成所有这些操作之后,我们将获得地图上所有点的列表,现在您可以在舞台上绘制它们。为此,请在Map类中创建OnDrawGizmos方法,在该方法中绘制点。地图 public sealed class Map : Obstacle { #if UNITY_EDITOR private void OnDrawGizmos() {} #endif }
现在,通过循环绘制每个点。地图 public sealed class Map : Obstacle { #if UNITY_EDITOR private void OnDrawGizmos() { foreach (Node node in this.nodes.Values) { Gizmos.DrawWireSphere(node.position, this.nodeSize / 10f); } } #endif }
完成所有这些操作后,我们的地图看起来有些无聊,为了真正获得网格,您需要将各个点相互连接。要搜索相邻点,我们只需要通过其在8个方向上的坐标来查找所需的点,因此在Map类中,我们将通过其GetNode坐标创建一个简单的Directions方向的静态数组和一个单元格搜索方法。地图 public sealed class Map : Obstacle { public static readonly Vector2Int[] Directions = { Vector2Int.up, new Vector2Int(1, 1), Vector2Int.right, new Vector2Int(1, -1), Vector2Int.down, new Vector2Int(-1, -1), Vector2Int.left, new Vector2Int(-1, 1), }; public Node GetNode(Vector2Int coords) { Node result = default(Node); try { result = this.nodes[coords]; } catch {} return result; } #if UNITY_EDITOR private void OnDrawGizmos() {} #endif }
GetNode方法将按节点列表中的坐标返回一个点,但是您需要仔细进行此操作,因为如果Vector2Int坐标不正确,则会发生错误,因此在这里我们使用try catch异常绕过块,它将帮助绕过该异常而不是使整个应用程序因错误而`` 挂起 ''。接下来,我们将遍历所有方向,并尝试在OnDrawGizmos方法中找到相邻的点,最重要的是,不要忘记考虑点的通畅性。Ondrawgizmos #if UNITY_EDITOR private void OnDrawGizmos() { Color c = Gizmos.color; foreach (Node node in this.nodes.Values) { Color newColor = Color.white; if (node.isWalkable) newColor = new Color32(153, 255, 51, 255); else newColor = Color.red; Gizmos.color = newColor; Gizmos.DrawWireSphere(node.position, this.nodeSize / 10f); newColor = Color.green; Gizmos.color = newColor; if (node.isWalkable) { for (int i = 0; i < Directions.Length; i++) { Vector2Int coords = node.coords + Directions[i]; Node connection = GetNode(coords); if (connection) { if (connection.isWalkable) Gizmos.DrawLine(node.position, connection.position); } } } } Gizmos.color = c; } #endif
现在您可以安全地开始游戏,看看发生了什么。在此示例中,我们仅使用任务构建了图本身,但这是在我将A *算法本身拧入系统后发生的事情,该算法本身也使用Job系统来查找路径,即本文结尾处的源。因此,您可以轻松地将新任务系统用于目标并构建有趣的系统。与上一篇文章一样,该任务系统在没有ECS的情况下使用,但是如果将此系统与ECS结合使用,则可以在性能提升方面获得令人称奇的结果。祝你好运!路径查找器项目源