嗨,Habr,在本文中,我将讨论ignite库,您可以使用该库使用PyTorch框架轻松地训练和测试神经网络。
使用ignite,您可以编写周期来训练网络,只需几行,从框中添加标准度量计算,保存模型,等等。 好吧,对于那些从TF转到PyTorch的人来说,我们可以说点火库是PyTorch的Keras。
本文将详细研究一个使用ignite训练神经网络进行分类任务的示例

向PyTorch添加更多火力
我不会浪费时间谈论PyTorch框架有多酷 。 任何使用过它的人都知道我在写什么。 但是,尽管具有所有优点,但在用于训练,测试和测试神经网络的编写周期方面仍处于低水平。
如果我们看一下使用PyTorch框架的官方示例 ,我们将看到至少两个迭代周期,分别是网格训练代码中的时期和成批的训练集:
for epoch in range(1, epochs + 1): for batch_idx, (data, target) in enumerate(train_loader):
ignite库的主要思想是将这些循环分解为一个类,同时允许用户使用事件处理程序与这些循环进行交互。
因此,在标准深度学习任务的情况下,我们可以节省很多代码行。 更少的行-更少的错误!
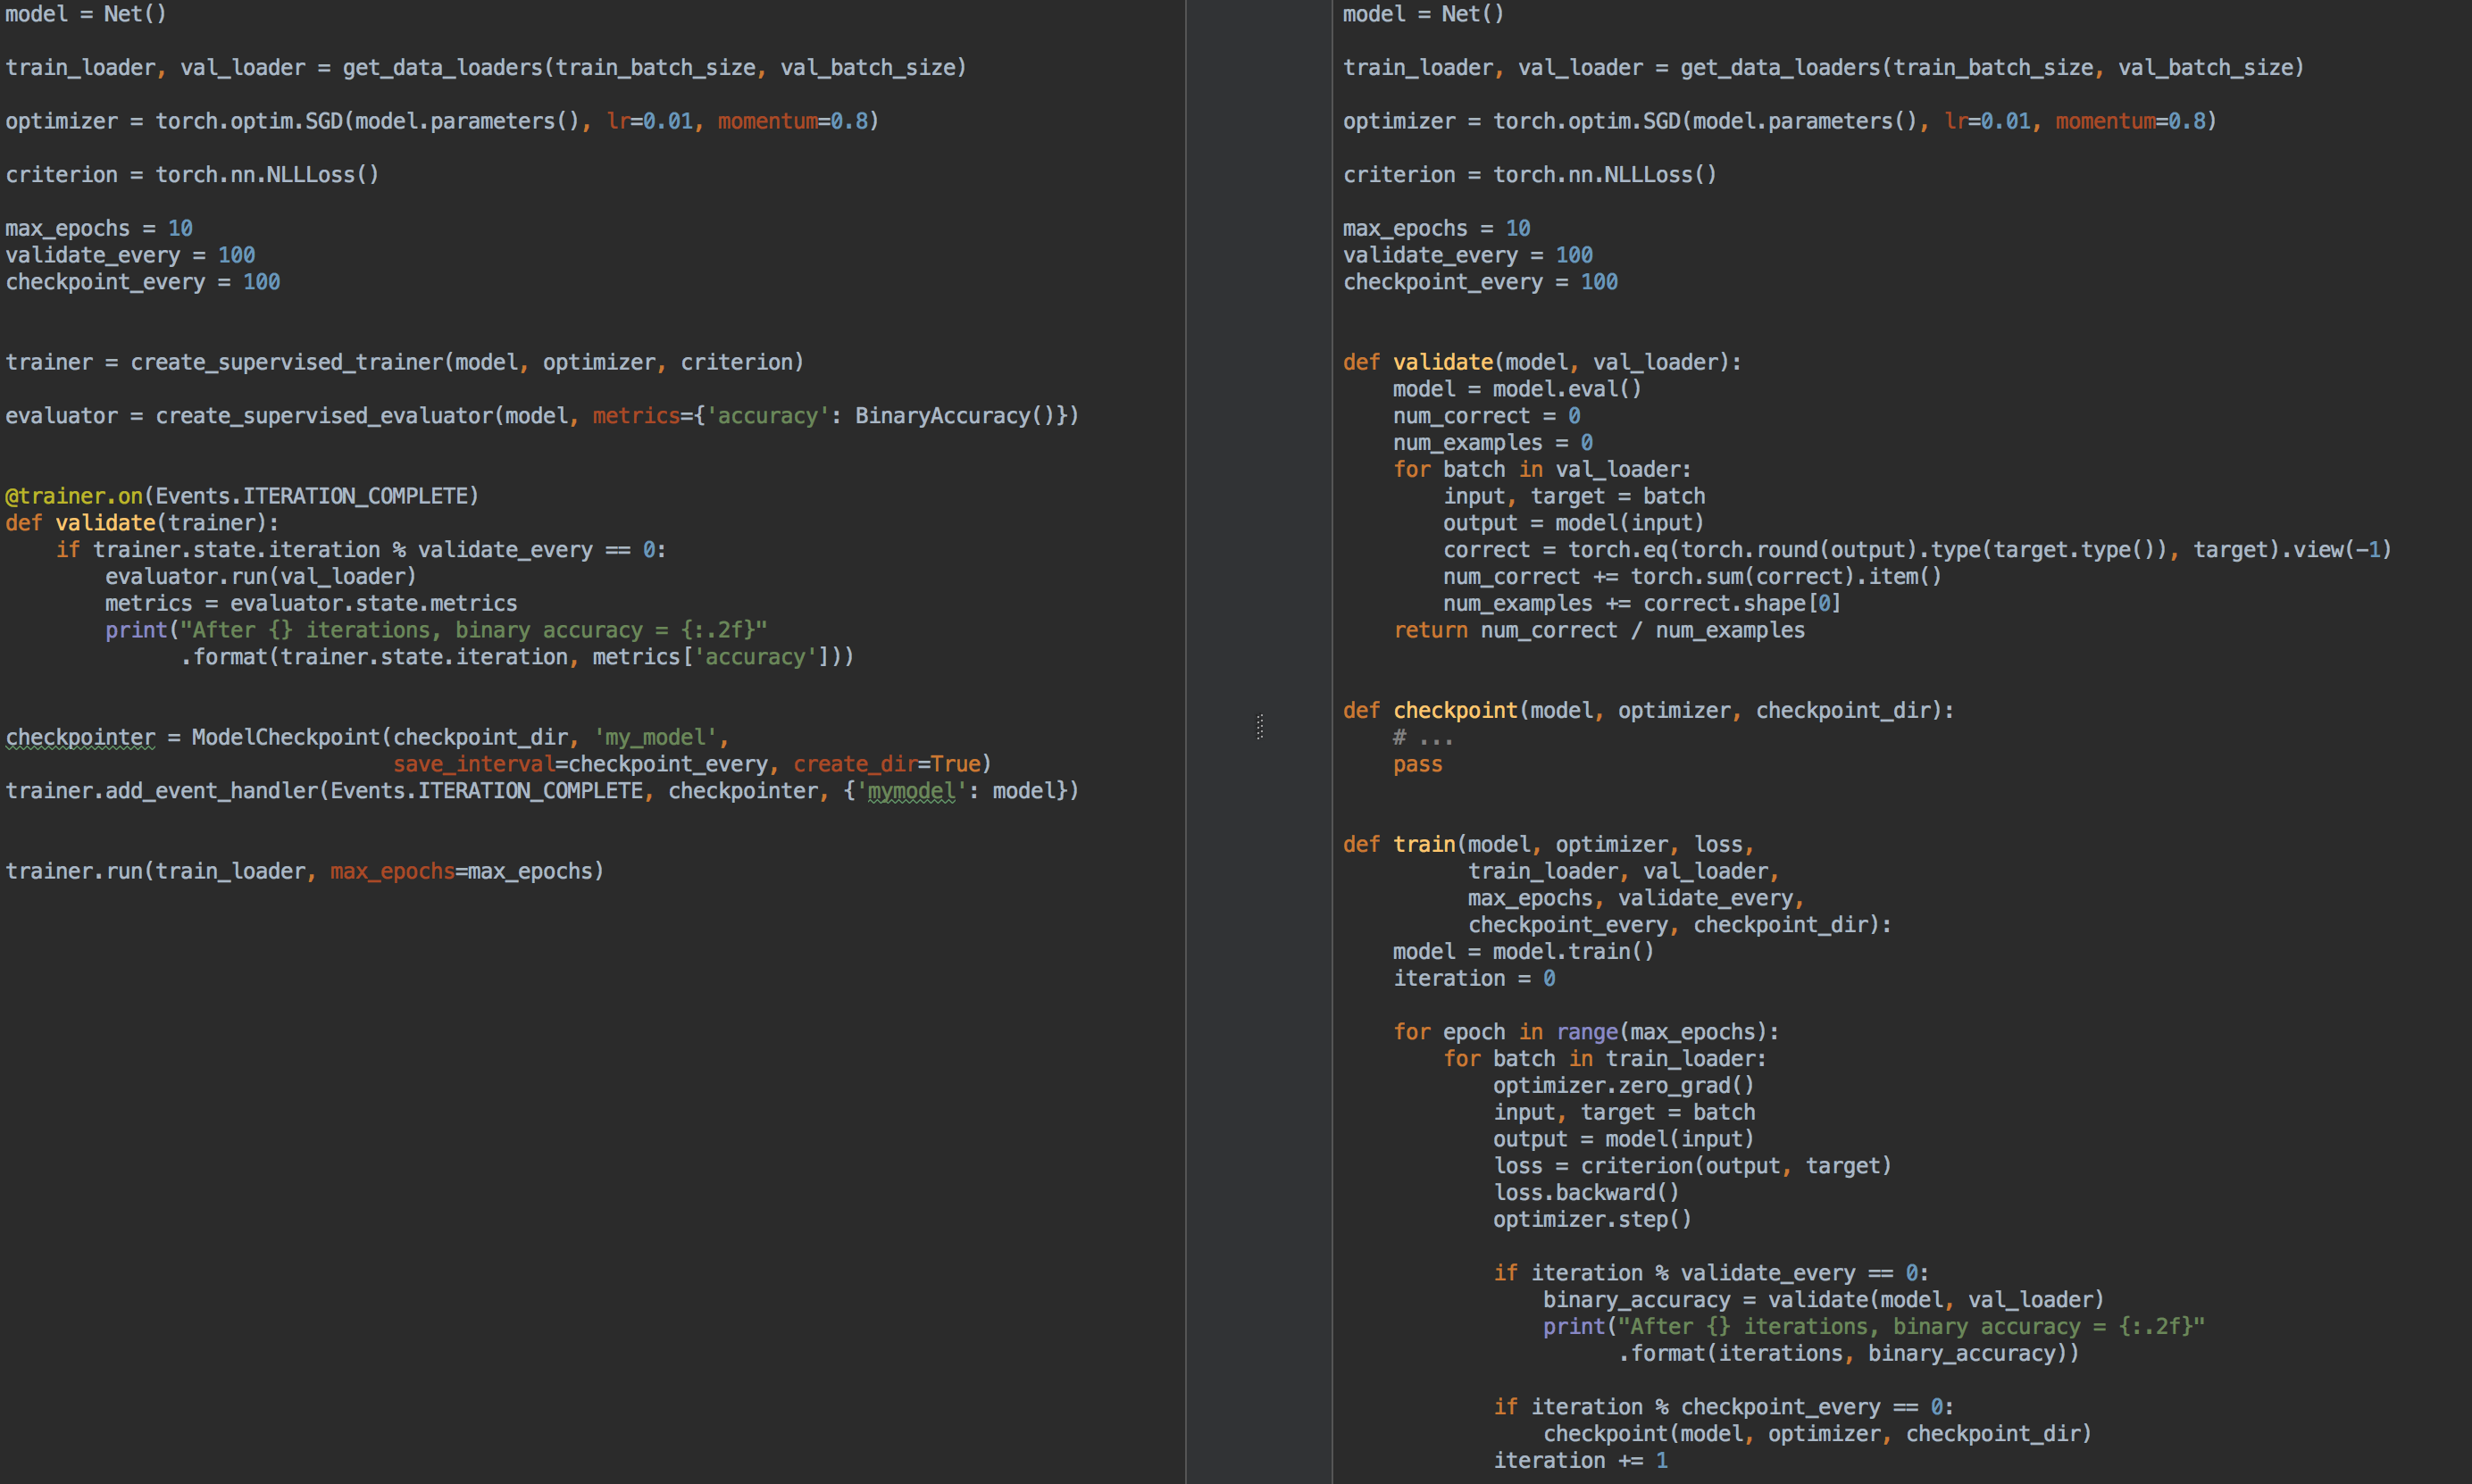
例如,为了进行比较,左侧是使用ignite进行训练和模型验证的代码,右侧是纯PyTorch:
那么, 点燃又有什么用呢?
- 您不再需要为每个任务循环编写
for epoch in range(n_epochs)和for epoch in range(n_epochs) for batch in data_loader 。 - 使您可以更好地分解代码
- 允许您开箱即用地计算基本指标
- 提供类型的“小圆面包”
- 在训练过程中保存最新和最好的模型(以及优化程序和学习率调度程序),
- 提前停止学习
- 等
- 轻松与可视化工具集成:tensorboardX,visdom,...
从某种意义上说,可以将ignite库与所有著名的Keras及其用于培训和测试网络的API进行比较。 同样,乍看之下的ignite库与tnt库非常相似,因为最初这两个库都有共同的目标,并且对于实现它们有相似的想法。
因此,点亮:
pip install pytorch-ignite
或
conda install ignite -c pytorch
接下来,通过一个特定的示例,我们将熟悉ignite库API 。
在本文的这一部分中,我们将考虑一个学校示例,该示例使用ignite库为分类问题训练神经网络。
因此,让我们使用kaggle拍摄带有水果图片的简单数据集。 任务是将对应的类别与每个水果图片相关联。
在使用ignite之前,让我们定义主要组件:
数据流
- 培训样品分
train_loader装载机train_loader - 结帐批处理下载器
val_loader
型号:
- 从
torchvision获得小的squeezeNet网格
优化算法:
损失函数:
代号 from pathlib import Path import numpy as np import torch from torch.utils.data import Dataset, DataLoader from torch.utils.data.dataset import Subset from torchvision.datasets import ImageFolder from torchvision.transforms import Compose, RandomResizedCrop, RandomVerticalFlip, RandomHorizontalFlip from torchvision.transforms import ColorJitter, ToTensor, Normalize FRUIT360_PATH = Path(".").resolve().parent / "input" / "fruits-360_dataset" / "fruits-360" device = "cuda" train_transform = Compose([ RandomHorizontalFlip(), RandomResizedCrop(size=32), ColorJitter(brightness=0.12), ToTensor(), Normalize(mean=[0.5, 0.5, 0.5], std=[0.5, 0.5, 0.5]) ]) val_transform = Compose([ RandomResizedCrop(size=32), ToTensor(), Normalize(mean=[0.5, 0.5, 0.5], std=[0.5, 0.5, 0.5]) ]) batch_size = 128 num_workers = 8 train_dataset = ImageFolder((FRUIT360_PATH /"Training").as_posix(), transform=train_transform, target_transform=None) val_dataset = ImageFolder((FRUIT360_PATH /"Test").as_posix(), transform=val_transform, target_transform=None) train_loader = DataLoader(train_dataset, batch_size=batch_size, shuffle=True, num_workers=num_workers, drop_last=True, pin_memory="cuda" in device) val_loader = DataLoader(val_dataset, batch_size=batch_size, shuffle=True, num_workers=num_workers, drop_last=False, pin_memory="cuda" in device)
import torch.nn as nn from torchvision.models.squeezenet import squeezenet1_1 model = squeezenet1_1(pretrained=False, num_classes=81) model.classifier[-1] = nn.AdaptiveAvgPool2d(1) model = model.to(device)
import torch.nn as nn from torch.optim import SGD optimizer = SGD(model.parameters(), lr=0.01, momentum=0.5) criterion = nn.CrossEntropyLoss()
因此,现在该运行ignit了 :
from ignite.engine import Engine, _prepare_batch def process_function(engine, batch): model.train() optimizer.zero_grad() x, y = _prepare_batch(batch, device=device) y_pred = model(x) loss = criterion(y_pred, y) loss.backward() optimizer.step() return loss.item() trainer = Engine(process_function)
让我们看看这段代码的含义。
引擎Engine
ignite.engine.Engine类是库框架,此类的对象是ignite.engine.Engine :
trainer = Engine(process_function)
它由输入函数process_function定义,用于处理一批,并用于实现训练样本的传递。 在ignite.engine.Engine类中,发生以下情况:
while epoch < max_epochs:
返回process_function函数:
def process_function(engine, batch): model.train() optimizer.zero_grad() x, y = _prepare_batch(batch, device=device) y_pred = model(x) loss = criterion(y_pred, y) loss.backward() optimizer.step() return loss.item()
我们看到,在函数内部,像在模型训练中一样,我们可以计算y_pred预测,计算损失函数, loss和梯度。 后者允许您更新模型权重: optimizer.step() 。
通常,对process_function函数的代码没有限制。 我们只注意到它以两个参数作为输入: Engine对象(在我们的例子中是trainer )和来自数据加载器的批处理。 因此,例如,对于测试神经网络,我们可以定义ignite.engine.Engine类的另一个对象,在该对象中,输入函数仅计算预测值,并一次执行一次测试采样。 稍后再阅读。
因此,以上代码仅定义了必要的对象,而没有开始进行培训。 基本上,在一个最小的示例中,您可以调用方法:
trainer.run(train_loader, max_epochs=10)
并且此代码足以“安静地”(无需任何中间结果的派生)训练模型。
笔记还请注意,对于此类任务,库提供了一种方便的方法来创建trainer对象:
from ignite.engine import create_supervised_trainer trainer = create_supervised_trainer(model, optimizer, criterion, device)
当然,实际上,上面的示例没有什么意义,所以让我们为“教练”添加以下选项:
- 每50次迭代显示损失函数值
- 开始使用固定模型对训练集中的指标进行计算
- 在每个时代之后开始计算测试样本的指标
- 在每个时代之后保存模型参数
- 保留三种最佳模式
- 学习速度因时代而异(学习率安排)
- 提前停止训练(提前停止)
事件和事件处理程序
为了为“ trainer”添加以上选项, ignite库提供了事件系统和自定义事件处理程序的启动。 因此,用户可以在每个阶段控制Engine类的对象:
- 引擎启动/完成启动
- 时代开始/结束
- 批处理迭代开始/结束
并在每个事件上运行您的代码。
显示损失函数值
为此,您只需要确定输出将在屏幕上显示的功能,并将其添加到“培训师”即可:
from ignite.engine import Events log_interval = 50 @trainer.on(Events.ITERATION_COMPLETED) def log_training_loss(engine): iteration = (engine.state.iteration - 1) % len(train_loader) + 1 if iteration % log_interval == 0: print("Epoch[{}] Iteration[{}/{}] Loss: {:.4f}" .format(engine.state.epoch, iteration, len(train_loader), engine.state.output))
实际上,有两种添加事件处理程序的方法:通过add_event_handler或通过on装饰器。 与上面相同,可以这样进行:
from ignite.engine import Events log_interval = 50 def log_training_loss(engine):
请注意,任何参数都可以传递给事件处理函数。 通常,这样的功能将如下所示:
def custom_handler(engine, *args, **kwargs): pass trainer.add_event_handler(Events.ITERATION_COMPLETED, custom_handler, *args, **kwargs)
因此,让我们开始一个时代的训练,看看会发生什么:
output = trainer.run(train_loader, max_epochs=1)
Epoch[1] Iteration[50/322] Loss: 4.3459 Epoch[1] Iteration[100/322] Loss: 4.2801 Epoch[1] Iteration[150/322] Loss: 4.2294 Epoch[1] Iteration[200/322] Loss: 4.1467 Epoch[1] Iteration[250/322] Loss: 3.8607 Epoch[1] Iteration[300/322] Loss: 3.6688
还不错! 让我们走得更远。
开始计算训练和测试样本的指标
让我们计算以下指标:平均准确性,每个训练阶段和整个测试样本在每个时代之后的平均完整性。 请注意,我们将在每个训练时代之后(而不是在训练期间)在训练样本部分计算指标。 因此,效率模型的计算将更加准确,因为模型在计算过程中不会发生变化。
因此,我们定义了指标:
from ignite.metrics import Loss, CategoricalAccuracy, Precision, Recall metrics = { 'avg_loss': Loss(criterion), 'avg_accuracy': CategoricalAccuracy(), 'avg_precision': Precision(average=True), 'avg_recall': Recall(average=True) }
接下来,我们将使用ignite.engine.create_supervised_evaluator创建两个引擎来评估模型:
from ignite.engine import create_supervised_evaluator
我们正在创建两个引擎,以便将附加的事件处理程序进一步附加到其中一个( val_evaluator )以保存模型并尽早停止学习(有关以下所有内容)。
我们还仔细研究一下如何定义用于评估模型的引擎,即如何定义输入函数process_function以处理一批:
def create_supervised_evaluator(model, metrics={}, device=None): if device: model.to(device) def _inference(engine, batch): model.eval() with torch.no_grad(): x, y = _prepare_batch(batch, device=device) y_pred = model(x) return y_pred, y engine = Engine(_inference) for name, metric in metrics.items(): metric.attach(engine, name) return engine
我们继续。 让我们随机选择训练样本中要计算指标的部分:
import numpy as np from torch.utils.data.dataset import Subset indices = np.arange(len(train_dataset)) random_indices = np.random.permutation(indices)[:len(val_dataset)] train_subset = Subset(train_dataset, indices=random_indices) train_eval_loader = DataLoader(train_subset, batch_size=batch_size, shuffle=True, num_workers=num_workers, drop_last=True, pin_memory="cuda" in device)
接下来,让我们确定在培训的什么时候开始度量的计算并输出到屏幕:
@trainer.on(Events.EPOCH_COMPLETED) def compute_and_display_offline_train_metrics(engine): epoch = engine.state.epoch print("Compute train metrics...") metrics = train_evaluator.run(train_eval_loader).metrics print("Training Results - Epoch: {} Average Loss: {:.4f} | Accuracy: {:.4f} | Precision: {:.4f} | Recall: {:.4f}" .format(engine.state.epoch, metrics['avg_loss'], metrics['avg_accuracy'], metrics['avg_precision'], metrics['avg_recall'])) @trainer.on(Events.EPOCH_COMPLETED) def compute_and_display_val_metrics(engine): epoch = engine.state.epoch print("Compute validation metrics...") metrics = val_evaluator.run(val_loader).metrics print("Validation Results - Epoch: {} Average Loss: {:.4f} | Accuracy: {:.4f} | Precision: {:.4f} | Recall: {:.4f}" .format(engine.state.epoch, metrics['avg_loss'], metrics['avg_accuracy'], metrics['avg_precision'], metrics['avg_recall']))
你可以跑!
output = trainer.run(train_loader, max_epochs=1)
我们在屏幕上
Epoch[1] Iteration[50/322] Loss: 3.5112 Epoch[1] Iteration[100/322] Loss: 2.9840 Epoch[1] Iteration[150/322] Loss: 2.8807 Epoch[1] Iteration[200/322] Loss: 2.9285 Epoch[1] Iteration[250/322] Loss: 2.5026 Epoch[1] Iteration[300/322] Loss: 2.1944 Compute train metrics... Training Results - Epoch: 1 Average Loss: 2.1018 | Accuracy: 0.3699 | Precision: 0.3981 | Recall: 0.3686 Compute validation metrics... Validation Results - Epoch: 1 Average Loss: 2.0519 | Accuracy: 0.3850 | Precision: 0.3578 | Recall: 0.3845
已经更好了!
一些细节
让我们再看一下前面的代码。 读者可能已经注意到以下代码行:
metrics = train_evaluator.run(train_eval_loader).metrics
可能存在一个关于从train_evaluator.run(train_eval_loader)获得的对象类型的问题,该对象具有metrics属性。
实际上, Engine类包含一个称为state (类型State )的结构,以便能够在事件处理程序之间传输数据。 此state属性包含有关当前时代,迭代,时代数等的基本信息。 它也可以用于传输任何用户数据,包括度量标准的计算结果。
state = train_evaluator.run(train_eval_loader) metrics = state.metrics
训练期间指标的计算
如果任务中有大量的训练样本,并且在每个训练时期之后计算指标很昂贵,但是您仍然希望在训练期间看到一些指标变化,则可以从框中使用以下RunningAverage事件处理程序。 例如,我们要计算并显示分类器的准确性:
acc_metric = RunningAverage(CategoryAccuracy(...), alpha=0.98) acc_metric.attach(trainer, 'running_avg_accuracy') @trainer.on(Events.ITERATION_COMPLETED) def log_running_avg_metrics(engine): print("running avg accuracy:", engine.state.metrics['running_avg_accuracy'])
要使用RunningAverage功能,您需要从以下来源安装ignite :
pip install git+https:
学习率安排
有多种方法可以使用ignite更改学习速度。 接下来,通过在每个时代开始时调用lr_scheduler.step()函数来考虑最简单的方法。
from torch.optim.lr_scheduler import ExponentialLR lr_scheduler = ExponentialLR(optimizer, gamma=0.8) @trainer.on(Events.EPOCH_STARTED) def update_lr_scheduler(engine): lr_scheduler.step()
在训练过程中保存最佳模型和其他参数
在训练过程中,最好在光盘上记录最佳模型的权重,并定期保存模型权重,优化器参数和用于更改学习速度的参数。 后者对于从上次保存的状态恢复学习很有用。
Ignite ModelCheckpoint有一个特殊的ModelCheckpoint类。 因此,让我们创建一个ModelCheckpoint事件ModelCheckpoint并就测试集中的准确性保存最佳模型。 在这种情况下,我们定义一个score_function函数,该函数将精度值提供给事件处理程序,并决定是否保存模型:
from ignite.handlers import ModelCheckpoint def score_function(engine): val_avg_accuracy = engine.state.metrics['avg_accuracy'] return val_avg_accuracy best_model_saver = ModelCheckpoint("best_models", filename_prefix="model", score_name="val_accuracy", score_function=score_function, n_saved=3, save_as_state_dict=True, create_dir=True)
现在创建另一个ModelCheckpoint事件ModelCheckpoint ,以每1000次迭代维护学习状态:
training_saver = ModelCheckpoint("checkpoint", filename_prefix="checkpoint", save_interval=1000, n_saved=1, save_as_state_dict=True, create_dir=True) to_save = {"model": model, "optimizer": optimizer, "lr_scheduler": lr_scheduler} trainer.add_event_handler(Events.ITERATION_COMPLETED, training_saver, to_save)
因此,几乎一切就绪,添加最后一个元素:
提早停止训练(提早停止)
让我们添加另一个事件处理程序,如果在10个时代内模型质量没有改善,该事件处理程序将停止学习。 我们将使用score_function score_function再次评估模型的质量。
from ignite.handlers import EarlyStopping early_stopping = EarlyStopping(patience=10, score_function=score_function, trainer=trainer) val_evaluator.add_event_handler(Events.EPOCH_COMPLETED, early_stopping)
开始训练
为了开始训练,我们只要调用run()方法就足够了。 我们将训练模型10个时代:
max_epochs = 10 output = trainer.run(train_loader, max_epochs=max_epochs)
屏幕输出 Learning rate: 0.01 Epoch[1] Iteration[50/322] Loss: 2.7984 Epoch[1] Iteration[100/322] Loss: 1.9736 Epoch[1] Iteration[150/322] Loss: 4.3419 Epoch[1] Iteration[200/322] Loss: 2.0261 Epoch[1] Iteration[250/322] Loss: 2.1724 Epoch[1] Iteration[300/322] Loss: 2.1599 Compute train metrics... Training Results - Epoch: 1 Average Loss: 1.5363 | Accuracy: 0.5177 | Precision: 0.5477 | Recall: 0.5178 Compute validation metrics... Validation Results - Epoch: 1 Average Loss: 1.5116 | Accuracy: 0.5139 | Precision: 0.5400 | Recall: 0.5140 Learning rate: 0.008 Epoch[2] Iteration[50/322] Loss: 1.4076 Epoch[2] Iteration[100/322] Loss: 1.4892 Epoch[2] Iteration[150/322] Loss: 1.2485 Epoch[2] Iteration[200/322] Loss: 1.6511 Epoch[2] Iteration[250/322] Loss: 3.3376 Epoch[2] Iteration[300/322] Loss: 1.3299 Compute train metrics... Training Results - Epoch: 2 Average Loss: 3.2686 | Accuracy: 0.1977 | Precision: 0.1792 | Recall: 0.1942 Compute validation metrics... Validation Results - Epoch: 2 Average Loss: 3.2772 | Accuracy: 0.1962 | Precision: 0.1628 | Recall: 0.1918 Learning rate: 0.006400000000000001 Epoch[3] Iteration[50/322] Loss: 0.9016 Epoch[3] Iteration[100/322] Loss: 1.2006 Epoch[3] Iteration[150/322] Loss: 0.8892 Epoch[3] Iteration[200/322] Loss: 0.8141 Epoch[3] Iteration[250/322] Loss: 1.4005 Epoch[3] Iteration[300/322] Loss: 0.8888 Compute train metrics... Training Results - Epoch: 3 Average Loss: 0.7368 | Accuracy: 0.7554 | Precision: 0.7818 | Recall: 0.7554 Compute validation metrics... Validation Results - Epoch: 3 Average Loss: 0.7177 | Accuracy: 0.7623 | Precision: 0.7863 | Recall: 0.7611 Learning rate: 0.005120000000000001 Epoch[4] Iteration[50/322] Loss: 0.8490 Epoch[4] Iteration[100/322] Loss: 0.8493 Epoch[4] Iteration[150/322] Loss: 0.8100 Epoch[4] Iteration[200/322] Loss: 0.9165 Epoch[4] Iteration[250/322] Loss: 0.9370 Epoch[4] Iteration[300/322] Loss: 0.6548 Compute train metrics... Training Results - Epoch: 4 Average Loss: 0.7047 | Accuracy: 0.7713 | Precision: 0.8040 | Recall: 0.7728 Compute validation metrics... Validation Results - Epoch: 4 Average Loss: 0.6737 | Accuracy: 0.7778 | Precision: 0.7955 | Recall: 0.7806 Learning rate: 0.004096000000000001 Epoch[5] Iteration[50/322] Loss: 0.6965 Epoch[5] Iteration[100/322] Loss: 0.6196 Epoch[5] Iteration[150/322] Loss: 0.6194 Epoch[5] Iteration[200/322] Loss: 0.3986 Epoch[5] Iteration[250/322] Loss: 0.6032 Epoch[5] Iteration[300/322] Loss: 0.7152 Compute train metrics... Training Results - Epoch: 5 Average Loss: 0.5049 | Accuracy: 0.8282 | Precision: 0.8393 | Recall: 0.8314 Compute validation metrics... Validation Results - Epoch: 5 Average Loss: 0.5084 | Accuracy: 0.8304 | Precision: 0.8386 | Recall: 0.8328 Learning rate: 0.0032768000000000007 Epoch[6] Iteration[50/322] Loss: 0.4433 Epoch[6] Iteration[100/322] Loss: 0.4764 Epoch[6] Iteration[150/322] Loss: 0.5578 Epoch[6] Iteration[200/322] Loss: 0.3684 Epoch[6] Iteration[250/322] Loss: 0.4847 Epoch[6] Iteration[300/322] Loss: 0.3811 Compute train metrics... Training Results - Epoch: 6 Average Loss: 0.4383 | Accuracy: 0.8474 | Precision: 0.8618 | Recall: 0.8495 Compute validation metrics... Validation Results - Epoch: 6 Average Loss: 0.4419 | Accuracy: 0.8446 | Precision: 0.8532 | Recall: 0.8442 Learning rate: 0.002621440000000001 Epoch[7] Iteration[50/322] Loss: 0.4447 Epoch[7] Iteration[100/322] Loss: 0.4602 Epoch[7] Iteration[150/322] Loss: 0.5345 Epoch[7] Iteration[200/322] Loss: 0.3973 Epoch[7] Iteration[250/322] Loss: 0.5023 Epoch[7] Iteration[300/322] Loss: 0.5303 Compute train metrics... Training Results - Epoch: 7 Average Loss: 0.4305 | Accuracy: 0.8579 | Precision: 0.8691 | Recall: 0.8596 Compute validation metrics... Validation Results - Epoch: 7 Average Loss: 0.4262 | Accuracy: 0.8590 | Precision: 0.8685 | Recall: 0.8606 Learning rate: 0.002097152000000001 Epoch[8] Iteration[50/322] Loss: 0.4867 Epoch[8] Iteration[100/322] Loss: 0.3090 Epoch[8] Iteration[150/322] Loss: 0.3721 Epoch[8] Iteration[200/322] Loss: 0.4559 Epoch[8] Iteration[250/322] Loss: 0.3958 Epoch[8] Iteration[300/322] Loss: 0.4222 Compute train metrics... Training Results - Epoch: 8 Average Loss: 0.3432 | Accuracy: 0.8818 | Precision: 0.8895 | Recall: 0.8817 Compute validation metrics... Validation Results - Epoch: 8 Average Loss: 0.3644 | Accuracy: 0.8713 | Precision: 0.8784 | Recall: 0.8707 Learning rate: 0.001677721600000001 Epoch[9] Iteration[50/322] Loss: 0.3557 Epoch[9] Iteration[100/322] Loss: 0.3692 Epoch[9] Iteration[150/322] Loss: 0.3510 Epoch[9] Iteration[200/322] Loss: 0.3446 Epoch[9] Iteration[250/322] Loss: 0.3966 Epoch[9] Iteration[300/322] Loss: 0.3451 Compute train metrics... Training Results - Epoch: 9 Average Loss: 0.3315 | Accuracy: 0.8954 | Precision: 0.9001 | Recall: 0.8982 Compute validation metrics... Validation Results - Epoch: 9 Average Loss: 0.3559 | Accuracy: 0.8818 | Precision: 0.8876 | Recall: 0.8847 Learning rate: 0.0013421772800000006 Epoch[10] Iteration[50/322] Loss: 0.3340 Epoch[10] Iteration[100/322] Loss: 0.3370 Epoch[10] Iteration[150/322] Loss: 0.3694 Epoch[10] Iteration[200/322] Loss: 0.3409 Epoch[10] Iteration[250/322] Loss: 0.4420 Epoch[10] Iteration[300/322] Loss: 0.2770 Compute train metrics... Training Results - Epoch: 10 Average Loss: 0.3246 | Accuracy: 0.8921 | Precision: 0.8988 | Recall: 0.8925 Compute validation metrics... Validation Results - Epoch: 10 Average Loss: 0.3536 | Accuracy: 0.8731 | Precision: 0.8785 | Recall: 0.8722
现在检查保存到磁盘的模型和参数:
ls best_models/ model_best_model_10_val_accuracy=0.8730994.pth model_best_model_8_val_accuracy=0.8712978.pth model_best_model_9_val_accuracy=0.8818188.pth
和
ls checkpoint/ checkpoint_lr_scheduler_3000.pth checkpoint_optimizer_3000.pth checkpoint_model_3000.pth
经过训练的模型进行预测
首先,创建一个测试数据加载器(例如,获取一个验证样本),以便数据批处理由图像及其索引组成:
class TestDataset(Dataset): def __init__(self, ds): self.ds = ds def __len__(self): return len(self.ds) def __getitem__(self, index): return self.ds[index][0], index test_dataset = TestDataset(val_dataset) test_loader = DataLoader(test_dataset, batch_size=batch_size, shuffle=False, num_workers=num_workers, drop_last=False, pin_memory="cuda" in device)
使用ignite,我们将为测试数据创建一个新的预测引擎。 为此,我们定义函数inference_update ,该函数返回预测结果和图像索引。 为了提高准确性,我们还将使用众所周知的技巧“测试时间增加”(TTA)。
import torch.nn.functional as F from ignite._utils import convert_tensor def _prepare_batch(batch): x, index = batch x = convert_tensor(x, device=device) return x, index def inference_update(engine, batch): x, indices = _prepare_batch(batch) y_pred = model(x) y_pred = F.softmax(y_pred, dim=1) return {"y_pred": convert_tensor(y_pred, device='cpu'), "indices": indices} model.eval() inferencer = Engine(inference_update)
接下来,创建事件处理程序,该处理程序将通知有关预测的阶段并将预测保存在专用数组中:
@inferencer.on(Events.EPOCH_COMPLETED) def log_tta(engine): print("TTA {} / {}".format(engine.state.epoch, n_tta)) n_tta = 3 num_classes = 81 n_samples = len(val_dataset) # y_probas_tta = np.zeros((n_samples, num_classes, n_tta), dtype=np.float32) @inferencer.on(Events.ITERATION_COMPLETED) def save_results(engine): output = engine.state.output tta_index = engine.state.epoch - 1 start_index = ((engine.state.iteration - 1) % len(test_loader)) * batch_size end_index = min(start_index + batch_size, n_samples) batch_y_probas = output['y_pred'].detach().numpy() y_probas_tta[start_index:end_index, :, tta_index] = batch_y_probas
在开始该过程之前,让我们下载最佳模型:
model = squeezenet1_1(pretrained=False, num_classes=64) model.classifier[-1] = nn.AdaptiveAvgPool2d(1) model = model.to(device) model_state_dict = torch.load("best_models/model_best_model_10_val_accuracy=0.8730994.pth") model.load_state_dict(model_state_dict)
我们推出:
inferencer.run(test_loader, max_epochs=n_tta) > TTA 1 / 3 > TTA 2 / 3 > TTA 3 / 3
接下来,以标准方式,对TTA预测取平均值,并以最高的概率计算类别索引:
y_probas = np.mean(y_probas_tta, axis=-1) y_preds = np.argmax(y_probas, axis=-1)
现在,我们可以根据预测再次计算模型的准确性:
from sklearn.metrics import accuracy_score y_test_true = [y for _, y in val_dataset] accuracy_score(y_test_true, y_preds) > 0.9310369676443035
, , . , , , ignite .
.
github
- fast neural transfer
- reinforcement learning
- dcgan
结论
, ignite Facebook (. ). 0.1.0, API (Engine, State, Events, Metric, ...) . , , , pull request- github .
感谢您的关注!