
(
插图 )
每个团队迟早都会开始考虑引入自己的体系结构方法,因此很多副本都被打破了。 因此,在
Umbrella IT部门,我们一直希望使用灵活的工具,以使架构的形成不会感到痛苦,并且导航,模拟文件,隔离和测试的问题不再是令人恐惧的事情,迟早会变得麻烦。笼罩着一个杂草丛生的项目。 幸运的是,我们不是在谈论带有假装缩写的新“专有”架构。 必须承认,当前流行的体系结构(MVP,MVVM,VIPER,Clean-swift)可以应付其任务,只有错误选择和错误使用此方法才能造成困难。 但是,在采用的体系结构的框架内,可以使用各种模式,这将允许实现那些非常神话般的指标:灵活性,隔离性,可测试性,可重用性。
当然,应用程序是不同的。 如果一个项目仅包含几个串联连接的屏幕,则模块之间无需进行复杂的交互。 可以使用通常的segue连接来完成,并使用良好的旧MVC / MVP来调味。 尽管体系结构的迟早会打败每个开发人员,但实现仍应与项目的目标和复杂性相称。 因此,如果项目涉及复杂的屏幕结构和各种状态(授权,来宾模式,脱机,用户角色等),则简化的体系结构方法肯定会发挥作用:很多依赖项,之间不明显且昂贵的数据传输屏幕和状态,导航问题,最重要的是-所有这些都将没有任何灵活性和可重用性,解决方案将紧密融合到项目中,并且屏幕A始终会打开屏幕B。尝试进行更改将导致痛苦的重构 在此期间,很容易犯错误并打破以前的工作方式。 在下面的示例中,我们将描述一种灵活的组织应用程序的方式,该应用程序具有两种状态:未授权用户,应将其定向到授权屏幕,授权用户,并应打开某个主屏幕。
1.主要协议的执行
首先,我们需要实施基础。 一切都始于可协调,可展示,可路由的协议:
protocol Coordinatable: class { func start() } protocol Presentable { var toPresent: UIViewController? { get } } extension UIViewController: Presentable { var toPresent: UIViewController? { return self } func showAlert(title: String, message: String? = nil) { UIAlertController.showAlert(title: title, message: message, inViewController: self, actionBlock: nil) } }
在此示例中,showAlert只是调用通知的一种便捷方法,该方法位于UIViewController扩展中。 protocol Routable: Presentable { func present(_ module: Presentable?) func present(_ module: Presentable?, animated: Bool) func push(_ module: Presentable?) func push(_ module: Presentable?, animated: Bool) func push(_ module: Presentable?, animated: Bool, completion: CompletionBlock?) func popModule() func popModule(animated: Bool) func dismissModule() func dismissModule(animated: Bool, completion: CompletionBlock?) func setRootModule(_ module: Presentable?) func setRootModule(_ module: Presentable?, hideBar: Bool) func popToRootModule(animated: Bool) }
2.创建一个协调员
有时需要更改应用程序屏幕,这意味着有必要实施测试层而不会降低成本,也不会违反SOLID原则。
我们继续执行坐标层:
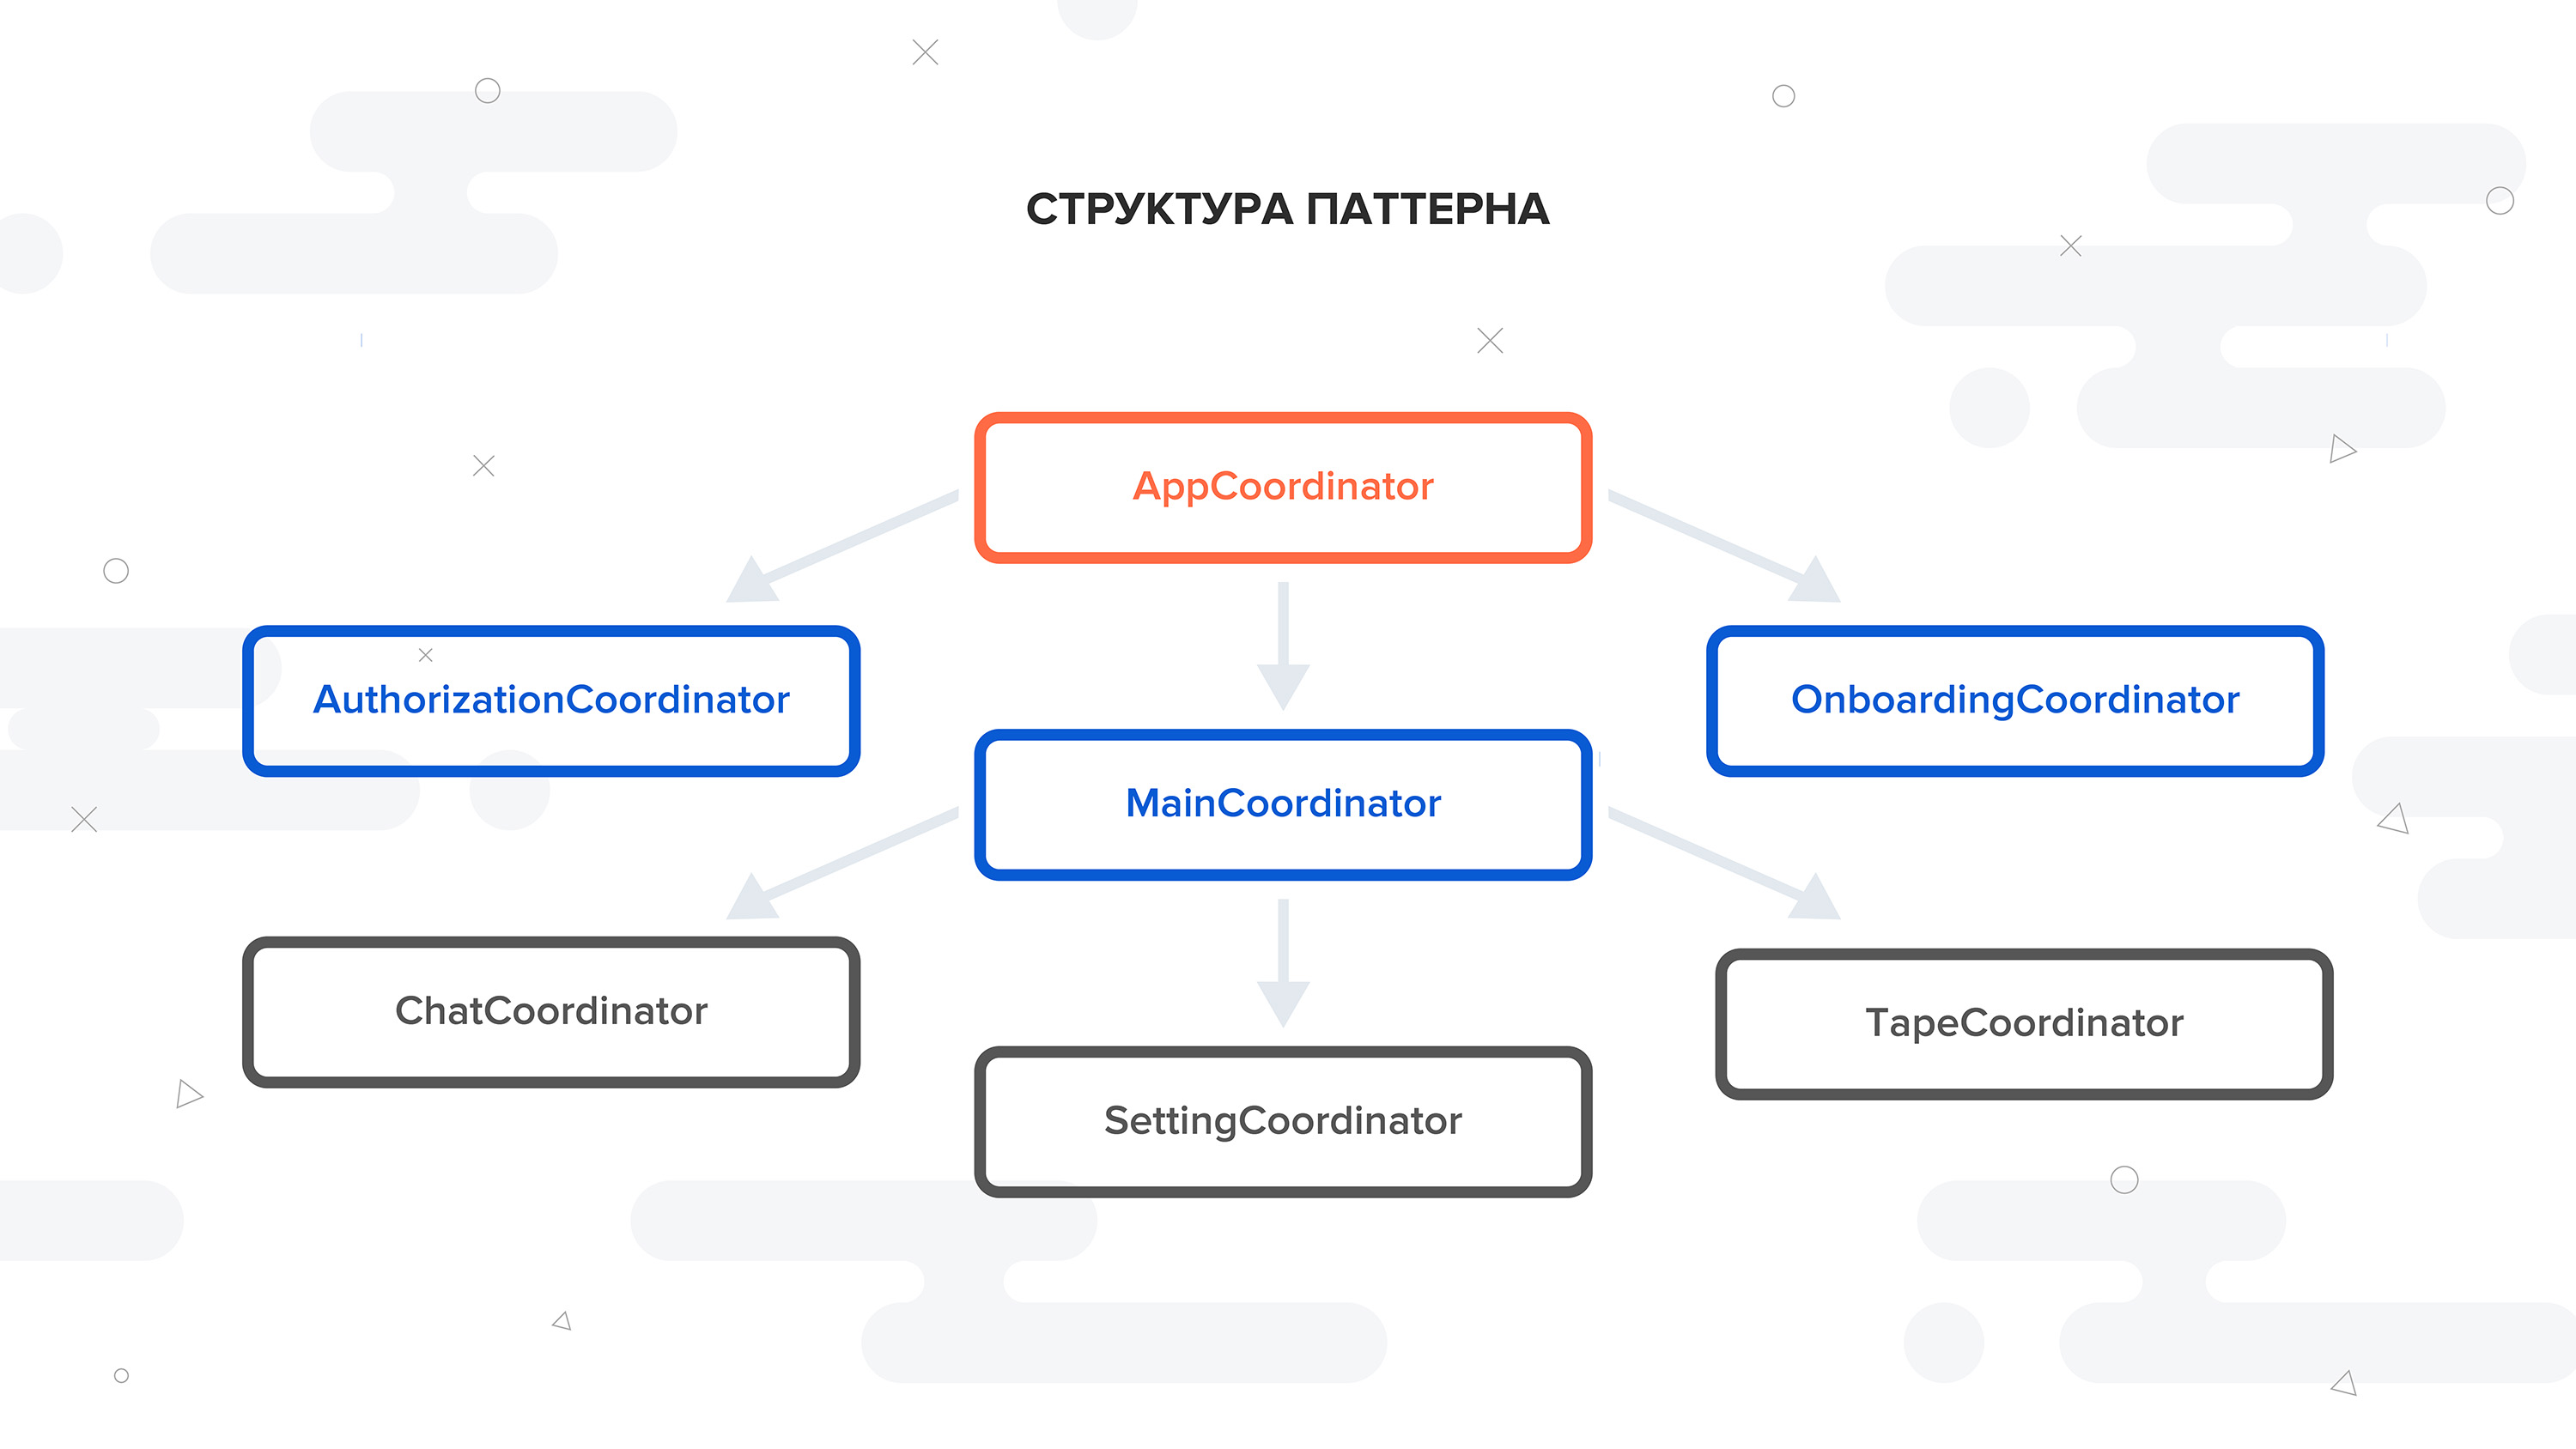
启动应用程序后,应调用AppCoordinator方法,该方法确定应启动哪个流。 例如,如果用户已注册,则应运行流程应用程序,如果未注册,则应运行流程授权。 在这种情况下,需要MainCoordinator和AuthorizationCoordinator。 我们将描述授权协调器,所有其他屏幕都可以类似的方式创建。
首先,您需要将输出添加到协调器,以便他可以与更高的协调器(AppCoordinator)建立连接:
protocol AuthorizationCoordinatorOutput: class { var finishFlow: CompletionBlock? { get set } } final class AuthorizationCoordinator: BaseCoordinator, AuthorizationCoordinatorOutput { var finishFlow: CompletionBlock? fileprivate let factory: AuthorizationFactoryProtocol fileprivate let router : Routable init(router: Routable, factory: AuthorizationFactoryProtocol) { self.router = router self.factory = factory } }
如上所示,我们有一个带有路由器和模块工厂的授权协调器。 但是谁又何时调用start()方法呢?
在这里,我们需要实现AppCoordinator。
final class AppCoordinator: BaseCoordinator { fileprivate let factory: CoordinatorFactoryProtocol fileprivate let router : Routable fileprivate let gateway = Gateway() init(router: Routable, factory: CoordinatorFactory) { self.router = router self.factory = factory } } // MARK:- Coordinatable extension AppCoordinator: Coordinatable { func start() { self.gateway.getState { [unowned self] (state) in switch state { case .authorization: self.performAuthorizationFlow() case .main: self.performMainFlow() } } } } // MARK:- Private methods func performAuthorizationFlow() { let coordinator = factory.makeAuthorizationCoordinator(with: router) coordinator.finishFlow = { [weak self, weak coordinator] in guard let `self` = self, let `coordinator` = coordinator else { return } self.removeDependency(coordinator) self.start() } addDependency(coordinator) coordinator.start() } func performMainFlow() { // MARK:- main flow logic }
从该示例中,您可以看到AppCoordinator具有路由器,协调器工厂以及AppCoordinator入口点的状态,其作用是确定应用程序的开始流。
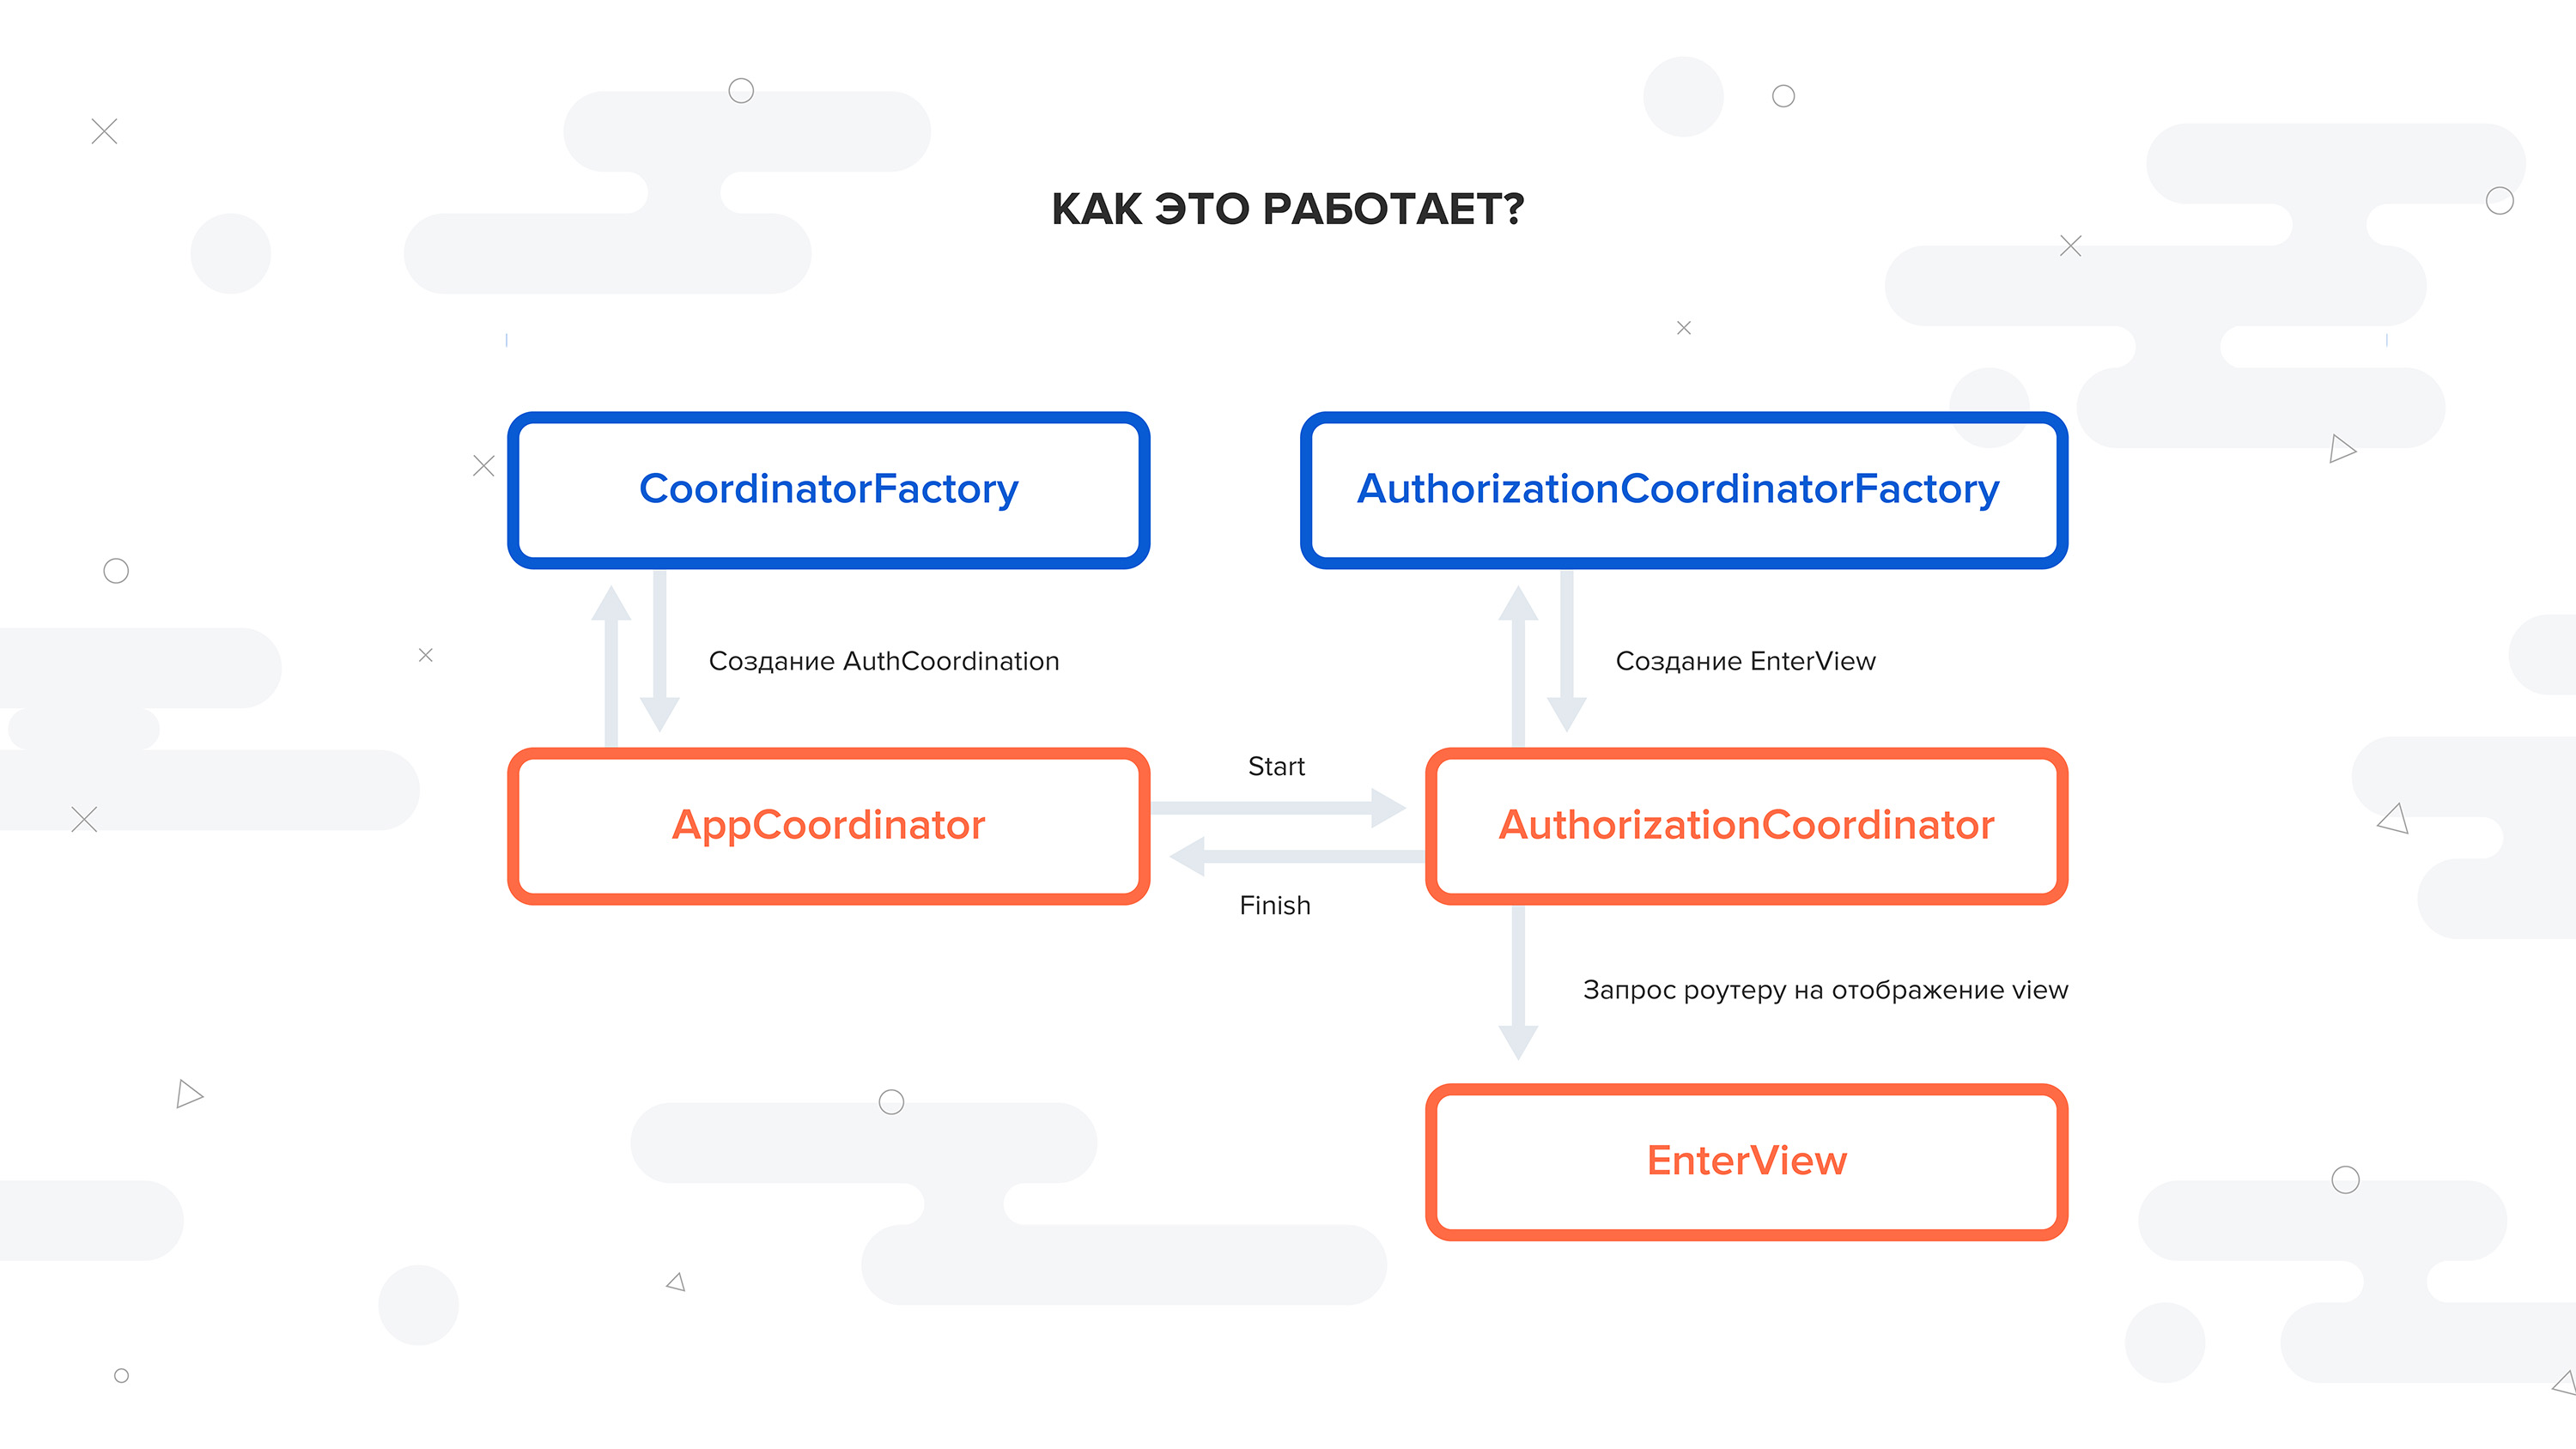
final class CoordinatorFactory { fileprivate let modulesFactory = ModulesFactory() } extension CoordinatorFactory: CoordinatorFactoryProtocol { func makeAuthorizationCoordinator(with router: Routable) -> Coordinatable & AuthorizationCoordinatorOutput { return AuthorizationCoordinator(router: router, factory: modulesFactory) } }
3.实施工厂协调员
每个协调器都由路由器和模块工厂初始化。 此外,每个协调器都必须从基本协调器继承:
class BaseCoordinator { var childCoordinators: [Coordinatable] = [] // Add only unique object func addDependency(_ coordinator: Coordinatable) { for element in childCoordinators { if element === coordinator { return } } childCoordinators.append(coordinator) } func removeDependency(_ coordinator: Coordinatable?) { guard childCoordinators.isEmpty == false, let coordinator = coordinator else { return } for (index, element) in childCoordinators.enumerated() { if element === coordinator { childCoordinators.remove(at: index) break } } } }
BaseCoordinator-一个包含子协调器数组和两个方法的类:Delete和Add协调器依赖项。
4.配置AppDelegate
现在让我们看一下
UIApplicationMain的样子
: @UIApplicationMain class AppDelegate: UIResponder, UIApplicationDelegate { var window: UIWindow? var rootController: UINavigationController { window?.rootViewController = UINavigationController() window?.rootViewController?.view.backgroundColor = .white return window?.rootViewController as! UINavigationController } fileprivate lazy var coordinator: Coordinatable = self.makeCoordinator() func application(_ application: UIApplication, didFinishLaunchingWithOptions launchOptions: [UIApplicationLaunchOptionsKey: Any]?) -> Bool { coordinator.start() return true } }
一旦调用了委托方法didFinishLaunchingWithOptions,就会调用AppCoordinator的start()方法,这将确定应用程序的进一步逻辑。
5.创建一个屏幕模块
为了演示接下来会发生什么,让我们回到AuthorizationCoordinator并实现performFlow()方法。
首先,我们需要在ModulesFactory类中实现AuthorizationFactoryProtocol接口:
final class ModulesFactory {} // MARK:- AuthorizationFactoryProtocol extension ModulesFactory: AuthorizationFactoryProtocol { func makeEnterView() -> EnterViewProtocol { let view: EnterViewController = EnterViewController.controllerFromStoryboard(.authorization) EnterAssembly.assembly(with: view) return view
通常,通过调用模块工厂中的任何方法,我们意味着从情节提要中初始化ViewController,然后在特定体系结构(MVP,MVVM,CleanSwift)中链接此模块的所有必需组件。
经过必要的准备,我们可以实现AuthorizationCoordinator的performFlow()方法。
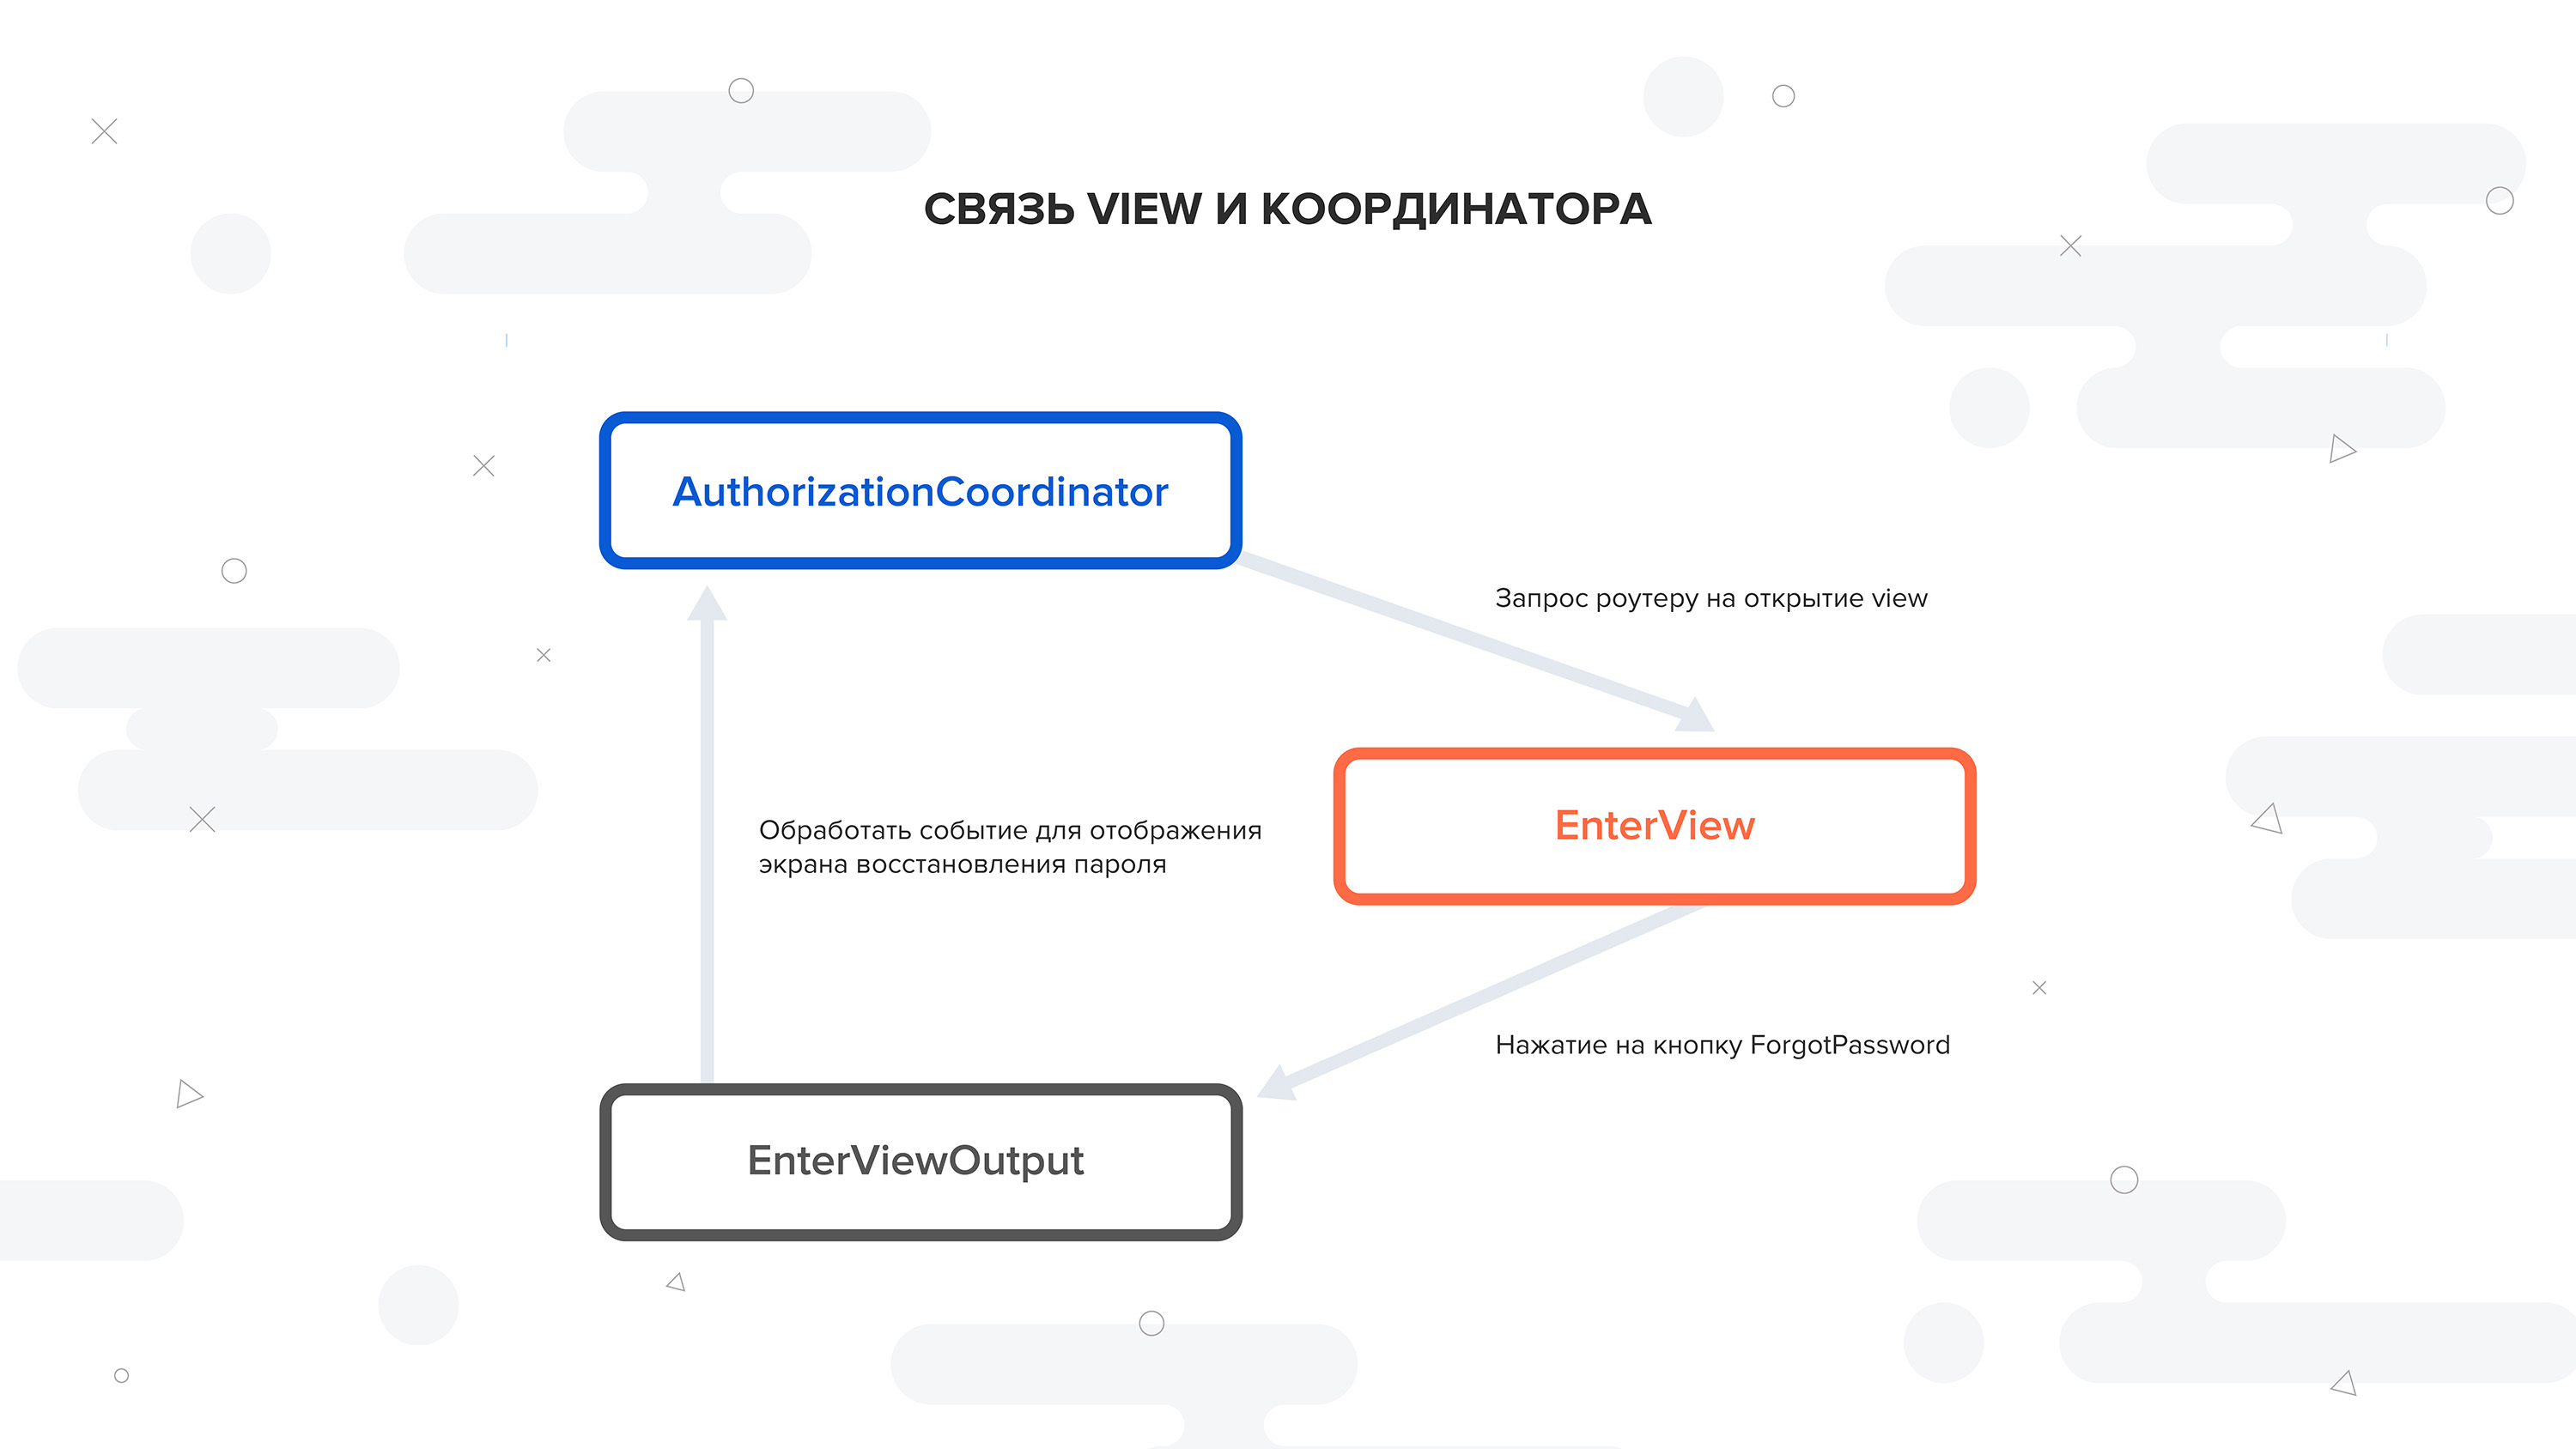
此协调器中的开始屏幕是EnterView。
在performFlow()方法中,使用模块工厂,为给定的协调器调用了一个现成的模块的创建,然后实现了处理我们的视图控制器一次或另一次调用的闭包的逻辑,然后由路由器将该模块设置为屏幕导航堆栈中的根:
private extension AuthorizationCoordinator { func performFlow() { let enterView = factory.makeEnterView() finishFlow = enterView.onCompleteAuthorization enterView.output?.onAlert = { [unowned self] (message: String) in self.router.toPresent?.showAlert(message: message) } router.setRootModule(enterView) } }
尽管在某些地方看似复杂,但这种模式还是处理模拟文件的理想选择,它允许您将模块彼此完全隔离,还可以使我们从UIKit中抽象出来,UIKit非常适合全面测试。 同时,Coordinator并不对应用程序的体系结构施加严格的要求,而只是一种方便的添加,它构造了模块之间的导航,依赖关系和数据流。
链接到github ,其中包含一个基于Clean架构的演示和一个用于创建必要的架构层的便捷Xcode模板。