使用
@ConfigurationProperties定制您的应用程序,以替代使用
@Value 。
在文章中
- 使用ConfigurationProperties通过application.properties设置和更改应用程序功能
- 将application.properties与IDE集成
- 检查设定
此处介绍了两种方法之间的差异
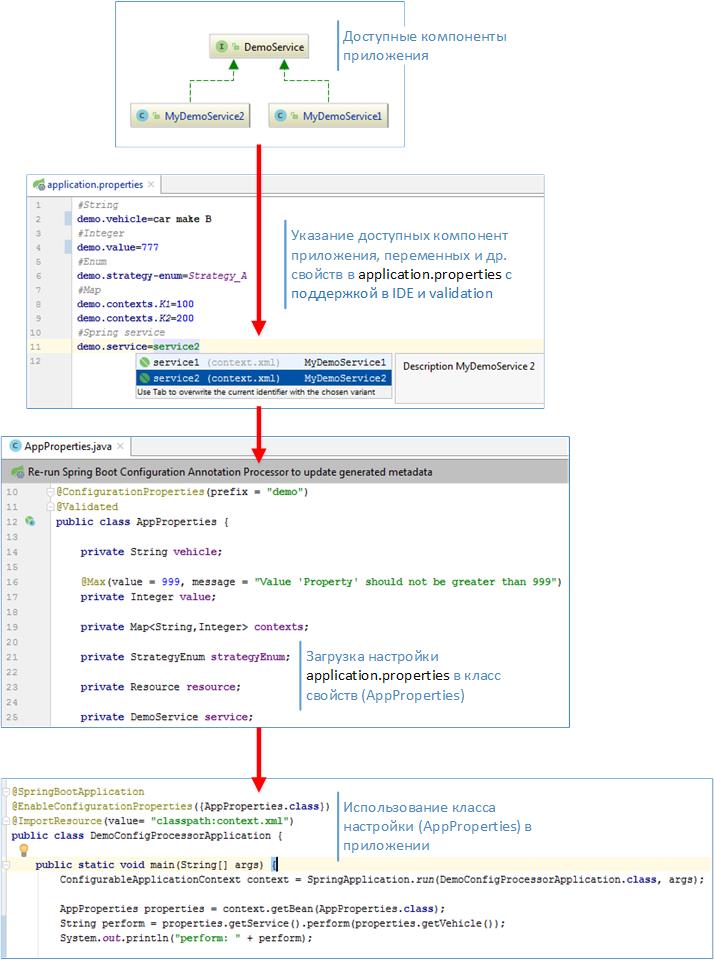
-ConfigurationProperties与 价值在上图中,主要组成和工作原理。 系统的可用组件是Spring组件,可以在application.properties文件中指定类,各种常量,变量等,甚至在开发环境指示时,也将提供选项并进行检查。 当应用程序启动时,将检查指示的值是否符合类型,限制条件,如果一切令人满意,则将启动应用程序。 例如,从可用的Spring组件列表中配置应用程序功能非常方便,下面我将展示如何。
物业类别
要使用ConfigurationProperties创建应用程序设置,可以从属性类开始。 它实际上指示我们要配置的属性和系统组件。
AppProperties.java @ConfigurationProperties(prefix = "demo") @Validated public class AppProperties { private String vehicle; @Max(value = 999, message = "Value 'Property' should not be greater than 999") private Integer value; private Map<String,Integer> contexts; private StrategyEnum strategyEnum; private Resource resource; private DemoService service; public String getVehicle() { return vehicle; } public void setVehicle(String vehicle) { this.vehicle = vehicle; } public Map<String, Integer> getContexts() { return contexts; } public void setContexts(Map<String, Integer> contexts) { this.contexts = contexts; } public StrategyEnum getStrategyEnum() { return strategyEnum; } public void setStrategyEnum(StrategyEnum strategyEnum) { this.strategyEnum = strategyEnum; } public Resource getResource() { return resource; } public void setResource(Resource resource) { this.resource = resource; } public DemoService getService() { return service; } public void setService(DemoService service) { this.service = service; } public Integer getValue() { return value; } public void setValue(Integer value) { this.value = value; } @Override public String toString() { return "MyAppProperties{" + "\nvehicle=" + vehicle + "\n,contexts=" + contexts + "\n,service=" + service + "\n,value=" + value + "\n,strategyEnum=" + strategyEnum + '}'; } }
在类中,将在application.properties中使用prefix =“ demo”作为属性的前缀。
SpringApplication应用程序类和项目pom.xml @SpringBootApplication @EnableConfigurationProperties({AppProperties.class}) @ImportResource(value= "classpath:context.xml") public class DemoConfigProcessorApplication { public static void main(String[] args) { ConfigurableApplicationContext context = SpringApplication.run(DemoConfigProcessorApplication.class, args); AppProperties properties = context.getBean(AppProperties.class); String perform = properties.getService().perform(properties.getVehicle()); System.out.println("perform: " + perform); System.out.println(properties.toString()); } }
<?xml version="1.0" encoding="UTF-8"?> <project xmlns="http://maven.apache.org/POM/4.0.0" xmlns:xsi="http://www.w3.org/2001/XMLSchema-instance" xsi:schemaLocation="http://maven.apache.org/POM/4.0.0 http://maven.apache.org/xsd/maven-4.0.0.xsd"> <modelVersion>4.0.0</modelVersion> <groupId>com.example</groupId> <artifactId>demoConfigProcessor</artifactId> <version>0.0.1-SNAPSHOT</version> <packaging>jar</packaging> <name>demoConfigProcessor</name> <description>Demo project for Spring Boot Configuration Processor</description> <parent> <groupId>org.springframework.boot</groupId> <artifactId>spring-boot-starter-parent</artifactId> <version>2.1.0.RELEASE</version> <relativePath/> </parent> <properties> <project.build.sourceEncoding>UTF-8</project.build.sourceEncoding> <project.reporting.outputEncoding>UTF-8</project.reporting.outputEncoding> <java.version>1.8</java.version> </properties> <dependencies> <dependency> <groupId>org.springframework.boot</groupId> <artifactId>spring-boot-starter</artifactId> </dependency> <dependency> <groupId>org.springframework.boot</groupId> <artifactId>spring-boot-starter-validation</artifactId> </dependency> <dependency> <groupId>org.springframework.boot</groupId> <artifactId>spring-boot-configuration-processor</artifactId> <optional>true</optional> </dependency> <dependency> <groupId>org.springframework.boot</groupId> <artifactId>spring-boot-starter-test</artifactId> <scope>test</scope> </dependency> <dependency> <groupId>com.jayway.jsonpath</groupId> <artifactId>json-path</artifactId> </dependency> </dependencies> <build> <plugins> <plugin> <groupId>org.springframework.boot</groupId> <artifactId>spring-boot-maven-plugin</artifactId> </plugin> </plugins> </build> </project>
然后我宣布了两个弹簧箱
Spring上下文(context.xml) <?xml version="1.0" encoding="UTF-8"?> <beans xmlns="http://www.springframework.org/schema/beans" xmlns:xsi="http://www.w3.org/2001/XMLSchema-instance" xsi:schemaLocation="http://www.springframework.org/schema/beans http://www.springframework.org/schema/beans/spring-beans.xsd"> <bean id="service1" class="com.example.demoConfigProcessor.MyDemoService1"> <description>Description MyDemoService 1</description> </bean> <bean id="service2" class="com.example.demoConfigProcessor.MyDemoService2"> <description>Description MyDemoService 2</description> </bean> </beans>
在AppProperties类中,我指示了一些可用应用程序服务的链接,我将在application.properties中对其进行更改,将有两个实现,并在application.properties中连接其中之一。
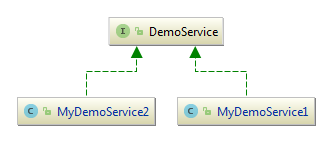
这是它们的实现
演示服务 public interface DemoService { String perform(String value); }
public class MyDemoService1 implements DemoService { @Override public String perform(String value) { return "Service №1: perform routine maintenance work on <" + value +">"; } }
public class MyDemoService2 implements DemoService { @Override public String perform(String value) { return "Service №2: perform routine maintenance work on <" + value +">"; } }
现在这足以开始自定义application.properties。 但是,只要使用ConfigurationProperties对类进行了更改,就需要
重新生成项目,此后文件将出现在项目中
\target\classes\META-INF\spring-configuration-metadata.json 。 实际上,其IDE用于在application.properties文件中进行编辑。 我将在材料链接中指出其结构。 该文件将基于AppProperties类创建。 如果现在打开application.properties文件并开始输入“ demo”,则环境将开始显示可用属性

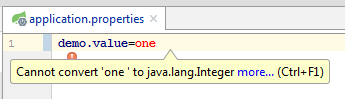
如果尝试输入错误的类型,IDE将报告
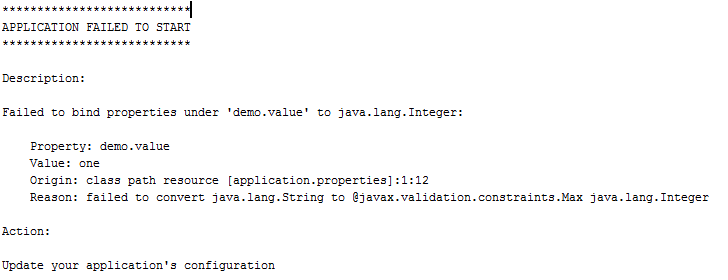
即使您保持原样并尝试启动应用程序,也将出现完全不同的错误
添加其他元数据
其他元数据,仅是为了方便在IDE中使用application.properties,如果没有必要,则不能这样做。 为此,可以在其他文件中为环境指定提示和其他信息。 为此,将创建的spring-configuration-metadata.json文件复制到
\src\main\resources\META-INF\并将其重命名为
additional-spring-configuration-metadata.json 。 在此文件中,我只会对提示部分感兴趣:[]
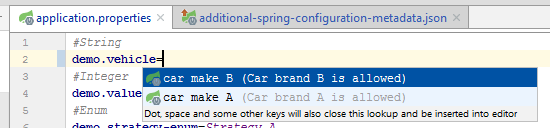
在其中可以列出例如demo.vehicle的有效值
"hints": [ { "name": "demo.vehicle", "values": [ { "value": "car make A", "description": "Car brand A is allowed." }, { "value": "car make B", "description": "Car brand B is allowed." } ] }]
在“名称”字段中,指示属性“ demo.vehicle”,在“值”中指示有效值的列表。 现在,如果我重建项目并转到application.properties文件,那么当我进入demo.vehicle时,我会得到一个有效值的列表
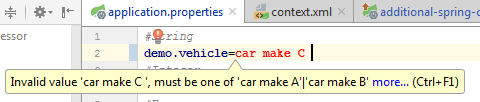
当您输入与建议的类型不同但类型相同的类型时,编辑器将突出显示,但是在这种情况下应用程序将启动,因为这不是严格的限制,而只是提示。
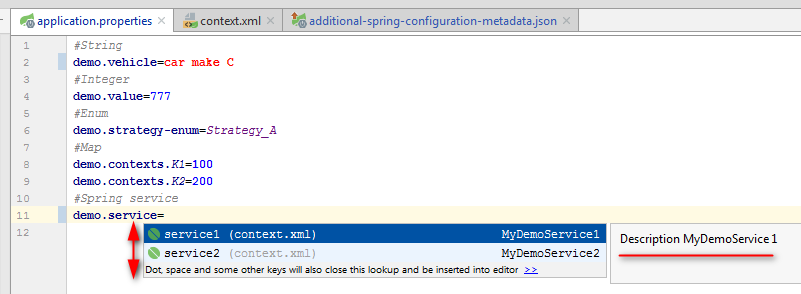
在项目的早期,我宣布了两个服务MyDemoService1和MyDemoService2,它们都实现了DemoService接口,现在您可以对其进行配置,以便只有实现此接口的服务才能被application.properties访问,因此,在AppProperties类中初始化了所选的类。 为此,有提供者,您可以在Additional-spring-configuration-metadata中指定它们。 在文档中可以找到几种类型的提供程序,我将展示其中一个示例
spring-bean-reference 。 此类型显示当前项目中可用bean的名称。 该列表仅限于基类或接口。
DemoService的提供程序示例:
"hints": [ { "name": "demo.service", "providers": [ { "name": "spring-bean-reference", "parameters": { "target": "com.example.demoConfigProcessor.DemoService" } } ] } ]
之后,在demo.service参数的application.properties中,将有两个服务可用,您可以看到它们的描述(来自定义的描述)。
现在可以方便地选择合适的服务,更改应用程序的功能。 对象设置有一点,Spring需要一些帮助,将设置中指定的字符串转换为对象。 为此,从Converter继承了一个小类。
服务转换器 @Component @ConfigurationPropertiesBinding public class ServiceConverter implements Converter<String, DemoService> { @Autowired private ApplicationContext applicationContext; @Override public DemoService convert(String source) { return (DemoService) applicationContext.getBean(source); } }
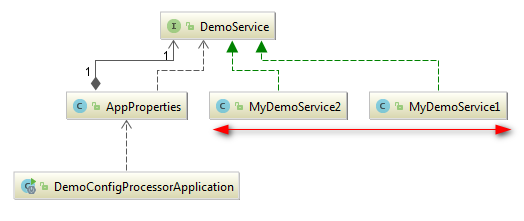
项目类图显示了如何将这些服务与主应用程序分离并通过AppProperty访问。
验证属性
在AppProperties类的字段中,您可以添加在JSR 303框架内可用的检查。 这将产生一个可验证的,方便的应用程序配置文件。
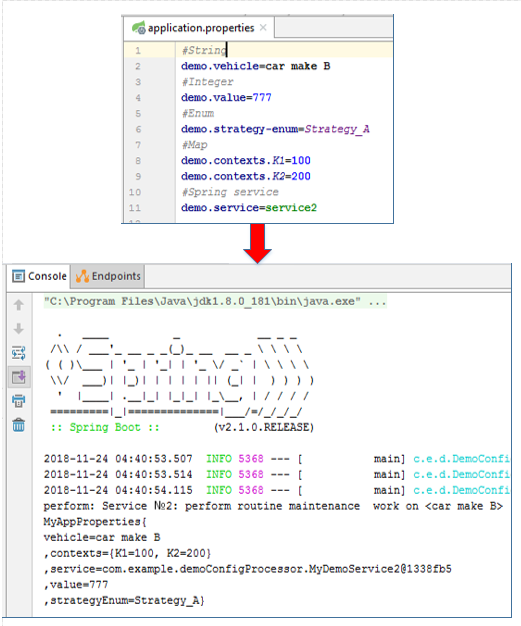
控制台输出
项目结构

完整档案Additional-spring-configuration-metadata.json
附加弹簧配置元数据 { "groups": [ { "name": "demo", "type": "com.example.demoConfigProcessor.AppProperties", "sourceType": "com.example.demoConfigProcessor.AppProperties" } ], "properties": [ { "name": "demo.contexts", "type": "java.util.Map<java.lang.String,java.lang.Integer>", "sourceType": "com.example.demoConfigProcessor.AppProperties" }, { "name": "demo.vehicle", "type": "java.lang.String", "sourceType": "com.example.demoConfigProcessor.AppProperties" } ], "hints": [ { "name": "demo.vehicle", "values": [ { "value": "car make A", "description": "Car brand A is allowed." }, { "value": "car make B", "description": "Car brand B is allowed." } ] }, { "name": "demo.service", "providers": [ { "name": "spring-bean-reference", "parameters": { "target": "com.example.demoConfigProcessor.DemoService" } } ] } ] }
配置元数据资料