下午好,我提请您注意Swift中PDF的文章翻译。
任何有兴趣的人,欢迎来猫。
我正在开发一个应能够下载PDF文件,保存它们并打开它们的应用程序。 对于此任务,您需要执行3个步骤:
步骤1. DownloadTask要通过URL下载文件,必须使用downloadTask。 还必须跟踪文件的移动位置,因此观察者(在我的情况下为
ViewController )必须支持
URLSessionDownloadDelegate 。
import UIKit class ViewController: UIViewController { override func viewDidLoad() { super.viewDidLoad() } @IBAction func downloadButtonPressed(_ sender: Any) { guard let url = URL(string: "https://www.tutorialspoint.com/swift/swift_tutorial.pdf") else { return } let urlSession = URLSession(configuration: .default, delegate: self, delegateQueue: OperationQueue()) let downloadTask = urlSession.downloadTask(with: url) downloadTask.resume() } } extension ViewController: URLSessionDownloadDelegate { func urlSession(_ session: URLSession, downloadTask: URLSessionDownloadTask, didFinishDownloadingTo location: URL) { print("downloadLocation:", location) } }
为了了解文件的保存位置,只需在Xcode控制台中打印
位置变量的输出即可。
单击“下载”按钮后,文件在不到一秒钟的时间内下载完毕,然后被系统杀死。 在模拟器和真实设备上都会重复此行为。
 步骤2.文件管理
iOS中的每个应用程序都有其自己的测试环境。 其中包含每个iOS开发人员应了解的3个组件:捆绑容器,数据容器和iCloud容器。 在本文中,我们将仅更详细地考虑数据容器,因为在执行任务(下载PDF文件)时将需要它。
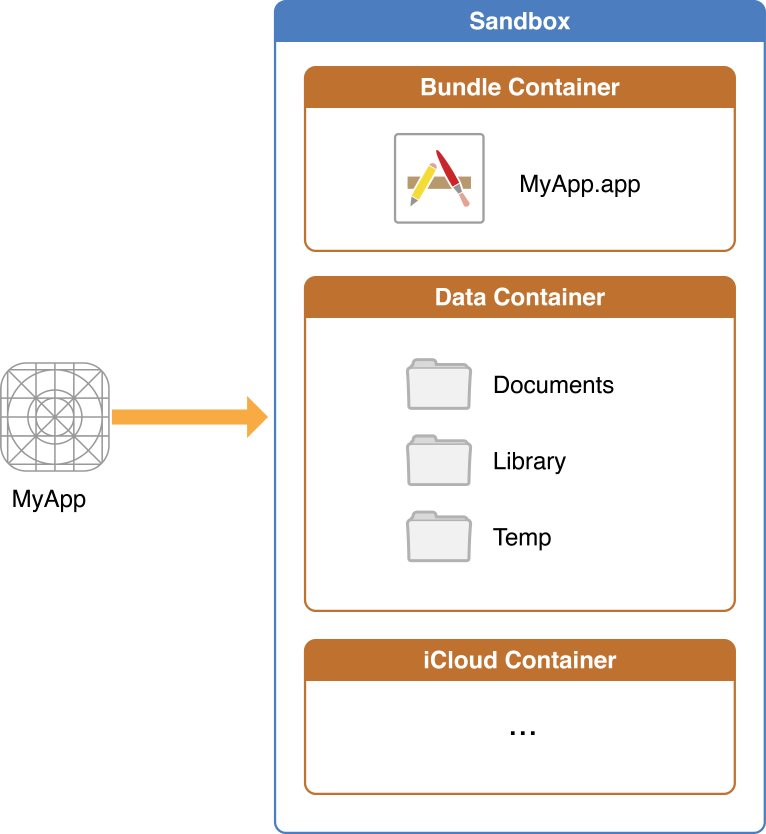
使用数据容器,我们可以管理从Internet保存的文件。 在下面,我将列出重要的属性:
- 库中的文件以及tmp文件将被自动删除
- iTunes会备份所有文件,但缓存,tmp和指定为.isExcludedFromBackup = true的文件除外。 在应用程序审查期间,如果Apple在iTines中发现不应保存的文件,则很可能该应用程序将被拒绝。
- 保存的文件必须存储在Documents中 。
接下来,我们的下一步是将文件从tmp保存到Documents。 这是我所做的:
- 我复制了pdf文件的名称
- 在文件中建立网址
- 删除了具有相同名称的文件,以避免复制错误: “ CFNetworkDownload_mdrFNb.tmp”无法复制到“文档”,因为已经存在具有相同名称的项目。
- 将文件复制到文档。
extension ViewController: URLSessionDownloadDelegate { func urlSession(_ session: URLSession, downloadTask: URLSessionDownloadTask, didFinishDownloadingTo location: URL) { print("downloadLocation:", location)
 步骤3. PDFView
因此,我们移动了PDF文件,现在用户可以访问它了。 现在,让我们弄清楚如何使用内置于iOS 11中的Apple便捷框架PDFKit内置的PDFView打开它。
尽管许多PDFKit教程使用
情节提要通过UIView属性创建PDFView,但这不能通过
Xibs完成。 因此,我将通过代码创建它。
@IBAction func openPDFButtonPressed(_ sender: Any) { let pdfViewController = PDFViewController() pdfViewController.pdfURL = self.pdfURL present(pdfViewController, animated: false, completion: nil) }
import UIKit import PDFKit class PDFViewController: UIViewController { var pdfView = PDFView() var pdfURL: URL! override func viewDidLoad() { super.viewDidLoad() view.addSubview(pdfView) if let document = PDFDocument(url: pdfURL) { pdfView.document = document } DispatchQueue.main.asyncAfter(deadline: .now()+3) { self.dismiss(animated: true, completion: nil) } } override func viewDidLayoutSubviews() { pdfView.frame = view.frame } }
瞧! 我们提取并打开了PDF文件。 我知道这本书的格式有些不同,这就是为什么我们
在下一篇文章中将更
详细地介绍PDFKit的原因。