在Python中使用深度学习创建人脸识别模型

专为Netology的翻译Elena Bornovolokova改编 Fayzan Shaykh 的文章,内容涉及如何创建面部识别模型以及可以在哪些领域应用。

引言


近年来,计算机视觉已普及并在另一个方向上脱颖而出。 开发人员正在创建在世界各地使用的新应用程序。
在这个方向上,我被开源的概念所吸引。 即使是技术巨头,也随时准备与所有人共享新发现和创新,以使技术不会成为富人的特权。

这些技术之一是面部识别。 如果正确并符合道德规范使用,则该技术可以应用于生活的许多领域。

在本文中,我将向您展示如何使用开源工具创建有效的人脸识别算法。 在继续了解这些信息之前,我希望您通过观看以下视频来做好准备并从中得到启发:


人脸识别:潜在的应用


这是人脸识别技术的一些潜在应用领域。

社交网络中的人脸识别 。 Facebook用自动生成的标签建议取代了图像的手动标记,该建议是针对上传到平台的每个图像。 Facebook使用一种简单的面部识别算法来分析图像中的像素并将其与各自的用户进行比较。

安全中的人脸识别 。 使用面部识别技术保护个人数据的一个简单示例是“在面部”解锁智能手机。 该技术也可以在访问系统中实现:一个人看着摄像机,并确定是否进入摄像机。


人脸识别算人数 。 人脸识别技术可用于计算参加活动(例如会议或音乐会)的人数。 代替手动计数参与者,我们安装了可以捕获参与者面部图像并给出访问者总数的摄像机。 这将有助于使过程自动化并节省时间。


系统设置程序:硬件和软件要求


通过联系我们可用的开源工具来考虑我们如何使用面部识别技术。

我使用了以下推荐给您的工具:

  • 网络摄像头(Logitech C920),用于在Lenovo E470 ThinkPad笔记本电脑(Core i5第7代)上构建实时面部识别模型。 您也可以将笔记本电脑的内置摄像头或便携式摄像机与任何合适的系统配合使用,以进行实时视频分析,而无需使用我以前使用的系统。
  • 最好使用图形处理器进行更快的视频处理。
  • 我们将Ubuntu 18.04操作系统与所有必需的软件一起使用。

在继续构建人脸识别模型之前,我们将更详细地分析这些点。
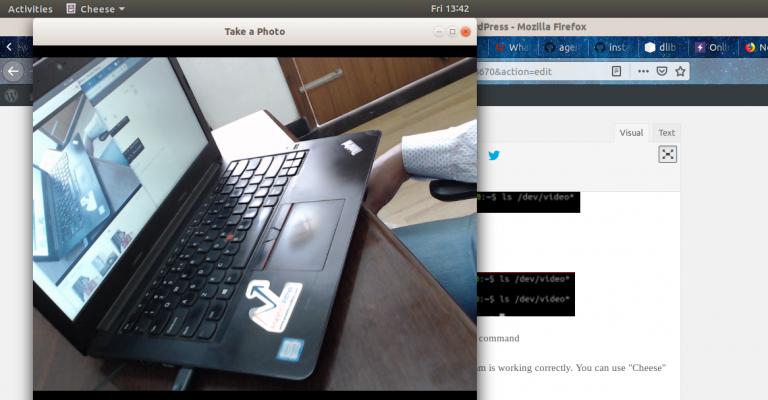
步骤1:硬件设定


检查相机配置是否正确。 使用Ubuntu,这很简单:查看设备是否被操作系统识别。 为此,请按照下列步骤操作:

  1. 在将网络摄像头连接到笔记本电脑之前,请在命令提示符下键入ls /dev/video* ,检查所有已连接的视频设备。 结果,将显示连接到系统的所有视频设备的列表。
  2. 连接网络摄像头,然后再次发出命令。 如果网络摄像头连接正确,则该命令将反映新设备。
  3. 您也可以使用网络摄像头软件来验证其正确操作。 Ubuntu可以为此使用Cheese程序。

步骤2:软件设定


步骤2.1:安装Python

本文中的代码是使用Python(3.5版)编写的。 要安装Python,我建议使用Anaconda (一种流行的Python发行版,用于处理和分析数据)。

步骤2.2:安装OpenCV

OpenCV是一个开放源代码库,旨在创建计算机视觉应用程序。 使用pip完成OpenCV的安装:

 pip3 install opencv-python 

步骤2.3:设置face_recognition API

我们将使用face_recognition API ,它被认为是世界上最简单的Python人脸识别API。 要安装,请使用:

 pip install dlib pip install face_recognition 

实作


设置系统后,我们继续执行。 首先,我们将创建一个程序,然后说明我们做了什么。

演练


创建一个face_detector.py文件,然后复制以下代码:

 # import libraries import cv2 import face_recognition # Get a reference to webcam video_capture = cv2.VideoCapture("/dev/video1") # Initialize variables face_locations = [] while True: # Grab a single frame of video ret, frame = video_capture.read() # Convert the image from BGR color (which OpenCV uses) to RGB color (which face_recognition uses) rgb_frame = frame[:, :, ::-1] # Find all the faces in the current frame of video face_locations = face_recognition.face_locations(rgb_frame) # Display the results for top, right, bottom, left in face_locations:  # Draw a box around the face  cv2.rectangle(frame, (left, top), (right, bottom), (0, 0, 255), 2) # Display the resulting image cv2.imshow('Video', frame) # Hit 'q' on the keyboard to quit! if cv2.waitKey(1) & 0xFF == ord('q'):  break # Release handle to the webcam video_capture.release() cv2.destroyAllWindows() 

然后输入以下内容运行此Python文件:

 python face_detector.py 

如果一切正常,将打开一个新窗口,其中会实时启动人脸识别模式。


总结和解释我们的代码做了什么:

  1. 首先,我们指出了将在其上分析视频的硬件
  2. 然后,我们逐帧制作了实时视频
  3. 然后处理每一帧,提取图像中所有脸部位置
  4. 结果, 这些帧以视频的形式与面部位置的指示一起被再现

人脸识别应用实例


这并不是所有乐趣的结局。 我们将做另外一件很酷的事情:我们将基于上面的代码创建一个完整的应用程序示例。 我们将对代码进行少量更改,一切准备就绪。

假设您要使用便携式摄像机创建一个自动系统来跟踪扬声器当前所在的位置。 根据其位置,系统会旋转摄像头,以使扬声器始终位于框架的中央。
第一步是创建一个系统,该系统可以识别视频中的一个或多个人,并着眼于讲话者的位置。


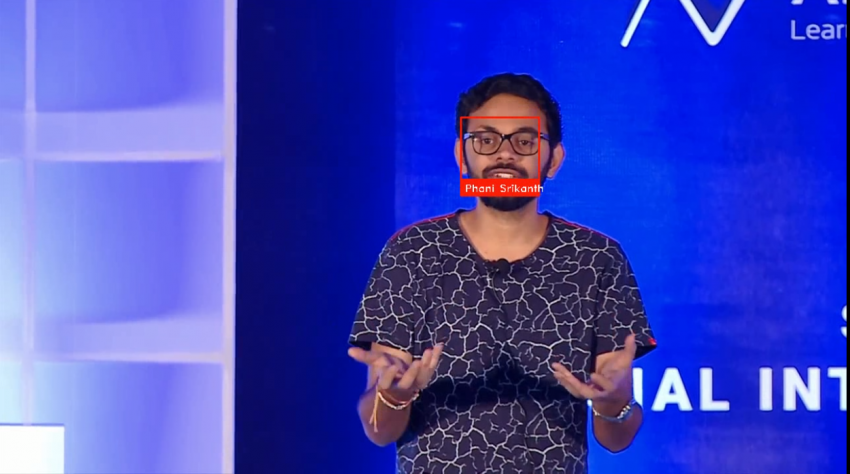
让我们弄清楚如何做。 例如,我选择了YouTube上的视频,并有DataHack Summit 2017会议演讲者的演讲。

首先,导入必要的库:

 import cv2 import face_recognition 

然后,我们阅读视频并设置长度:

 input_movie = cv2.VideoCapture("sample_video.mp4") length = int(input_movie.get(cv2.CAP_PROP_FRAME_COUNT)) 

然后,我们创建一个输出文件,其分辨率和帧速率与输入文件中的分辨率和帧率相似。

我们将扬声器图像作为样本加载,以便在视频上进行识别:

 image = face_recognition.load_image_file("sample_image.jpeg") face_encoding = face_recognition.face_encodings(image)[0] known_faces = [ face_encoding, ] 

完成后,我们将开始以下循环:

  • 从视频中提取帧。
  • 找到所有面孔并识别它们。
  • 创建一个新视频,该视频将原始帧与说话者面部的位置与签名结合在一起。

让我们看一下将执行此代码的代码:

 # Initialize variables face_locations = [] face_encodings = [] face_names = [] frame_number = 0 while True: # Grab a single frame of video ret, frame = input_movie.read() frame_number += 1 # Quit when the input video file ends if not ret:  break # Convert the image from BGR color (which OpenCV uses) to RGB color (which face_recognition uses) rgb_frame = frame[:, :, ::-1] # Find all the faces and face encodings in the current frame of video face_locations = face_recognition.face_locations(rgb_frame, model="cnn") face_encodings = face_recognition.face_encodings(rgb_frame, face_locations) face_names = [] for face_encoding in face_encodings:  # See if the face is a match for the known face(s)  match = face_recognition.compare_faces(known_faces, face_encoding, tolerance=0.50)  name = None  if match[0]:      name = "Phani Srikant"  face_names.append(name) # Label the results for (top, right, bottom, left), name in zip(face_locations, face_names):  if not name:      continue      # Draw a box around the face  cv2.rectangle(frame, (left, top), (right, bottom), (0, 0, 255), 2)  # Draw a label with a name below the face  cv2.rectangle(frame, (left, bottom - 25), (right, bottom), (0, 0, 255), cv2.FILLED)       font = cv2.FONT_HERSHEY_DUPLEX  cv2.putText(frame, name, (left + 6, bottom - 6), font, 0.5, (255, 255, 255), 1) # Write the resulting image to the output video file print("Writing frame {} / {}".format(frame_number, length)) output_movie.write(frame) # All done! input_movie.release() cv2.destroyAllWindows() 

该代码将为您提供以下结果:


来自编辑


有关该主题的网络学课程:

Source: https://habr.com/ru/post/zh-CN434354/


All Articles