“他又做了一次!”-这是我看着皮克斯传单
[1]的背面时想到的第一件事,传单完全充满了代码。 在右下角,由安德鲁·肯斯勒(Andrew Kensler)签名了一组构造和表达。 对于那些不认识他的人,我会说:Andrew是一位程序员,他于2009年发明了1337字节
名片大小的射线追踪器 。
这次,安德鲁想出了很多东西,但视觉效果却更有趣。 自从我写完有关
Wolf3D和
DOOM的游戏引擎黑皮书
以来 ,我就有时间学习其隐秘代码的
内幕 。 几乎立即,我对他身上发现的技术着迷了。 它们与安德鲁以前的工作完全不同,后者基于“标准”射线追踪器。 我感兴趣的是了解射线行进,构造体积几何的功能,蒙特卡洛渲染/路径跟踪以及他用来将代码压缩到这么小的纸上的许多其他技巧。
源代码
传单的正面是皮克斯招聘部门的广告。 在背面,打印了2037个字节的C ++代码,它们经过混淆处理以占据尽可能小的表面。
#include <stdlib.h> // card > pixar.ppm #include <stdio.h> #include <math.h> #define R return #define O operator typedef float F;typedef int I;struct V{F x,y,z;V(F v=0){x=y=z=v;}V(F a,F b,F c=0){x=a;y=b;z=c;}V O+(V r){RV(x+rx,y+ry,z+rz);}VO*(V r){RV(x*rx,y*r. y,z*rz);}FO%(V r){R x*r.x+y*r.y+z*rz;}VO!(){R*this*(1/sqrtf(*this%*this) );}};FL(F l,F r){R l<r?l:r;}FU(){R(F)rand()/RAND_MAX;}FB(V p,V l,V h){l=p +l*-1;h=h+p*-1;RL(L(L(lx,hx),L(ly,hy)),L(lz,hz));}FS(V p,I&m){F d=1\ e9;V f=p;fz=0;char l[]="5O5_5W9W5_9_COC_AOEOA_E_IOQ_I_QOUOY_Y_]OWW[WaOa_aW\ eWa_e_cWiO";for(I i=0;i<60;i+=4){V b=V(l[i]-79,l[i+1]-79)*.5,e=V(l[i+2]-79,l [i+3]-79)*.5+b*-1,o=f+(b+e*L(-L((b+f*-1)%e/(e%e),0),1))*-1;d=L(d,o%o);}d=sq\ rtf(d);V a[]={V(-11,6),V(11,6)};for(I i=2;i--;){V o=f+a[i]*-1;d=L(d,ox>0?f\ absf(sqrtf(o%o)-2):(o.y+=oy>0?-2:2,sqrtf(o%o)));}d=powf(powf(d,8)+powf(pz, 8),.125)-.5;m=1;F r=L(-L(B(p,V(-30,-.5,-30),V(30,18,30)),B(p,V(-25,17,-25),V (25,20,25))),B(V(fmodf(fabsf(px),8),py,pz),V(1.5,18.5,-25),V(6.5,20,25))) ;if(r<d)d=r,m=2;F s=19.9-py;if(s<d)d=s,m=3;R d;}IM(V o,V d,V&h,V&n){I m,s= 0;F t=0,c;for(;t<100;t+=c)if((c=S(h=o+d*t,m))<.01||++s>99)R n=!V(S(h+V(.01,0 ),s)-c,S(h+V(0,.01),s)-c,S(h+V(0,0,.01),s)-c),m;R 0;}VT(V o,V d){V h,n,r,t= 1,l(!V(.6,.6,1));for(I b=3;b--;){I m=M(o,d,h,n);if(!m)break;if(m==1){d=d+n*( n%d*-2);o=h+d*.1;t=t*.2;}if(m==2){F i=n%l,p=6.283185*U(),c=U(),s=sqrtf(1-c), g=nz<0?-1:1,u=-1/(g+nz),v=nx*ny*u;d=V(v,g+ny*ny*u,-ny)*(cosf(p)*s)+V( 1+g*nx*nx*u,g*v,-g*nx)*(sinf(p)*s)+n*sqrtf(c);o=h+d*.1;t=t*.2;if(i>0&&M(h +n*.1,l,h,n)==3)r=r+t*V(500,400,100)*i;}if(m==3){r=r+t*V(50,80,100);break;}} R r;}I main(){I w=960,h=540,s=16;V e(-22,5,25),g=!(V(-3,4,0)+e*-1),l=!V(gz, 0,-gx)*(1./w),u(gy*lz-gz*ly,gz*lx-gx*lz,gx*ly-gy*lx);printf("P\ 6 %d %d 255 ",w,h);for(I y=h;y--;)for(I x=w;x--;){V c;for(I p=s;p--;)c=c+T(e ,!(g+l*(xw/2+U())+u*(yh/2+U())));c=c*(1./s)+14./241;V o=c+1;c=V(cx/ox,c. y/oy,cz/oz)*255;printf("%c%c%c",(I)cx,(I)cy,(I)cz);}}// Andrew Kensler
他甚至工作吗?
有了代码,便有一个启动说明。 这个想法是将标准输出重定向到文件。 通过扩展,我们可以假设输出格式是一种称为NetPBM
[2]的文本图像格式。
  $ clang -o card2 -O3 raytracer.cpp
 $时间./card> pixar.ppm

真实2m58.524s
用户2m57.567s
 sys 0m0.415s
在2分58秒
[3]之后 ,将生成以下图像。 令人惊讶的是,几乎不需要多少代码。
您可以从上图中提取很多内容。 坚韧是“路径追踪器”的明显标志。 这种类型的渲染器与射线跟踪的不同之处在于,射线不会追溯到光源。 在这种方法中,每个像素从光源发射出数千条光线,程序对其进行监视,希望它们能够找到光源。 这是一种有趣的技术,它比光线跟踪好得多,它可以处理环境光遮挡,柔和阴影,焦散和放射线的渲染。
我们将把代码分成几部分
将输入传递给CLion会格式化代码(请参阅
此处的输出),并将其分成较小的部分/任务。
  #include <stdlib.h> //卡> pixar.ppm
  #include <stdio.h>
  #include <math.h>
  #定义R返回
  #定义O运算符
  typedef float F; typedef int I;
  结构V {F x,y,z; V(F v = 0){x = y = z = v;} V(F a,F b,F
  c = 0){x = a; y = b; z = c;} V O +(V r){RV(x + rx,y + ry,z + rz);} VO *(V r){RV( x * rx,y * r。
  y,z * rz);} FO%(V r){R x * r.x + y * r.y + z * rz;} VO!(){R *此*(1 / sqrtf(*此% *这个)
  );}};
FL(F l,F r){R l <r?L:r;} FU(){R(F)rand()/ RAND_MAX;} FB(V p,V l,V h){l = p
+ l * -1; h = h + p * -1; RL(L(L(L(lx,hx),L(ly,hy)),L(lz,hz));} FS(V p,I&m){F d = 1 \
e9; V f = p; fz = 0; char l [] =“ 5O5_5W9W5_9_COC_AOEOA_E_IOQ_I_QOUOY_Y_] OWW [WaOa_aW \
eWa_e_cWiO“;对于(I i = 0; i <60; i + = 4){V b = V(l [i] -79,l [i + 1] -79)*。5,e = V(l [ i + 2] -79,l
[i + 3] -79)*。5 + b * -1,o = f +(b + e * L(-L((b + f * -1)%e /(e%e),0), 1))*-1; d = L(d,o%o);} d = sq \
rtf(d); V a [] = {V(-11.6),V(11.6)};对于(I i = 2; i-;){V o = f + a [i] * -1; d = L(d,ox> 0?F \
absf(sqrtf(o%o)-2):( o.y + = oy> 0?-2:2,sqrtf(o%o)));} d = powf(powf(d,8)+ powf(pz ,
8),. 125)-.5; m = 1; F r = L(-L(B(p,V(-30,-。5,-30),V(30,18,30)),B (p,V(-25.17,-25),V
(25,20,25))),B(V(fmodf(fabsf(px),8),py,pz),V(1.5,18.5,-25),V(6.5,20,25)))
;如果(r <d)d = r,m = 2; F s = 19.9-py;如果(s <d)d = s,m = 3; R d;} IM(V o,V d,V&h,V&n){I m,s =
0; F t = 0,c;对于(; t <100; t + = c)如果((c = S(h = o + d * t,m))<。01 || ++ s> 99)R n =!V(S(h + V(.01,0
),s)-c,S(h + V(0,.01),s)-c,S(h + V(0,0,.01),s)-c),m; R 0;} VT(V o,V d){V h,n,r,t =
1,l(!V(.6,.6,1));对于(I b = 3; b-;){I m = M(o,d,h,n);如果(!M)中断; if(m == 1){d = d + n *(
n%d * -2); o = h + d * .1; t = t * .2;}如果(m == 2){F i = n%l,p = 6.283185 * U(),c = U(),s = sqrtf(1-c),
g = nz <0?-1:1,u = -1 /(g + nz),v = nx * ny * u; d = V(v,g + ny * ny * u,-ny)*(cosf (p)* s)+ V(
1 + g * nx * nx * u,g * v,-g * nx)*(sinf(p)* s)+ n * sqrtf(c); o = h + d * .1; t = t *。 2;如果(i> 0 && M(h
+ n * .1,l,h,n)== 3)r = r + t * V(500,400,100)* i;} if(m == 3){r = r + t * V(50,80,100) ; break;}}
R r;} I main(){I w = 960,h = 540,s = 16; V e(-22,5,25),g =!(V(-3,4,0)+ e * -1),l =!V(gz,
0,-gx)*(1./w),u(gy * lz-gz * ly,gz * lx-gx * lz,gx * ly-gy * lx); printf(“ P \
6%d%d 255“,w,h);对于(I y = h; y-;)对于(I x = w; x-;){V c;对于(I p = s; p- -;)c = c + T(e
,!(g + l *(xw / 2 + U())+ u *(yh / 2 + U())))); c = c *(1./s)+ 14/241; V o = c +1; c = V(cx / ox,c。
y / oy,cz / oz)* 255; printf(“%c%c%c”,(I)cx,(I)cy,(I)cz);}} //安德鲁·肯斯勒(Andrew Kensler)
本文其余部分将详细介绍每个部分:
■ -普通技巧,
■ -矢量类,
■ -辅助代码,
■ -数据库,
■ -射线行进,
■ -采样,
■ -主代码。
#define和typedef的常见技巧
常见的技巧是使用#define和typedef来显着减少代码量。 在这里,我们表示F =浮点数,I =整数,R =返回值,以及O =运算符。 逆向工程是微不足道的。
V级
接下来是V类,我将其重命名为Vec(尽管,正如我们将在下面看到的那样,它也用于以浮点格式存储RGB通道)。
struct Vec { float x, y, z; Vec(float v = 0) { x = y = z = v; } Vec(float a, float b, float c = 0) { x = a; y = b; z = c;} Vec operator+(Vec r) { return Vec(x + rx, y + ry, z + rz); } Vec operator*(Vec r) { return Vec(x * rx, y * ry, z * rz); }
请注意,没有减法运算符(-),因此不是使用“ X = A-B”,而是使用“ X = A + B * -1”。 平方根反数在以后方便使用以标准化向量。
主要功能
main()是唯一无法混淆的字符,因为它是由libc库的_start函数调用的。 通常值得一开始,因为这样做会更容易。 我花了一段时间才弄清首字母的含义,但仍然设法创建了可读的东西。
int main() { int w = 960, h = 540, samplesCount = 16; Vec position(-22, 5, 25); Vec goal = !(Vec(-3, 4, 0) + position * -1); Vec left = !Vec(goal.z, 0, -goal.x) * (1. / w);
请注意,浮点文字不包含字母“ f”,并且小数部分被丢弃以节省空间。 下面使用相同的技巧,其中删除整数部分(浮点数x = 0.5)。 同样不寻常的是在中断条件内插入了迭代表达式的“ for”构造。
这是光线/路径跟踪器的相当标准的主要功能。 在此设置相机矢量,并为每个像素发射光线。 光线追踪器和路径追踪器之间的区别在于,TP中的每个像素发射了几条光线,这些光线随机地随机移动。 然后,在三个浮动通道R,B,G中累积为像素中的每条射线获得的颜色。 最后,对Reinhardt方法的结果进行色调校正。
最重要的部分是sampleCount,理论上可以将其设置为1以加快渲染和迭代速度。 以下是样本渲染,样本值介于1到2048之间。
扰流板方向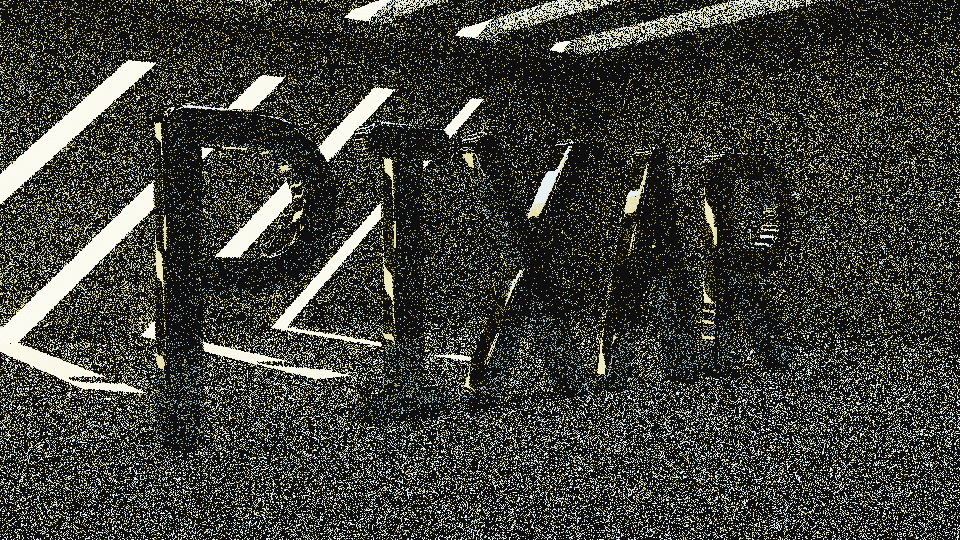
1个

2

4

8

16

32

64

128

256

512

1024

2048
帮手代码
另一段简单的代码是助手功能。 在这种情况下,我们有一个琐碎的函数min(),一个在[0,1]区间内的随机值生成器以及一个更有趣的boxTest(),它是用于切割世界的构造实体几何(CSG)系统的一部分。 下一节将讨论CSG。
float min(float l, float r) { return l < r ? l : r; } float randomVal() { return (float) rand() / RAND_MAX; }
构造体积几何的功能
代码中没有顶点。 一切都使用CSG功能完成。 如果您不熟悉它们,只需说这些是描述坐标是在对象内部还是外部的函数。 如果函数返回正距离,则该点在对象内部。 负距离表示该点在对象外部。 有许多用于描述不同对象的函数,但是为了简化起见,让我们以一个球体和两个点A和B为例。
testSphere()函数对于点A(即在外部)返回-1,对于点B(即在内部)返回1。 远处的符号只是一个技巧,它使您可以获得两条信息,而不是单个值的信息。 可以编写类似类型的函数来描述平行四边形(这正是在BoxTest函数中执行的操作)。
现在让我们看看如果翻转返回值的符号会发生什么。
现在我们不描述实体,而是将整个世界声明为实体并在其中切出空白。 功能可以用作建筑用砖,将其组合起来可以描述更复杂的形式。 使用逻辑加法运算符(min函数),我们可以在一对矩形上方切出一对矩形,结果将如下所示。
如果您考虑一下,它看起来就像我们正在研究的房间,因为较低的房间正是这样表达的-借助两个平行四边形。
现在,在掌握了CSG的强大知识之后,我们可以返回代码并考虑最难处理的数据库功能。
#define HIT_NONE 0 #define HIT_LETTER 1 #define HIT_WALL 2 #define HIT_SUN 3
您可以在此处看到“切出”平行四边形的功能,其中仅使用两个矩形来构建整个房间(我们的大脑负责其余部分,它代表墙壁)。 水平阶梯是使用余数除法的稍微复杂一些的CSG功能。 最后,单词PIXAR的字母由15行组成,带有“原点/增量”对,以及字母P和R的曲线的两种特殊情况。
雷行军
有了描述世界的CSG函数数据库,我们就可以跳过main()函数中发出的所有光线。 射线行进使用距离功能。 这意味着采样位置会向前移动一定距离,直到最近的障碍物。
基于距离的光线行进的思想是将距离向前移动到最近的对象。 最后,光束将非常接近表面,因此可以将其视为入射点。
请注意,光线行进不会返回与曲面的真实相交,而是返回近似值。 这就是为什么当d <0.01f时行进在代码中停止的原因。
放在一起:抽样
路径跟踪器的研究即将完成。 我们缺少将main()函数与ray marcher连接起来的桥梁。 最后一部分(我将其重命名为“迹线”)是“大脑”,光线在其中反弹或停止,具体取决于它们遇到的情况。
Vec Trace(Vec origin, Vec direction) { Vec sampledPosition, normal, color, attenuation = 1; Vec lightDirection(!Vec(.6, .6, 1));
我对该功能进行了一些实验,以更改允许的最大光束反射数量。 值“ 2”赋予字母令人惊讶的美丽漆面Vantablack颜色
[4] 。
1个234完全清理的源代码
为了将所有内容放在一起,我创建了一个完全干净的
源代码 。
参考文献
[1]来源:
lexfrench Twitter于2018年10月8日发布。[2]来源:
维基百科:NetPBM图像格式[3]资料来源:
在功能最强大的MacBook Pro上进行的可视化,2017年[4]来源:
维基百科:Vantablack