原始文件第二部分第三部分目录:
1. Thymeleaf与Spring集成
2. SpringStandard方言
3.视图和视图解析器
3.1 Spring MVC中的视图和视图解析器
3.2 Thymeleaf中的视图和视图解析器
4.春百里香种子启动经理
4.1概念
4.2业务层
4.3 Spring MVC配置
4.4控制器
4.5配置转换服务
5显示种子启动器数据
6创建表格
6.1处理命令对象
6.2输入
6.3复选框字段
6.4单选按钮字段
6.5下拉/列表选择器
6.6动态字段
7验证和错误消息
7.1现场错误
7.2所有错误
7.3全局错误
7.4在表格之外显示错误
7.5丰富的错误对象
8这仍然是原型!
9转换服务
9.1配置
9.2双括号语法
9.3表格使用
9.4 #conversions转换对象
模板模板片段的10个渲染片段(AJAX等)
10.1在View Bean中定义片段
10.2在控制器的返回值中定义片段
11种高级集成功能
11.1与RequestDataValueProcessor集成
11.1建立到控制器的URI
12 Spring WebFlow集成
Spring WebFlow中的12.2 AJAX代码片段
本指南说明了
Thymeleaf如何与Spring框架集成,尤其是(但不限于)Spring MVC。
请注意,Thymeleaf具有针对Spring Framework 3.x和4.x及更高版本的集成,由两个分别称为thymeleaf-spring3和thymeleaf-spring4的库提供。 这些库打包在单独的.jar文件中(thymeleaf-spring3- {version} .jar和thymeleaf-spring4- {version} .jar),并且必须添加到类路径中才能在应用程序中使用Thymeleaf Spring集成。
本指南中的代码示例和示例应用程序使用Spring 4.x及其对应的Thymeleaf集成,但是本文的内容也适用于Spring3.x。 如果您的应用程序使用Spring 3.x,则只需在代码示例中将org.thymeleaf.spring4包替换为org.thymeleaf.spring3。
1. Thymeleaf与Spring集成
Thymeleaf提供了一组Spring集成,可将其用作Spring MVC应用程序中的全功能JSP替代品。
这些集成将使您能够:
- 就像使用JSP一样,映射到Thymeleaf 控制的模式的Spring MVC Controller对象中的方法。
- 在模板中使用Spring表达式语言(Spring EL)代替OGNL。
- 在与表单支持组件和Bean完全集成的模板中创建表单,包括使用属性编辑器,转换服务和验证错误处理。
- 显示由Spring管理的消息文件中的国际化消息(通过常规MessageSource对象)。
- 使用本机Spring资源解析机制找到您的模式。
请注意,为了完全理解本教程,您必须首先阅读“
Using Thymeleaf ”
教程 ,该
教程详细解释了标准方言。
2. SpringStandard方言
为了实现更轻松,更好的集成,Thymeleaf提供了一种方言,该方言专门实现了所有必需的功能以正确使用Spring。
这个特定的方言基于标准的Thymeleaf方言,并在org.thymeleaf.spring4.dialect.SpringStandardDialect类中实现,该类实际上来自org.thymeleaf.standard.StandardDialect。
除了标准方言中已经存在的所有功能(因此已继承)之外,SpringStandard方言还提供以下特定功能:
- 使用Spring Expression Language(Spring EL或SpEL)作为变量表达语言,而不是OGNL。 因此,所有$ {...}和* {...}表达式将由Spring表达式语言引擎求值。 还要注意,Spring EL编译器支持(Spring 4.2.4+)可用。
- 使用SpringEL语法访问应用程序上下文中的任何组件: $ {@ myBean.doSomething()}
- 用于处理表单的新属性: th:field , th:errors和th:errorclass ,除了新的th:对象实现之外,该实现允许您使用它来选择form命令。
- 对象和表达式方法#themes.code(...) ,等效于JSP spring:theme自定义标记。
- 对象和表达式方法#mvc.uri(...)等效于JSP spring自定义函数:mvcUrl(...) (仅在Spring 4.1+中)。
请注意,在大多数情况下,不应在常规TemplateEngine对象中直接使用此方言作为其配置的一部分。 如果您对Spring没有特殊的集成需求,则应该创建一个新模板类的实例,该实例将自动执行所有必要的配置步骤:
org.thymeleaf.spring4.SpringTemplateEngine 。
Bean配置示例:
@Bean public SpringResourceTemplateResolver templateResolver(){
或使用基于XML的Spring配置:
<bean id="templateResolver" class="org.thymeleaf.spring4.templateresolver.SpringResourceTemplateResolver"> <property name="prefix" value="/WEB-INF/templates/" /> <property name="suffix" value=".html" /> <property name="templateMode" value="HTML" /> <property name="cacheable" value="true" /> </bean> <bean id="templateEngine" class="org.thymeleaf.spring4.SpringTemplateEngine"> <property name="templateResolver" ref="templateResolver" /> <property name="enableSpringELCompiler" value="true" /> </bean>
3.视图和视图解析器
3.1 Spring MVC中的视图和视图解析器
Spring MVC具有两个与其模板系统核心相对应的接口:
- org.springframework.web.servlet.View
- org.springframework.web.servlet.ViewResolver
在我们的应用程序中
查看模型页面,并允许您通过将其定义为bean组件来更改和确定其行为。 视图通常负责渲染实际的HTML接口,以执行某种模板引擎,例如Thymeleaf。
ViewResolvers是负责获取特定操作和语言环境的
View对象的对象。 通常,控制器要求ViewResolvers用特定名称(由controller方法返回的字符串)转发视图,然后在应用程序中解析视图的所有方法都按有序链执行,直到其中一种可以解析该视图为止,在这种情况下,将返回View对象并将控制权转移给该视图对象用于呈现HTML。
请注意,并非应将应用程序中的所有页面都定义为视图,而应将那些我们希望其行为为非标准或以特殊方式自定义(例如,通过将某些特殊组件连接到)的页面定义为视图。 如果为没有对应bean的视图请求ViewResolver (这是常见的情况), 则临时创建一个新View并返回。过去,Spring MVC应用程序中的典型
JSP + JSTL ViewResolver配置如下所示:
<bean class="org.springframework.web.servlet.view.InternalResourceViewResolver"> <property name="viewClass" value="org.springframework.web.servlet.view.JstlView" /> <property name="prefix" value="/WEB-INF/jsps/" /> <property name="suffix" value=".jsp" /> <property name="order" value="2" /> <property name="viewNames" value="*jsp" /> </bean>
快速浏览一下其属性就足以了解其配置方式:
- viewClass设置View实例的类。 对于JSP识别器来说,这是必需的,但与Thymeleaf一起工作时根本不需要。
- 前缀和后缀的作用类似于Thymeleaf TemplateResolver对象中具有相同名称的属性。
- order设置链中请求ViewResolver的顺序。
- viewNames允许您 (使用通配符)定义此ViewResolver将解析的视图的名称。
3.2 Thymeleaf中的视图和视图解析器
Thymeleaf提供了上述两个接口的实现:
- org.thymeleaf.spring4.view.ThymeleafView
- org.thymeleaf.spring4.view.ThymeleafViewResolver
由于控制器的执行,这两个类将负责处理Thymeleaf模板。
Resolver Thymeleaf视图的配置与JSP非常相似:
@Bean public ThymeleafViewResolver viewResolver(){ ThymeleafViewResolver viewResolver = new ThymeleafViewResolver(); viewResolver.setTemplateEngine(templateEngine());
...或XML:
<bean class="org.thymeleaf.spring4.view.ThymeleafViewResolver"> <property name="templateEngine" ref="templateEngine" /> <property name="order" value="1" /> <property name="viewNames" value="*.html,*.xhtml" /> </bean>
当然,
templateEngine参数是我们在上一章中定义的SpringTemplateEngine对象。 其他两个(
order和
viewNames )是可选的,并且与我们在前面看到的JSP ViewResolver中的含义相同。
请注意,我们不需要前缀或后缀参数,因为它们已在模板解析器中指定(反过来又传递给模板引擎)。
但是,如果我们想定义一个
View bean并向其中
添加一些静态变量,该怎么办? 简单,只需为其定义一个原型:
@Bean @Scope("prototype") public ThymeleafView mainView() { ThymeleafView view = new ThymeleafView("main");
完成此操作后,您可以通过按名称选择该组件(在本例中为mainView)。
4.春百里香种子启动经理
可以在
GitHub Spring Seyme Seed Starter Manager存储库中找到本指南本章及后续各章中显示的示例的源代码。
4.1概念
关于Thymeleaf,我们是百里香的忠实拥护者,每年春天,我们都会准备好土壤和最喜欢的种子的入门套件,将它们种植在西班牙的阳光下,耐心地等待我们的新植物生长。
但是今年,我们已经厌倦了在起始种子容器上粘贴标签以找出容器中每个单元格中包含哪些种子的
麻烦 ,因此我们决定使用Spring MVC和
Thymeleaf编写应用程序以帮助我们对起始程序进行分类:
Spring Thyme SeedStarter Manager 。
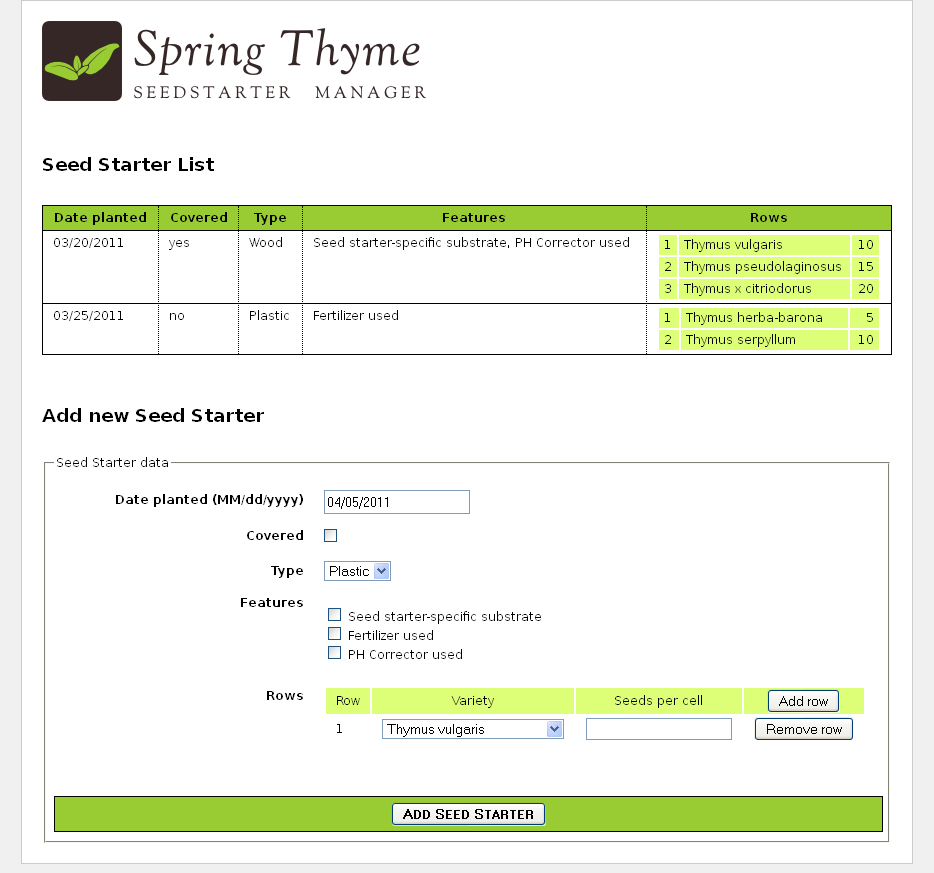
与我们在使用Thymeleaf教程中开发的Good Thymes虚拟杂货应用程序类似,STSM允许我们演示将Thymeleaf集成为Spring MVC的模板引擎的最重要方面。
4.2业务层
对于我们的应用程序,我们将需要一个非常简单的业务层。 首先,让我们看一下我们的模型对象:

几个非常简单的服务类别将提供必要的业务方法。 像:
@Service public class SeedStarterService { @Autowired private SeedStarterRepository seedstarterRepository; public List<SeedStarter> findAll() { return this.seedstarterRepository.findAll(); } public void add(final SeedStarter seedStarter) { this.seedstarterRepository.add(seedStarter); } }
并且:
@Service public class VarietyService { @Autowired private VarietyRepository varietyRepository; public List<Variety> findAll() { return this.varietyRepository.findAll(); } public Variety findById(final Integer id) { return this.varietyRepository.findById(id); } }
4.3 Spring MVC配置
接下来,我们需要为应用程序
配置Spring MVC配置 ,该
配置不仅包括标准Spring MVC工件(例如处理资源或扫描注释),还包括创建
Template Engine和
View Resolver的实例。
@Configuration @EnableWebMvc @ComponentScan public class SpringWebConfig extends WebMvcConfigurerAdapter implements ApplicationContextAware { private ApplicationContext applicationContext; public SpringWebConfig() { super(); } public void setApplicationContext(final ApplicationContext applicationContext) throws BeansException { this.applicationContext = applicationContext; } @Override public void addResourceHandlers(final ResourceHandlerRegistry registry) { super.addResourceHandlers(registry); registry.addResourceHandler("/images/**").addResourceLocations("/images/"); registry.addResourceHandler("/css/**").addResourceLocations("/css/"); registry.addResourceHandler("/js/**").addResourceLocations("/js/"); } @Bean public ResourceBundleMessageSource messageSource() { ResourceBundleMessageSource messageSource = new ResourceBundleMessageSource(); messageSource.setBasename("Messages"); return messageSource; } @Override public void addFormatters(final FormatterRegistry registry) { super.addFormatters(registry); registry.addFormatter(varietyFormatter()); registry.addFormatter(dateFormatter()); } @Bean public VarietyFormatter varietyFormatter() { return new VarietyFormatter(); } @Bean public DateFormatter dateFormatter() { return new DateFormatter(); } @Bean public SpringResourceTemplateResolver templateResolver(){
4.4控制器
当然,我们还需要针对我们的应用程序的控制器。 由于STSM将仅包含一个包含初始值列表和用于添加新值的表单的网页,因此对于所有服务器交互,我们将只编写一个控制器类:
@Controller public class SeedStarterMngController { @Autowired private VarietyService varietyService; @Autowired private SeedStarterService seedStarterService; ... }
现在,让我们看看可以添加到此控制器类的内容。
模型属性首先,我们将在页面上添加一些模型属性:
@ModelAttribute("allTypes") public List<Type> populateTypes() { return Arrays.asList(Type.ALL); } @ModelAttribute("allFeatures") public List<Feature> populateFeatures() { return Arrays.asList(Feature.ALL); } @ModelAttribute("allVarieties") public List<Variety> populateVarieties() { return this.varietyService.findAll(); } @ModelAttribute("allSeedStarters") public List<SeedStarter> populateSeedStarters() { return this.seedStarterService.findAll(); }
映射方法现在,控制器最重要的部分是映射的方法:一个显示表单页面,另一个处理添加新的
SeedStarter对象。
@RequestMapping({"/","/seedstartermng"}) public String showSeedstarters(final SeedStarter seedStarter) { seedStarter.setDatePlanted(Calendar.getInstance().getTime()); return "seedstartermng"; } @RequestMapping(value="/seedstartermng", params={"save"}) public String saveSeedstarter( final SeedStarter seedStarter, final BindingResult bindingResult, final ModelMap model) { if (bindingResult.hasErrors()) { return "seedstartermng"; } this.seedStarterService.add(seedStarter); model.clear(); return "redirect:/seedstartermng"; }
4.5配置转换服务
为了在视图层中为
Date对象以及
Variety对象提供简单的格式设置,我们配置了应用程序,以便使用几个所需的格式设置对象来创建和初始化Spring
ConversionService对象(可扩展
WebMvcConfigurerAdapter )。
再看一遍:
@Override public void addFormatters(final FormatterRegistry registry) { super.addFormatters(registry); registry.addFormatter(varietyFormatter()); registry.addFormatter(dateFormatter()); } @Bean public VarietyFormatter varietyFormatter() { return new VarietyFormatter(); } @Bean public DateFormatter dateFormatter() { return new DateFormatter(); }
Spring
格式化程序是
org.springframework.format.Formatter接口的
实现 。 有关Spring转换基础结构如何工作的更多信息,请参见
spring.io上的文档。
让我们看一下一个
DateFormatter ,它根据
Messages.properties的
date.format键中存在的格式字符串格式化日期:
public class DateFormatter implements Formatter<Date> { @Autowired private MessageSource messageSource; public DateFormatter() { super(); } public Date parse(final String text, final Locale locale) throws ParseException { final SimpleDateFormat dateFormat = createDateFormat(locale); return dateFormat.parse(text); } public String print(final Date object, final Locale locale) { final SimpleDateFormat dateFormat = createDateFormat(locale); return dateFormat.format(object); } private SimpleDateFormat createDateFormat(final Locale locale) { final String format = this.messageSource.getMessage("date.format", null, locale); final SimpleDateFormat dateFormat = new SimpleDateFormat(format); dateFormat.setLenient(false); return dateFormat; } }
VarietyFormatter自动在我们的
Variety对象和我们要在表单中使用它们的方式之间进行转换(主要是通过其
id字段的值):
public class VarietyFormatter implements Formatter<Variety> { @Autowired private VarietyService varietyService; public VarietyFormatter() { super(); } public Variety parse(final String text, final Locale locale) throws ParseException { final Integer varietyId = Integer.valueOf(text); return this.varietyService.findById(varietyId); } public String print(final Variety object, final Locale locale) { return (object != null ? object.getId().toString() : ""); } }
我们将进一步了解这些格式化工具如何影响我们将来显示数据的方式。