我向您展示了使用Dex,dex-k8s-authenticator和GitHub生成对Kubernetes集群的访问的教程。
电报上的俄语聊天Kubernetes的本地模因引言
我们使用Kubernetes为开发团队和质量保证创建动态环境。 因此,我们希望使他们能够访问仪表板和kubectl的集群。 与OpenShift不同,香草Kubernetes没有本地身份验证,因此我们为此使用第三方工具。
在此配置中,我们使用:
我们尝试使用Google OIDC,但不幸的是我们
无法将它们
归为一组,因此与GitHub集成对我们来说很好。 如果没有组映射,则无法创建基于组的RBAC策略。
因此,我们在Kubernetes中的授权过程如何以可视表示形式工作:
 授权流程
授权流程更多细节和要点:
- 用户登录dex-k8s-authenticator(
login.k8s.example.com ) - dex-k8s-authenticator将请求重定向到Dex(
dex.k8s.example.com ) - Dex重定向到GitHub登录页面
- GitHub生成必要的授权信息,并将其返回给Dex
- Dex将接收到的信息传递给dex-k8s-authenticator
- 用户从GitHub获取OIDC令牌
- dex-k8s-authenticator将令牌添加到kubeconfig
- kubectl将令牌传递给KubeAPIServer
- 基于传输的令牌的KubeAPIServer返回kubectl中的访问
- 用户从kubectl获得访问权限
筹备活动
当然,我们已经安装了Kubernetes-cluster(
k8s.example.com )以及HELM。 我们还在GitHub(super-org)上有一个组织。
如果您没有HELM,则
非常容易安装。
首先,我们需要配置GitHub。
转到组织的设置页面(
https://github.com/organizations/super-org/settings/applications )并创建一个新应用(授权的OAuth应用):
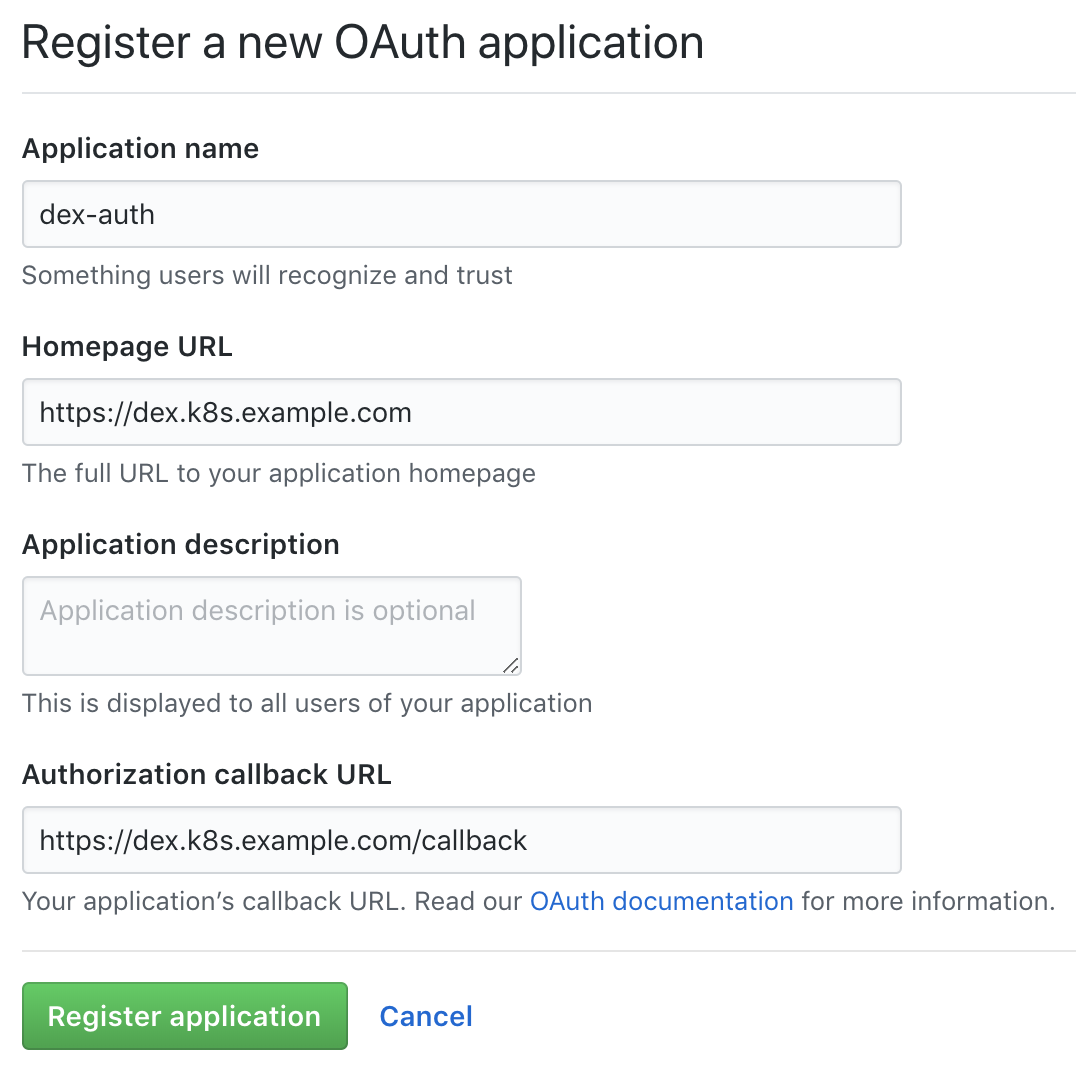 在GitHub上创建一个新应用
使用必要的URL填写字段,例如:
- 主页网址:
https://dex.k8s.example.com : https://dex.k8s.example.com - 授权回调网址:
https://dex.k8s.example.com/callback : https://dex.k8s.example.com/callback
谨慎使用链接,重要的是不要丢失斜线。响应完成的表单,GitHub将生成
Client ID和
Client secret ,并将它们保存在安全的地方,它们对我们有用(例如,我们使用
Vault来存储密钥):
Client ID: 1ab2c3d4e5f6g7h8 Client secret: 98z76y54x32w1
准备子域
login.k8s.example.com和
dex.k8s.example.com DNS记录,以及用于
dex.k8s.example.com SSL证书。
创建SSL证书:
cat <<EOF | kubectl create -f - apiVersion: certmanager.k8s.io/v1alpha1 kind: Certificate metadata: name: cert-auth-dex namespace: kube-system spec: secretName: cert-auth-dex dnsNames: - dex.k8s.example.com acme: config: - http01: ingressClass: nginx domains: - dex.k8s.example.com issuerRef: name: le-clusterissuer kind: ClusterIssuer --- apiVersion: certmanager.k8s.io/v1alpha1 kind: Certificate metadata: name: cert-auth-login namespace: kube-system spec: secretName: cert-auth-login dnsNames: - login.k8s.example.com acme: config: - http01: ingressClass: nginx domains: - login.k8s.example.com issuerRef: name: le-clusterissuer kind: ClusterIssuer EOF kubectl describe certificates cert-auth-dex -n kube-system kubectl describe certificates cert-auth-login -n kube-system
名称为
le-clusterissuer ClusterIssuer应该已经存在,如果不存在,请使用HELM创建它:
helm install --namespace kube-system -n cert-manager stable/cert-manager cat << EOF | kubectl create -f - apiVersion: certmanager.k8s.io/v1alpha1 kind: ClusterIssuer metadata: name: le-clusterissuer namespace: kube-system spec: acme: server: https://acme-v02.api.letsencrypt.org/directory email: k8s-admin@example.com privateKeySecretRef: name: le-clusterissuer http01: {} EOF
KubeAPIServer配置
为了使kubeAPIServer正常工作,您必须配置OIDC并更新集群:
kops edit cluster ... kubeAPIServer: anonymousAuth: false authorizationMode: RBAC oidcClientID: dex-k8s-authenticator oidcGroupsClaim: groups oidcIssuerURL: https://dex.k8s.example.com/ oidcUsernameClaim: email kops update cluster --yes kops rolling-update cluster --yes
我们使用
kops部署集群,但
其他集群管理器的工作原理相同。
Dex和dex-k8s-authenticator配置
为了使Dex正常工作,您必须具有Kubernetes主服务器的证书和密钥,并将其从中取出:
sudo cat /srv/kubernetes/ca.{crt,key} -----BEGIN CERTIFICATE----- AAAAAAAAAAABBBBBBBBBBCCCCCC -----END CERTIFICATE----- -----BEGIN RSA PRIVATE KEY----- DDDDDDDDDDDEEEEEEEEEEFFFFFF -----END RSA PRIVATE KEY-----
克隆dex-k8s-authenticator存储库:
git clone git@github.com:mintel/dex-k8s-authenticator.git cd dex-k8s-authenticator/
使用值文件,我们可以为
HELM图表灵活设置变量。
让我们描述一下Dex的配置:
cat << \EOF > values-dex.yml global: deployEnv: prod tls: certificate: |- -----BEGIN CERTIFICATE----- AAAAAAAAAAABBBBBBBBBBCCCCCC -----END CERTIFICATE----- key: |- -----BEGIN RSA PRIVATE KEY----- DDDDDDDDDDDEEEEEEEEEEFFFFFF -----END RSA PRIVATE KEY----- ingress: enabled: true annotations: kubernetes.io/ingress.class: nginx kubernetes.io/tls-acme: "true" path: / hosts: - dex.k8s.example.com tls: - secretName: cert-auth-dex hosts: - dex.k8s.example.com serviceAccount: create: true name: dex-auth-sa config: | issuer: https://dex.k8s.example.com/ storage: # https://github.com/dexidp/dex/issues/798 type: sqlite3 config: file: /var/dex.db web: http: 0.0.0.0:5556 frontend: theme: "coreos" issuer: "Example Co" issuerUrl: "https://example.com" logoUrl: https://example.com/images/logo-250x25.png expiry: signingKeys: "6h" idTokens: "24h" logger: level: debug format: json oauth2: responseTypes: ["code", "token", "id_token"] skipApprovalScreen: true connectors: - type: github id: github name: GitHub config: clientID: $GITHUB_CLIENT_ID clientSecret: $GITHUB_CLIENT_SECRET redirectURI: https://dex.k8s.example.com/callback orgs: - name: super-org teams: - team-red staticClients: - id: dex-k8s-authenticator name: dex-k8s-authenticator secret: generatedLongRandomPhrase redirectURIs: - https://login.k8s.example.com/callback/ envSecrets: GITHUB_CLIENT_ID: "1ab2c3d4e5f6g7h8" GITHUB_CLIENT_SECRET: "98z76y54x32w1" EOF
对于dex-k8s-authenticator:
cat << EOF > values-auth.yml global: deployEnv: prod dexK8sAuthenticator: clusters: - name: k8s.example.com short_description: "k8s cluster" description: "Kubernetes cluster" issuer: https://dex.k8s.example.com/ k8s_master_uri: https://api.k8s.example.com client_id: dex-k8s-authenticator client_secret: generatedLongRandomPhrase redirect_uri: https://login.k8s.example.com/callback/ k8s_ca_pem: | -----BEGIN CERTIFICATE----- AAAAAAAAAAABBBBBBBBBBCCCCCC -----END CERTIFICATE----- ingress: enabled: true annotations: kubernetes.io/ingress.class: nginx kubernetes.io/tls-acme: "true" path: / hosts: - login.k8s.example.com tls: - secretName: cert-auth-login hosts: - login.k8s.example.com EOF
安装Dex和dex-k8s-authenticator:
helm install -n dex --namespace kube-system --values values-dex.yml charts/dex helm install -n dex-auth --namespace kube-system --values values-auth.yml charts/dex-k8s-authenticator
让我们检查服务的可服务性(Dex应该返回代码400,而dex-k8s-authenticator-代码200):
curl -sI https://dex.k8s.example.com/callback | head -1 HTTP/2 400 curl -sI https://login.k8s.example.com/ | head -1 HTTP/2 200
RBAC配置
我们为组创建ClusterRole,在我们的示例中,它具有只读访问权限:
cat << EOF | kubectl create -f - apiVersion: rbac.authorization.k8s.io/v1 kind: ClusterRole metadata: name: cluster-read-all rules: - apiGroups: - "" - apps - autoscaling - batch - extensions - policy - rbac.authorization.k8s.io - storage.k8s.io resources: - componentstatuses - configmaps - cronjobs - daemonsets - deployments - events - endpoints - horizontalpodautoscalers - ingress - ingresses - jobs - limitranges - namespaces - nodes - pods - pods/log - pods/exec - persistentvolumes - persistentvolumeclaims - resourcequotas - replicasets - replicationcontrollers - serviceaccounts - services - statefulsets - storageclasses - clusterroles - roles verbs: - get - watch - list - nonResourceURLs: ["*"] verbs: - get - watch - list - apiGroups: [""] resources: ["pods/exec"] verbs: ["create"] EOF
为ClusterRoleBinding创建配置:
cat <<EOF | kubectl create -f - apiVersion: rbac.authorization.k8s.io/v1beta1 kind: ClusterRoleBinding metadata: name: dex-cluster-auth namespace: kube-system roleRef: apiGroup: rbac.authorization.k8s.io kind: ClusterRole name: cluster-read-all subjects: kind: Group name: "super-org:team-red" EOF
现在我们可以进行测试了。
测验
我们转到登录页面(
https://login.k8s.example.com ),然后使用GitHub帐户登录:
 登录页面
登录页面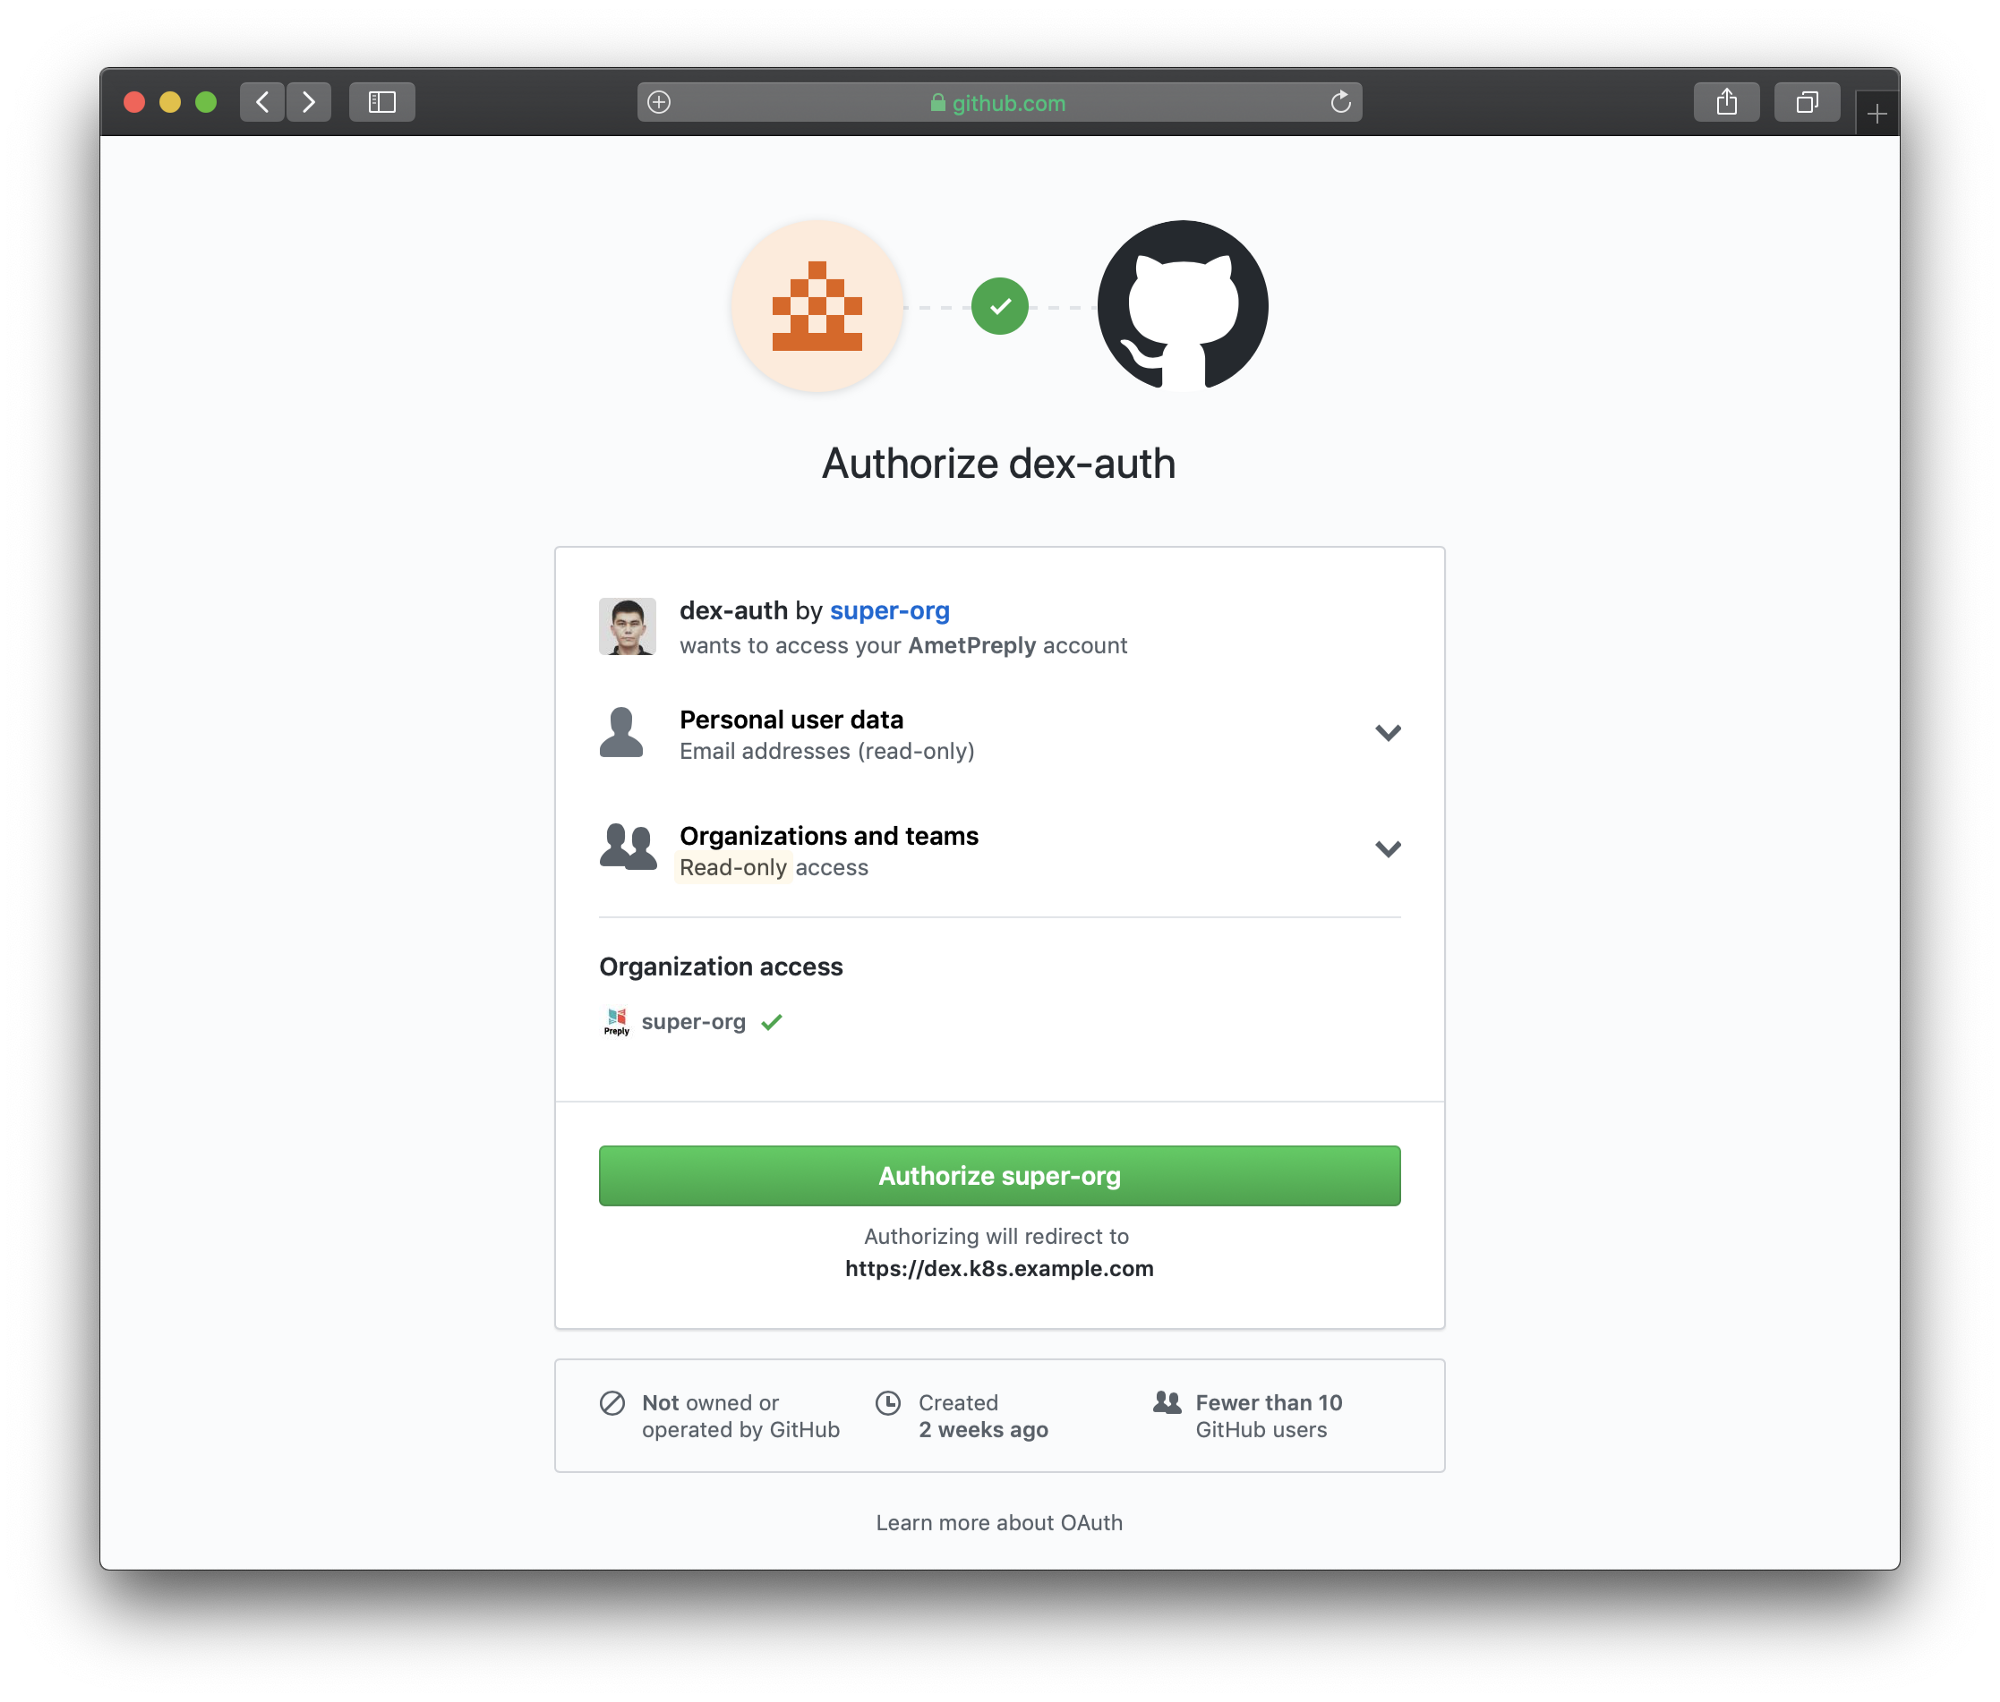 登录页面重定向到GitHub
 请按照生成的说明进行访问
从网页复制粘贴后,我们可以使用kubectl来管理集群的资源:
kubectl get po NAME READY STATUS RESTARTS AGE mypod 1/1 Running 0 3d kubectl delete po mypod Error from server (Forbidden): pods "mypod" is forbidden: User "amet@example.com" cannot delete pods in the namespace "default"
并且它可以正常工作,我们组织中的所有GitHub用户都可以看到资源并输入pod,但是他们无权更改它们。