通过部署一个简单的模板站点,对其进行监控,执行计划的作业和运行状况检查的示例,为开发人员简要地了解了kubernetes(随附所有源代码)
-
安装Kubernetes-
安装用户界面-
在集群中启动您的应用程序-
向应用程序添加自定义指标-
通过Prometheus收集指标-
在Grafana中显示指标-
预定任务-
容错-
结论-
笔记-
参考安装Kubernetes
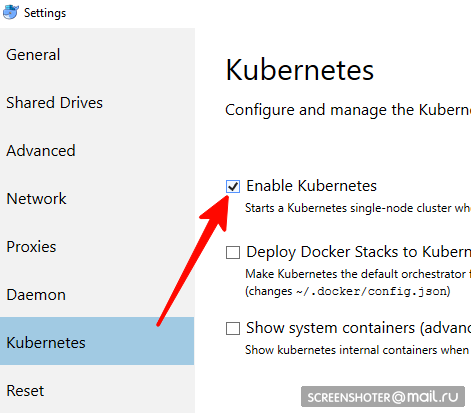
不适合Linux用户,您必须使用minikube- 你有码头工人桌面吗
- 在其中您需要找到并启用Kubernetes单节点集群
- 现在您有了api http://本地主机:8001 /用于kubernetis
- 通过便捷的实用工具kubectl与他进行交流
使用命令> kubectl version检查其kubectl version
最新的相关内容写在这里https://storage.googleapis.com/kubernetes-release/release/stable.txt
您可以通过相应的链接https://storage.googleapis.com/kubernetes-release/release/v1.13.2/bin/windows/amd64/kubectl.exe下载它 kubectl cluster-info集群是否正常运行> kubectl cluster-info
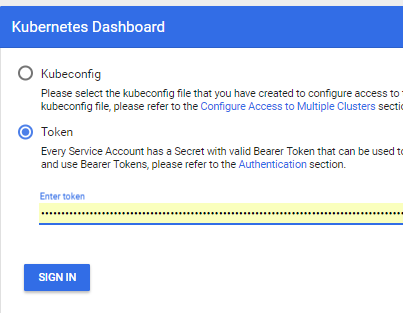
UI安装
- 该接口部署在同一集群中
kubectl create -f https://raw.githubusercontent.com/kubernetes/dashboard/master/aio/deploy/recommended/kubernetes-dashboard.yaml
- 获取令牌以访问界面
kubectl describe secret
并复制
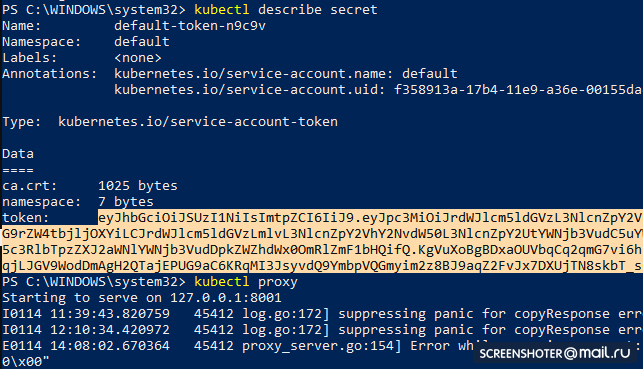
- 现在启动代理
kubectl proxy
- 您可以使用http://本地主机:8001 / api / v1 /名称空间/ kube-system /服务/ https:kubernetes-dashboard:/ proxy /
在集群中运行您的应用程序
- 我通过工作室https://github.com/SanSYS/kuberfirst制作了一个标准的mvc netcoreapp2.1应用程序
- Dockerfile:
FROM microsoft/dotnet:2.1-aspnetcore-runtime AS base WORKDIR /app EXPOSE 80 FROM microsoft/dotnet:2.1-sdk AS build WORKDIR /src COPY ./MetricsDemo.csproj . RUN ls RUN dotnet restore "MetricsDemo.csproj" COPY . . RUN dotnet build "MetricsDemo.csproj" -c Release -o /app FROM build AS publish RUN dotnet publish "MetricsDemo.csproj" -c Release -o /app FROM base AS final WORKDIR /app COPY --from=publish /app . ENTRYPOINT ["dotnet", "MetricsDemo.dll"]
- 用metricsdemo3标签收集了这个东西
docker build -t metricsdemo3 .
- 但是! 默认情况下,Coober从集线器提取图像,所以我提高了本地寄存器
- 注意-没有尝试在kubernetis中运行
docker create -p 5000:5000 --restart always --name registry registry:2
- 而且我将其规定为不安全的授权:
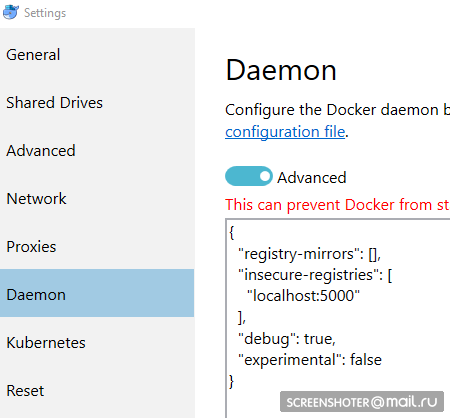
{ "registry-mirrors": [], "insecure-registries": [ "localhost:5000" ], "debug": true, "experimental": false }
- 在推入收银机之前,还有一些手势
docker start registry docker tag metricsdemo3 localhost:5000/sansys/metricsdemo3 docker push localhost:5000/sansys/metricsdemo3
- 它看起来像这样:

如果启动,则一切正常,您可以开始操作
创建一个部署文件
1-deployment-app.yaml kind: Deployment apiVersion: apps/v1 metadata: name: metricsdemo labels: app: web spec: replicas: 2
小说明
- 种类-指示通过yaml文件描述哪种类型的实体
- apiVersion-对象传输到的api
- 标签-本质上只是标签(左侧的键和值可以自己考虑)
- 选择器-允许您将服务与部署关联,例如通过标签
下一个:
kubectl create -f .\1-deployment-app.yaml
并且您应该在接口
http:// localhost:8001 / api / v1 / namespaces / kube-system / services / https:kubernetes-dashboard:/ proxy /#!/ Deployment?命名空间=默认值下看到部署里面有一个副本集,表明该应用程序在两个实例(Pods)中运行,并且有一个相关服务,其地址来自外部,可以在浏览器中打开配音的应用程序
向应用程序添加自定义指标
已将包
https://www.app-metrics.io/添加
到应用程序
我暂时不会详细描述如何添加它们-我注册了用于增加对api方法的调用计数器的中间件
这是中间件 private static void AutoDiscoverRoutes(HttpContext context) { if (context.Request.Path.Value == "/favicon.ico") return; List<string> keys = new List<string>(); List<string> vals = new List<string>(); var routeData = context.GetRouteData(); if (routeData != null) { keys.AddRange(routeData.Values.Keys); vals.AddRange(routeData.Values.Values.Select(p => p.ToString())); } keys.Add("method"); vals.Add(context.Request.Method); keys.Add("response"); vals.Add(context.Response.StatusCode.ToString()); keys.Add("url"); vals.Add(context.Request.Path.Value); Program.Metrics.Measure.Counter.Increment(new CounterOptions { Name = "api",
所收集的指标可从以下
网址获得:
http://本地主机:9376
* IMetricRoot或其抽象可以轻松地在服务中注册并在应用程序中使用(
services.AddMetrics(Program.Metrics); )
通过Prometheus收集指标
最基本的prometheus设置:将新作业添加到其配置(prometheus.yml)中,并将其提供给新目标:
global: scrape_interval: 15s evaluation_interval: 15s rule_files:
但是Prometheus具有从kubernetis收集指标的本机支持
https://prometheus.io/docs/prometheus/latest/configuration/configuration/#kubernetes_sd_config我想监视按服务类型分别过滤的每个服务:业务标签
熟悉码头之后,工作如下:
- job_name: business-metrics
在kubernetis中,有一个特殊的位置用于存储配置文件-ConfigMap
我在这里保存此配置:
2-prometheus-configmap.yaml apiVersion: v1 kind: ConfigMap
出发前往kubernetis
kubectl create -f .\2-prometheus-configmap.yaml
现在,您需要使用此配置文件部署prometheus
kubectl创建-f。\ 3-deployment-prometheus.yaml apiVersion: extensions/v1beta1 kind: Deployment metadata: name: prometheus namespace: default spec: replicas: 1 template: metadata: labels: app: prometheus-server spec: containers: - name: prometheus image: prom/prometheus args: - "--config.file=/etc/config/prometheus.yml" - "--web.enable-lifecycle" ports: - containerPort: 9090 volumeMounts: - name: prometheus-config-volume
注意-prometheus.yml文件未在任何地方指定
在config-map中指定的所有文件将成为prometheus-config-volume部分中的文件,该部分安装在/ etc / config /目录中
此外,容器具有启动参数以及配置路径
--web.enable-lifecycle-表示您可以拉POST /-/重新加载,这将应用新的配置(如果配置“实时”更改并且您不想重新启动容器,则很有用)
实际部署
kubectl create -f .\3-deployment-prometheus.yaml
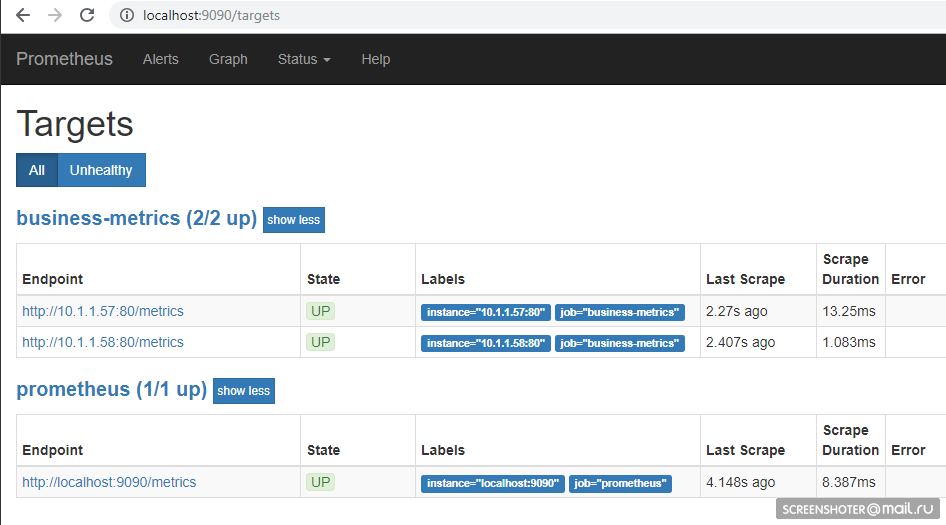
按照小步骤,然后转到地址
http://本地主机:9090 / target ,您应该在那里看到服务的端点
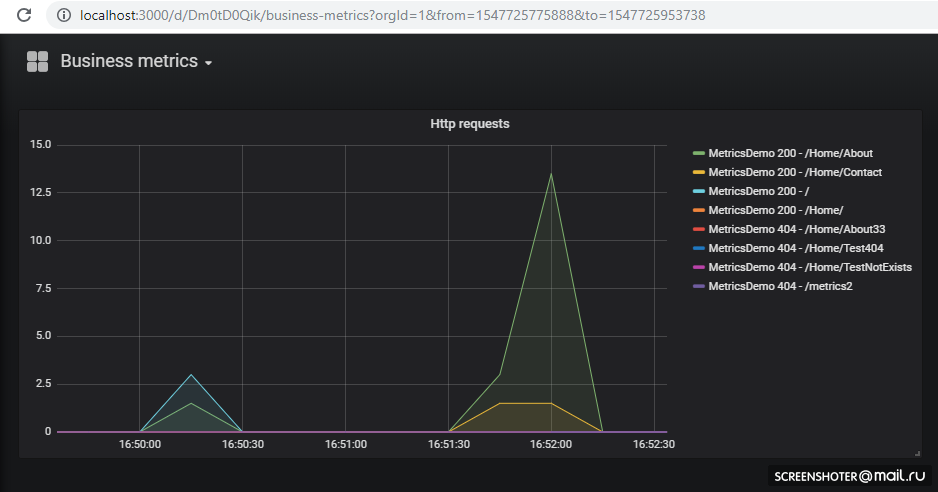
在主页上,您可以向Prometheus发送请求
sum by (response, action, url, app) (delta(application_api[15s]))
查询语言
-https://prometheus.io/docs/prometheus/latest/querying/basics/在Grafana中显示指标
我们很幸运-直到第5版,仪表板配置只能通过HTTP API滑动,但是现在您可以执行与Prometeus相同的技巧
默认情况下,Grafana在启动时
可以拉出数据源
配置和仪表板
/etc/grafana/provisioning/datasources/ -源配置(用于访问prometeus,postgres,zabbiks,elastic等的设置)/etc/grafana/provisioning/dashboards/ - /etc/grafana/provisioning/dashboards/访问设置/var/lib/grafana/dashboards/ -在这里我将以json文件的形式存储仪表板本身
原来是这样的 apiVersion: v1 kind: ConfigMap metadata: creationTimestamp: null name: grafana-provisioning-datasources namespace: default data: all.yml: | datasources: - name: 'Prometheus' type: 'prometheus' access: 'proxy' org_id: 1 url: 'http://prometheus:9090' is_default: true version: 1 editable: true --- apiVersion: v1 kind: ConfigMap metadata: creationTimestamp: null name: grafana-provisioning-dashboards namespace: default data: all.yml: | apiVersion: 1 providers: - name: 'default' orgId: 1 folder: '' type: file disableDeletion: false updateIntervalSeconds: 10
部署本身,没有新内容 apiVersion: extensions/v1beta1 kind: Deployment metadata: name: grafana namespace: default labels: app: grafana component: core spec: replicas: 1 template: metadata: labels: app: grafana component: core spec: containers: - image: grafana/grafana name: grafana imagePullPolicy: IfNotPresent resources: limits: cpu: 100m memory: 100Mi requests: cpu: 100m memory: 100Mi env: - name: GF_AUTH_BASIC_ENABLED value: "true" - name: GF_AUTH_ANONYMOUS_ENABLED value: "true" - name: GF_AUTH_ANONYMOUS_ORG_ROLE value: Admin readinessProbe: httpGet: path: /login port: 3000
展开
kubectl create -f .\4-grafana-configmap.yaml kubectl create -f .\5-deployment-grafana.yaml
请记住,石墨烯不会立即升高,但会因sqlite迁移而有所减弱,您可以
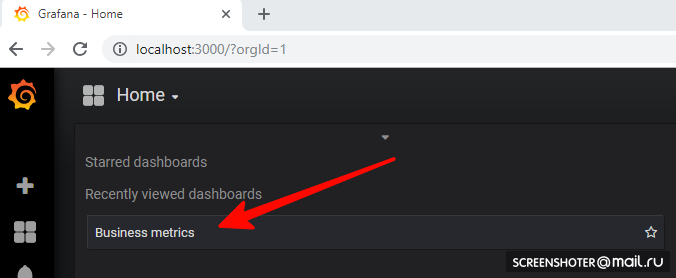
在日志中看到现在转到
http://本地主机:3000 /然后点击仪表板上
如果要添加新视图或更改现有视图,请在界面中直接将其更改,然后单击“保存”,您将获得一个带有json的模态窗口,您需要将其放入配置映射中
计划任务
为了在立方体中的表冠上执行任务,有CronJob的概念
使用CronJob,您可以为任何任务设置时间表,最简单的示例是:
时间表部分设置了王冠的经典规则
触发器启动容器(busybox)的容器,我在其中拉动了metricsdemo服务api方法
您可以使用该命令来跟踪作业。
kubectl.exe get cronjob runapijob --watch
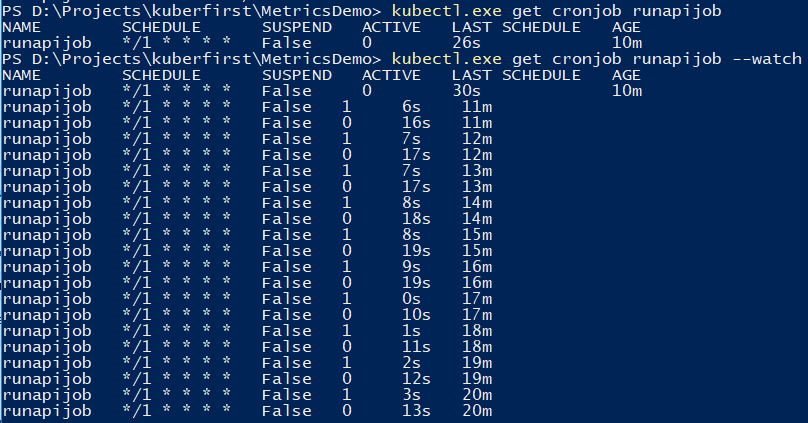
从工作中抽出的主要服务在几种情况下都会启动,因为对该服务的调用以大约均匀的价差到达了一个炉膛
一个关于计算π数的示例的小演示,它涉及从控制台启动的差异
容错能力
如果应用程序意外终止,则群集会重新启动Pod
例如,我做了一个删除api的方法
[HttpGet("kill/me")] public async void Kill() { throw new Exception("Selfkill"); }
*异步void方法中的api中发生的异常被视为未处理的异常,它会使应用程序完全崩溃我呼吁
http://本地主机:9376 / api / job / kill / me炉膛列表显示该服务的炉膛之一已重新启动
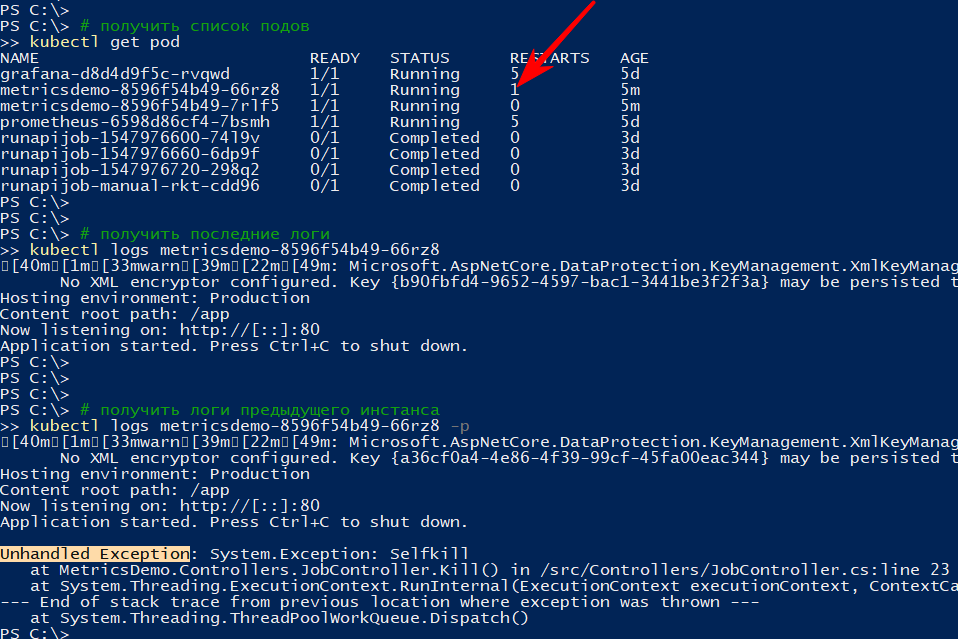
logs命令显示当前输出,并带有-p选项将显示前一个实例的日志。 这样您可以找出重新启动的原因。
我认为只要跌倒,一切都会很清楚:跌倒-上升
但是该应用程序可以有条件地生效,即 不会倒下,但是什么也不做,或者做他的工作,但是要慢慢
根据
文档,至少有两种类型的Pod中的应用程序“生存能力”检查
- 准备就绪-这种类型的检查用于了解是否有可能在此Pod上启动流量。 如果没有,则将吊舱解除管制,直到其恢复正常。
- 活动-检查应用程序的“生存能力”。 特别是,如果无法访问重要资源,或者如果应用程序完全不响应(例如,死锁并因此超时),则将重新启动容器。 200至400之间的所有http代码均被视为成功,其余均失败
我将检查超时重新启动,为此,我将添加一个新的api方法,该方法将根据特定命令开始放慢123秒的生存能力验证方法
static bool deadlock; [HttpGet("alive/{cmd}")] public string Kill(string cmd) { if (cmd == "deadlock") { deadlock = true; return "Deadlocked"; } if (deadlock) Thread.Sleep(123 * 1000); return deadlock ? "Deadlocked!!!" : "Alive"; }
我在容器的1-deployment-app.yaml文件中添加了几节:
containers: - name: metricsdemo image: localhost:5000/sansys/metricsdemo3:6 ports: - containerPort: 80 readinessProbe:
再说一遍,我确定该应用已启动并订阅了活动
kubectl get events --watch
我按菜单Deadlock me(
http://本地主机:9376 / api / job / alive / deadlock )

在五秒钟内,我开始观察问题及其解决方案
1s Warning Unhealthy Pod Liveness probe failed: Get http://10.1.0.137:80/api/job/alive/check: net/http: request canceled (Client.Timeout exceeded while awaiting headers) 1s Warning Unhealthy Pod Liveness probe failed: Get http://10.1.0.137:80/api/job/alive/check: net/http: request canceled (Client.Timeout exceeded while awaiting headers) 0s Warning Unhealthy Pod Liveness probe failed: Get http://10.1.0.137:80/api/job/alive/check: net/http: request canceled (Client.Timeout exceeded while awaiting headers) 0s Warning Unhealthy Pod Readiness probe failed: Get http://10.1.0.137:80/health: dial tcp 10.1.0.137:80: connect: connection refused 0s Normal Killing Pod Killing container with id docker://metricsdemo:Container failed liveness probe.. Container will be killed and recreated. 0s Normal Pulled Pod Container image "localhost:5000/sansys/metricsdemo3:6" already present on machine 0s Normal Created Pod Created container 0s Normal Started Pod Started container
结论
- 一方面,进入门槛比我想象的要低得多,另一方面,它根本不是真正的kubernetes集群,而仅仅是开发人员的计算机。 并且没有考虑资源,有状态应用程序,a / b测试等方面的限制。
- Prometeus首次尝试使用它,但是在审查多维数据集期间阅读了各种文档和示例后,很明显它非常适合从群集和应用程序中收集指标
- 太好了,它使开发人员可以在其计算机上实现功能,并除了将信息添加到部署中之外,还可以将计划的部署附加到石墨烯上。 结果,新的指标会自动添加。 努力将开始在舞台和产品上展示。 方便的
注意事项
- 应用程序可以通过
:相互联系 : ,这是使用grafana→prometeus完成的。 对于熟悉docker-compose的人来说,没有什么新鲜的 kubectl create -f file.yml创建一个实体kubectl delete -f file.yml删除实体kubectl get pod所有炉kubectl get pod的列表(服务,端点...)--namespace=kube-system按名称空间过滤-n kube-system类似
kubectl -it exec grafana-d8d4d9f5c-cvnkh -- /bin/bash底部附件kubectl delete service grafana删除服务,pod。 部署(-全部-全部删除)kubectl describe描述实体(您可以一次完成所有操作)kubectl edit service metricsdemo通过启动记事本即时编辑所有yamlkubectl --help帮助-很大的帮助)- 一个典型的问题是有一个pod(考虑正在运行的映像),出了点问题,没有选项,除了没有办法在内部进行调试(通过tcpdump / nc等)。 -Yuzai kubectl-debug habr.com/en/company/flant/blog/436112
参考文献
- 什么是应用指标?
- Kubernetes
- 普罗米修斯
- 预先准备的grafana配置
- 要查看人们的工作方式 (但已经有些事情已经过时了)-原则上,这里还有日志记录,警报等。
- Helm -Kubernetes的软件包管理器-通过它可以更容易地组织prometeus + grafana,但是手动进行-会出现更多的了解
- 库伯的普罗米修斯立方体
- Kubernetes失败的故事
- Kubernetes-HA。 使用5个向导部署Kubernetes故障转移群集
 github上的源代码和果酱