我们向您提供Chidume Nnamdi文章的翻译,该文章已发布在blog.bitsrc.io上。 如果您想学习如何避免不必要的渲染以及新工具如何在React中使用,欢迎使用cat。

React.js团队正在努力使React尽可能快地运行。 为了使开发人员能够加快其React应用程序的速度,已向其中添加了以下工具:
- React.lazy和Suspense用于延迟组件加载;
- 纯成分
- 生命周期挂钩shouldComponentUpdate(...){...}。
在本文中,我们将考虑在React v16.6中添加的另一个优化工具来加速组件功能
-React.memo 。
提示:使用
Bit安装和共享React组件。 使用您的组件来构建新的应用程序并与团队共享以加快处理速度。 试试看!

额外渲染
在React中,每个组件都对应一个视图单元。 组件也有状态。 当状态值由于用户操作而改变时,组件将意识到需要重绘。 React组件可以重画多次。 在某些情况下,这是必需的,但是大多数情况下您可以不使用渲染器,尤其是因为它会大大降低应用程序的速度。
考虑以下组件:
import React from 'react'; class TestC extends React.Component { constructor(props) { super(props); this.state = { count: 0 } } componentWillUpdate(nextProps, nextState) { console.log('componentWillUpdate') } componentDidUpdate(prevProps, prevState) { console.log('componentDidUpdate') } render() { return ( <div > {this.state.count} <button onClick={()=>this.setState({count: 1})}>Click Me</button> </div> ); } } export default TestC;
{count:0}状态的初始值为0。如果单击“单击我”按钮,则计数状态将变为1。在我们的屏幕上,0也将变为1。但是,如果再次单击该按钮,就会出现问题:不应重绘该组件,因为它条件没有改变。 计数器值“ to”为1,新值也为1,这意味着不需要更新DOM。
为了查看我们的TestC的更新(其中两次设置相同的状态),我添加了两种生命周期方法。 当组件由于状态变化而被更新/重绘时,React将启动componentWillUpdate周期。 当组件成功渲染时,componentdidUpdate React周期开始。
如果我们在浏览器中启动该组件并尝试多次单击“单击我”按钮,则会得到以下结果:
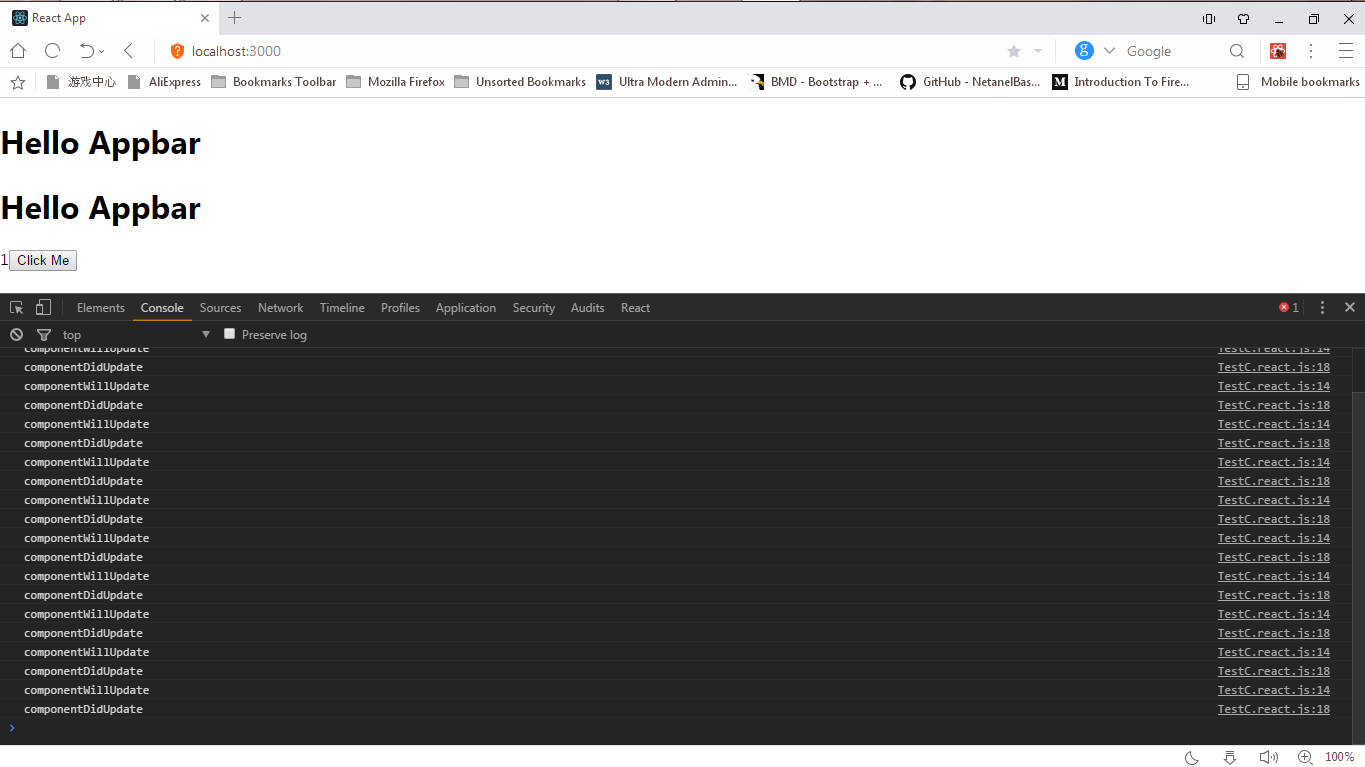
在我们的控制台中重复componentWillUpdate条目,表明即使状态未更改,该组件也已重绘。 这是一个额外的渲染。
纯组件/ shouldComponentUpdate
shouldComponentUpdate生命周期钩子将有助于避免在React组件中不必要的渲染。
React在组件渲染开始时启动
shouldComponentUpdate方法,并从该方法接收绿灯以继续该过程或该过程被
禁止的信号。
让我们的shouldComponentUpdate看起来像这样:
shouldComponentUpdate(nextProps, nextState) { return true }
nextProps :组件将接收的下一个props值;nextState :组件将接收的下一个state值。
所以我们允许React渲染组件,因为返回值为
true 。
假设我们编写以下代码:
shouldComponentUpdate(nextProps, nextState) { return false }
在这种情况下,我们禁止React渲染组件,因为返回
false 。
从上面可以看出,要渲染组件,我们需要返回
true 。 现在我们可以如下重写TestC组件:
import React from 'react'; class TestC extends React.Component { constructor(props) { super(props); this.state = { count: 0 } } componentWillUpdate(nextProps, nextState) { console.log('componentWillUpdate') } componentDidUpdate(prevProps, prevState) { console.log('componentDidUpdate') } shouldComponentUpdate(nextProps, nextState) { if (this.state.count === nextState.count) { return false } return true } render() { return ( <div> { this.state.count } <button onClick = { () => this.setState({ count: 1 }) }> Click Me </button> </div> ); } } export default TestC;
我们向TestC组件添加了一个shouldComponentUpdate钩子。 现在,将当前状态对象
this.state.count的
count数值与下一个状态对象
nextState.count的
count数值进行
nextState.count 。 如果它们等于
=== ,则不会发生重绘,并且返回
false 。 如果它们不相等,
true返回
true并启动渲染器以显示新值。
如果我们在浏览器中测试代码,我们将看到一个熟悉的结果:

但是通过多次单击“
Click Me按钮,我们看到的只是以下内容(仅显示一次!):
componentWillUpdate
componentDidUpdate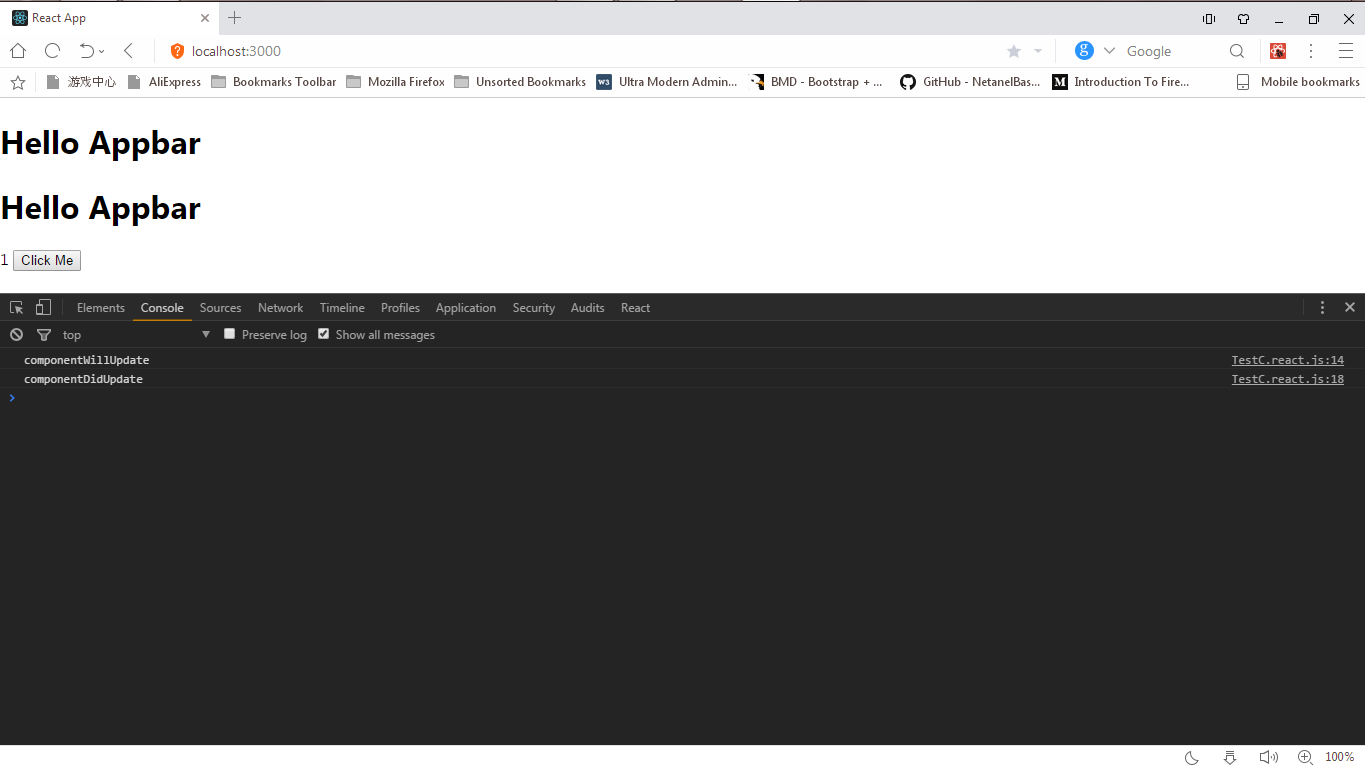
您可以在React DevTools选项卡中更改TestC组件的状态。 单击React选项卡,在右侧选择TestC,您将看到计数器状态值:
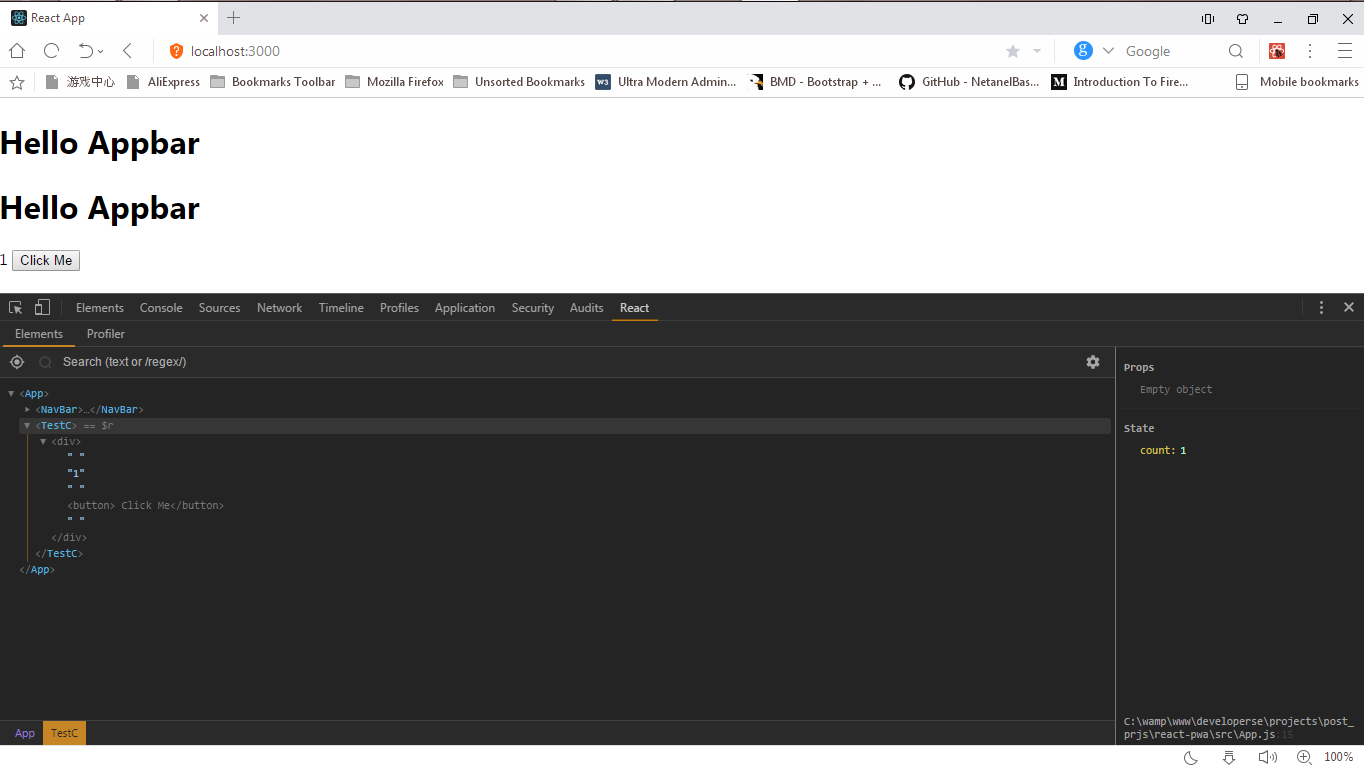
该值可以更改。 单击计数器文本,键入2并按Enter。

计数状态将改变,在控制台中,我们将看到:
componentWillUpdate componentDidUpdate componentWillUpdate componentDidUpdate
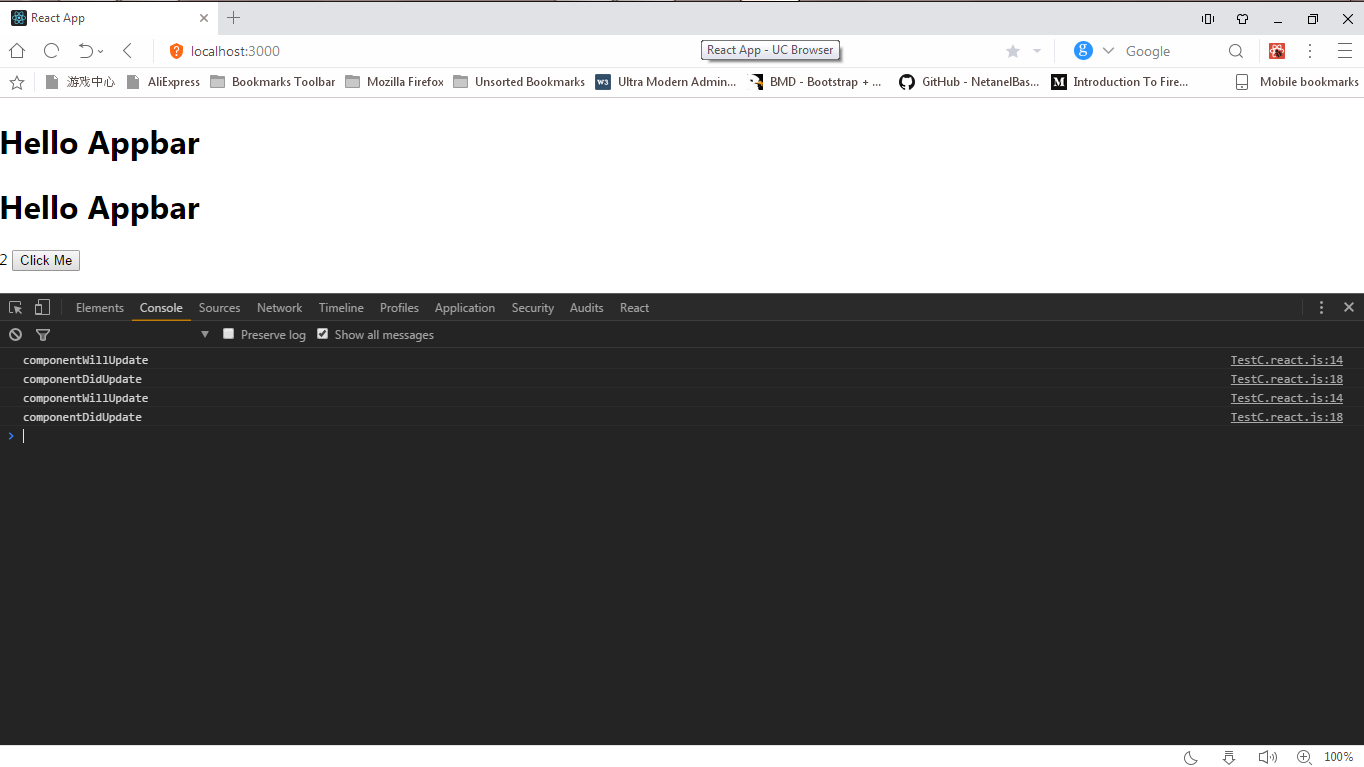
先前的值为1,而新的值为2,因此需要重绘。
让我们继续进行
Pure Component 。
Pure Component出现在v15.5版本的React中。 用于比较默认值(
change detection )。 使用
extend React.PureComponent ,您不必向组件添加
shouldComponentUpdate生命周期方法:更改跟踪本身发生。
将一个PureComponent添加到TestC组件。
import React from 'react'; class TestC extends React.PureComponent { constructor(props) { super(props); this.state = { count: 0 } } componentWillUpdate(nextProps, nextState) { console.log('componentWillUpdate') } componentDidUpdate(prevProps, prevState) { console.log('componentDidUpdate') } render() { return ( <div> { this.state.count } <button onClick = { () => this.setState({ count: 1 }) }> Click Me </button> </div > ); } } export default TestC;
如您所见,我们
shouldComponentUpdate放入注释中。 我们不再需要它:所有工作都由
React.PureComponent完成。
重新启动浏览器以测试新解决方案,然后多次单击“
Click Me按钮,我们得到:
如您所见,控制台中仅显示一个
component*Update条目。
在了解了如何在React中使用ES6的组件类中的重绘功能之后,我们继续进行组件功能。 如何用它们获得相同的结果?
功能组成
我们已经知道如何使用Pure Component和
shouldComponentUpdate生命周期
shouldComponentUpdate优化类的工作。 没有人认为类组件是React的主要组件,但是您可以将函数用作组件。
function TestC(props) { return ( <div> I am a functional component </div> ) }
重要的是要记住,与类组件不同,函数组件没有状态(尽管现在
useState挂钩已经
useState ,这可以争论),这意味着我们无法配置它们的重绘。 我们在使用类时使用的生命周期方法在这里不可用。 如果我们可以向功能组件添加生命周期挂钩,则可以添加
shouldComponentUpdate方法来告知React需要一个功能渲染器。 (也许作者在最后一句话中犯了一个事实错误
extend React.PureComponent大约。)而且,我们当然不能使用
extend React.PureComponent 。
我们将组件类ES6 TestC转换为组件函数。
import React from 'react'; const TestC = (props) => { console.log(`Rendering TestC :` props) return ( <div> {props.count} </div> ) } export default TestC;
在控制台中进行渲染之后,我们将看到“
Rendering TestC :5条目。

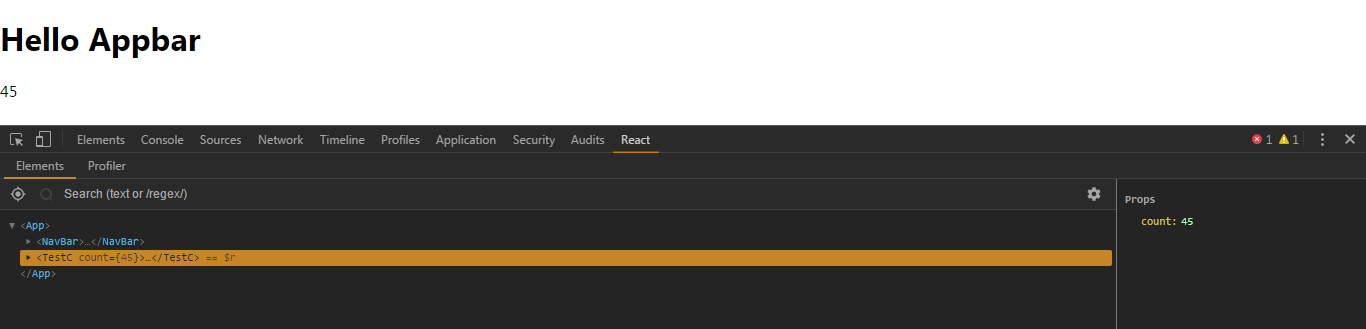
打开DevTools并单击React选项卡。 在这里,我们将尝试更改TestC组件的属性值。 选择TestC,计数器属性以及所有TestC的属性和值将在右侧打开。 我们只看到当前值为5的计数器。
单击数字5更改值。 将会出现一个输入窗口。

如果更改数值并按Enter,则组件的属性将根据输入的值而更改。 假设为45。
转到控制台选项卡。
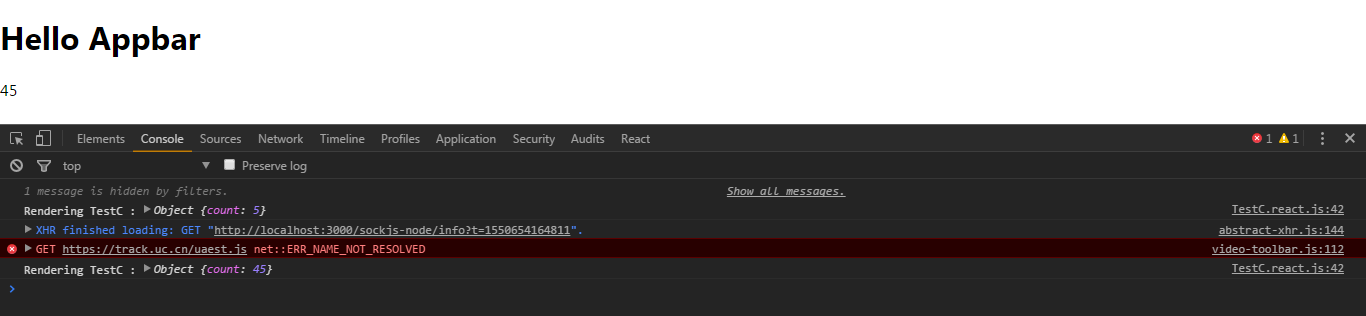
重绘了TestC组件,因为先前的值5更改为当前值-45。返回到React选项卡并将值更改为45,然后返回到Console。
如您所见,尽管先前的值和新的值相同,但是再次重绘了该组件。 :(
如何管理渲染器?
解决方案:React.memo()
React.memo()是React v16.6中引入的新功能。 它的操作原理类似于
React.PureComponent的原理:帮助管理组件功能的重绘。 用于类组件的
React.memo(...)是用于功能组件的
React.PureComponent 。
如何使用React.memo(...)?很简单 说我们有一个组件功能。
const Funcomponent = ()=> { return ( <div> Hiya!! I am a Funtional component </div> ) }
我们只需要将FuncComponent作为参数传递给React.memo函数。
const Funcomponent = ()=> { return ( <div> Hiya!! I am a Funtional component </div> ) } const MemodFuncComponent = React.memo(FunComponent)
React.memo返回
purified MemodFuncComponent 。 这就是我们将在JSX标记中绘制的内容。 当组件的属性和状态更改时,React将比较组件的先前属性和当前属性和状态。 并且只有当它们不相同时,才重绘组件函数。
将此应用到TestC功能组件。
let TestC = (props) => { console.log('Rendering TestC :', props) return ( <div> { props.count } </> ) } TestC = React.memo(TestC);
打开浏览器并下载应用程序。 打开DevTools并转到React选项卡。 选择
<Memo(TestC)> 。
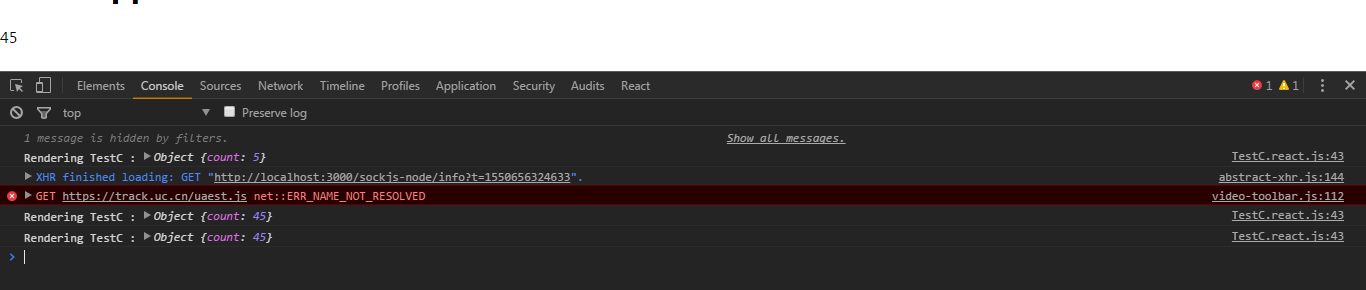
如果在右边的块中将计数器的属性更改为89,则将重绘该应用程序。

如果我们将值更改为上一个值89,则...

不会重绘!
荣耀React.memo(...)! :)
在我们的第一个示例中,不使用
React.memo(...) ,即使先前的值更改为相同的值,也将重绘TestC组件函数。 现在,由于
React.memo(...) ,我们可以避免不必要地渲染组件函数。
结论
- 让我们浏览一下清单吗?
React.PureComponent银;React.memo(...) -金;React.PureComponent与ES6类一起使用;React.memo(...)使用函数;React.PureComponent优化了ES6类的重绘;React.memo(...)优化了函数重绘;- 功能优化是一个了不起的主意;
React将永远不再相同。
如果您对文章有任何疑问或任何其他信息,更改或异议,请随时给
我写评论,电子邮件或私人消息。
谢谢你