 返回 下一个
我发现使用pytest进行Python测试是pytest测试环境的非常有用的入门指南。 它已经给我带来了公司的红利。
克里斯·剃须刀
起义技术产品副总裁
本书中的示例是使用Python 3.6和pytest 3.2编写的。 pytest 3.2支持Python 2.6、2.7和Python 3.3+。
本书网页上的链接 pragprog.com上提供了Tasks项目以及本书中显示的所有测试的源代码。 您无需下载源代码即可了解测试代码。 示例中以方便的形式提供了测试代码。 但是,为了跟上项目的任务,或者改编测试示例来测试自己的项目(不费力气!),您必须转到本书的网页并下载工作。 在该书的网页上,有一个勘误信息链接和一个论坛 。
在剧透下方是该系列文章的列表。
走吧
这是测试:
ch1 / test_one.py
def test_passing(): assert (1, 2, 3) == (1, 2, 3)
这是启动时的样子:
$ cd /path/to/code/ch1 $ pytest test_one.py ===================== test session starts ====================== collected 1 items test_one.py . =================== 1 passed in 0.01 seconds ===================
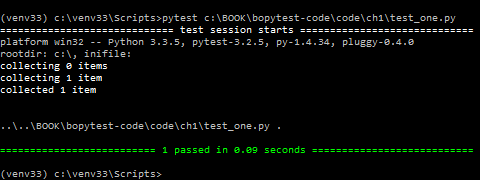
test_one.py之后的点表示已运行一项测试并通过了测试。 如果需要更多信息,可以使用-v或--verbose :
$ pytest -v test_one.py ===================== test session starts ====================== collected 1 items test_one.py::test_passing PASSED =================== 1 passed in 0.01 seconds ===================
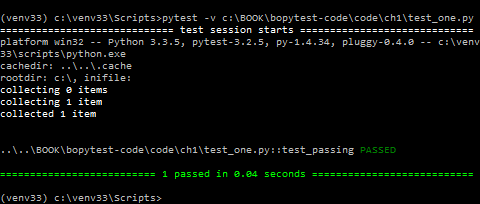
如果您有彩色端子,则“通过”和底线为绿色。 太好了!
这是一个失败的测试:
ch1 / test_two.py
def test_failing(): assert (1, 2, 3) == (3, 2, 1)
pytest显示测试失败的方式是开发人员喜欢pytest的众多原因之一。 让我们看看结果如何:
$ pytest test_two.py ===================== test session starts ====================== collected 1 items test_two.py F =========================== FAILURES =========================== _________________________ test_failing _________________________ def test_failing(): > assert (1, 2, 3) == (3, 2, 1) E assert (1, 2, 3) == (3, 2, 1) E At index 0 diff: 1 != 3 E Use -v to get the full diff test_two.py:2: AssertionError =================== 1 failed in 0.04 seconds ===================
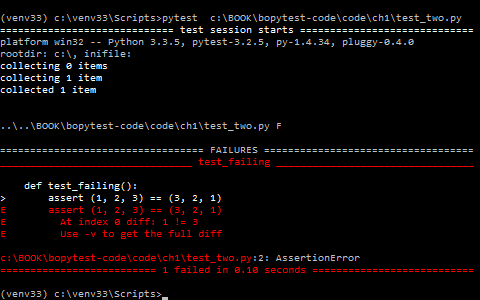
太好了! 测试test test_failing的部分向我们展示了为什么失败。
pytest准确地报告了第一次崩溃:索引0不匹配。
该消息的很大一部分是红色,这使它真正脱颖而出(如果您有彩色端子)。
这已经是很多信息,但是有一行提示说使用-v可以得到更多关于差异的描述。
让我们挂钩这个-v :
$ pytest -v test_two.py ===================== test session starts ====================== collected 1 items test_two.py::test_failing FAILED =========================== FAILURES =========================== _________________________ test_failing _________________________ def test_failing(): > assert (1, 2, 3) == (3, 2, 1) E assert (1, 2, 3) == (3, 2, 1) E At index 0 diff: 1 != 3 E Full diff: E - (1, 2, 3) E ? ^ ^ E + (3, 2, 1) E ? ^ ^ test_two.py:2: AssertionError =================== 1 failed in 0.04 seconds ===================
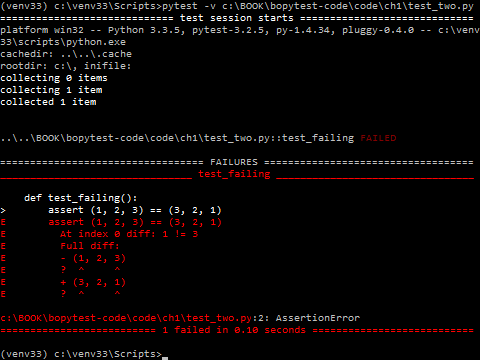
哇!
pytest添加脱字号(^)字符,以向我们确切显示差异。
如果您对pytest的编写,读取和运行测试的简易性以及对输出读取以查看发生故障的位置的简易性印象深刻,那么……您还没有看到任何东西。 它来自哪里,还有更多奇迹。 留下,让我向您展示为什么我认为pytest绝对是最佳的测试平台。
在本章的其余部分,您将安装pytest,查看运行它的各种方法,并遵循一些最常用的命令行选项。 在以后的章节中,您将学习如何编写使pytest功能发挥最大作用的测试函数,如何将安装代码放入设置和拆卸部分(称为Fixture)中,以及如何使用Fixture和插件使软件测试真正过载。
但是首先我要道歉。 很抱歉测试assert (1, 2, 3) == (3, 2, 1) ,这很无聊。 我听到打了吗? 没有人会在现实生活中编写这样的测试。 软件测试由检查其他软件的代码组成,这些软件可能永远无法正常运行。 并且(1, 2, 3) == (1, 2, 3)将始终有效。 这就是为什么我们在本书的其余部分中不会使用像这样的愚蠢测试的原因。 我们将考虑对真实软件项目的测试。 我们将使用一个需要测试代码的示例Tasks项目。 希望这足够简单以至于易于理解,但又不至于变得无聊。
软件测试的另一个有用的应用程序是测试您对被测软件如何工作的假设,其中可能包括测试您对第三方模块和软件包的理解,甚至构建Python数据结构。
Tasks项目使用基于namedtuple factory方法的Task结构,该方法是标准库的一部分。 任务结构用作在用户界面和API之间传输信息的数据结构。
在本章的其余部分中,我将使用Task来演示如何启动pytest并使用一些常用的命令行选项。
这是任务:
from collections import namedtuple Task = namedtuple('Task', ['summary', 'owner', 'done', 'id'])
在进入示例之前,让我们退后一步,讨论如何获取pytest并安装它。
自Python 2.6起,工厂namedtuple()函数就存在了,但我仍然发现许多Python开发人员都不知道这有多酷。 至少,将任务用于测试用例比(1, 2, 3) == (1, 2, 3)或(1, 2)==3更有趣。
在继续示例之前,让我们退后一步,讨论在哪里获取pytest以及如何安装它。
挖掘pytest
Pytest总部https://docs.pytest.org 。 这是官方文档。 但是它通过PyPI(Python包索引)在https://pypi.python.org/pypi/pytest上传播。
像通过PyPI分发的其他Python软件包一样,使用pip在用于测试的虚拟环境中安装pytest:
$ pip3 install -U virtualenv $ python3 -m virtualenv venv $ source venv/bin/activate $ pip install pytest
如果您不熟悉virtualenv或pip,我将为您介绍。 请参阅第155页的附录1“虚拟环境”和第159页的附录2。
Windows,Python 2和venv呢?
virtualenv和pip示例应在许多POSIX系统上运行,例如Linux和macOS,以及在许多版本的Python(包括Python 2.7.9和更高版本)上都可以使用。
该行中的venv / bin / activate源不适用于Windows,请改用venv \ Scripts \ activate.bat 。
这样做:
C:\> pip3 install -U virtualenv C:\> python3 -m virtualenv venv C:\> venv\Scripts\activate.bat (venv) C:\> pip install pytest
对于Python 3.6及更高版本,您可以使用venv代替virtualenv,并且不必担心先安装它。 它包含在Python 3.6及更高版本中。 但是,我听说某些平台在使用virtualenv时仍然表现更好。
运行pytest
$ pytest --help usage: pytest [options] [file_or_dir] [file_or_dir] [...] ...
没有参数,pytest将检查您的当前目录和测试文件的所有子目录,并运行找到的测试代码。 如果给pytest指定文件名,目录名或它们的列表,则会在此处找到它们,而不是当前目录。 递归检查命令行上指定的每个目录以找到测试代码。
例如,让我们创建一个名为task的子目录,并从以下测试文件开始:
ch1 /任务/ test_three.py
""" Task.""" from collections import namedtuple Task = namedtuple('Task', ['summary', 'owner', 'done', 'id']) Task.__new__.__defaults__ = (None, None, False, None) def test_defaults(): """ , .""" t1 = Task() t2 = Task(None, None, False, None) assert t1 == t2 def test_member_access(): """ .field () namedtuple.""" t = Task('buy milk', 'brian') assert t.summary == 'buy milk' assert t.owner == 'brian' assert (t.done, t.id) == (False, None)
test_member_access()测试旨在演示如何通过名称nd而不是通过索引访问成员,这是使用namedtuples的主要原因之一。
让我们在第二个文件中进行更多测试,以演示_asdict()和_replace()功能
您可以使用__new __.__ defaults__创建Task对象,而无需指定所有字段。 test_defaults()测试旨在演示和测试默认设置的工作方式。
test_member_access()测试应演示如何不按索引访问名为nd的成员,这是使用namedtuples的主要原因之一。
让我们在第二个文件中添加更多测试,以演示_asdict()和_replace()函数
ch1 /任务/ test_four.py
""" Task.""" from collections import namedtuple Task = namedtuple('Task', ['summary', 'owner', 'done', 'id']) Task.__new__.__defaults__ = (None, None, False, None) def test_asdict(): """_asdict() .""" t_task = Task('do something', 'okken', True, 21) t_dict = t_task._asdict() expected = {'summary': 'do something', 'owner': 'okken', 'done': True, 'id': 21} assert t_dict == expected def test_replace(): """ fields.""" t_before = Task('finish book', 'brian', False) t_after = t_before._replace(id=10, done=True) t_expected = Task('finish book', 'brian', True, 10) assert t_after == t_expected
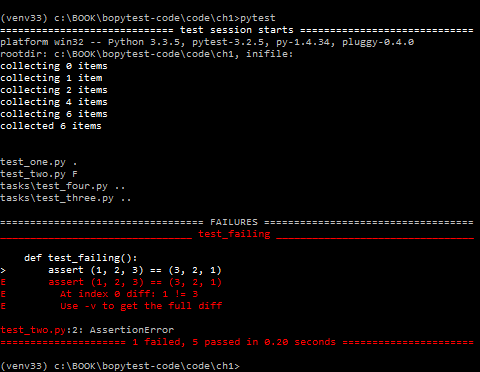
要运行pytest,您可以选择指定文件和目录。 如果您未指定任何文件或目录,则pytest将在当前工作目录和子目录中搜索测试。 它搜索以test_开头或以_test结尾的文件。 如果从ch1目录运行pytest而不使用命令,则将对四个文件运行测试:
$ cd /path/to/code/ch1 $ pytest ===================== test session starts ====================== collected 6 items test_one.py . test_two.py F tasks/test_four.py .. tasks/test_three.py .. =========================== FAILURES =========================== _________________________ test_failing _________________________ def test_failing(): > assert (1, 2, 3) == (3, 2, 1) E assert (1, 2, 3) == (3, 2, 1) E At index 0 diff: 1 != 3 E Use -v to get the full diff test_two.py:2: AssertionError ============== 1 failed, 5 passed in 0.08 seconds ==============
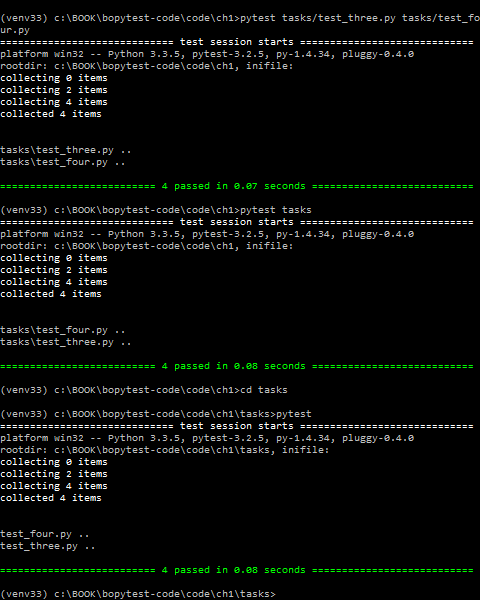
要仅运行我们的新任务测试,可以为pytest提供要运行的所有文件名或目录,或者从我们的测试所在的目录中调用pytest:
$ pytest tasks/test_three.py tasks/test_four.py ===================== test session starts ====================== collected 4 items tasks/test_three.py .. tasks/test_four.py .. =================== 4 passed in 0.02 seconds =================== $ pytest tasks ===================== test session starts ====================== collected 4 items tasks/test_four.py .. tasks/test_three.py .. =================== 4 passed in 0.03 seconds =================== $ cd /path/to/code/ch1/tasks $ pytest ===================== test session starts ====================== collected 4 items test_four.py .. test_three.py .. =================== 4 passed in 0.02 seconds ===================
pytest通过并找到要运行的测试的pytest执行部分称为测试发现。 pytest之所以能够找到我们要运行的所有测试,是因为我们根据pytest命名约定对它们进行了命名。
以下是命名约定的简要概述,以便可以使用pytest检测到您的测试代码:
- 测试文件应命名为
test_<something>.py或<something>_test.py 。 - 测试方法和功能应称为
test_<something> 。 - 测试类应称为
Test<Something> 。
由于我们的测试文件和函数test_ ,所以一切都很好。 如果您有一堆名称不同的测试,则有多种方法可以更改这些发现规则。
我将在第113页的第6章“配置”中进行介绍。
让我们仔细看看只运行一个文件的结果:
$ cd /path/to/code/ch1/tasks $ pytest test_three.py ================= test session starts ================== platform darwin -- Python 3.6.2, pytest-3.2.1, py-1.4.34, pluggy-0.4.0 rootdir: /path/to/code/ch1/tasks, inifile: collected 2 items test_three.py .. =============== 2 passed in 0.01 seconds ===============
结果告诉了我们很多。
=====测试会话开始====
。
pytest提供了一个优雅的分隔符来启动测试会话。 会话是单个pytest调用,包括在多个目录中运行的所有测试。 当我在第56页的夹具区域定义中谈论与pytest夹具有关的会话区域时,该会话定义变得很重要。
达尔文平台-在我的Mac上。 在Windows计算机上,平台是不同的。 以下是Python和pytest的版本,以及对pytest软件包的依赖。 py和pluggy都是pytest团队开发的软件包,可帮助实现pytest。
rootdir:/路径/到/代码/ ch1 /任务,ini文件:
rootdir是在其中搜索测试代码的所有目录的最顶层共享目录。 inifile (此处为空)列出了使用的配置文件。 配置文件可以是pytest.ini , tox.ini或setup.cfg 。 有关配置文件的更多信息,请参阅第113页第6章,“配置”。
收集了2个项目
这是文件中的两个测试功能。
test_three.py ..
test_three.py显示测试文件。 每个测试文件只有一行。 两点表示测试已通过-每个测试功能或方法一个点。 点仅用于通过测试。 失败,错误,跳过,xfails和xpass分别用F,E,s,x和X表示。 如果要查看更多通过测试的要点,请使用-v或--verbose选项。
== 2在0.01秒内通过==
该行表示通过的测试数和整个测试会话所花费的时间。 如果有通过测试,则每个类别的编号也会在此处显示。
测试结果是执行测试或查看结果的用户了解测试过程中发生的情况的主要方式。 在pytest中,测试函数可以有几种不同的结果,而不仅仅是通过或失败。 这是测试功能的可能结果:
- 通过(。):测试成功完成。
- 失败(F):测试失败(或XPASS +严格)。
- 跳过:跳过了测试。 您可以使用
@pytest.mark.skip()或pytest.mark.skipif()装饰器pytest.mark.skipif()跳过测试,如第34页的“跳过测试”部分所述。 - xfail(x):测试不应该通过,它已经启动并且失败。 您可以使用
@pytest.mark.xfail()装饰器@pytest.mark.xfail()第37页的测试标记中将其描述为预期失败@pytest.mark.xfail()来强制pytest指示测试失败。 - XPASS(X):测试不应该通过,它已经启动并通过!
- 错误(E):在测试功能之外发生了异常,无论是在第49章第3章pytest固定装置中讨论的夹具中,还是在第95章第5章的插件中讨论的钩子函数中都发生了异常。
仅执行一项测试
开始编写测试后,可能要做的第一件事就是只运行一个。 直接指定文件并添加名称::test_name :
$ cd /path/to/code/ch1 $ pytest -v tasks/test_four.py::test_asdict =================== test session starts =================== collected 3 items tasks/test_four.py::test_asdict PASSED ================ 1 passed in 0.01 seconds =================
现在让我们看一些选项。
使用选项
我们已经使用了verbose, -v或--verbose选项几次,但是还有许多值得了解的选项。 在本书中,我们将只使用其中的一些。 您可以使用pytest --help选项查看完整列表。
以下是一些在使用pytest时非常有用的选项。 这不是一个完整的列表,但是这些选项足以启动。
$ pytest --help usage: pytest [options] [file_or_dir] [file_or_dir] [...] ... subset of the list ... positional arguments: file_or_dir general: -k EXPRESSION only run tests which match the given substring expression. An expression is a python evaluatable expression where all names are substring-matched against test names and their parent classes. Example: -k 'test_method or test_other' matches all test functions and classes whose name contains 'test_method' or 'test_other', while -k 'not test_method' matches those that don't contain 'test_method' in their names. Additionally keywords are matched to classes and functions containing extra names in their 'extra_keyword_matches' set, as well as functions which have names assigned directly to them. -m MARKEXPR only run tests matching given mark expression. example: -m 'mark1 and not mark2'. --markers show markers (builtin, plugin and per-project ones). -x, --exitfirst exit instantly on first error or failed test. --maxfail=num exit after first num failures or errors. ... --capture=method per-test capturing method: one of fd|sys|no. -s shortcut for --capture=no. ... --lf, --last-failed rerun only the tests that failed at the last run (or all if none failed) --ff, --failed-first run all tests but run the last failures first. This may re-order tests and thus lead to repeated fixture setup/teardown ... reporting: -v, --verbose increase verbosity. -q, --quiet decrease verbosity. --verbosity=VERBOSE set verbosity ... -l, --showlocals show locals in tracebacks (disabled by default). --tb=style traceback print mode (auto/long/short/line/native/no). ... --durations=N show N slowest setup/test durations (N=0 for all). ... collection: --collect-only only collect tests, don't execute them. ... test session debugging and configuration: --basetemp=dir base temporary directory for this test run.(warning: this directory is removed if it exists) --version display pytest lib version and import information. -h, --help show help message and configuration info
-仅收集
--collect-only指示将使用给定的参数和配置执行哪些测试。 首先显示此参数很方便,以便将输出用作其他示例的参考。 如果您从ch1目录开始,则应该看到到目前为止在本章中已经看到的所有测试功能:
$ cd /path/to/code/ch1 $ pytest --collect-only =================== test session starts =================== collected 6 items <Module 'test_one.py'> <Function 'test_passing'> <Module 'test_two.py'> <Function 'test_failing'> <Module 'tasks/test_four.py'> <Function 'test_asdict'> <Function 'test_replace'> <Module 'tasks/test_three.py'> <Function 'test_defaults'> <Function 'test_member_access'> ============== no tests ran in 0.03 seconds ===============
--collect-only对于验证是否正确选择了在运行测试之前选择测试的其他选项很有用。 我们将再次使用它与-k一起显示其工作原理。
-k表达
-k允许您使用表达式来定义测试功能。
一个非常强大的选择! 如果名称是唯一的,它可以用作运行单独测试的快捷方式,或者运行名称中具有通用前缀或后缀的一组测试。 假设您要运行测试test_asdict()和test_defaults() 。 您可以使用以下方法检查过滤器:-- --collect-only :
$ cd /path/to/code/ch1 $ pytest -k "asdict or defaults" --collect-only =================== test session starts =================== collected 6 items <Module 'tasks/test_four.py'> <Function 'test_asdict'> <Module 'tasks/test_three.py'> <Function 'test_defaults'> =================== 4 tests deselected ==================== ============== 4 deselected in 0.03 seconds ===============
是的 这类似于我们所需要的。 现在,您可以通过删除--collect-only来运行它们:
$ pytest -k "asdict or defaults" =================== test session starts =================== collected 6 items tasks/test_four.py . tasks/test_three.py . =================== 4 tests deselected ==================== ========= 2 passed, 4 deselected in 0.03 seconds ==========
糟糕! 只是点。 所以他们过去了。 但是他们是正确的测试吗? 一种找出方法是使用-v或--verbose :
$ pytest -v -k "asdict or defaults" =================== test session starts =================== collected 6 items tasks/test_four.py::test_asdict PASSED tasks/test_three.py::test_defaults PASSED =================== 4 tests deselected ==================== ========= 2 passed, 4 deselected in 0.02 seconds ==========
是的 这些是正确的测试。
-m MARKEXPR
标记是标记一部分测试功能以一起运行的最佳方法之一。 例如,即使它们在单独的文件中,运行test_replace()和test_member_access()一种方法是对其进行标记。 可以使用任何标记名称。 假设您要使用run_these_please 。 使用@pytest.mark.run_these_please装饰器记录测试,如下所示:
import pytest ... @pytest.mark.run_these_please def test_member_access(): ...
现在对test_replace()相同。 然后,您可以使用pytest -m run_these_please使用相同的标记运行所有测试:
$ cd /path/to/code/ch1/tasks $ pytest -v -m run_these_please ================== test session starts =================== collected 4 items test_four.py::test_replace PASSED test_three.py::test_member_access PASSED =================== 2 tests deselected =================== ========= 2 passed, 2 deselected in 0.02 seconds =========
标记表达不必是单个标记。 您可以将-m "mark1 and mark2"等选项用于带有两个标记的测试,将-m "mark1 and not mark2"用于具有标签1但没有标签2的测试, -m "mark1 or mark2"用于测试与其中之一等,我将在第31页的“标记验证方法”中更详细地讨论标记。
-x,--exitfirst
pytest的正常行为是运行它找到的所有测试。 如果测试功能检测到断言或异常失败,则此测试将停止并且测试将失败。 然后pytest运行下一个测试。 在大多数情况下,这就是您所需要的。 但是,尤其是在调试问题时,如果测试不正确,它将立即干扰整个测试会话。 这是-x选项的作用。 让我们在目前进行的六个测试中尝试一下:
$ cd /path/to/code/ch1 $ pytest -x ====================== test session starts ==================== collected 6 items test_one.py . test_two.py F ============================ FAILURES ========================= __________________________ test_failing _______________________ def test_failing(): > assert (1, 2, 3) == (3, 2, 1) E assert (1, 2, 3) == (3, 2, 1) E At index 0 diff: 1 != 3 E Use -v to get the full diff test_two.py:2: AssertionError =============== 1 failed, 1 passed in 0.38 seconds ============
在输出的顶部,您看到所有六个测试(或“项目”)均已收集,在最底行,您看到一个测试失败并通过了一个测试,而pytest显示了“ Interrupted”行让我们知道他已经停止了。 如果没有-x则将运行所有六个测试。 让我们在没有-x情况下再次重复。 我们还使用--tb=no来禁用堆栈跟踪,因为您已经看到了它,而不必再次看到它:
$ cd /path/to/code/ch1 $ pytest --tb=no =================== test session starts =================== collected 6 items test_one.py . test_two.py F tasks/test_four.py .. tasks/test_three.py .. =========== 1 failed, 5 passed in 0.09 seconds ============
, -x , pytest test_two.py .
--maxfail=num
-x . , , , --maxfail , , . , . , --maxfail = 2 , , --maxfail = 1 , -x :
$ cd /path/to/code/ch1 $ pytest --maxfail=2 --tb=no =================== test session starts =================== collected 6 items test_one.py . test_two.py F tasks/test_four.py .. tasks/test_three.py .. =========== 1 failed, 5 passed in 0.08 seconds ============ $ pytest --maxfail=1 --tb=no =================== test session starts =================== collected 6 items test_one.py . test_two.py F !!!!!!!!! Interrupted: stopping after 1 failures !!!!!!!!!! =========== 1 failed, 1 passed in 0.19 seconds ============
E --tb=no , .
-s and --capture=method
-s — , stdout , . --capture=no . , . , , , . -s --capture=no . print() , .
, , -l/--showlocals , , .
--capture=fd --capture=sys . — --capture=sys sys.stdout/stderr mem-. --capture=fd 1 2 .
sys fd . , , . -s . , -s , .
; . , , .
-lf, --last-failed
. --lf :
, --tb , , .
$ cd /path/to/code/ch1 $ pytest --lf =================== test session starts =================== run-last-failure: rerun last 1 failures collected 6 items test_two.py F ======================== FAILURES ========================= ______________________ test_failing _______________________ def test_failing(): > assert (1, 2, 3) == (3, 2, 1) E assert (1, 2, 3) == (3, 2, 1) E At index 0 diff: 1 != 3 E Use -v to get the full diff test_two.py:2: AssertionError =================== 5 tests deselected ==================== ========= 1 failed, 5 deselected in 0.08 seconds ==========
–ff, --failed-first
--ff/--failed-first , --last-failed , , :
$ cd /path/to/code/ch1 $ pytest --ff --tb=no =================== test session starts =================== run-last-failure: rerun last 1 failures first collected 6 items test_two.py F test_one.py . tasks/test_four.py .. tasks/test_three.py .. =========== 1 failed, 5 passed in 0.09 seconds ============
test_failing() test\_two.py test\_one.py . , test_failing() , --ff
-v, --verbose
-v/--verbose . , , .
, --ff --tb=no :
$ cd /path/to/code/ch1 $ pytest -v --ff --tb=no =================== test session starts =================== run-last-failure: rerun last 1 failures first collected 6 items test_two.py::test_failing FAILED test_one.py::test_passing PASSED tasks/test_four.py::test_asdict PASSED tasks/test_four.py::test_replace PASSED tasks/test_three.py::test_defaults PASSED tasks/test_three.py::test_member_access PASSED =========== 1 failed, 5 passed in 0.07 seconds ============
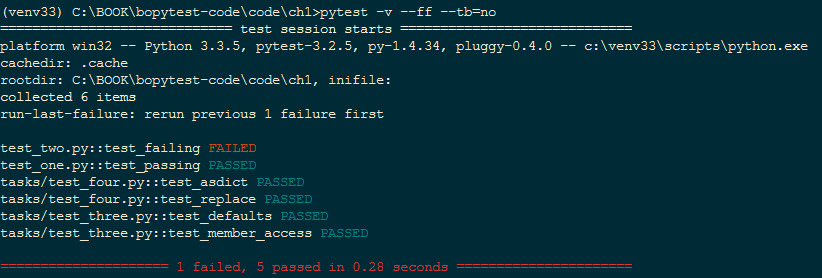
FAILED PASSED.
-q, --quiet
-q/--quiet -v/--verbose ; . --tb=line , .
- q :
$ cd /path/to/code/ch1 $ pytest -q .F.... ======================== FAILURES ========================= ______________________ test_failing _______________________ def test_failing(): > assert (1, 2, 3) == (3, 2, 1) E assert (1, 2, 3) == (3, 2, 1) E At index 0 diff: 1 != 3 E Full diff: E - (1, 2, 3) E ? ^ ^ E + (3, 2, 1) E ? ^ ^ test_two.py:2: AssertionError 1 failed, 5 passed in 0.08 seconds
-q , . -q ( --tb=no ), , .
-l, --showlocals
-l/--showlocals tracebacks .
. test_replace()
t_expected = Task('finish book', 'brian', True, 10)
在
t_expected = Task('finish book', 'brian', True, 11)
10 11 . . --l/--showlocals :
$ cd /path/to/code/ch1 $ pytest -l tasks =================== test session starts =================== collected 4 items tasks/test_four.py .F tasks/test_three.py .. ======================== FAILURES ========================= ______________________ test_replace _______________________ @pytest.mark.run_these_please def test_replace(): """replace() should change passed in fields.""" t_before = Task('finish book', 'brian', False) t_after = t_before._replace(id=10, done=True) t_expected = Task('finish book', 'brian', True, 11) > assert t_after == t_expected E AssertionError: assert Task(summary=...e=True, id=10) == Task(summary='...e=True, id=11) E At index 3 diff: 10 != 11 E Use -v to get the full diff t_after = Task(summary='finish book', owner='brian', done=True, id=10) t_before = Task(summary='finish book', owner='brian', done=False, id=None) t_expected = Task(summary='finish book', owner='brian', done=True, id=11) tasks\test_four.py:28: AssertionError =========== 1 failed, 3 passed in 0.08 seconds ============
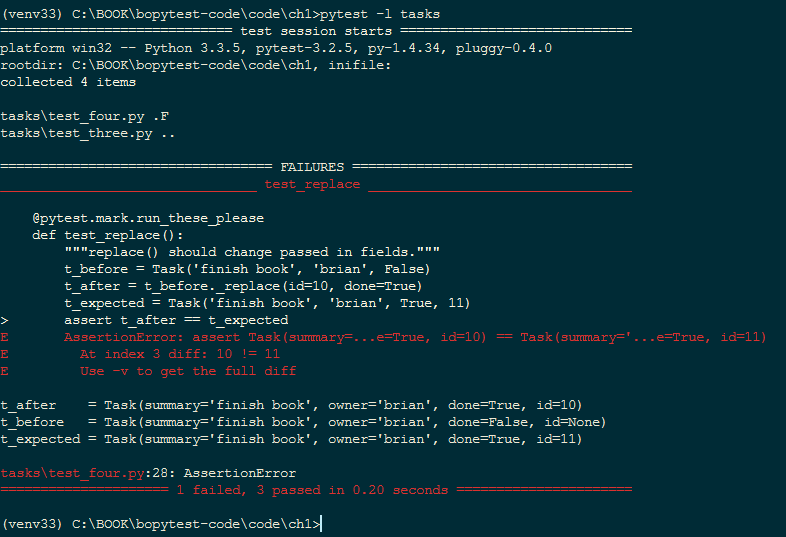
t_after , t_before t_expected , assert-.
--tb=style
--tb=style . pytest , , . tracebacks , , . --tb=style . , , short, line no. short assert E ; line ; no .
test_replace() , , . --tb=no
$ cd /path/to/code/ch1 $ pytest --tb=no tasks =================== test session starts =================== collected 4 items tasks/test_four.py .F tasks/test_three.py .. =========== 1 failed, 3 passed in 0.04 seconds ============
--tb=line in many cases is enough to tell what's wrong. If you have a ton of failing tests, this option can help to show a pattern in the failures:
--tb=line , , . , :
$ pytest --tb=line tasks =================== test session starts =================== collected 4 items tasks/test_four.py .F tasks/test_three.py .. ======================== FAILURES ========================= /path/to/code/ch1/tasks/test_four.py:20: AssertionError: assert Task(summary=...e=True, id=10) == Task( summary='...e=True, id=11) =========== 1 failed, 3 passed in 0.05 seconds ============
verbose tracebacks --tb=short :
$ pytest --tb=short tasks =================== test session starts =================== collected 4 items tasks/test_four.py .F tasks/test_three.py .. ======================== FAILURES ========================= ______________________ test_replace _______________________ tasks/test_four.py:20: in test_replace assert t_after == t_expected E AssertionError: assert Task(summary=...e=True, id=10) == Task( summary='...e=True, id=11) E At index 3 diff: 10 != 11 E Use -v to get the full diff =========== 1 failed, 3 passed in 0.04 seconds ============
, , .
, .
pytest --tb=long traceback. pytest --tb=auto tracebacks , . . pytest --tb=native traceback .
--durations=N
--durations=N , . ; N tests/setups/teardowns . --durations=0 , .
, time.sleep(0.1) . , :
$ cd /path/to/code/ch1 $ pytest --durations=3 tasks ================= test session starts ================= collected 4 items tasks/test_four.py .. tasks/test_three.py .. ============== slowest 3 test durations =============== 0.10s call tasks/test_four.py::test_replace 0.00s setup tasks/test_three.py::test_defaults 0.00s teardown tasks/test_three.py::test_member_access ============== 4 passed in 0.13 seconds
sleep , . : call(), (setup) (teardown). , , , , . 3, pytest Fixtures, . 49.
--version
--version pytest , :
$ pytest --version This is pytest version 3.0.7, imported from /path/to/venv/lib/python3.5/site-packages/pytest.py
pytest , pytest site-packages .
-h, --help
-h/--help , , pytest. , stock- pytest, , , .
-h :
- : pytest [] [file_or_dir] [file_or_dir] [...]
- ,
- , ini , 6, , . 113
- , pytest ( 6, , . 113)
- , pytest
--markers , 2, , . 23 - , pytest
--fixtures , 3, pytest, . 49
:
(shown according to specified file_or_dir or current dir if not specified)
, , . , pytest conftest.py, - (hook functions), , .
pytest conftest.py . conftest.py ini, pytest.ini 6 «», 113.
练习题
, python -m virtualenv python -m venv . , , , , , . , . 1, , . 155, .
.
- $ source venv/bin/activate - $ deactivate On Windows: - C:\Users\okken\sandbox>venv\scripts\activate.bat - C:\Users\okken\sandbox>deactivate
pytest . . 2, pip, 159, . , pytest, , .
. , . pytest .
assert. assert something == something_else; , :
- assert 1 in [2, 3, 4]
- assert a < b
- assert 'fizz' not in 'fizzbuzz'
接下来是什么
在本章中,我们研究了在哪里获取pytest以及各种运行方式。但是,我们没有讨论测试功能中包含的内容。在下一章中,我们将考虑编写测试函数,对其进行参数化,以便使用不同的数据调用它们,并将测试分组为类,模块和包。
返回 下一个