FFmpeg Visual Studio入门

你好 首先,我正在开发一个程序,用于在廉价的低功耗处理器(例如Intel ATOM Z8350)上确定汽车编号。 在不使用神经网络的情况下,以良好的性能确定静态图片中的俄罗斯数字(高达97%)时,我们获得了相当不错的结果。 剩下的仅是很小的-使用IP摄像机即可工作。图1。
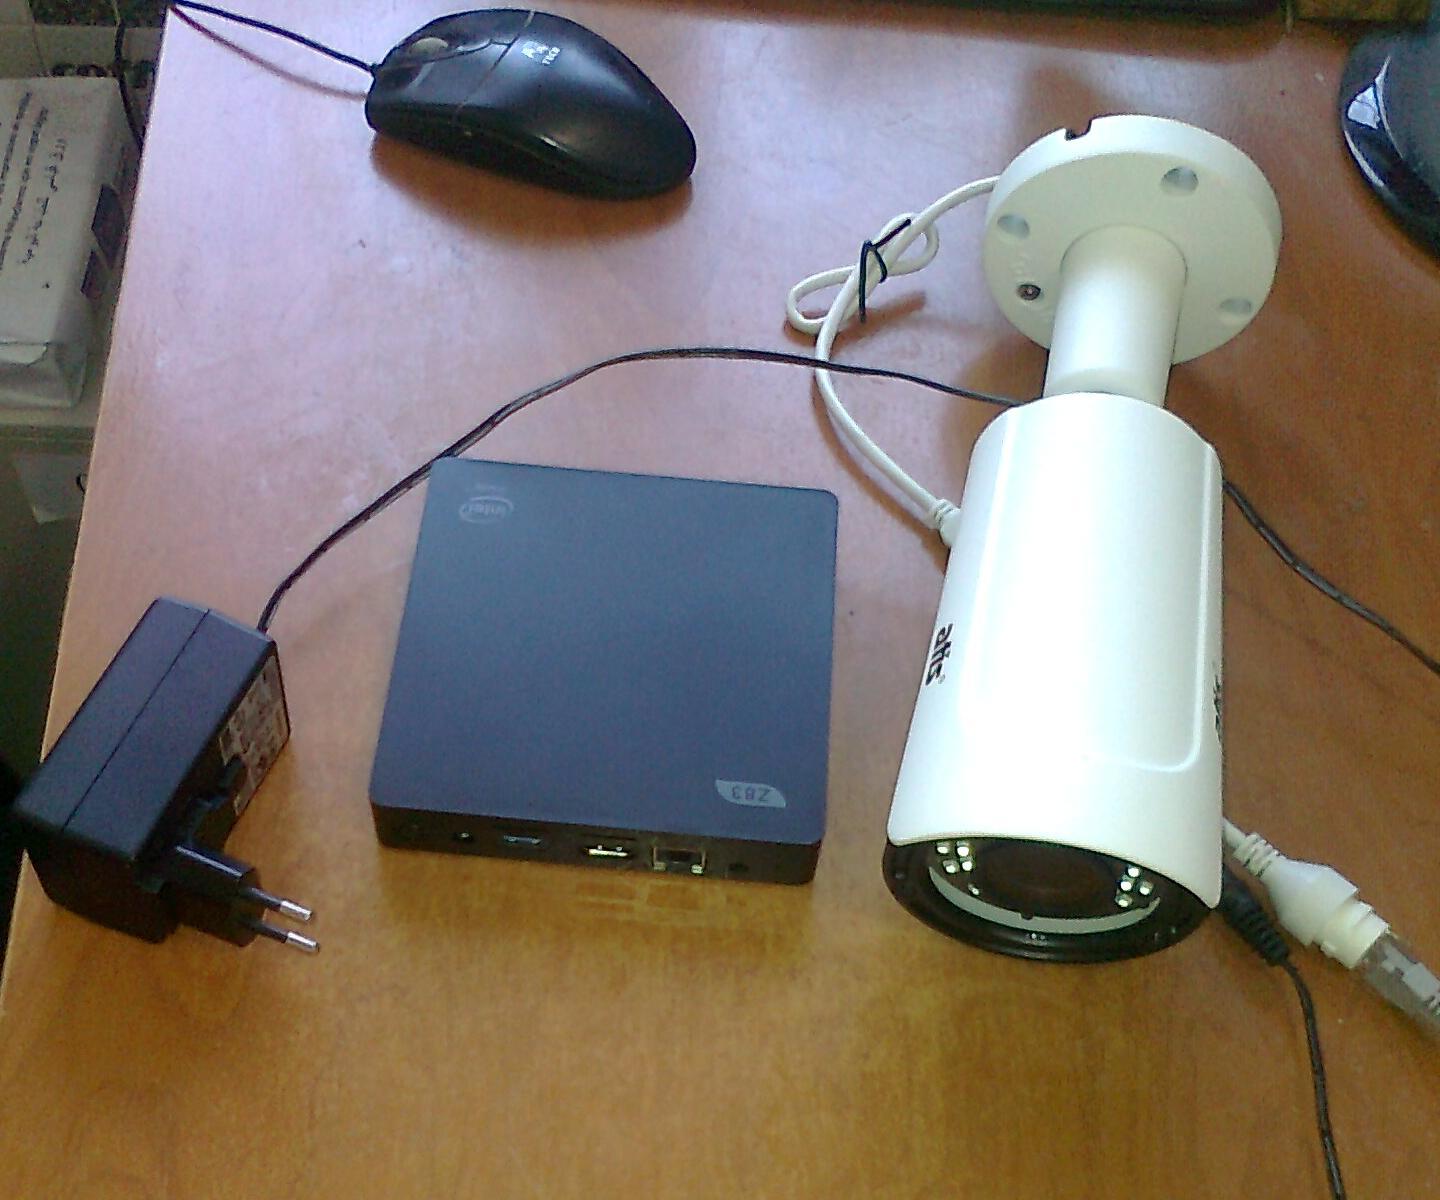
图片
图1英特尔ATOM Z83II计算机和ATIS IP摄像机

FFmpeg是一个用于创建视频应用程序甚至通用实用程序的库,该库承担了视频处理的所有艰苦工作,为您完成了所有解码,编码,多路复用和多路分解。

任务 :h.264标准的全高清IP摄像机传输RTSP流。 解压缩后的帧大小为1920x1080像素,频率为每秒25帧。 必须在RAM中接收解码的帧,并将每25帧保存到磁盘。

在此示例中,我们将以编程方式解码帧。 目的是学习如何使用FFmpeg,并进一步比较使用硬件解码获得的结果。 您将看到FFmpeg-这很容易!

安装FFmpeg :许多人建议为其硬件构建FFmpeg。 我建议使用zeranoe builds ,它可以大大简化任务。 zeranoe组件包含对DXVA2的支持非常重要, 稍后将在硬件解码时为我们提供方便。

我们选择https://ffmpeg.zeranoe.com/builds/网站并下载2个共享和开发档案,然后再选择32或64位。 开发档案库存储库(.lib)和包含。 共享存档包含必要的.dll,这些文件需要在以后的程序的文件夹中重写。

因此,在C:\驱动器上创建ffmpeg文件夹。 我们将文件从dev存档重写到其中。

将FFmpeg连接到Visual Studio 2017:创建一个新项目。 转到项目属性(“项目”-“属性”)。 接下来,使用C / C ++并选择“包含文件的其他目录”。 设置值:“ C:\ ffmpeg \ dev \ include;”。 之后,转到链接程序附加库目录,并将值设置为“ C:\ ffmpeg \ dev \ lib;”。 仅此而已。 FFmpeg已连接到我们的项目。

FFmpeg的第一个项目:软件视频解码,并将每25帧记录到磁盘上。 在图2的框图中介绍了在FFmpeg中使用视频文件的原理。
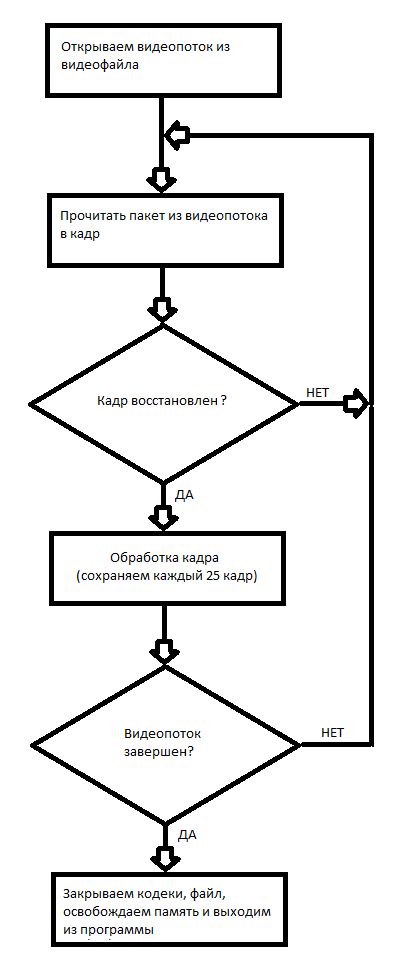
图片
图2使用视频文件的框图。

这是C ++项目代码
// 21  2019 //  ,  ,   http://dranger.com/ffmpeg/tutorial01.html // #include "pch.h" extern "C" { #include <libavcodec/avcodec.h> #include <libavformat/avformat.h> #include <libswscale/swscale.h> #include <libavformat/avio.h> #include <libavutil/pixdesc.h> #include <libavutil/hwcontext.h> #include <libavutil/opt.h> #include <libavutil/avassert.h> #include <libavutil/imgutils.h> #include <libavutil/motion_vector.h> #include <libavutil/frame.h> } <cut /> #include <stdio.h> #include <stdlib.h> #include <string.h> #pragma comment(lib, "avcodec.lib") #pragma comment(lib, "avformat.lib") #pragma comment(lib, "swscale.lib") #pragma comment(lib, "avdevice.lib") #pragma comment(lib, "avutil.lib") #pragma comment(lib, "avfilter.lib") #pragma comment(lib, "postproc.lib") #pragma comment(lib, "swresample.lib") #define _CRT_SECURE_NO_WARNINGS #pragma warning(disable : 4996) // compatibility with newer API #if LIBAVCODEC_VERSION_INT < AV_VERSION_INT(55,28,1) #define av_frame_alloc avcodec_alloc_frame #define av_frame_free avcodec_free_frame #endif void SaveFrame(AVFrame *pFrame, int width, int height, int iFrame) { FILE *pFile; char szFilename[32]; int y; //        sprintf(szFilename, "frame%d.ppm", iFrame); pFile = fopen(szFilename, "wb"); if (pFile == NULL) return; //    fprintf(pFile, "P6\n%d %d\n255\n", width, height); //    for (y = 0; y < height; y++) fwrite(pFrame->data[0] + y * pFrame->linesize[0], 1, width * 3, pFile); //   fclose(pFile); } <cut /> int main(int argc, char *argv[]) { AVFormatContext *pFormatCtx = NULL; int i, videoStream; AVCodecContext *pCodecCtxOrig = NULL; AVCodecContext *pCodecCtx = NULL; AVCodec *pCodec = NULL; AVFrame *pFrame = NULL; AVFrame *pFrameRGB = NULL; AVPacket packet; int frameFinished; int numBytes; uint8_t *buffer = NULL; struct SwsContext *sws_ctx = NULL; if (argc < 2) { printf("Please provide a movie file\n"); return -1; } //      av_register_all(); //     if (avformat_open_input(&pFormatCtx, argv[1], NULL, NULL) != 0) return -1; //     //      if (avformat_find_stream_info(pFormatCtx, NULL) < 0) return -1; //     : , ,    av_dump_format(pFormatCtx, 0, argv[1], 0); //    videoStream = -1; for (i = 0; i < pFormatCtx->nb_streams; i++) if (pFormatCtx->streams[i]->codec->codec_type == AVMEDIA_TYPE_VIDEO) { videoStream = i; break; } if (videoStream == -1) return -1; //   <cut /> //      pCodecCtxOrig = pFormatCtx->streams[videoStream]->codec; //      pCodec = avcodec_find_decoder(pCodecCtxOrig->codec_id); if (pCodec == NULL) { fprintf(stderr, "Unsupported codec!\n"); return -1; //    } //   pCodecCtx = avcodec_alloc_context3(pCodec); if (avcodec_copy_context(pCodecCtx, pCodecCtxOrig) != 0) { fprintf(stderr, "Couldn't copy codec context"); return -1; //   } //   if (avcodec_open2(pCodecCtx, pCodec, NULL) < 0) return -1; //     //     pFrame = av_frame_alloc(); //      RGB pFrameRGB = av_frame_alloc(); if (pFrameRGB == NULL) return -1; //        numBytes = avpicture_get_size(AV_PIX_FMT_RGB24, pCodecCtx->width, pCodecCtx->height); buffer = (uint8_t *)av_malloc(numBytes * sizeof(uint8_t)); //      . avpicture_fill((AVPicture *)pFrameRGB, buffer, AV_PIX_FMT_RGB24, pCodecCtx->width, pCodecCtx->height); //  SWS context       RGB sws_ctx = sws_getContext(pCodecCtx->width, pCodecCtx->height, pCodecCtx->pix_fmt, pCodecCtx->width, pCodecCtx->height, AV_PIX_FMT_RGB24, SWS_BILINEAR, NULL, NULL, NULL ); <cut /> //     25    i = 0; while (av_read_frame(pFormatCtx, &packet) >= 0) { //    ? if (packet.stream_index == videoStream) { //    avcodec_decode_video2(pCodecCtx, pFrame, &frameFinished, &packet); //    ? if (frameFinished) { //    RGB sws_scale(sws_ctx, (uint8_t const * const *)pFrame->data, pFrame->linesize, 0, pCodecCtx->height, pFrameRGB->data, pFrameRGB->linesize); //     if (++i % 25 == 0) SaveFrame(pFrameRGB, pCodecCtx->width, pCodecCtx->height,i); } } //   av_free_packet(&packet); } //      av_free(buffer); av_frame_free(&pFrameRGB); av_frame_free(&pFrame); avcodec_close(pCodecCtx); avcodec_close(pCodecCtxOrig); avformat_close_input(&pFormatCtx); return 0; } 


因为 我的IP摄像机的IP为192.168.1.168,则程序调用:

 decode.exe rtsp://192.168.1.168 

另外,此示例可以解码视频文件,足以表明其位置。

因此,在此示例中,我们学会了以编程方式解码视频文件并将接收到的帧保存到磁盘。 帧以.ppm格式保存。 您可以在Windows上使用IrfanView 64或GIMP打开这些文件。

结论: RTSP Full HD H.264流的软件解码最多需要两个Intel ATOM Z8350内核;此外,由于部分帧解码不正确,因此会定期发生数据包丢失。 该方法更适用于解码录制的视频文件,因为不需要实时操作。

在下一篇文章中,我将告诉您如何在硬件中解码RTSP流。

与项目一起存档

工作程序

FFmpeg资料的链接:


1. 有关使用FFmpeg教程,有点过时了。
2. 有关FFmpeg的各种有用信息。
3. 有关使用FFmpeg提供的各种库的信息。

Source: https://habr.com/ru/post/zh-CN449198/


All Articles