
本文适用于需要使用GitLab在sonatype和/或maven中央存储库中快速发布其产品的Java开发人员。 在本文中,我将讨论设置gitlab-runner,gitlab-ci和maven-plugin来解决此问题。
先决条件:
- 安全存储mvn和GPG密钥。
- 安全执行公共CI任务。
- 将工件(发布/快照)上传到公共存储库。
- 自动检查发布版本以在Maven Central中发布。
- 将工件上传到多个项目的资源库的一般解决方案。
- 简单性和可用性。
目录内容
- Googolplex已在本文中详细描述了通过Sonatype OSS存储库托管服务将工件发布到Maven Central的机制,因此,我将在正确的位置引用该文章。
- 我们已预先注册了Sonatype JIRA并启动了一个票据以打开存储库(有关更多详细信息,请阅读为Sonatype JIRA创建票据一节)。 打开存储库后,将使用JIRA登录名/密码对(以下称为Sonatype帐户)将工件上传到Sonatype nexus。
- 此外,非常简单地描述了生成GPG密钥的过程。 有关更多信息,请参阅配置GnuPG以对工件进行签名 。
- 如果使用Linux控制台生成GPG密钥(gnupg / gnupg2),则需要安装rng-tools来生成熵。 否则,密钥生成可能需要很长时间。
- 存储公共 GPG密钥的服务
到内容
在GitLab中配置部署项目
- 首先,必须创建和配置一个项目,在该项目中将存储管道以部署工件。 我称我的项目简单明了- 部署
- 创建存储库后,必须限制访问权限才能更改存储库。
转到项目->设置->存储库->受保护的分支。 我们删除所有规则,并使用通配符*添加唯一的规则,并仅对具有维护者角色的用户推送和合并权限。 此规则将适用于该项目的所有用户以及该项目所属的组。

- 如果有几个维护者,那么最好的解决方案是原则上限制对项目的访问。
转到项目->设置->常规->可见性,项目功能,权限,并将项目可见性设置为私有 。
我有一个公共领域的项目,因为我使用自己的GitLab Runner,并且只有我有权更改存储库。 好吧,实际上,在公共管道日志中公开私人信息不符合我的利益。 - 更改存储库的更严格规则
转到项目->设置->存储库->推送规则,并设置标志Committer限制,检查作者是否是GitLab用户。 我还建议您配置提交的签名 ,并设置拒绝未签名的提交标志。 - 接下来,您需要配置触发器以运行任务
转到项目->设置-> CI / CD->管道触发器并创建一个新的触发器令牌
该标记可以立即添加到一组项目的变量的常规配置中。
转到组->设置-> CI / CD->变量,然后添加变量DEPLOY_TOKEN并在该值中包含触发令牌。
到内容
Gitlab亚军
本节介绍使用其自己的(特定)运行程序和公用(共享)运行程序在部署时启动任务的配置。
具体亚军
我使用自己的跑步机,首先,它方便,快捷,便宜。
对于亚军,我建议使用具有1个CPU,2 GB RAM,20 GB HDD的Linux VDS。 发行价格为每年3000₽。
我的跑步者对于跑步者,我选择了VDS 4 CPU,4 GB RAM,50 GB SSD。 它的价格约为11,000卢布,从不后悔。
我总共有7辆车。 阿鲁巴岛5,伊霍尔岛2。
因此,我们有一个跑步者。 现在我们将对其进行配置。
我们转到使用SSH的计算机并安装java,git,maven,gnupg2。
到内容
安装gitlabRunner
- 创建一个新的
runner组
sudo groupadd runner
- 为Maven缓存创建目录并附加运行
runner组的权限
如果您不打算在同一台计算机上运行多个运行程序,则可以跳过此项目。
mkdir -p /usr/cache/.m2/repository chown -R :runner /usr/cache chmod -R 770 /usr/cache
- 创建
gitlab-deployer并将runner gitlab-deployer添加到组中
useradd -m -d /home/gitlab-deployer gitlab-deployer usermod -a -G runner gitlab-deployer
/etc/ssh/sshd_config下行添加到/etc/ssh/sshd_config文件中
AllowUsers root@* gitlab-deployer@127.0.0.1
- 重新启动
sshd
systemctl restart sshd
- 我们为
gitlab-deployer设置密码(这很简单,因为对本地主机的限制适用)
passwd gitlab-deployer
- 安装GitLab Runner(Linux x86-64)
sudo wget -O /usr/local/bin/gitlab-runner https://gitlab-runner-downloads.s3.amazonaws.com/latest/binaries/gitlab-runner-linux-amd64 sudo chmod +x /usr/local/bin/gitlab-runner ln -s /usr/local/bin/gitlab-runner /etc/alternatives/gitlab-runner ln -s /etc/alternatives/gitlab-runner /usr/bin/gitlab-runner
- 转到gitlab.com->部署项目->设置-> CI / CD->运行程序->特定运行程序并复制注册令牌
过程 Runtime platform arch=amd64 os=linux pid=17594 revision=3001a600 version=11.10.0 Running in system-mode. Please enter the gitlab-ci coordinator URL (eg https://gitlab.com/): https://gitlab.com/ Please enter the gitlab-ci token for this runner: REGISTRATION_TOKEN Please enter the gitlab-ci description for this runner: [ih1174328.vds.myihor.ru]: Deploy Runner Please enter the gitlab-ci tags for this runner (comma separated): deploy Registering runner... succeeded runner=ZvKdjJhx Please enter the executor: docker-ssh, parallels, virtualbox, docker-ssh+machine, kubernetes, docker, ssh, docker+machine, shell: shell Runner registered successfully. Feel free to start it, but if it's running already the config should be automatically reloaded!
- 检查跑步者是否已注册。 转到gitlab.com-> deploy-project->设置-> CI / CD-> Runners->特定Runners->为此项目激活的Runners
- 添加一个单独的服务
/etc/systemd/system/gitlab-deployer.service
[Unit] Description=GitLab Deploy Runner After=syslog.target network.target ConditionFileIsExecutable=/usr/local/bin/gitlab-runner [Service] StartLimitInterval=5 StartLimitBurst=10 ExecStart=/usr/local/bin/gitlab-runner "run" "--working-directory" "/home/gitlab-deployer" "--config" "/etc/gitlab-runner/gitlab-deployer-config.toml" "--service" "gitlab-deployer" "--syslog" "--user" "gitlab-deployer" Restart=always RestartSec=120 [Install] WantedBy=multi-user.target
- 我们开始服务。
systemctl enable gitlab-deployer.service systemctl start gitlab-deployer.service systemctl status gitlab-deployer.service
- 检查跑步者是否在跑步。
到内容
GPG密钥生成
在同一台机器上,我们通过用户gitlab-deployer下的ssh(这对于生成GPG密钥很重要)
ssh gitlab-deployer@127.0.0.1
我们通过回答问题来生成密钥。 我用自己的名字和邮件。
确保指定密钥的密码。 该密钥将对工件进行签名。
gpg --gen-key
检查一下
gpg --list-keys -a /home/gitlab-deployer/.gnupg/pubring.gpg ---------------------------------------- pub 4096R/00000000 2019-04-19 uid Petruha Petrov <pp@example.com> sub 4096R/11111111 2019-04-19
将我们的公钥上传到密钥服务器
gpg --keyserver keys.gnupg.net --send-key 00000000 gpg: sending key 00000000 to hkp server keys.gnupg.net
到内容
Maven设置
- 我们进入用户
gitlab-deployer
su gitlab-deployer
- 创建一个Maven 存储库并链接到缓存(没错)
如果您不打算在同一台计算机上启动多个运行程序,则可以跳过此项目。
mkdir -p ~/.m2/repository ln -s /usr/cache/.m2/repository /home/gitlab-deployer/.m2/repository
- 创建一个主密钥
mvn --encrypt-master-password password {hnkle5BJ9HUHUMP+CXfGBl8dScfFci/mpsur/73tR2I=}
- 创建文件〜/ .m2 / settings-security.xml
<settingsSecurity> <master>{hnkle5BJ9HUHUMP+CXfGBl8dScfFci/mpsur/73tR2I=}</master> </settingsSecurity>
- 我们对Sonatype帐户的密码进行加密
mvn --encrypt-password SONATYPE_PASSWORD {98Wv5+u+Tn0HX2z5G/kR4R8Z0WBgcDBgi7d12S/un+SCU7uxzaZGGmJ8Cu9pAZ2J}
- 创建文件〜/ .m2 / settings.xml
<settings> <profiles> <profile> <id>env</id> <activation> <activeByDefault>true</activeByDefault> </activation> <properties> <gpg.passphrase>GPG_SECRET_KEY_PASSPHRASE</gpg.passphrase> </properties> </profile> </profiles> <servers> <server> <id>sonatype</id> <username>SONATYPE_USERNAME</username> <password>{98Wv5+u+Tn0HX2z5G/kR4R8Z0WBgcDBgi7d12S/un+SCU7uxzaZGGmJ8Cu9pAZ2J}</password> </server> </servers> </settings>
在哪里
GPG_SECRET_KEY_PASSPHRASE-GPG密钥的密码
SONATYPE_USERNAME-声音类型帐户登录
这样就完成了跑步者的设置,您可以转到GitLab CI部分
到内容
共享跑步者
GPG密钥生成
首先,您需要创建一个GPG密钥。 为此,请安装gnupg。
yum install -y gnupg
我们通过回答问题来生成密钥。 我用自己的名字和邮件。 确保指定密钥的密码。
gpg --gen-key
我们在钥匙上显示信息
gpg --list-keys -a pub rsa3072 2019-04-24 [SC] [expires: 2021-04-23] 2D0D1706366FC4AEF79669E24D09C55BBA3FD728 uid [ultimate] tttemp <temp@temp.temp> sub rsa3072 2019-04-24 [E] [expires: none]
将我们的公钥上传到密钥服务器
gpg --keyserver keys.gnupg.net --send-key 2D0D1706366FC4AEF79669E24D09C55BBA3FD728 gpg: sending key 2D0D1706366FC4AEF79669E24D09C55BBA3FD728 to hkp server keys.gnupg.net
获取私钥
gpg --export-secret-keys --armor 2D0D1706366FC4AEF79669E24D09C55BBA3FD728 -----BEGIN PGP PRIVATE KEY BLOCK----- lQWGBFzAqp8BDADN41CPwJ/gQwiKEbyA902DKw/WSB1AvZQvV/ZFV77xGeG4K7k5 ... =2Wd2 -----END PGP PRIVATE KEY BLOCK-----
转到项目设置->设置-> CI / CD->变量,然后将私钥保存在变量GPG_SECRET_KEY

到内容
Maven设置
- 创建一个主密钥
mvn --encrypt-master-password password {hnkle5BJ9HUHUMP+CXfGBl8dScfFci/mpsur/73tR2I=}
- 转到项目设置->设置-> CI / CD->变量,并将以下几行保存在
SETTINGS_SECURITY_XML变量中:
<settingsSecurity> <master>{hnkle5BJ9HUHUMP+CXfGBl8dScfFci/mpsur/73tR2I=}</master> </settingsSecurity>
- 我们对Sonatype帐户的密码进行加密
mvn --encrypt-password SONATYPE_PASSWORD {98Wv5+u+Tn0HX2z5G/kR4R8Z0WBgcDBgi7d12S/un+SCU7uxzaZGGmJ8Cu9pAZ2J}
- 转到项目设置->设置-> CI / CD->变量,并将以下几行保存在
SETTINGS_XML变量中:
<settings> <profiles> <profile> <id>env</id> <activation> <activeByDefault>true</activeByDefault> </activation> <properties> <gpg.passphrase>GPG_SECRET_KEY_PASSPHRASE</gpg.passphrase> </properties> </profile> </profiles> <servers> <server> <id>sonatype</id> <username>sonatype_username</username> <password>{98Wv5+u+Tn0HX2z5G/kR4R8Z0WBgcDBgi7d12S/un+SCU7uxzaZGGmJ8Cu9pAZ2J}</password> </server> </servers> </settings>
在哪里
GPG_SECRET_KEY_PASSPHRASE-GPG密钥的密码
SONATYPE_USERNAME-声音类型帐户登录
到内容
部署Docker映像
创建一个足够简单的Dockerfile,以使用正确版本的Java在部署时运行任务。 以下是高山运动的例子。
FROM java:8u111-jdk-alpine RUN apk add gnupg maven git --update-cache \ --repository http://dl-4.alpinelinux.org/alpine/edge/community/ --allow-untrusted && \ mkdir ~/.m2/
我们为您的项目收集容器
docker build -t registry.gitlab.com/group/deploy .
对容器进行身份验证并将其加载到注册表中。
docker login -u USER -p PASSWORD registry.gitlab.com docker push registry.gitlab.com/group/deploy
到内容
吉它实验室
部署项目
将.gitlab-ci.yml文件添加到部署项目的根目录
该脚本提出了两个相互排斥的任务。 特定运行程序或共享运行程序。
.gitlab-ci.yml stages: - deploy Specific Runner: extends: .java_deploy_template # shell- tags: - deploy Shared Runner: extends: .java_deploy_template # docker- tags: - docker # GitLab Runner -> Shared Runner -> Docker image: registry.gitlab.com/group/deploy-project:latest before_script: # GPG - printf "${GPG_SECRET_KEY}" | gpg --batch --import # maven - printf "${SETTINGS_SECURITY_XML}" > ~/.m2/settings-security.xml - printf "${SETTINGS_XML}" > ~/.m2/settings.xml .java_deploy_template: stage: deploy # , DEPLOY java only: variables: - $DEPLOY == "java" variables: # GIT_STRATEGY: none script: # - git config --global credential.helper store # gitlab-ci-token # gitlab.com - echo "https://gitlab-ci-token:${CI_JOB_TOKEN}@gitlab.com" >> ~/.git-credentials # - rm -rf .* * # , Sonatype Nexus - git clone ${DEPLOY_CI_REPOSITORY_URL} . # - git checkout ${DEPLOY_CI_COMMIT_SHA} -f # pom.xml autoReleaseAfterClose . # maven central - > for pom in $(find . -name pom.xml); do if [[ $(grep -q autoReleaseAfterClose "$pom" && echo $?) == 0 ]]; then echo "File $pom contains prohibited setting: <autoReleaseAfterClose>"; exit 1; fi; done # DEPLOY_CI_COMMIT_TAG , SNAPSHOT- - > if [[ "${DEPLOY_CI_COMMIT_TAG}" != "" ]]; then mvn versions:set -DnewVersion=${DEPLOY_CI_COMMIT_TAG} else VERSION=$(mvn -q -Dexec.executable=echo -Dexec.args='${project.version}' --non-recursive exec:exec) if [[ "${VERSION}" == *-SNAPSHOT ]]; then mvn versions:set -DnewVersion=${VERSION} else mvn versions:set -DnewVersion=${VERSION}-SNAPSHOT fi fi # - mvn clean deploy -DskipTests=true
到内容
Java项目
在应该上载到公共存储库的Java项目中,您需要添加2个步骤来下载Release和Snapshot版本。
.gitlab-ci.yml stages: - build - test - verify - deploy <...> Release: extends: .trigger_deploy # o . only: - tags Snapshot: extends: .trigger_deploy # SNAPSHOT when: manual # , . except: - tags .trigger_deploy: stage: deploy variables: # GIT_STRATEGY: none # deploy- URL: "https://gitlab.com/api/v4/projects/<deploy project ID>/trigger/pipeline" # deploy- POST_DATA: "\ token=${DEPLOY_TOKEN}&\ ref=master&\ variables[DEPLOY]=${DEPLOY}&\ variables[DEPLOY_CI_REPOSITORY_URL]=${CI_REPOSITORY_URL}&\ variables[DEPLOY_CI_PROJECT_NAME]=${CI_PROJECT_NAME}&\ variables[DEPLOY_CI_COMMIT_SHA]=${CI_COMMIT_SHA}&\ variables[DEPLOY_CI_COMMIT_TAG]=${CI_COMMIT_TAG} " script: # cURL, --fail --show-error # , HTTP 400 - wget --content-on-error -qO- ${URL} --post-data ${POST_DATA}
在此解决方案中,我走得更远,决定为Java项目使用一个CI模板。
更多细节我创建了一个单独的gitlab-ci项目,在其中放置了common.yml java项目的CI模板。
普通版 stages: - build - test - verify - deploy variables: SONAR_ARGS: "\ -Dsonar.gitlab.commit_sha=${CI_COMMIT_SHA} \ -Dsonar.gitlab.ref_name=${CI_COMMIT_REF_NAME} \ " .build_java_project: stage: build tags: - touchbit-shell variables: SKIP_TEST: "false" script: - mvn clean - mvn package -DskipTests=${SKIP_TEST} artifacts: when: always expire_in: 30 day paths: - "*/target/reports" .build_sphinx_doc: stage: build tags: - touchbit-shell variables: DOCKERFILE: .indirect/docs/Dockerfile script: - docker build --no-cache -t ${CI_PROJECT_NAME}/doc -f ${DOCKERFILE} . .junit_module_test_run: stage: test tags: - touchbit-shell variables: MODULE: "" script: - cd ${MODULE} - mvn test artifacts: when: always expire_in: 30 day paths: - "*/target/reports" .junit_test_run: stage: test tags: - touchbit-shell script: - mvn test artifacts: when: always expire_in: 30 day paths: - "*/target/reports" .sonar_review: stage: verify tags: - touchbit-shell dependencies: [] script: - > if [ "$CI_BUILD_REF_NAME" == "master" ]; then mvn compile sonar:sonar -Dsonar.login=$SONAR_LOGIN $SONAR_ARGS else mvn compile sonar:sonar -Dsonar.login=$SONAR_LOGIN $SONAR_ARGS -Dsonar.analysis.mode=preview fi .trigger_deploy: stage: deploy tags: - touchbit-shell variables: URL: "https://gitlab.com/api/v4/projects/10345765/trigger/pipeline" POST_DATA: "\ token=${DEPLOY_TOKEN}&\ ref=master&\ variables[DEPLOY]=${DEPLOY}&\ variables[DEPLOY_CI_REPOSITORY_URL]=${CI_REPOSITORY_URL}&\ variables[DEPLOY_CI_PROJECT_NAME]=${CI_PROJECT_NAME}&\ variables[DEPLOY_CI_COMMIT_SHA]=${CI_COMMIT_SHA}&\ variables[DEPLOY_CI_COMMIT_TAG]=${CI_COMMIT_TAG} " script: - wget --content-on-error -qO- ${URL} --post-data ${POST_DATA} .trigger_release_deploy: extends: .trigger_deploy only: - tags .trigger_snapshot_deploy: extends: .trigger_deploy when: manual except: - tags
结果,在Java项目中,.gitlab-ci.yml看起来非常紧凑且不冗长
.gitlab-ci.yml include: https://gitlab.com/TouchBIT/gitlab-ci/raw/master/common.yml Shields4J: extends: .build_java_project Sphinx doc: extends: .build_sphinx_doc variables: DOCKERFILE: .docs/Dockerfile Sonar review: extends: .sonar_review dependencies: - Shields4J Release: extends: .trigger_release_deploy Snapshot: extends: .trigger_snapshot_deploy
到内容
Pom.xml配置
Googolplex在“ 配置maven以自动签名并将工件上载到快照和登台存储库”中详细描述了此主题,因此,我将介绍一些使用插件的细微差别。 我还将描述如果您不想或无法使用org.sonatype.oss:oss-parent作为项目的父级,可以轻松自然地使用nexus-staging-maven-plugin 。
Maven安装插件
在本地存储库中安装模块。
对于本地验证其他项目中的解决方案以及校验和非常有用。
<plugin> <groupId>org.apache.maven.plugins</groupId> <artifactId>maven-install-plugin</artifactId> <executions> <execution> <id>install-project</id> <phase>install</phase> <configuration> <file>target/${project.artifactId}-${project.version}.jar</file> ```target/${project.artifactId}-${project.version}-sources.jar</sources> <pomFile>dependency-reduced-pom.xml</pomFile> <updateReleaseInfo>true</updateReleaseInfo> <createChecksum>true</createChecksum> </configuration> </execution> </executions> </plugin>
到内容
Maven的Javadoc插件
为项目生成javadoc。
<plugin> <groupId>org.apache.maven.plugins</groupId> <artifactId>maven-javadoc-plugin</artifactId> <executions> <execution> <goals> <goal>jar</goal> </goals> <phase>prepare-package</phase> <configuration> <failOnError>true</failOnError> <failOnWarnings>true</failOnWarnings> <detectOfflineLinks>false</detectOfflineLinks> </configuration> </execution> </executions> </plugin>
如果您的模块不包含Java(例如仅资源)
或者您原则上不想生成javadoc,那么maven-jar-plugin有所帮助
<plugin> <groupId>org.apache.maven.plugins</groupId> <artifactId>maven-jar-plugin</artifactId> <executions> <execution> <id>empty-javadoc-jar</id> <phase>generate-resources</phase> <goals> <goal>jar</goal> </goals> <configuration> <classifier>javadoc</classifier> <classesDirectory>${basedir}/javadoc</classesDirectory> </configuration> </execution> </executions> </plugin>
到内容
Maven的GPG插件
<plugin> <groupId>org.apache.maven.plugins</groupId> <artifactId>maven-gpg-plugin</artifactId> <executions> <execution> <id>sign-artifacts</id> <phase>deploy</phase> <goals> <goal>sign</goal> </goals> </execution> </executions> </plugin>
到内容
关联分阶段Maven插件
配置:
<project> <build> <plugins> <plugin> <groupId>org.sonatype.plugins</groupId> <artifactId>nexus-staging-maven-plugin</artifactId> </plugin> </plugins> <pluginManagement> <plugins> <plugin> <groupId>org.sonatype.plugins</groupId> <artifactId>nexus-staging-maven-plugin</artifactId> <extensions>true</extensions> <configuration> <serverId>sonatype</serverId> <nexusUrl>https://oss.sonatype.org/</nexusUrl> <updateReleaseInfo>true</updateReleaseInfo> </configuration> </plugin> <plugin> <groupId>org.apache.maven.plugins</groupId> <artifactId>maven-deploy-plugin</artifactId> <configuration> <skip>true</skip> </configuration> </plugin> </plugins> </pluginManagement> </build> <distributionManagement> <snapshotRepository> <id>sonatype</id> <name>Nexus Snapshot Repository</name> <url>https://oss.sonatype.org/content/repositories/snapshots/</url> </snapshotRepository> <repository> <id>sonatype</id> <name>Nexus Release Repository</name> <url>https://oss.sonatype.org/service/local/staging/deploy/maven2/</url> </repository> </distributionManagement> </project>
如果您有一个多模块项目,并且不需要将特定模块加载到存储库中,则将带有skipNexusStagingDeployMojo标志的nexus-staging-maven-plugin添加到该模块的pom.xml中
<build> <plugins> <plugin> <groupId>org.sonatype.plugins</groupId> <artifactId>nexus-staging-maven-plugin</artifactId> <configuration> <skipNexusStagingDeployMojo>true</skipNexusStagingDeployMojo> </configuration> </plugin> </plugins> </build>
下载后,快照/发布版本在登台存储库中可用
<repositories> <repository> <id>SonatypeNexus</id> <url>https://oss.sonatype.org/content/groups/staging/</url> </repository> </repositories>
更多优势
- 使用nexus存储库的目标列表非常丰富(
mvn help:describe -Dplugin=org.sonatype.plugins:nexus-staging-maven-plugin )。 - 在Maven Central中自动检查发布以获取下载功能
到内容
结果
发布SNAPSHOT版本
在构建项目时,可以手动启动任务以在Nexus中下载SNAPSHOT版本

启动此任务时,将触发部署项目中的相应任务( 示例 )。
修整后的原木 Running with gitlab-runner 11.10.0 (3001a600) on Deploy runner JSKWyxUw Using Shell executor... Running on ih1174328.vds.myihor.ru... Skipping Git repository setup Skipping Git checkout Skipping Git submodules setup $ rm -rf .* * $ git config --global credential.helper store $ echo "https://gitlab-ci-token:${CI_JOB_TOKEN}@gitlab.com" >> ~/.git-credentials $ git clone ${DEPLOY_CI_REPOSITORY_URL} . Cloning into 'shields4j'... $ git checkout ${DEPLOY_CI_COMMIT_SHA} Note: checking out '850f86aa317194395c5387790da1350e437125a7'. You are in 'detached HEAD' state. You can look around, make experimental changes and commit them, and you can discard any commits you make in this state without impacting any branches by performing another checkout. If you want to create a new branch to retain commits you create, you may do so (now or later) by using -b with the checkout command again. Example: git checkout -b new_branch_name HEAD is now at 850f86a... skip deploy test-core $ for pom in $(find . -name pom.xml); do # collapsed multi-line command $ if [[ "${DEPLOY_CI_COMMIT_TAG}" != "" ]]; then # collapsed multi-line command [INFO] Scanning for projects... [INFO] Inspecting build with total of 4 modules... [INFO] Installing Nexus Staging features: [INFO] ... total of 4 executions of maven-deploy-plugin replaced with nexus-staging-maven-plugin [INFO] ------------------------------------------------------------------------ [INFO] Reactor Build Order: [INFO] [INFO] Shields4J [pom] [INFO] test-core [jar] [INFO] Shields4J client [jar] [INFO] TestNG listener [jar] [INFO] [INFO] --------------< org.touchbit.shields4j:shields4j-parent >--------------- [INFO] Building Shields4J 1.0.0 [1/4] [INFO] --------------------------------[ pom ]--------------------------------- [INFO] [INFO] --- versions-maven-plugin:2.5:set (default-cli) @ shields4j-parent --- [INFO] Searching for local aggregator root... [INFO] Local aggregation root: /home/gitlab-deployer/JSKWyxUw/0/TouchBIT/deploy/shields4j [INFO] Processing change of org.touchbit.shields4j:shields4j-parent:1.0.0 -> 1.0.0-SNAPSHOT [INFO] Processing org.touchbit.shields4j:shields4j-parent [INFO] Updating project org.touchbit.shields4j:shields4j-parent [INFO] from version 1.0.0 to 1.0.0-SNAPSHOT [INFO] [INFO] Processing org.touchbit.shields4j:client [INFO] Updating parent org.touchbit.shields4j:shields4j-parent [INFO] from version 1.0.0 to 1.0.0-SNAPSHOT [INFO] Updating dependency org.touchbit.shields4j:test-core [INFO] from version 1.0.0 to 1.0.0-SNAPSHOT [INFO] [INFO] Processing org.touchbit.shields4j:test-core [INFO] Updating parent org.touchbit.shields4j:shields4j-parent [INFO] from version 1.0.0 to 1.0.0-SNAPSHOT [INFO] [INFO] Processing org.touchbit.shields4j:testng [INFO] Updating parent org.touchbit.shields4j:shields4j-parent [INFO] from version 1.0.0 to 1.0.0-SNAPSHOT [INFO] Updating dependency org.touchbit.shields4j:client [INFO] from version 1.0.0 to 1.0.0-SNAPSHOT [INFO] Updating dependency org.touchbit.shields4j:test-core [INFO] from version 1.0.0 to 1.0.0-SNAPSHOT [INFO] [INFO] ------------------------------------------------------------------------ [INFO] Reactor Summary: [INFO] [INFO] Shields4J 1.0.0 .................................... SUCCESS [ 0.992 s] [INFO] test-core .......................................... SKIPPED [INFO] Shields4J client ................................... SKIPPED [INFO] TestNG listener 1.0.0 .............................. SKIPPED [INFO] ------------------------------------------------------------------------ [INFO] BUILD SUCCESS [INFO] ------------------------------------------------------------------------ [INFO] Total time: 2.483 s [INFO] Finished at: 2019-04-21T02:40:42+03:00 [INFO] ------------------------------------------------------------------------ $ mvn clean deploy -DskipTests=${SKIP_TESTS} [INFO] Scanning for projects... [INFO] Inspecting build with total of 4 modules... [INFO] Installing Nexus Staging features: [INFO] ... total of 4 executions of maven-deploy-plugin replaced with nexus-staging-maven-plugin [INFO] ------------------------------------------------------------------------ [INFO] Reactor Build Order: [INFO] [INFO] Shields4J [pom] [INFO] test-core [jar] [INFO] Shields4J client [jar] [INFO] TestNG listener [jar] [INFO] [INFO] --------------< org.touchbit.shields4j:shields4j-parent >--------------- [INFO] Building Shields4J 1.0.0-SNAPSHOT [1/4] [INFO] --------------------------------[ pom ]--------------------------------- ... DELETED ... [INFO] * Bulk deploy of locally gathered snapshot artifacts finished. [INFO] Remote deploy finished with success. [INFO] ------------------------------------------------------------------------ [INFO] Reactor Summary: [INFO] [INFO] Shields4J 1.0.0-SNAPSHOT ........................... SUCCESS [ 2.375 s] [INFO] test-core .......................................... SUCCESS [ 3.929 s] [INFO] Shields4J client ................................... SUCCESS [ 3.815 s] [INFO] TestNG listener 1.0.0-SNAPSHOT ..................... SUCCESS [ 36.134 s] [INFO] ------------------------------------------------------------------------ [INFO] BUILD SUCCESS [INFO] ------------------------------------------------------------------------ [INFO] Total time: 47.629 s [INFO] Finished at: 2019-04-21T02:41:32+03:00 [INFO] ------------------------------------------------------------------------
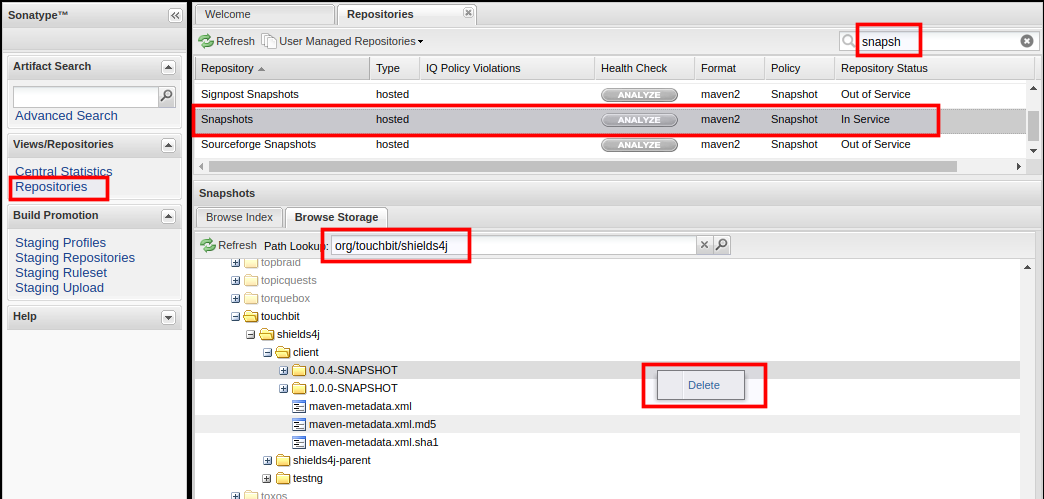
结果,版本1.0.0-SNAPSHOT被加载到了nexus中。
可以从您帐户下的oss.sonatype.org的存储库中删除所有快照版本。
到内容
发布发行版本
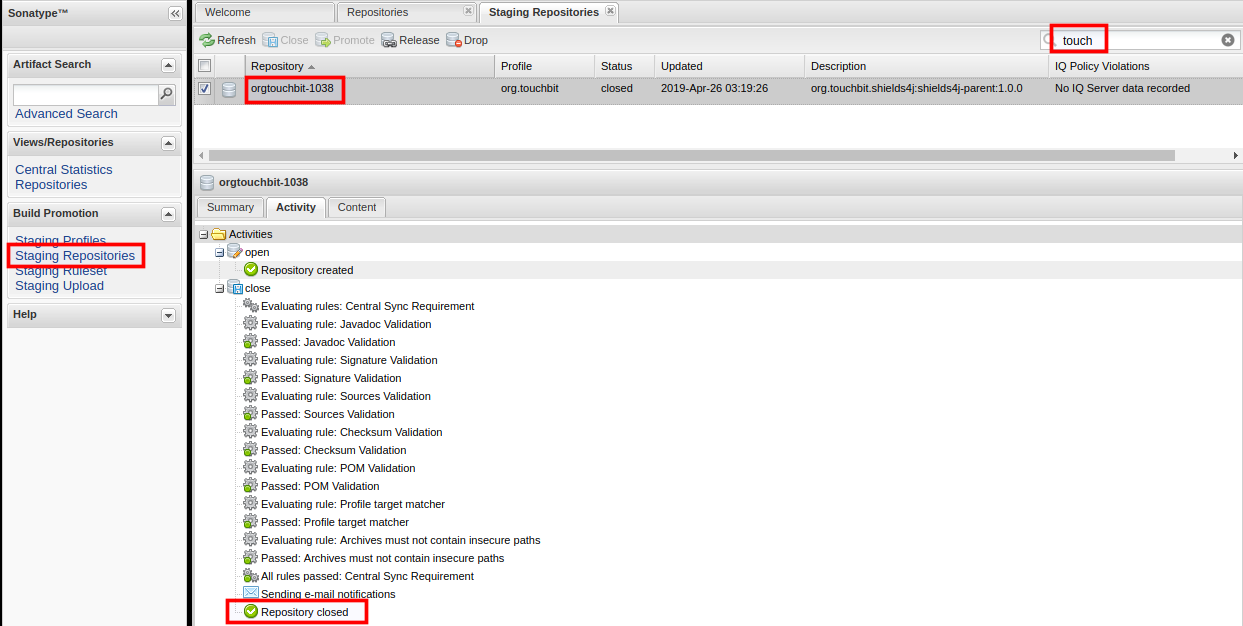
安装标签后,将自动触发deploy项目中的相应任务,以下载nexus中的发行版( 示例 )。

最好的部分是,会自动触发紧密联系。
[INFO] Performing remote staging... [INFO] [INFO] * Remote staging into staging profile ID "9043b43f77dcc9" [INFO] * Created staging repository with ID "orgtouchbit-1037". [INFO] * Staging repository at https://oss.sonatype.org:443/service/local/staging/deployByRepositoryId/orgtouchbit-1037 [INFO] * Uploading locally staged artifacts to profile org.touchbit [INFO] * Upload of locally staged artifacts finished. [INFO] * Closing staging repository with ID "orgtouchbit-1037". Waiting for operation to complete... ......... [INFO] Remote staged 1 repositories, finished with success. [INFO] ------------------------------------------------------------------------ [INFO] Reactor Summary: [INFO] [INFO] Shields4J 1.0.0 .................................... SUCCESS [ 9.603 s] [INFO] test-core .......................................... SUCCESS [ 3.419 s] [INFO] Shields4J client ................................... SUCCESS [ 9.793 s] [INFO] TestNG listener 1.0.0 .............................. SUCCESS [01:23 min] [INFO] ------------------------------------------------------------------------ [INFO] BUILD SUCCESS [INFO] ------------------------------------------------------------------------ [INFO] Total time: 01:47 min [INFO] Finished at: 2019-04-21T04:05:46+03:00 [INFO] ------------------------------------------------------------------------
如果出了问题,那么任务肯定会失败 [INFO] Performing remote staging... [INFO] [INFO] * Remote staging into staging profile ID "9043b43f77dcc9" [INFO] * Created staging repository with ID "orgtouchbit-1038". [INFO] * Staging repository at https://oss.sonatype.org:443/service/local/staging/deployByRepositoryId/orgtouchbit-1038 [INFO] * Uploading locally staged artifacts to profile org.touchbit [INFO] * Upload of locally staged artifacts finished. [INFO] * Closing staging repository with ID "orgtouchbit-1038". Waiting for operation to complete... ....... [ERROR] Rule failure while trying to close staging repository with ID "orgtouchbit-1039". [ERROR] [ERROR] Nexus Staging Rules Failure Report [ERROR] ================================== [ERROR] [ERROR] Repository "orgtouchbit-1039" failures [ERROR] Rule "signature-staging" failures [ERROR] * No public key: Key with id: (1f42b618d1cbe1b5) was not able to be located on <a href=http://keys.gnupg.net:11371/>http://keys.gnupg.net:11371/</a>. Upload your public key and try the operation again. ... [ERROR] Cleaning up local stage directory after a Rule failure during close of staging repositories: [orgtouchbit-1039] [ERROR] * Deleting context 9043b43f77dcc9.properties [ERROR] Cleaning up remote stage repositories after a Rule failure during close of staging repositories: [orgtouchbit-1039] [ERROR] * Dropping failed staging repository with ID "orgtouchbit-1039" (Rule failure during close of staging repositories: [orgtouchbit-1039]). [ERROR] Remote staging finished with a failure: Staging rules failure! [INFO] ------------------------------------------------------------------------ [INFO] Reactor Summary: [INFO] [INFO] Shields4J 1.0.0 .................................... SUCCESS [ 4.073 s] [INFO] test-core .......................................... SUCCESS [ 2.788 s] [INFO] Shields4J client ................................... SUCCESS [ 3.962 s] [INFO] TestNG listener 1.0.0 .............................. FAILURE [01:07 min] [INFO] ------------------------------------------------------------------------ [INFO] BUILD FAILURE [INFO] ------------------------------------------------------------------------
. .
, 
到内容
结论
- deploy- CI .
- Deploy- Owner Maintainer.
- Specific Runner "" deploy .
- snapshot/release .
- release maven central.
- "" maven central.
- snapshot " ".
- snapshot/release .
- // java .
GitLab CI . CI " " , . GitLab . . ( :) ).
.
, GitLab CI ( docker-compose), shell .
到内容