关于查克·诺里斯的事实是一种互联网现象,带有关于武术大师和演员查克·诺里斯的幽默“事实”。 “事实”是关于诺里斯的耐力,他的男子气概和阿尔法男性地位的笑话。
在本教程中,我们将使用Kotlin创建有关Chuck Norris的事实的我们自己的Android应用程序。 作为IDE,我们将使用Android Studio。 在此示例中,您可以学习如何在Kotlin上执行网络请求以及如何使用OkHttp 3库。
这些事实将从有关Chuck Norris的事实数据库中获得, 该数据库提供了用于获取随机事实的简单API。
为OkHttp添加依赖项
要进行网络调用,我们将使用OkHttp库。 因此,我们需要将OkHttp 3.10依赖项添加到我们的build.gradle文件中:
apply plugin: 'com.android.application' apply plugin: 'kotlin-android' apply plugin: 'kotlin-android-extensions' android { compileSdkVersion 27 defaultConfig { applicationId "com.ssaurel.chucknorrisfacts" minSdkVersion 15 targetSdkVersion 27 versionCode 1 versionName "1.0" } buildTypes { release { minifyEnabled false proguardFiles getDefaultProguardFile('proguard-android.txt'), 'proguard-rules.pro' } } } dependencies { implementation fileTree(dir: 'libs', include: ['*.jar']) implementation "org.jetbrains.kotlin:kotlin-stdlib-jre7:$kotlin_version" implementation 'com.android.support:appcompat-v7:27.1.1' implementation 'com.android.support.constraint:constraint-layout:1.1.2' implementation 'com.squareup.okhttp3:okhttp:3.10.0' }
自定义Android清单
另外,要进行网络调用,我们需要向应用程序清单添加INTERNET权限:
<?xml version="1.0" encoding="utf-8"?> <manifest xmlns:android="http://schemas.android.com/apk/res/android" package="com.ssaurel.chucknorrisfacts"> <uses-permission android:name="android.permission.INTERNET" /> <application android:allowBackup="true" android:icon="@mipmap/ic_launcher" android:label="@string/app_name" android:roundIcon="@mipmap/ic_launcher_round" android:supportsRtl="true" android:theme="@style/AppTheme"> <activity android:name=".MainActivity"> <intent-filter> <action android:name="android.intent.action.MAIN" /> <category android:name="android.intent.category.LAUNCHER" /> </intent-filter> </activity> </application> </manifest>
用户界面创建
下一步是创建应用程序的用户界面。 我们将使用ConstraintLayout作为布局的根组件。
在我们的用户界面顶部,是带有Chuck Norris脸的ImageView :

然后,我们添加一个TextView ,其中将显示Chuck Norris的事实。 对于TextView定义依赖项,该依赖项位于ImageView正下方。 之后,添加一个按钮,该按钮将允许用户下载新事实,并从数据库中请求它。 最后,添加ProgressBar ,它将位于屏幕的中心。
结果,我们为用户界面获得了以下布局:
<?xml version="1.0" encoding="utf-8"?> <android.support.constraint.ConstraintLayout xmlns:android="http://schemas.android.com/apk/res/android" xmlns:app="http://schemas.android.com/apk/res-auto" xmlns:tools="http://schemas.android.com/tools" android:layout_width="match_parent" android:layout_height="match_parent" android:background="#FFFFFF" tools:context=".MainActivity"> <ImageView android:id="@+id/imageView" android:layout_width="200dp" android:layout_height="200dp" android:layout_marginEnd="8dp" android:layout_marginLeft="8dp" android:layout_marginRight="8dp" android:layout_marginStart="8dp" android:layout_marginTop="30dp" app:layout_constraintEnd_toEndOf="parent" app:layout_constraintStart_toStartOf="parent" app:layout_constraintTop_toTopOf="parent" app:srcCompat="@drawable/chucknorris" /> <TextView android:id="@+id/factTv" android:layout_width="wrap_content" android:layout_height="wrap_content" android:layout_marginEnd="8dp" android:layout_marginLeft="8dp" android:layout_marginRight="8dp" android:layout_marginStart="8dp" android:layout_marginTop="30dp" android:text="Chuck Norris Fact" app:layout_constraintEnd_toEndOf="parent" app:layout_constraintStart_toStartOf="parent" app:layout_constraintTop_toBottomOf="@+id/imageView" android:textSize="20sp" android:paddingLeft="30dp" android:paddingRight="30dp" android:gravity="center_horizontal"/> <Button android:id="@+id/nextBtn" android:layout_width="wrap_content" android:layout_height="wrap_content" android:layout_marginBottom="30dp" android:layout_marginEnd="8dp" android:layout_marginLeft="8dp" android:layout_marginRight="8dp" android:layout_marginStart="8dp" android:text="Next" app:layout_constraintBottom_toBottomOf="parent" app:layout_constraintEnd_toEndOf="parent" app:layout_constraintStart_toStartOf="parent" /> <ProgressBar android:id="@+id/progressBar" style="?android:attr/progressBarStyle" android:layout_width="wrap_content" android:layout_height="wrap_content" android:layout_marginBottom="8dp" android:layout_marginEnd="8dp" android:layout_marginLeft="8dp" android:layout_marginRight="8dp" android:layout_marginStart="8dp" android:layout_marginTop="8dp" app:layout_constraintBottom_toBottomOf="parent" app:layout_constraintEnd_toEndOf="parent" app:layout_constraintStart_toStartOf="parent" app:layout_constraintTop_toTopOf="parent" android:visibility="gone"/> </android.support.constraint.ConstraintLayout>
API测试
在MainActivity编写代码之前MainActivity我们测试数据库API返回的响应。 我们将联系以下地址: https : //api.icndb.com/jokes/random 。
该Web服务在每次调用时随机返回有关Chuck Norris的新事实。 通过在Web浏览器中输入URL,您将得到以下结果:
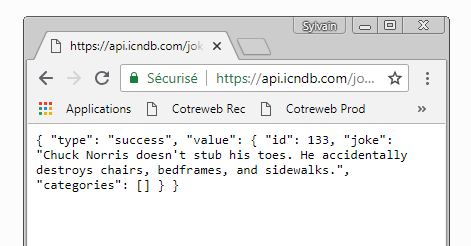
因此,我们将需要解析JSON响应才能获得joke属性,其中包含我们需要的事实。
为MainActivity编写Kotlin代码
现在是时候为MainActivity编写代码了。 我们定义一个变量,在其中存储要调用的API端点URL。 然后我们实例化OkHttpClient对象。
在onCreate MainActivity方法中,我们只需要将OnClickListener设置为允许用户下载有关Chuck Norris的新事实的按钮。
通过特殊的loadRandomFact方法loadRandomFact该API。 在访问网络之前,我们将显示ProgressBar 。 然后,使用参数中的端点URL创建一个Request对象。
之后,我们在newCall上调用newCall方法,将Request作为参数传递给它。 为了处理响应,我们使用参数中的Callback实例调用enqueue方法。
在onResponse方法中onResponse我们得到一个响应,然后创建一个JSONObject 。 最后一步是获取值对象的笑话属性。 之后,通过将所有内容封装在runOnUiThread块中,以确保在用户界面线程中更新了用户界面,我们可以在TextView显示Chuck Norrim的事实。
结果,我们为Android应用程序的MainActivity得到了以下代码:
package com.ssaurel.chucknorrisfacts import android.os.Bundle import android.support.v7.app.AppCompatActivity import android.text.Html import android.view.View import kotlinx.android.synthetic.main.activity_main.* import okhttp3.* import org.json.JSONObject import java.io.IOException class MainActivity : AppCompatActivity() { val URL = "https://api.icndb.com/jokes/random" var okHttpClient: OkHttpClient = OkHttpClient() override fun onCreate(savedInstanceState: Bundle?) { super.onCreate(savedInstanceState) setContentView(R.layout.activity_main) nextBtn.setOnClickListener { loadRandomFact() } } private fun loadRandomFact() { runOnUiThread { progressBar.visibility = View.VISIBLE } val request: Request = Request.Builder().url(URL).build() okHttpClient.newCall(request).enqueue(object: Callback { override fun onFailure(call: Call?, e: IOException?) { } override fun onResponse(call: Call?, response: Response?) { val json = response?.body()?.string() val txt = (JSONObject(json).getJSONObject("value").get("joke")).toString() runOnUiThread { progressBar.visibility = View.GONE factTv.text = Html.fromHtml(txt) } } }) } }
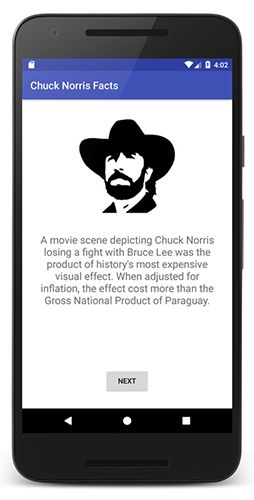
启动应用程序
本课的最佳部分。 启动应用程序时,将得到以下结果: