
引言
3月底,我们
报告了在UC浏览器中下载和运行未经验证的代码的潜在潜力。 今天,我们将详细研究它是如何发生的以及黑客如何使用它。
不久前,UC Browser得到了积极的推广和分发。 它是通过恶意软件安装在设备上的,并以视频文件的形式通过网站进行分发(即,用户认为他们正在下载色情内容或其他内容,但使用此浏览器获取了APK文件),并使用令人担忧的横幅广告来宣传该用户的浏览器已过时或脆弱。 官方的UC Browser VK小组有一个
主题 ,用户可能会抱怨虚假广告,许多用户提供了示例。 在2016年,甚至有一个俄语广告(是的,一个阻止广告的浏览器广告)。
在撰写本文时,UC浏览器已从Google Play安装了500,000,000次。 这是令人印象深刻的,因为只有谷歌浏览器才能做到这一点。 在评论中,您会看到很多用户抱怨广告和将其重定向到Google Play上的其他应用程序。 这就是我们进行研究的原因:我们想查看UC浏览器是否做错了什么。 是的! 该应用程序能够下载并运行可执行代码,这
违反了Google Play的应用发布政策 。 UC浏览器不仅下载可执行代码,还下载了可执行代码。 它这样做是不安全的,可用于MitM攻击。 让我们看看是否可以通过这种方式使用它。
后续内容适用于在研究期间通过Google Play分发的UC浏览器版本:
package: com.UCMobile.intl versionName: 12.10.8.1172 versionCode: 10598 sha1 APK-file: f5edb2243413c777172f6362876041eb0c3a928c
攻击向量
UC浏览器的清单包含一个服务名称为
com.uc.deployment.UpgradeDeployService的服务 。
<service android:exported="false" android:name="com.uc.deployment.UpgradeDeployService" android:process=":deploy" />
启动此服务后,浏览器会向
puds.ucweb.com/upgrade/index.xhtml发出POST请求,启动后一段时间
内在流量中都可以看到该请求。 作为响应,浏览器可以接收下载任何更新或新模块的命令。 在分析过程中,我们从未收到来自服务器的此类命令,但是我们注意到,当尝试在浏览器中打开PDF文件时,它将重复请求到上述地址,然后下载一个本机库。 为了模拟攻击,我们决定使用UC浏览器的此功能-使用本机库打开PDF文件的功能-不存在于APK文件中,但可以从Internet下载。 从技术上讲,当对启动时发送的请求给予适当响应时,UC Browser可以下载未经用户许可的内容。 但是为此,我们需要更详细地研究与服务器的交互协议,因此我们认为,仅挂接和编辑响应,然后用其他方法替换打开PDF文件所需的库,会更容易。
因此,当用户想要直接在浏览器中打开PDF文件时,流量可能包含以下请求:
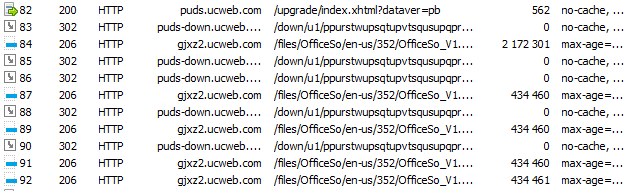
首先,对
puds.ucweb.com/upgrade/index.xhtml发出POST请求,然后下载用于查看PDF文件和Office文档的压缩库。 从逻辑上讲,我们可以假设第一个请求发送有关系统的信息(至少是体系结构,因为服务器需要选择适当的库),并且服务器以一些有关需要下载的库的信息作为响应,例如其地址也许还有其他东西。 问题是此请求已加密。
该库已压缩为ZIP文件,未加密。
搜索流量解密代码
让我们尝试解密服务器的响应。 看一下
com.uc.deployment.UpgradeDeployService类的代码:从
onStartCommand方法中 ,我们导航到
com.uc.deployment.bx ,然后导航到
com.uc.browser.core.dcfe :
public final void e(l arg9) { int v4_5; String v3_1; byte[] v3; byte[] v1 = null; if(arg9 == null) { v3 = v1; } else { v3_1 = arg9.iGX.ipR; StringBuilder v4 = new StringBuilder("["); v4.append(v3_1); v4.append("]product:"); v4.append(arg9.iGX.ipR); v4 = new StringBuilder("["); v4.append(v3_1); v4.append("]version:"); v4.append(arg9.iGX.iEn); v4 = new StringBuilder("["); v4.append(v3_1); v4.append("]upgrade_type:"); v4.append(arg9.iGX.mMode); v4 = new StringBuilder("["); v4.append(v3_1); v4.append("]force_flag:"); v4.append(arg9.iGX.iEo); v4 = new StringBuilder("["); v4.append(v3_1); v4.append("]silent_mode:"); v4.append(arg9.iGX.iDQ); v4 = new StringBuilder("["); v4.append(v3_1); v4.append("]silent_type:"); v4.append(arg9.iGX.iEr); v4 = new StringBuilder("["); v4.append(v3_1); v4.append("]silent_state:"); v4.append(arg9.iGX.iEp); v4 = new StringBuilder("["); v4.append(v3_1); v4.append("]silent_file:"); v4.append(arg9.iGX.iEq); v4 = new StringBuilder("["); v4.append(v3_1); v4.append("]apk_md5:"); v4.append(arg9.iGX.iEl); v4 = new StringBuilder("["); v4.append(v3_1); v4.append("]download_type:"); v4.append(arg9.mDownloadType); v4 = new StringBuilder("["); v4.append(v3_1); v4.append("]download_group:"); v4.append(arg9.mDownloadGroup); v4 = new StringBuilder("["); v4.append(v3_1); v4.append("]download_path:"); v4.append(arg9.iGH); v4 = new StringBuilder("["); v4.append(v3_1); v4.append("]apollo_child_version:"); v4.append(arg9.iGX.iEx); v4 = new StringBuilder("["); v4.append(v3_1); v4.append("]apollo_series:"); v4.append(arg9.iGX.iEw); v4 = new StringBuilder("["); v4.append(v3_1); v4.append("]apollo_cpu_arch:"); v4.append(arg9.iGX.iEt); v4 = new StringBuilder("["); v4.append(v3_1); v4.append("]apollo_cpu_vfp3:"); v4.append(arg9.iGX.iEv); v4 = new StringBuilder("["); v4.append(v3_1); v4.append("]apollo_cpu_vfp:"); v4.append(arg9.iGX.iEu); ArrayList v3_2 = arg9.iGX.iEz; if(v3_2 != null && v3_2.size() != 0) { Iterator v3_3 = v3_2.iterator(); while(v3_3.hasNext()) { Object v4_1 = v3_3.next(); StringBuilder v5 = new StringBuilder("["); v5.append(((au)v4_1).getName()); v5.append("]component_name:"); v5.append(((au)v4_1).getName()); v5 = new StringBuilder("["); v5.append(((au)v4_1).getName()); v5.append("]component_ver_name:"); v5.append(((au)v4_1).aDA()); v5 = new StringBuilder("["); v5.append(((au)v4_1).getName()); v5.append("]component_ver_code:"); v5.append(((au)v4_1).gBl); v5 = new StringBuilder("["); v5.append(((au)v4_1).getName()); v5.append("]component_req_type:"); v5.append(((au)v4_1).gBq); } } j v3_4 = new j(); mb(v3_4); h v4_2 = new h(); mb(v4_2); ay v5_1 = new ay(); v3_4.hS(""); v3_4.setImsi(""); v3_4.hV(""); v5_1.bPQ = v3_4; v5_1.bPP = v4_2; v5_1.yr(arg9.iGX.ipR); v5_1.gBF = arg9.iGX.mMode; v5_1.gBI = arg9.iGX.iEz; v3_2 = v5_1.gAr; c.aBh(); v3_2.add(g.fs("os_ver", c.getRomInfo())); v3_2.add(g.fs("processor_arch", com.uc.baacgetCpuArch())); v3_2.add(g.fs("cpu_arch", com.uc.baacPb())); String v4_3 = com.uc.baacPd(); v3_2.add(g.fs("cpu_vfp", v4_3)); v3_2.add(g.fs("net_type", String.valueOf(com.uc.base.system.a.Jo()))); v3_2.add(g.fs("fromhost", arg9.iGX.iEm)); v3_2.add(g.fs("plugin_ver", arg9.iGX.iEn)); v3_2.add(g.fs("target_lang", arg9.iGX.iEs)); v3_2.add(g.fs("vitamio_cpu_arch", arg9.iGX.iEt)); v3_2.add(g.fs("vitamio_vfp", arg9.iGX.iEu)); v3_2.add(g.fs("vitamio_vfp3", arg9.iGX.iEv)); v3_2.add(g.fs("plugin_child_ver", arg9.iGX.iEx)); v3_2.add(g.fs("ver_series", arg9.iGX.iEw)); v3_2.add(g.fs("child_ver", r.aVw())); v3_2.add(g.fs("cur_ver_md5", arg9.iGX.iEl)); v3_2.add(g.fs("cur_ver_signature", SystemHelper.getUCMSignature())); v3_2.add(g.fs("upgrade_log", i.bjt())); v3_2.add(g.fs("silent_install", String.valueOf(arg9.iGX.iDQ))); v3_2.add(g.fs("silent_state", String.valueOf(arg9.iGX.iEp))); v3_2.add(g.fs("silent_file", arg9.iGX.iEq)); v3_2.add(g.fs("silent_type", String.valueOf(arg9.iGX.iEr))); v3_2.add(g.fs("cpu_archit", com.uc.baacPc())); v3_2.add(g.fs("cpu_set", SystemHelper.getCpuInstruction())); boolean v4_4 = v4_3 == null || !v4_3.contains("neon") ? false : true; v3_2.add(g.fs("neon", String.valueOf(v4_4))); v3_2.add(g.fs("cpu_cores", String.valueOf(com.uc.baacJl()))); v3_2.add(g.fs("ram_1", String.valueOf(com.uc.baahPo()))); v3_2.add(g.fs("totalram", String.valueOf(com.uc.baahOL()))); c.aBh(); v3_2.add(g.fs("rom_1", c.getRomInfo())); v4_5 = e.getScreenWidth(); int v6 = e.getScreenHeight(); StringBuilder v7 = new StringBuilder(); v7.append(v4_5); v7.append("*"); v7.append(v6); v3_2.add(g.fs("ss", v7.toString())); v3_2.add(g.fs("api_level", String.valueOf(Build$VERSION.SDK_INT))); v3_2.add(g.fs("uc_apk_list", SystemHelper.getUCMobileApks())); Iterator v4_6 = arg9.iGX.iEA.entrySet().iterator(); while(v4_6.hasNext()) { Object v6_1 = v4_6.next(); v3_2.add(g.fs(((Map$Entry)v6_1).getKey(), ((Map$Entry)v6_1).getValue())); } v3 = v5_1.toByteArray(); } if(v3 == null) { this.iGY.iGI.a(arg9, "up_encode", "yes", "fail"); return; } v4_5 = this.iGY.iGw ? 0x1F : 0; if(v3 == null) { } else { v3 = gi(v4_5, v3); if(v3 == null) { } else { v1 = new byte[v3.length + 16]; byte[] v6_2 = new byte[16]; Arrays.fill(v6_2, 0); v6_2[0] = 0x5F; v6_2[1] = 0; v6_2[2] = ((byte)v4_5); v6_2[3] = -50; System.arraycopy(v6_2, 0, v1, 0, 16); System.arraycopy(v3, 0, v1, 16, v3.length); } } if(v1 == null) { this.iGY.iGI.a(arg9, "up_encrypt", "yes", "fail"); return; } if(TextUtils.isEmpty(this.iGY.mUpgradeUrl)) { this.iGY.iGI.a(arg9, "up_url", "yes", "fail"); return; } StringBuilder v0 = new StringBuilder("["); v0.append(arg9.iGX.ipR); v0.append("]url:"); v0.append(this.iGY.mUpgradeUrl); com.uc.browser.core.dci v0_1 = this.iGY.iGI; v3_1 = this.iGY.mUpgradeUrl; com.uc.base.net.e v0_2 = new com.uc.base.net.e(new com.uc.browser.core.dci$a(v0_1, arg9)); v3_1 = v3_1.contains("?") ? v3_1 + "&dataver=pb" : v3_1 + "?dataver=pb"; n v3_5 = v0_2.uc(v3_1); mb(v3_5, false); v3_5.setMethod("POST"); v3_5.setBodyProvider(v1); v0_2.b(v3_5); this.iGY.iGI.a(arg9, "up_null", "yes", "success"); this.iGY.iGI.b(arg9); }
我们可以看到这是发出POST请求的地方。 看一下包含以下内容的16字节数组:0x5F,0、0x1F,-50(= 0xCE)。 值与上述请求中的值相同。
同一类包含带有另一个有趣方法的嵌套类:
public final void a(l arg10, byte[] arg11) { f v0 = this.iGQ; StringBuilder v1 = new StringBuilder("["); v1.append(arg10.iGX.ipR); v1.append("]:UpgradeSuccess"); byte[] v1_1 = null; if(arg11 == null) { } else if(arg11.length < 16) { } else { if(arg11[0] != 0x60 && arg11[3] != 0xFFFFFFD0) { goto label_57; } int v3 = 1; int v5 = arg11[1] == 1 ? 1 : 0; if(arg11[2] != 1 && arg11[2] != 11) { if(arg11[2] == 0x1F) { } else { v3 = 0; } } byte[] v7 = new byte[arg11.length - 16]; System.arraycopy(arg11, 16, v7, 0, v7.length); if(v3 != 0) { v7 = gj(arg11[2], v7); } if(v7 == null) { goto label_57; } if(v5 != 0) { v1_1 = gP(v7); goto label_57; } v1_1 = v7; } label_57: if(v1_1 == null) { v0.iGY.iGI.a(arg10, "up_decrypt", "yes", "fail"); return; } q v11 = gb(arg10, v1_1); if(v11 == null) { v0.iGY.iGI.a(arg10, "up_decode", "yes", "fail"); return; } if(v0.iGY.iGt) { v0.d(arg10); } if(v0.iGY.iGo != null) { v0.iGY.iGo.a(0, ((o)v11)); } if(v0.iGY.iGs) { v0.iGY.a(((o)v11)); v0.iGY.iGI.a(v11, "up_silent", "yes", "success"); v0.iGY.iGI.a(v11); return; } v0.iGY.iGI.a(v11, "up_silent", "no", "success"); } }
此方法接收字节数组的输入,并检查零字节是0x60,还是第三个字节是0xD0,以及第二个字节是1、11还是0x1F。 检查服务器响应:零字节为0x60,第二个字节为0x1F,第三个字节为0x60。 看来我们需要什么。 从字符串(例如“ up_decrypt”)来看,应该在此处调用一种方法来解密服务器响应。 现在让我们看一下gj方法。 请注意,第一个参数是偏移量2处的一个字节(在本例中为0x1F),第二个参数是不包含前16个字节的服务器响应。
public static byte[] j(int arg1, byte[] arg2) { if(arg1 == 1) { arg2 = cc(arg2, c.adu); } else if(arg1 == 11) { arg2 = m.aF(arg2); } else if(arg1 != 0x1F) { } else { arg2 = EncryptHelper.decrypt(arg2); } return arg2; }
显然,它正在选择解密算法,在我们的情况下等于0x1F的字节表示三个可能的选项之一。
让我们回到代码分析。 跳了几下之后,我们便获得了一个具有
故事名的方法
cryptoBytesByKey 。 现在,从我们的响应中分离出另外两个字节并形成一个字符串。 很明显,这就是选择密钥解密消息的方式。
private static byte[] decryptBytesByKey(byte[] bytes) { byte[] v0 = null; if(bytes != null) { try { if(bytes.length < EncryptHelper.PREFIX_BYTES_SIZE) { } else if(bytes.length == EncryptHelper.PREFIX_BYTES_SIZE) { return v0; } else { byte[] prefix = new byte[EncryptHelper.PREFIX_BYTES_SIZE];
继续前进,请注意,在此阶段,它只是密钥标识符,而不是密钥本身。 密钥选择将更加复杂。
在下一个方法中,将两个以上的参数添加到现有参数中,因此总共有四个。 由于某种原因(此处为空),将魔术数字16,密钥标识符,加密数据和字符串添加到其中。
public final byte[] l(String keyId, byte[] encrypted) throws SecException { return this.ayJ().staticBinarySafeDecryptNoB64(16, keyId, encrypted, ""); }
经过一系列跳转之后,我们看到了
com.alibaba.wireless.security.open.staticdataencrypt.IStaticDataEncryptComponent接口的
staticBinarySafeDecryptNoB64方法。 主应用程序代码没有实现此接口的类。 此类包含在文件
lib / armeabi-v7a / libsgmain.so中 ,该文件不是真正的.SO,而是.JAR。 我们感兴趣的方法实现如下:
package com.alibaba.wireless.security.ai;
在这里,我们的参数列表添加了另外两个整数:2和0。显然,2表示解密,就像
javax.crypto.Cipher系统类的
doFinal方法一样 。 然后,此信息与编号10601(显然是命令编号)一起传输到某个路由器。
在下
一跳跳转之后,我们找到一个实现
RouterComponent接口和
doCommand方法的类:
package com.alibaba.wireless.security.mainplugin; import com.alibaba.wireless.security.framework.IRouterComponent; import com.taobao.wireless.security.adapter.JNICLibrary; public class a implements IRouterComponent { public a() { super(); } public Object doCommand(int arg2, Object[] arg3) { return JNICLibrary.doCommandNative(arg2, arg3); } }
还有一个
JNIC Library类,在其中声明了本机
doCommandNative方法:
package com.taobao.wireless.security.adapter; public class JNICLibrary { public static native Object doCommandNative(int arg0, Object[] arg1); }
因此,我们需要在本机代码中找到
doCommandNative方法。 那就是乐趣的开始。
机器码混淆
libsgmain.so文件中有一个本机库(实际上是一个.JAR文件,并且正如我们上面所说的,实现了一些与加密有关的接口):
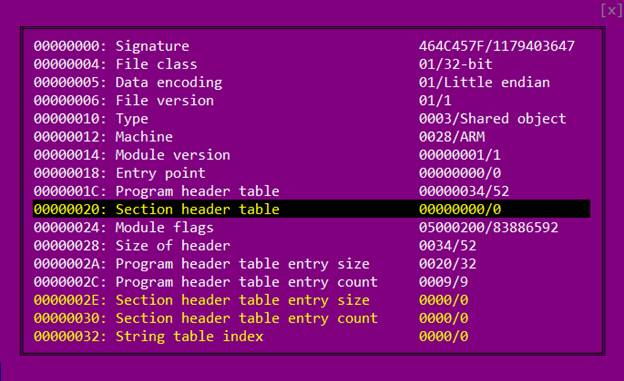
libsgmainso-6.4.36.so 。 我们将其加载到IDA中,并获得一堆带有错误消息的对话框。 问题在于节头表无效。 这样做是为了使分析复杂化。
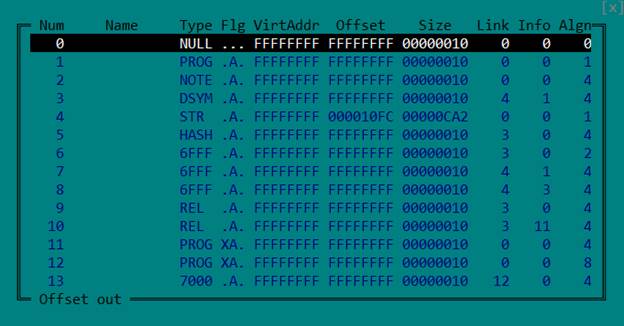
但是我们真的并不需要它。 程序头表足以正确加载ELF文件并进行分析。 因此,我们只需要删除节标题表,就可以使标题中的相应字段为空。
然后,我们再次在IDA中打开文件。
我们有两种方法可以准确地告诉Java虚拟机本机库包含Java代码中声明为本机的方法的实现。 首先是给它一个这样的名称:
Java_package_name_ClassName_methodName 。 第二个是在加载库时(在JNI_OnLoad函数中)通过调用RegisterNatives函数对其进行注册。 在我们的情况下,如果使用第一种方法,则名称应类似于:
Java_com_taobao_wireless_security_adapter_JNICLibrary_doCommandNative 。 导出的函数列表不包含此名称,这意味着我们需要查找RegisterNatives。 因此,我们转到JNI_OnLoad函数并查看以下内容:
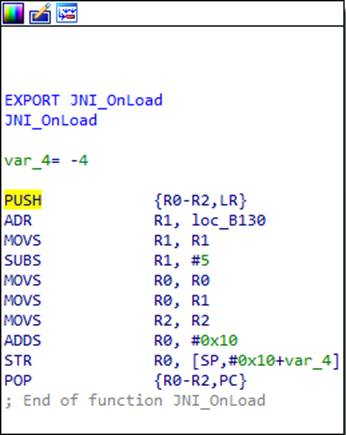
这是怎么回事 乍一看,该功能的开始和结束是ARM体系结构的典型特征。 第一条指令将函数将使用的寄存器的内容(在本例中为R0,R1和R2)以及带有函数返回地址的LR寄存器的内容压入堆栈。 最后一条指令恢复保存的寄存器并将返回地址放入PC寄存器,从而从函数返回。 但是,如果仔细观察,我们可能会注意到倒数第二条指令更改了存储在堆栈中的返回地址。 让我们计算一下代码执行后的状态。 地址0xB130加载到R1中,从中减去5,然后移到R0并接收0x10的加法。 最后,它等于0xB13B。 因此,IDA认为最终指令执行了正常的函数返回,而实际上,它执行了到计算地址0xB13B的传输。
现在让我们提醒您,ARM处理器具有两种模式和两组指令-ARM和Thumb。 地址的低位确定处理器将使用哪个指令集。即,该地址实际上是0xB13A,而低位中的值表示Thumb模式。
在此库中,每个函数的开头都添加了一个类似的“适配器”和一些语义垃圾。 但是我们不会详细介绍它们。 只需记住,几乎所有功能的真正开始都还需要一点时间。
由于代码中不存在向0xB13A的明确过渡,因此IDA无法识别那里存在代码。 出于同样的原因,它无法将库中的大多数代码识别为代码,这使得分析变得有些棘手。 因此,我们告诉IDA有代码,这就是发生的情况:

从0xB144开始,我们显然有了该表。 但是sub_494C呢?
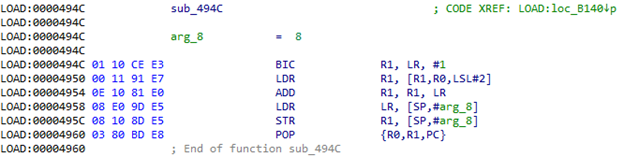
在LR寄存器中调用此函数时,我们获得上述表的地址(0xB144)。 R0包含此表中的索引。 也就是说,我们从表中获取值,将其添加到LR中,并获得需要访问的地址。 让我们尝试计算它:0xB144 + [0xB144 + 8 * 4] = 0xB144 + 0x120 = 0xB264。 我们导航到该地址,并查看一些有用的说明,然后转到0xB140:

现在,将在表的偏移量为0x20处进行过渡。
从表的大小来看,代码中会有很多这样的转换。 因此,我们希望自动处理此问题,并避免手动计算地址。 因此,脚本和IDA中补丁代码的功能可以帮助我们:
def put_unconditional_branch(source, destination): offset = (destination - source - 4) >> 1 if offset > 2097151 or offset < -2097152: raise RuntimeError("Invalid offset") if offset > 1023 or offset < -1024: instruction1 = 0xf000 | ((offset >> 11) & 0x7ff) instruction2 = 0xb800 | (offset & 0x7ff) patch_word(source, instruction1) patch_word(source + 2, instruction2) else: instruction = 0xe000 | (offset & 0x7ff) patch_word(source, instruction) ea = here() if get_wide_word(ea) == 0xb503:
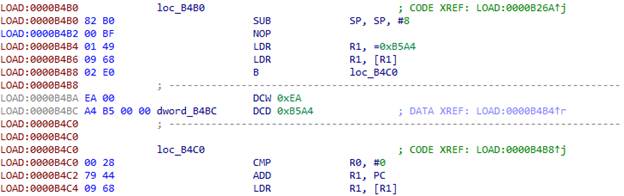
我们将光标放在0xB26A字符串上,运行脚本,然后查看到0xB4B0的过渡:

同样,IDA不会将此地方识别为代码。 我们帮助它并在那里看到另一个结构:
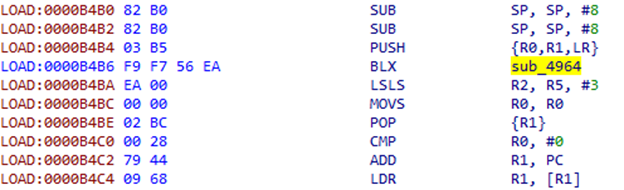
BLX之后的说明似乎没有什么意义。 他们更像是一种补偿。 我们来看一下sub_4964:
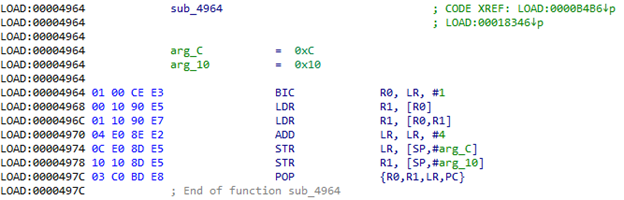
确实,它在LR的地址处获取DWORD,将其添加到该地址,然后在结果地址处获取值并将其存储在堆栈中。 另外,从函数返回后,它向LR加4以跳过相同的偏移量。 然后POP {R1}命令从堆栈中获取结果值。 查看地址0xB4BA + 0xEA = 0xB5A4处的内容,我们可以看到类似于地址表的内容:

要修补此结构,我们需要从代码中获取两个参数:要在其中推送结果的偏移量和寄存器号。 我们将必须为每个可能的寄存器预先准备一段代码。
patches = {} patches[0] = (0x00, 0xbf, 0x01, 0x48, 0x00, 0x68, 0x02, 0xe0) patches[1] = (0x00, 0xbf, 0x01, 0x49, 0x09, 0x68, 0x02, 0xe0) patches[2] = (0x00, 0xbf, 0x01, 0x4a, 0x12, 0x68, 0x02, 0xe0) patches[3] = (0x00, 0xbf, 0x01, 0x4b, 0x1b, 0x68, 0x02, 0xe0) patches[4] = (0x00, 0xbf, 0x01, 0x4c, 0x24, 0x68, 0x02, 0xe0) patches[5] = (0x00, 0xbf, 0x01, 0x4d, 0x2d, 0x68, 0x02, 0xe0) patches[8] = (0x00, 0xbf, 0xdf, 0xf8, 0x06, 0x80, 0xd8, 0xf8, 0x00, 0x80, 0x01, 0xe0) patches[9] = (0x00, 0xbf, 0xdf, 0xf8, 0x06, 0x90, 0xd9, 0xf8, 0x00, 0x90, 0x01, 0xe0) patches[10] = (0x00, 0xbf, 0xdf, 0xf8, 0x06, 0xa0, 0xda, 0xf8, 0x00, 0xa0, 0x01, 0xe0) patches[11] = (0x00, 0xbf, 0xdf, 0xf8, 0x06, 0xb0, 0xdb, 0xf8, 0x00, 0xb0, 0x01, 0xe0) ea = here() if (get_wide_word(ea) == 0xb082
我们将光标放在要替换的结构的开头(即0xB4B2)并运行脚本:
除了已经提到的结构之外,该代码还包括以下内容:

与前面的情况一样,BLX指令后还有一个偏移量:
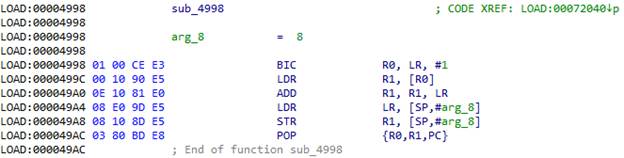
我们将偏移量取自LR的地址,将其添加到LR,然后在那儿导航。 0x72044 + 0xC = 0x72050。 该结构的脚本非常简单:
def put_unconditional_branch(source, destination): offset = (destination - source - 4) >> 1 if offset > 2097151 or offset < -2097152: raise RuntimeError("Invalid offset") if offset > 1023 or offset < -1024: instruction1 = 0xf000 | ((offset >> 11) & 0x7ff) instruction2 = 0xb800 | (offset & 0x7ff) patch_word(source, instruction1) patch_word(source + 2, instruction2) else: instruction = 0xe000 | (offset & 0x7ff) patch_word(source, instruction) ea = here() if get_wide_word(ea) == 0xb503:
执行脚本的结果:

修补此功能的所有内容之后,我们可以将IDA指向真正的起点。 它将逐段收集整个功能代码,我们将能够使用HexRays对其进行反编译。
解密字符串
我们已经从UC浏览器的
libsgmainso-6.4.36.so库中了解了如何处理机器代码混淆,并获得了功能代码
JNI_OnLoad 。
int __fastcall real_JNI_OnLoad(JavaVM *vm) { int result;
让我们看一下以下字符串:
sub_73E24(&unk_83EA6, &v6, 49); clazz = (jclass)((int (__fastcall *)(JNIEnv *, int *))(*env)->FindClass)(env, &v6);
很显然
sub_73E24函数解密类名。 该函数的参数包含指向类似于加密数据的指针,一种缓冲区和一个数字。 显然,在调用该函数之后,解密的字符串将位于缓冲区中,因为缓冲区将转到
FindClass函数,该函数接收与第二个参数相同的类名。 因此,数字是缓冲区的大小或字符串的长度。 让我们尝试解密该类的名称。 它应该表明我们是否朝着正确的方向前进。 让我们仔细看看
sub_73E24会发生什么。
int __fastcall sub_73E56(unsigned __int8 *in, unsigned __int8 *out, size_t size) { int v4;
sub_7AF78函数为指定大小的字节数组创建一个容器实例(我们将不对其进行详细介绍)。 这里创建了两个这样的容器:一个包含字符串“
DcO / lcK + h?M3c * q @ ”(很容易猜到这是密钥),另一个包含加密的数据。 然后
将这两个对象放置在某个结构中,该结构将转移到
sub_6115C函数。 我们可能还会注意到,该结构包含一个值为3的字段。让我们看看接下来会发生什么。
int __fastcall sub_611B4(struc_1 *a1, _DWORD *a2) { int v3;
先前分配值为3的字段将转换为开关参数。 让我们看一下情况3-将先前添加到结构中的函数(即密钥和加密数据)转换为sub_6364C函数的参数。 如果仔细查看sub_6364C,我们可以识别RC4算法。
因此,我们有一个算法和一个密钥。 让我们尝试解密该类的名称。 这就是我们得到的:com / taobao /无线/安全/适配器/ JNICLibrary。 太棒了! 我们走在正确的轨道上。
命令树
现在我们需要找到对
RegisterNatives的调用,它将使我们指向
doCommandNative函数。 因此,我们浏览了从
JNI_OnLoad调用的函数,并在
sub_B7B0中找到了它:
int __fastcall sub_B7F6(JNIEnv *env, jclass clazz) { char signature[41];
实际上,在这里注册了一个名为
doCommandNative的本地方法。 现在我们知道了它的地址。 让我们看看它的作用。
int __fastcall doCommandNative(JNIEnv *env, jobject obj, int command, jarray args) { int v5;
顾名思义,它是开发人员转移到本机库的所有功能的入口点。 我们特别对功能号10601感兴趣。
从代码中,我们可以看到命令编号为我们提供了三个数字:command / 10000,command%10000/100和command%10(在我们的示例中为1、6和1)。 这三个数字以及指向JNIEnv的指针和传递给该函数的参数构成一个结构并继续传递。 使用这三个数字(我们将分别表示它们N1,N2和N3),将构建命令树。 像这样:
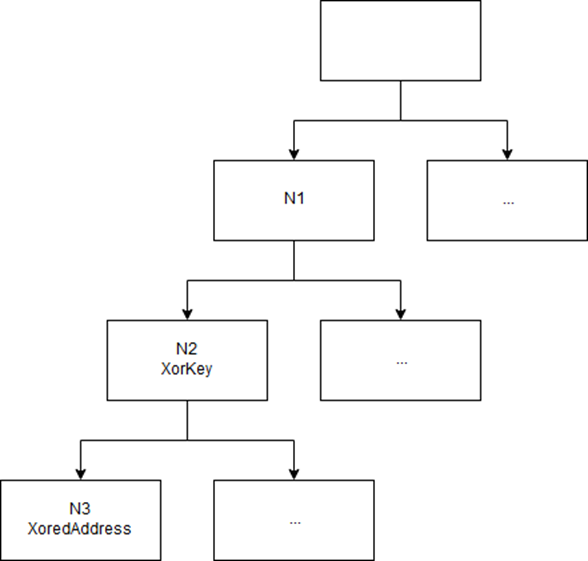
该树是在JNI_OnLoad中动态创建的。 三个数字对树中的路径进行编码。 树的每个叶子都包含相应函数的异或地址。 密钥在父节点中。 如果我们了解树中的所有结构,那么在代码中很容易找到需要的功能添加到树上的位置(在本文中我们不会花时间描述它们)。
更多混淆
我们有应该解密流量的函数的地址:0x5F1AC。 但是,放松放松还为时过早-UC浏览器开发人员为我们带来了另一个惊喜。
从Java代码中的数组接收到参数后,我们转到函数0x4D070。 另一类代码混淆已经在等待。
然后,我们在R7和R4中推两个索引:
第一个索引移至R11:

我们使用此索引从表中获取地址:

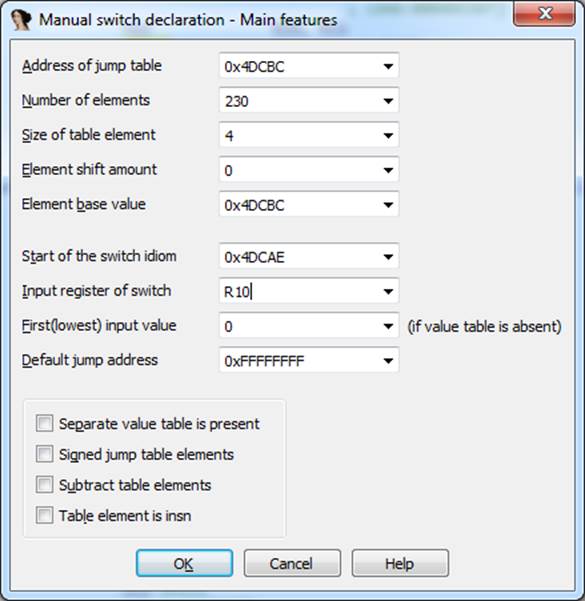
转移到第一个地址后,我们使用R4中的第二个索引。 该表包含230个元素。
我们该怎么办? 我们可以告诉IDA这是一种开关:编辑->其他->指定开关习惯。
结果代码太可怕了。 However, we can see the call to the familiar
sub_6115C function in its tangles:
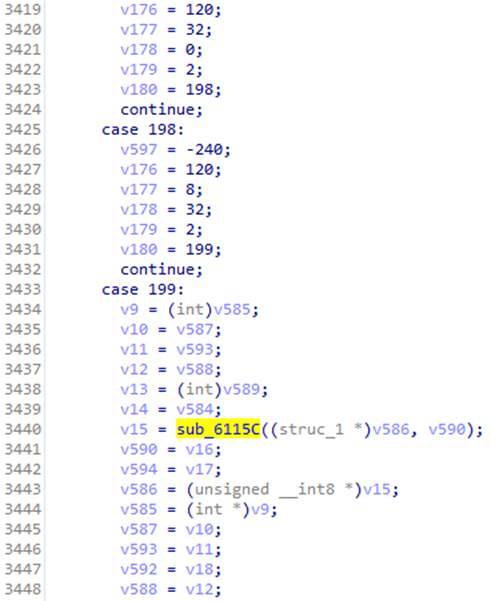
There was the switch parameter with the RC4 decryption in case 3. In this case, the structure that transfers to the function is filled with the parameters transferred to doCommandNative. We recall that we had magicInt there with value 16. We look at the corresponding case and after several transitions, find the code that helps us identify the algorithm.

It's AES!
We have an algorithm and only need to get its parameters, such as mode, key, and (possibly) the initialization vector (its presence depends on the AES algorithm operation mode). The structure that contains them should be created somewhere before calling the sub_6115C function. But since this part of the code is particularly well obfuscated, we decided to patch the code so all parameters of the decryption function could be dumped into a file.
Patch
If you don't want to manually write all the patch code in the assembly language, you can run Android Studio, code a function that receives the same parameters as our decryption function and writes to the file, then copy the resulting code generated by the compiler.
Our good friends from the UC Browser team also “ensured” the convenience of adding code. We do remember that we have garbage code at the beginning of each function, which can easily be replaced with any other code. Very convenient :) However, there is not enough room at the beginning of the target function for the code that saves all parameters to a file. We had to divide it into parts and use the garbage blocks of neighboring functions. We got four parts in total.
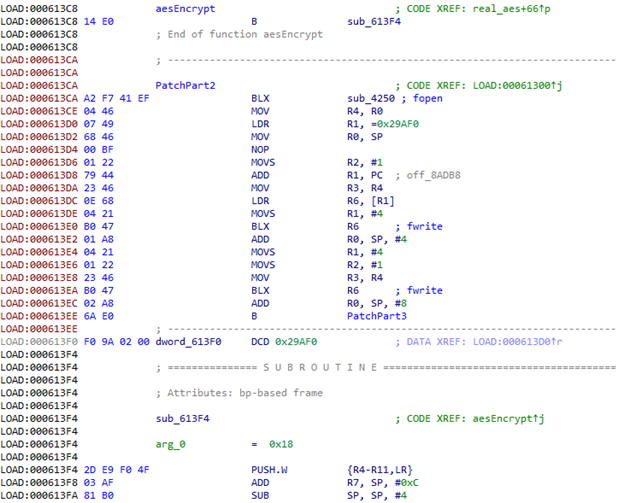
Part one:

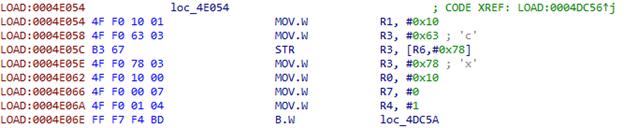
The first four function parameters in the ARM architecture are indicated in the R0-R3 registers, while the rest, if any, goes via the stack. The LR register indicates the return address. We need to save all this data so the function can work after we dump its parameters. We also need to save all the registers that we use in the process, so we use PUSH.W {R0-R10,LR}. In R7, we get the address of the list of parameters transferred to the function via the stack.
Using the fopen function, we open the /data/local/tmp/aes file in the “ab” mode (so that we could add something). We then load the file name address in R0 and the string address that indicates the mode in R1. This is where the garbage code ends, so we navigate to the next function. Since we want it to continue working, we put the transition to the actual function code in the beginning, before the garbage, and replace the garbage with the rest of the patch.
We then call fopen.
The first three parameters of the aes function are of the int type. Since we pushed the registers to the stack at the beginning, we can simply transfer their addresses in the stack to the fwrite function.
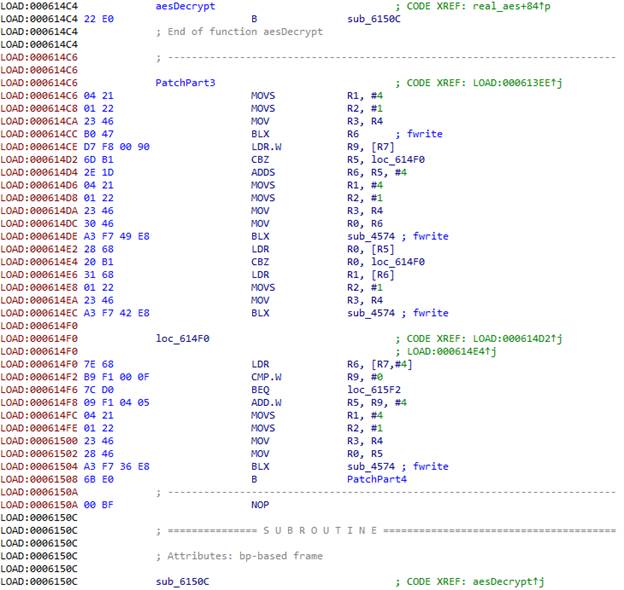
Next, we have three structures that indicate the size of the data and contain a pointer to the data for the key, the initialization vector, and the encrypted data.
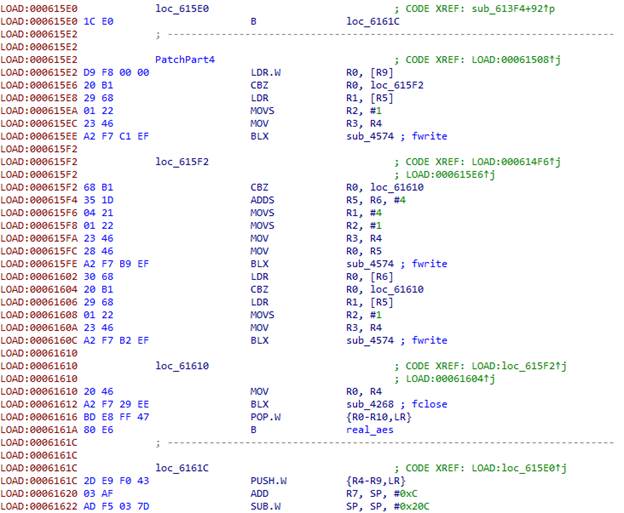
At the end, we close the file, restore the registers, and give control back to the actual aes function.
We compile the APK file with the patched library, sign it, download it onto a device or emulator, and run it. Now we see the dump has been created with a lot of data. The browser does not just decrypt traffic, but other data too, and all decryption is performed via this function. For some reason, we don't see the data we need, and the request we are expecting is not visible in the traffic. Let's skip waiting until UC Browser has the chance to make this request and take the encrypted response obtained earlier from the server to patch the application again. We'll add the decryption to the onCreate of the main activity.
const/16 v1, 0x62 new-array v1, v1, [B fill-array-data v1, :encrypted_data const/16 v0, 0x1f invoke-static {v0, v1}, Lcom/uc/browser/core/d/c/g;->j(I[B)[B move-result-object v1 array-length v2, v1 invoke-static {v2}, Ljava/lang/String;->valueOf(I)Ljava/lang/String; move-result-object v2 const-string v0, "ololo" invoke-static {v0, v2}, Landroid/util/Log;->d(Ljava/lang/String;Ljava/lang/String;)I
We compile it, sign, install, and run. Thus, we get a NullPointerException since the method returns a null value.
After analyzing of the code further, we found a function with rather interesting strings: “META-INF/” and “.RSA”. Looks like the app verifies its certificate, or even generates keys from it. We don't really want to dig into what is happening with the certificate, so let's just give it the correct certificate. We'll patch the encrypted string, so instead of “META-INF/” we get “BLABLINF/”, we create a folder with this name in the APK file, and save the browser certificate in it.
We compile it, sign, install, and run. Bingo! We have the key!
MitM
Now we've got the key and an equal initialization vector. Let's try to decrypt the server response in the CBC mode.

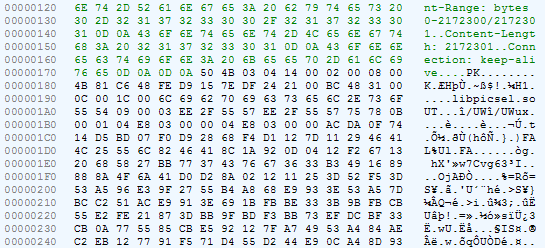
We see the archive URL, something like MD5, “extract_unzipsize”, and a number. Let us check. The MD5 of the archive is the same; the size of the unzipped library is the same. Now we'll try to patch this library and transmit it to the browser. To show that our patched library has loaded, we'll build an Intent to create the text message «PWNED!» We'll replace two responses from the server:
puds.ucweb.com/upgrade/index.xhtml and the one that prompts the archive download. In the first, we substitute MD5 (the size remains the same after unzipping); in the second, we send the archive with the patched library.
The browser makes several attempts to download the archive, resulting in an error. Apparently, something fishy is happening there. Analyzing this bizarre format, we found that the server also transmits the archive size:

It is LEB128 encoded. The patch slightly changes the size of the compressed library, so the browser decided that the archive broke upon download and displayed an error after several attempts.
So we fix the archive size and… voila! :) See the result in the video.
Consequences and developer's response
In the same way, hackers can use this insecure feature of UC Browser to distribute and launch malicious libraries. These libraries will work in the context of the browser, resulting in full system privileges that the browser has. This grants them free reign to display phishing windows, as well as access to the browser's working files including logins, passwords, and cookies in the database.
We contacted the UC Browser developers and informed them about the problem we had found, tried to point out the vulnerability and its danger, but they refused to discuss the matter. Meanwhile, the browser with the dangerous function remained in plain sight. Though as soon as we revealed the details of the vulnerability, it was impossible to ignore it as before. A new version of UC Browser 12.10.9.1193 was released on March 27, which accessed the server via HTTPS
puds.ucweb.com/upgrade/index.xhtml . In addition, between the “bug fixing” and the time we wrote this article, an attempt to open a PDF in the browser resulted in an error message with the text, “Oops, something is wrong.” There was no request to the server when trying to open the PDF file. This was performed upon startup, though, which is a sign that the ability to download the executable code in violation of Google Play policies is still present.