从头开始
如果对的没问题,那么从版本6开始就可以在一个工作空间中创建不同类型的项目:应用程序和库。
在那一刻之前,想要创建组件库的人最有可能使用了出色且有用的ng-packagr软件包,该软件包有助于以angular可接受的格式创建软件包。 实际上,我使用此工具创建了以前的库。 现在,角度团队在angular-cli中加入了ng-packagr,并添加了用于创建和构建库的原理图,扩展了angular.json格式并添加了更多便利设施。 现在让我们从ng new到npm install-从创建一个空库到发布它并将其导入到第三方项目中。
工作区照常创建
ng new test-app
将创建工作区和应用程序项目,看一下angular.json
{ ... "projects": { "test-app": { ... "sourceRoot": "src", "projectType": "application", "prefix": "app" ... } ... } ... }
现在添加库项目
ng generate library test-lib --prefix=tl
我们将添加--prefix键,以指示组件和指令将使用tl前缀,也就是说,组件标签看起来像
<tl-component-name></tl-component-name>
让我们现在在angular.json中看到,我们添加了一个新项目
{ ... "projects": { "test-app": { "root": "", "sourceRoot": "src", "projectType": "application", "prefix": "app" ... }, ... "test-lib": { "root": "projects/test-lib", "sourceRoot": "projects/test-lib/src", "projectType": "library", "prefix": "tl" } ... } ... }
以下结构出现在项目目录中
- projects - test-lib ng-package.json package.json - src public-api.ts - lib test-lib.component.ts test-lib.module.ts test-lib.service.ts
另外,在tsconfig.json中,路径部分中有一个附加项
"paths": { "test-lib": [ "dist/test-lib" ], "test-lib/*": [ "dist/test-lib/*" ] }
现在,如果您运行该应用程序,
ng serve
然后我们将看到一个标准的工作角度应用模板
创建库功能
让我们创建一个包含服务,指令和组件的库。 我们将服务和指令放置在不同的模块中。 让我们移至projects / test-lib / src / lib目录并删除test-lib。*。TS,还删除project / test-lib / src / public-api.ts的内容。
让我们转到project / test-lib / src / lib并创建模块,指令,服务和组件
ng g module list ng g module border ng g service list /* list*/ ng g component list /* border*/ ng g directive border
用逻辑填充组件,服务和指令。 该组件将显示提交给输入的行的列表。 指令是添加一个红色框,该服务每秒将当前时间戳添加到Observable。
服务专区
import {Injectable} from '@angular/core'; import {Observable, Subject} from 'rxjs'; @Injectable({ providedIn: 'root' }) export class ListService { timer: any; private list$: Subject<string> = new Subject<string>(); list: Observable<string> = this.list$.asObservable(); constructor() { this.timer = setInterval(this.nextItem.bind(this), 1000); } nextItem() { const now = new Date(); const currentTime = now.getTime().toString(); this.list$.next(currentTime); } }
组件清单和模块
import {NgModule} from '@angular/core'; import {CommonModule} from '@angular/common'; import {ListComponent} from './list/list.component'; @NgModule({ declarations: [ ListComponent ], exports: [ ListComponent ], imports: [ CommonModule ] }) export class ListModule { } @Component({ selector: 'tl-list', template: ` <ul> <li *ngFor="let item of list">{{item}}</li> </ul>`, styleUrls: ['./list.component.css'], changeDetection: ChangeDetectionStrategy.OnPush }) export class ListComponent implements OnInit { @Input() list: string[]; constructor() { } ngOnInit() { } }
车架
import {NgModule} from '@angular/core'; import {CommonModule} from '@angular/common'; import {BorderDirective} from './border.directive'; @NgModule({ declarations: [ BorderDirective ], exports: [ BorderDirective ], imports: [ CommonModule ] }) export class BorderModule { } import {Directive, ElementRef, OnInit} from '@angular/core'; @Directive({ selector: '[tlBorder]' }) export class BorderDirective implements OnInit { private element$: HTMLElement; constructor(private elementRef$: ElementRef) { this.element$ = elementRef$.nativeElement; } ngOnInit() { this.element$.style.border = 'solid 1px red'; } }
! 这很重要。 生成组件和库时,cli不会创建导出,因此请确保添加模块中的export部分中应该可用的组件和指令。
此外,为了将来可以使用库中的类,我们将一些代码添加到public-api.ts
export * from './lib/list.service'; export * from './lib/border/border.module'; export * from './lib/border/border.directive'; export * from './lib/list/list.module'; export * from './lib/list/list/list.component';
在测试应用程序中连接库
让我们组装图书馆项目
ng build test-lib --watch
接下来在app.module中,我们将使用组件和指令导入模块,并添加逻辑
import {BrowserModule} from '@angular/platform-browser'; import {NgModule} from '@angular/core'; import {AppRoutingModule} from './app-routing.module'; import {AppComponent} from './app.component'; import {ListModule} from 'test-lib'; import {BorderModule} from 'test-lib'; @NgModule({ declarations: [ AppComponent ], imports: [ BrowserModule, AppRoutingModule, ListModule, BorderModule ], providers: [], bootstrap: [AppComponent] }) export class AppModule { }
并在应用程序中使用我们库中的片段
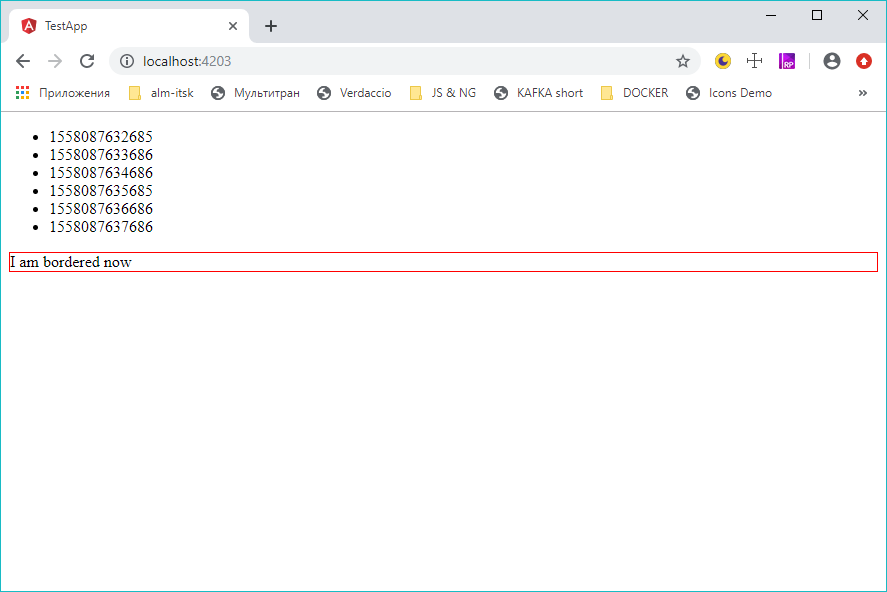
import {Component, OnInit} from '@angular/core'; import {ListService} from 'test-lib'; @Component({ selector: 'app-root', template: ` <tl-list [list]="list"></tl-list> <div tlBorder>I am bordered now</div>`, styleUrls: ['./app.component.styl'] }) export class AppComponent implements OnInit { list: string[] = []; constructor(private svc$: ListService) { } ngOnInit() { this.svc$.list.subscribe((value => this.list = [...this.list, value])); } }
运行并检查应用程序,一切正常:
汇编和出版
它仍然可以收集和发布程序包。 对于组装和发布,将命令添加到package.json应用程序中的脚本很方便
{ "name": "test-app", "version": "0.0.1", "scripts": { ... "lib:build": "ng build test-lib", "lib:watch": "ng build test-lib --watch", "lib:publish": "npm run lib:build && cd dist/test-lib && npm pack npm publish", ... } }
安装在任何其他Angular项目中后,库现在可以编译,发布
npm install test-lib
您可以使用组件和指令。
小笔记
我们公司中有一整套npm软件包,因此在本例中,该软件包应以名称空间发布为
company / test-lib。 为此,我们将做一些更改
重命名package.json库中的包
/* projects/test-lib/package.json */ { "name": "@company/test-lib", "version": "0.0.1", "peerDependencies": { "@angular/common": "^7.2.0", "@angular/core": "^7.2.0" } }
因此,在测试应用程序中,可以通过名称空间和名称空间访问该库,我们将对tsconfig进行一些修复
/* test-app/tsconfig.json */ *** "paths": { "@company/test-lib": [ "dist/test-lib" ], "@company/test-lib/*": [ "dist/test-lib/*" ] } ***
并在测试应用程序中替换导入,例如
import {ListModule} from 'test-lib';
替换为
import {ListModule} from '@company/test-lib';
到此为止。
PS:学习这个主题时,我曾经阅读以下文章
角库系列如何使用Angular构建npm ready组件库