Svelte 3在一个多月前发布。 我想是个很高兴认识您的好时机,并完成了一个出色的教程 ,该教程也被翻译成了俄语。
为了巩固过去,我做了一个小项目,并与您分享成果。 这不仅仅是一个待办事项清单,而是一款您需要从黑色方块射击的游戏。
0.不耐烦
教程库
带有额外功能的存储库
演示版
1.准备
我们克隆一个开发模板
git clone https://github.com/sveltejs/template.git
安装依赖项。
cd template/ npm i
我们启动开发服务器。
npm run dev
我们的模板位于
http://本地主机:5000 该服务器支持热重装,因此在保存更改后,我们的更改将在浏览器中可见。
如果您不想在本地部署环境,则可以在线使用支持Svelte的codeandbox和stackblitz沙箱。
2.游戏框架
src文件夹由两个文件main.js和App.svelte组成 。
main.js是我们应用程序的入口。 在开发过程中,我们不会碰它。 这里,App.svelte组件安装在文档主体中。
App.svelte是svelte的组件。 组件模板包括三个部分:
<script> </script> <style> h1 { color: purple; } </style> <h1>Hello {name}!</h1>
组件样式是孤立的,但是可以使用以下指令分配全局样式:global()。 有关样式的更多信息 。
为我们的组件添加通用样式。
src / App.svelte <script> export let name; </script> <style> :global(html) { height: 100%; } :global(body) { height: 100%; overscroll-behavior: none; user-select: none; margin: 0; background-color: #efefef; font-family: -apple-system, BlinkMacSystemFont, "Segoe UI", Roboto, Oxygen, Ubuntu, Cantarell, "Open Sans", "Helvetica Neue", sans-serif; } </style> <h1>Hello {name}!</h1>
让我们创建src / components文件夹,其中将存储我们的组件
在此文件夹中,创建两个文件,其中将包含运动场和控件。
src /组件/ GameField.svelte 组件是通过指令导入的
import Controls from "./components/Controls.svelte";
要显示组件,只需将组件标签插入标记中。 了解有关标签的更多信息 。
<Controls />
现在,我们将组件导入并显示在App.svelte中。
src / App.svelte <script> </script> <style> :global(html) { height: 100%; } :global(body) { height: 100%; overscroll-behavior: none; user-select: none; margin: 0; background-color: #efefef; font-family: -apple-system, BlinkMacSystemFont, "Segoe UI", Roboto, Oxygen, Ubuntu, Cantarell, "Open Sans", "Helvetica Neue", sans-serif; } </style> <Controls /> <GameField />
3.控制
Controls.svelte组件将包含三个按钮:向左移动,向右移动,射击。 svg元素将显示按钮图标。
创建src / asssets文件夹 ,在其中添加svg图标。
src /资产/ Bullet.svelte <svg height="40px" viewBox="0 0 427 427.08344" width="40px"> <path d="m341.652344 38.511719-37.839844 37.839843 46.960938 46.960938 37.839843-37.839844c8.503907-8.527344 15-18.839844 19.019531-30.191406l19.492188-55.28125-55.28125 19.492188c-11.351562 4.019531-21.664062 10.515624-30.191406 19.019531zm0 0" /> <path d="m258.65625 99.078125 69.390625 69.390625 14.425781-33.65625-50.160156-50.160156zm0 0" /> <path d="m.0429688 352.972656 28.2812502-28.285156 74.113281 74.113281-28.28125 28.28125zm0 0" /> <path d="m38.226562 314.789062 208.167969-208.171874 74.113281 74.113281-208.171874 208.171875zm0 0" /> </svg>
src /资产/ LeftArrow.svelte <svg width="40px" height="40px" viewBox="0 0 292.359 292.359" transform="translate(-5 0)"> <path d="M222.979,5.424C219.364,1.807,215.08,0,210.132,0c-4.949,0-9.233,1.807-12.848,5.424L69.378,133.331 c-3.615,3.617-5.424,7.898-5.424,12.847c0,4.949,1.809,9.233,5.424,12.847l127.906,127.907c3.614,3.617,7.898,5.428,12.848,5.428 c4.948,0,9.232-1.811,12.847-5.428c3.617-3.614,5.427-7.898,5.427-12.847V18.271C228.405,13.322,226.596,9.042,222.979,5.424z" /> </svg>
src /资产/ RightArrow.svelte <svg width="40px" height="40px" viewBox="0 0 292.359 292.359" transform="translate(5 0) rotate(180)"> <path d="M222.979,5.424C219.364,1.807,215.08,0,210.132,0c-4.949,0-9.233,1.807-12.848,5.424L69.378,133.331 c-3.615,3.617-5.424,7.898-5.424,12.847c0,4.949,1.809,9.233,5.424,12.847l127.906,127.907c3.614,3.617,7.898,5.428,12.848,5.428 c4.948,0,9.232-1.811,12.847-5.428c3.617-3.614,5.427-7.898,5.427-12.847V18.271C228.405,13.322,226.596,9.042,222.979,5.424z" /> </svg>
添加按钮组件src / components / IconButton.svelte 。
我们将接受来自父组件的事件处理程序。 为了能够按住按钮,我们需要两个处理程序:单击的开始和单击的结束。 我们声明变量start和release ,我们将在其中接受事件处理程序,以进行单击的开始和结束。 我们还需要活动变量,无论是否按下按钮,该变量都会显示。
<script> export let start; export let release; export let active; </script>
我们风格化我们的组件
<style> .iconButton { display: flex; align-items: center; justify-content: center; width: 60px; height: 60px; border: 1px solid black; border-radius: 50px; outline: none; background: transparent; } .active { background-color: #bdbdbd; } </style>
按钮是一个按钮元素,在其中显示从父组件传输的内容。 <slot />标记指示要安装传输的内容的位置。 了解有关<slot />元素的更多信息 。
<button> <slot /> </button>
事件处理程序使用on:指令指示,例如on:click 。
我们将处理鼠标事件和触摸点击。 了解有关事件绑定的更多信息 。
如果按下按钮, 活动类将被添加到组件的基类中。 您可以通过class属性分配一个类。 有关课程的更多信息
<button on:mousedown={start} on:touchstart={start} on:mouseup={release} on:touchend={release} class={`iconButton ${active ? 'active' : ''}`}> <slot /> </button>
结果,我们的组件将如下所示:
src /组件/ IconButton.svelte <script> export let start; export let release; export let active; </script> <style> .iconButton { display: flex; align-items: center; justify-content: center; width: 60px; height: 60px; border: 1px solid black; border-radius: 50px; outline: none; background: transparent; } .active { background-color: #bdbdbd; } </style> <button on:mousedown={start} on:touchstart={start} on:mouseup={release} on:touchend={release} class={`iconButton ${active ? 'active' : ''}`}> <slot /> </button>
现在,我们将图标和按钮元素导入src / components / Controls.svelte并组成布局。
src /组件/ Controls.svelte <script> </script> <style> .controls { position: fixed; bottom: 0; left: 0; width: 100%; } .container { display: flex; justify-content: space-between; margin: 1rem; } .arrowGroup { display: flex; justify-content: space-between; width: 150px; } </style> <div class="controls"> <div class="container"> <div class="arrowGroup"> <IconButton> <LeftArrow /> </IconButton> <IconButton> <RightArrow /> </IconButton> </div> <IconButton> <Bullet /> </IconButton> </div> </div>
我们的应用程序应如下所示:
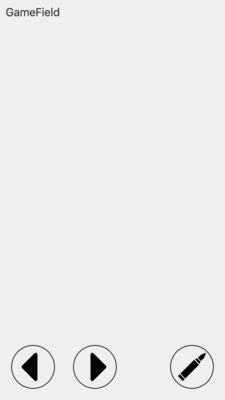
4.比赛场地
比赛场地是svg组件,我们将在其中添加游戏元素(枪支,炮弹,对手)。
更新src /组件/ GameField.svelte代码
src /组件/ GameField.svelte <style> .container { flex-grow: 1; display: flex; flex-direction: column; justify-content: flex-start; max-height: 100%; } </style> <div class="container"> <svg viewBox="0 0 480 800"> </svg> </div>
创建src / components / Cannon.svelte枪 。 大声喊出一个矩形,但是。
src /组件/ Cannon.svelte <style> .cannon { transform-origin: 4px 55px; } </style> <g class="cannon" transform={`translate(236, 700)`}> <rect width="8" height="60" fill="#212121" /> </g>
现在,我们在战场上进口枪支。
src / GameField.svelte <script> </script> <style> .container { flex-grow: 1; display: flex; flex-direction: column; justify-content: flex-start; max-height: 100%; } </style> <div class="container"> <svg viewBox="0 0 480 800"> <Cannon /> </svg> </div>
5.游戏周期
我们有游戏的基本框架。 下一步是创建一个处理我们的逻辑的游戏循环。
让我们创建包含逻辑变量的存储。 我们将需要svelte / store模块中的可写组件。 了解有关商店的更多信息 。
创建一个简单的存储库如下所示:
让我们创建src / stores /文件夹,我们游戏的所有可变值都将存储在这里。
创建src / stores / game.js文件 ,其中将存储负责游戏一般状态的变量。
创建src / stores / cannon.js文件 ,在其中存储负责枪支状态的变量
Svelte允许您创建包含工作逻辑的自定义存储库。 您可以在教科书中阅读有关此内容的更多信息。 我无法完美地将其融入游戏周期的概念,因此我们仅在存储库中声明变量。 我们将在src / gameLoop部分中对它们进行所有操作。
将使用requestAnimationFrame函数计划游戏循环。 描述游戏逻辑的函数数组将输入到输入中。 在游戏周期结束时,如果游戏尚未结束,则计划进行下一次迭代。 在游戏循环中,我们将访问isPlaying变量的值以检查游戏是否结束。
使用存储,您可以订阅一个值。 我们将在组件中使用此功能。 现在,我们将使用get函数来读取变量的值。 我们将使用变量的.set()方法来设置值。
您可以通过调用.update()方法来更新值,该方法将一个函数作为输入,该函数的第一个值将传递给当前值。 文档中有更多详细信息 。 其他所有内容都是纯JS。
src / gameLoop / gameLoop.js 现在,我们描述枪支行为的逻辑。
src / gameLoop / cannon.js 现在,将我们的枪支旋转处理程序添加到游戏循环中。
import { rotateCannon } from "./cannon"; export const startGame = () => { isPlaying.set(true); startLoop([rotateCannon]); };
当前游戏周期代码:
src / gameLoop / gameLoop.js import { isPlaying } from '../stores/game'; import { get } from 'svelte/store'; import { rotateCannon } from './cannon';
我们有可以旋转枪支的逻辑。 但是我们还没有将其与按钮关联。 是时候这样做了。 Click事件处理程序将添加到src / components / Controls.svelte中 。
import { direction } from "../stores/cannon.js";
将处理程序和单击的当前状态添加到IconButton元素。 为此,只需将值传递到先前创建的属性start , release和active即可 ,如文档中所述。
<IconButton start={setDirectionLeft} release={resetDirection} active={$direction === 'left'}> <LeftArrow /> </IconButton> <IconButton start={setDirectionRight} release={resetDirection} active={$direction === 'right'}> <RightArrow /> </IconButton>
我们将$表达式用作$方向变量。 这种语法使该值成为反应性的,并自动订阅更改。 文档中有更多详细信息 。
src /组件/ Controls.svelte <script> import IconButton from "./IconButton.svelte"; import LeftArrow from "../assets/LeftArrow.svelte"; import RightArrow from "../assets/RightArrow.svelte"; import Bullet from "../assets/Bullet.svelte"; </script> <style> .controls { position: fixed; bottom: 0; left: 0; width: 100%; } .container { display: flex; justify-content: space-between; margin: 1rem; } .arrowGroup { display: flex; justify-content: space-between; width: 150px; } </style> <div class="controls"> <div class="container"> <div class="arrowGroup"> <IconButton start={setDirectionLeft} release={resetDirection} active={$direction === 'left'}> <LeftArrow /> </IconButton> <IconButton start={setDirectionRight} release={resetDirection} active={$direction === 'right'}> <RightArrow /> </IconButton> </div> <IconButton> <Bullet /> </IconButton> </div> </div>
此刻,当按下我们的按钮时,会进行选择,但喷枪仍不会旋转。 我们需要将角度值导入Cannon.svelte组件并更新变换变换规则
src /组件/ Cannon.svelte <script> </script> <style> .cannon { transform-origin: 4px 55px; } </style> <g class="cannon" transform={`translate(236, 700) rotate(${$angle})`}> <rect width="8" height="60" fill="#212121" /> </g>
仍然需要在App.svelte组件中运行我们的游戏循环。
import { startGame } from "./gameLoop/gameLoop"; startGame();
瘦身 <script> import Controls from "./components/Controls.svelte"; import GameField from "./components/GameField.svelte"; </script> <style> :global(html) { height: 100%; } :global(body) { height: 100%; overscroll-behavior: none; user-select: none; margin: 0; background-color: #efefef; font-family: -apple-system, BlinkMacSystemFont, "Segoe UI", Roboto, Oxygen, Ubuntu, Cantarell, "Open Sans", "Helvetica Neue", sans-serif; } </style> <Controls /> <GameField />
万岁! 我们的枪开始移动。

6.射击
现在教我们的枪射击。 我们需要存储值:
- 现在是否开枪(按下开火按钮);
- 最后一枪的时间戳,您需要计算射速;
- 壳数组。
将这些变量添加到我们的src / stores / cannon.js存储库中 。
src /商店/ cannon.js import { writable } from 'svelte/store'; export const direction = writable(null); export const angle = writable(0);
在src / gameLoop / cannon.js中更新导入和游戏逻辑。
src / gameLoop / cannon.js import { get } from 'svelte/store';
现在,将处理程序导入gameLoop.js并将它们添加到游戏循环中。
import { rotateCannon, shoot, moveBullet, clearBullets } from "./cannon"; export const startGame = () => { isPlaying.set(true); startLoop([rotateCannon, shoot, moveBullet, clearBullets ]); };
src / gameLoop / gameLoop.js import { isPlaying } from '../stores/game'; import { get } from 'svelte/store';
现在,我们只需要创建按下“火”按钮的过程,并在运动场上添加贝壳的显示即可。
编辑src / components / Controls.svelte 。
现在,像旋转按钮一样,将处理程序添加到火控按钮
<IconButton start={startFire} release={stopFire} active={$isFiring}> <Bullet /> </IconButton>
src /组件/ Controls.svelte <script> import IconButton from "./IconButton.svelte"; import LeftArrow from "../assets/LeftArrow.svelte"; import RightArrow from "../assets/RightArrow.svelte"; import Bullet from "../assets/Bullet.svelte"; </script> <style> .controls { position: fixed; bottom: 0; left: 0; width: 100%; } .container { display: flex; justify-content: space-between; margin: 1rem; } .arrowGroup { display: flex; justify-content: space-between; width: 150px; } </style> <div class="controls"> <div class="container"> <div class="arrowGroup"> <IconButton start={setDirectionLeft} release={resetDirection} active={$direction === 'left'}> <LeftArrow /> </IconButton> <IconButton start={setDirectionRight} release={resetDirection} active={$direction === 'right'}> <RightArrow /> </IconButton> </div> <IconButton start={startFire} release={stopFire} active={$isFiring}> <Bullet /> </IconButton> </div> </div>
它仍然可以在运动场上显示贝壳。 首先,创建弹丸组件
src /组件/ Bullet.svelte <script> </script> <g transform={`translate(${bullet.x}, ${bullet.y}) rotate(${bullet.angle})`}> <rect width="3" height="5" fill="#212121" /> </g>
由于我们拥有的外壳存储在数组中,因此我们需要一个迭代器来显示它们。 实际上,对于这种情况有一个Every指令。 文档中有更多详细信息 。
// bulletList, bullet. // id , svelte , . // key React {#each $bulletList as bullet (bullet.id)} <Bullet {bullet}/> {/each}
src/components/GameField.svelte <script> import Cannon from "./Cannon.svelte"; </script> <style> .container { flex-grow: 1; display: flex; flex-direction: column; justify-content: flex-start; max-height: 100%; } </style> <div class="container"> <svg viewBox="0 0 480 800"> {#each $bulletList as bullet (bullet.id)} <Bullet {bullet} /> {/each} <Cannon /> </svg> </div>
.
7.
太好了 . src/stores/enemy.js .
src/stores/enemy.js import { writable } from "svelte/store";
src/gameLoop/enemy.js
src/gameLoop/enemy.js import { get } from 'svelte/store';
.
src/gameLoop/gameLoop.js import { isPlaying } from '../stores/game'; import { get } from 'svelte/store'; import { rotateCannon, shoot, moveBullet, clearBullets } from './cannon';
src/components/Enemy.js .
src/components/Enemy.js <script> </script> // , . <g transform={`translate(${enemy.x}, ${enemy.y})`} > <rect width="30" height="30" fill="#212121" /> </g>
, Each
src/components/GameField.svelte <script> import Cannon from "./Cannon.svelte"; import Bullet from "./Bullet.svelte"; </script> <style> .container { flex-grow: 1; display: flex; flex-direction: column; justify-content: flex-start; max-height: 100%; } </style> <div class="container"> <svg viewBox="0 0 480 800"> {#each $enemyList as enemy (enemy.id)} <Enemy {enemy} /> {/each} {#each $bulletList as bullet (bullet.id)} <Bullet {bullet} /> {/each} <Cannon /> </svg> </div>
!

8.
, .
. src/gameLoop/game.js . MDN
src/gameLoop/game.js import { get } from 'svelte/store';
.
src/gameLoop/gameLoop.js import { isPlaying } from '../stores/game'; import { get } from 'svelte/store'; import { rotateCannon, shoot, moveBullet, clearBullets } from './cannon';
, .
9.
, ToDo :
github .
结论
, , React. 60 FPS, Svelte .
Svelte , .