想象一下一本书,其中没有章节,但所有内容都没有逻辑和语义上的细分,一本书没有段落,点和逗号,一本书的第一行讲述了一件事情,第二行讲述了另一件事,第三行讲述了第一件事。
赠送?
您能理解这本书的内容吗?
您能多快找到感兴趣的段落?
您的代码以及本书的内容都需要进行结构化,以使代码易于阅读并传达其中的含义。
在本文中,我将展示组织代码的示例,在这些代码中,类具有相同的主要块顺序及其分解。
为方便起见,我将使用单词class(类),但暗含任何类型(class,struct,enum)。
由于这些技巧的应用,您的代码将变得可读,将来可以为您提供方便和快速的工作方式。
当然,遵循基本原则,可以将描述的技巧升级为您喜欢的方式。
首先,让我们以两种方式比较相同的代码。
一个凌乱的类的例子:
| final class MessyViewController: UIViewController { |
| |
| private let userService = UserService() |
| var userID: String? |
| private var userList: [User]? |
| |
| @IBOutlet private weak var searchBar: UISearchBar! |
| |
| weak var delegate: SomeDelegate? |
| |
| @IBAction private func cancelButtonPressed(_ sender: UIBarButtonItem) { |
| dismiss(animated: true, completion: nil) |
| } |
| |
| override func viewDidLoad() { |
| super.viewDidLoad() |
| // Do any additional setup after loading the view. |
| navigationController?.navigationBar.backgroundColor = .red |
| navigationItem.title = "Some" |
| } |
| @IBOutlet private weak var tableView: UITableView! |
| } |
此代码类似于方法,变量和出口的转储,其中所有内容都合并在一起,很难理解它指的是什么以及在什么地方寻找什么。
一个纯类的例子:
| final class CleanViewController: UIViewController { |
| |
| // MARK: - IBOutlets |
| |
| @IBOutlet private weak var searchBar: UISearchBar! |
| @IBOutlet private weak var tableView: UITableView! |
| |
| // MARK: - Public Properties |
| |
| var userID: String? |
| weak var delegate: SomeDelegate? |
| |
| // MARK: - Private Properties |
| |
| private let userService = UserService() |
| private var userList: [User]? |
| |
| // MARK: - Lifecycle |
| |
| override func viewDidLoad() { |
| super.viewDidLoad() |
| |
| setupNavigationBar() |
| } |
| |
| // MARK: - Private Methods |
| |
| private func setupNavigationBar() { |
| navigationController?.navigationBar.backgroundColor = .red |
| navigationItem.title = "Some" |
| } |
| |
| // MARK: - IBActions |
| |
| @IBAction private func cancelButtonPressed(_ sender: UIBarButtonItem) { |
| dismiss(animated: true, completion: nil) |
| } |
| |
| } |
两个示例中都显示了相同的功能,但是不同之处在于第二个选项具有清晰的结构,因此逻辑更明显,代码易于阅读,您可以快速找到要查找的内容,此外,很好看它。
形成纯类结构的基本原则:
- 始终使用// MARK:-
- 给出标签名称并设置其优先级
- 将逻辑从生命周期方法中分离出来
- 我们使用扩展来实现协议
- 选择逻辑相关元素
- 我们删除未使用的
- 例行自动化
1.始终使用// MARK:-
为了便于阅读,本书分为几章,如果使用
// MARK:-创建类的目录,对于我们来说工作起来会更舒服。
该标签不仅在整个代码中脱颖而出,而且会自动创建一个目录-在该文件的元素列表中以黑体突出显示代码中的部分。
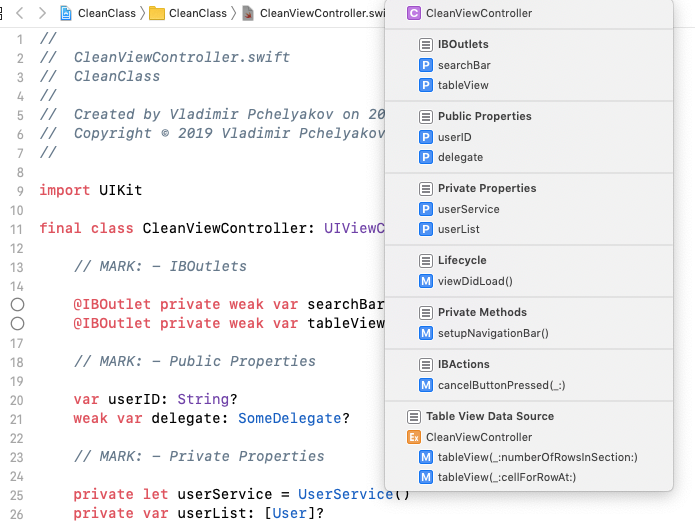 您可以通过单击该文件名或ctr + 6(文档项目菜单)后文件顶部最右箭头(>)后面的按钮来查看文件的目录。
2.我们给出标签名称并确定其顺序
以下是将代码分为逻辑连接的块及其顺序的主要标签:
| // MARK: - IBOutlets |
| |
| // MARK: - Public Properties |
| |
| // MARK: - Private Properties |
| |
| // MARK: - Initializers |
| |
| // MARK: - Lifecycle |
| |
| // MARK: - Public Methods |
| |
| // MARK: - Private Methods |
| |
| // MARK: - IBActions |
使用这种分组方法时,可以轻松地浏览任何类的代码。
3.将逻辑从生命周期方法中拉出到单独的方法中
即使必须使用一行代码创建一个方法,也必须将ViewController生命周期方法中的逻辑放入单独的方法中。 今天是一,明天是十。
| ❌ NOT Preferred |
| |
| override func viewDidLoad() { |
| super.viewDidLoad() |
| |
| navigationController?.navigationBar.backgroundColor = .red |
| someButton.layer.cornerRadius = 10 |
| someButton.layer.masksToBounds = true |
| navigationItem.title = "Some" |
| print("Some") |
| } |
| |
| |
| ✅ Preferred |
| |
| // MARK: - Lifecycle |
| |
| override func viewDidLoad() { |
| super.viewDidLoad() |
| |
| setupNavigationBar() |
| setupSomeButton() |
| printSome() |
| } |
| |
| |
| // MARK: - Private Methods |
| |
| private func setupNavigationBar() { |
| navigationController?.navigationBar.backgroundColor = .red |
| navigationItem.title = "Some" |
| } |
| |
| private func setupSomeButton() { |
| someButton.layer.cornerRadius = 10 |
| someButton.layer.masksToBounds = true |
| } |
| |
| private func printSome() { |
| print("Some") |
| } |
由于将实现细节外包给了第三方方法,因此生命周期的逻辑变得更加清晰。
4.使用扩展来实现协议
取出标记为
// MARK的扩展中的协议实现
:-SomeProtocol :
| ❌ NOT Preferred |
| |
| final class CleanViewController: UIViewController, UITableViewDataSource, UITableViewDelegate { |
| |
| // all methods |
| } |
| |
| |
| ✅ Preferred |
| |
| final class CleanViewController: UIViewController { |
| |
| // class stuff here |
| |
| } |
| |
| |
| // MARK: - Table View Data Source |
| extension CleanViewController: UITableViewDataSource { |
| |
| func tableView(_ tableView: UITableView, numberOfRowsInSection section: Int) -> Int { |
| |
| return userList?.count ?? 0 |
| } |
| |
| func tableView(_ tableView: UITableView, cellForRowAt indexPath: IndexPath) -> UITableViewCell { |
| |
| let cell = UITableViewCell() |
| return cell |
| } |
| |
| } |
该标签将包含与此协议相关的所有内容-仅存在于此处的所有内容,而无需走到其他任何地方,否则该协议的方法和属性将分散在整个类中。
5.选择逻辑上相关的元素
为了增加可见性,必须使用空行选择逻辑上相关的元素:
| ❌ NOT Preferred |
| |
| private func showActivityIndicator(on viewController: UIViewController) { |
| activityIndicator.center = viewController.view.center |
| loadingView.backgroundColor = #colorLiteral(red: 0, green: 0, blue: 0, alpha: 1) |
| loadingView.alpha = 0.5 |
| activityIndicator.hidesWhenStopped = true |
| activityIndicator.style = .whiteLarge |
| loadingView.center = viewController.view.center |
| loadingView.clipsToBounds = true |
| loadingView.layer.cornerRadius = 15 |
| viewController.view.addSubview(loadingView) |
| viewController.view.addSubview(activityIndicator) |
| activityIndicator.startAnimating() |
| } |
| |
| |
| ✅ Preferred |
| |
| private func showActivityIndicator(on viewController: UIViewController) { |
| activityIndicator.center = viewController.view.center |
| activityIndicator.hidesWhenStopped = true |
| activityIndicator.style = .whiteLarge |
| |
| loadingView.center = viewController.view.center |
| loadingView.backgroundColor = #colorLiteral(red: 0, green: 0, blue: 0, alpha: 1) |
| loadingView.alpha = 0.5 |
| loadingView.clipsToBounds = true |
| loadingView.layer.cornerRadius = 15 |
| |
| viewController.view.addSubview(loadingView) |
| viewController.view.addSubview(activityIndicator) |
| |
| activityIndicator.startAnimating() |
| } |
6.我们删除未使用的
不要留下不必要的注释(默认),空方法或无效功能-这会阻塞代码。 注意AppDelegate类,最有可能在其中找到带有注释的空方法。
| ❌ NOT Preferred |
| |
| @UIApplicationMain |
| class AppDelegate: UIResponder, UIApplicationDelegate { |
| |
| var window: UIWindow? |
| |
| |
| func application( |
| _ application: UIApplication, |
| didFinishLaunchingWithOptions launchOptions: [UIApplication.LaunchOptionsKey: Any]?) -> Bool { |
| // Override point for customization after application launch. |
| return true |
| } |
| // |
| // func someFunc() { |
| // print("Some") |
| // } |
| |
| func applicationWillResignActive(_ application: UIApplication) { |
| // Sent when the application is about to move from active to inactive state. This can occur for certain |
| //types of temporary interruptions (such as an incoming phone call or SMS message) or when the user quits |
| //the application and it begins the transition to the background state. |
| // Use this method to pause ongoing tasks, disable timers, and invalidate graphics rendering callbacks. Games should use this method to pause the game. |
| } |
| |
| |
| ✅ Preferred |
| |
| @UIApplicationMain |
| class AppDelegate: UIResponder, UIApplicationDelegate { |
| |
| var window: UIWindow? |
| |
| |
| func application( |
| _ application: UIApplication, |
| didFinishLaunchingWithOptions launchOptions: [UIApplication.LaunchOptionsKey: Any]?) -> Bool { |
| |
| return true |
| } |
| |
| } |
7.自动化例程
为了避免在每个类中手动编写
// // MARK:-SomeMark ,请使用
Code Snippet 。
 我们写一个标签,选择它,然后选择Editor-> Create Code Snippet,给它起一个名字并称之为快捷方式。
// MARK:-红利
- 如果此类没有子级,请使用final关键字标记该类-项目编译速度更快,代码运行更快。
- 用private关键字标记属性,出口和方法-它们仅在类内部可用,如果在那里不需要,则不会出现在属性和方法的公共列表中。
祝您在应用程序开发中取得圆满成功,并让您的课堂变得更加干净!
// MARK:-帮助撰写文章谢尔盖·普列亚科夫(Sergey Pchelyakov)
阿列克谢·普列什科夫(Alexey
Pleshkov)// MARK:-链接Ray Wenderlich代码样式