
大家好,我是GNU / Linux操作系统的快乐用户,并且众所周知,与Windows相比,不带铃鼓跳舞的人去Linux玩的玩具要少得多。
MMORPG类型的游戏甚至更少。
但是,大约半年或一年以前,我发现他们已将Albion Online游戏移植到Linux。
游戏非常有趣,但是需要花费大量时间。 为了不浪费我宝贵的时间,我决定写一个机器人。 在我开展业务时,谁会耕种我的资源。
游戏中有多种手工艺品,您可以砍柴,挖石头,甚至种园,但我的选择是钓鱼。
因此,在Albion在线钓鱼的本质很简单,拿一根钓鱼竿,去池塘,按住按钮以扔下诱饵,等待一定时间。
啄食时,您必须再次按下按钮并玩一个迷你游戏。
在这里,您将需要交替拉动,而不要拉动钓鱼竿,具体取决于浮子的运动。 浮子总是以不同的顺序和速度随机移动。 如果您做的一切正确,并且漂浮物未超出允许的范围,那么您将抓鱼。
因此,我们将使所有这些业务自动化。 通过计算机语言python。 我决定从最困难的地方开始,即从游戏开始时开始。 在这里,我最喜欢的
OpenCV计算机视觉
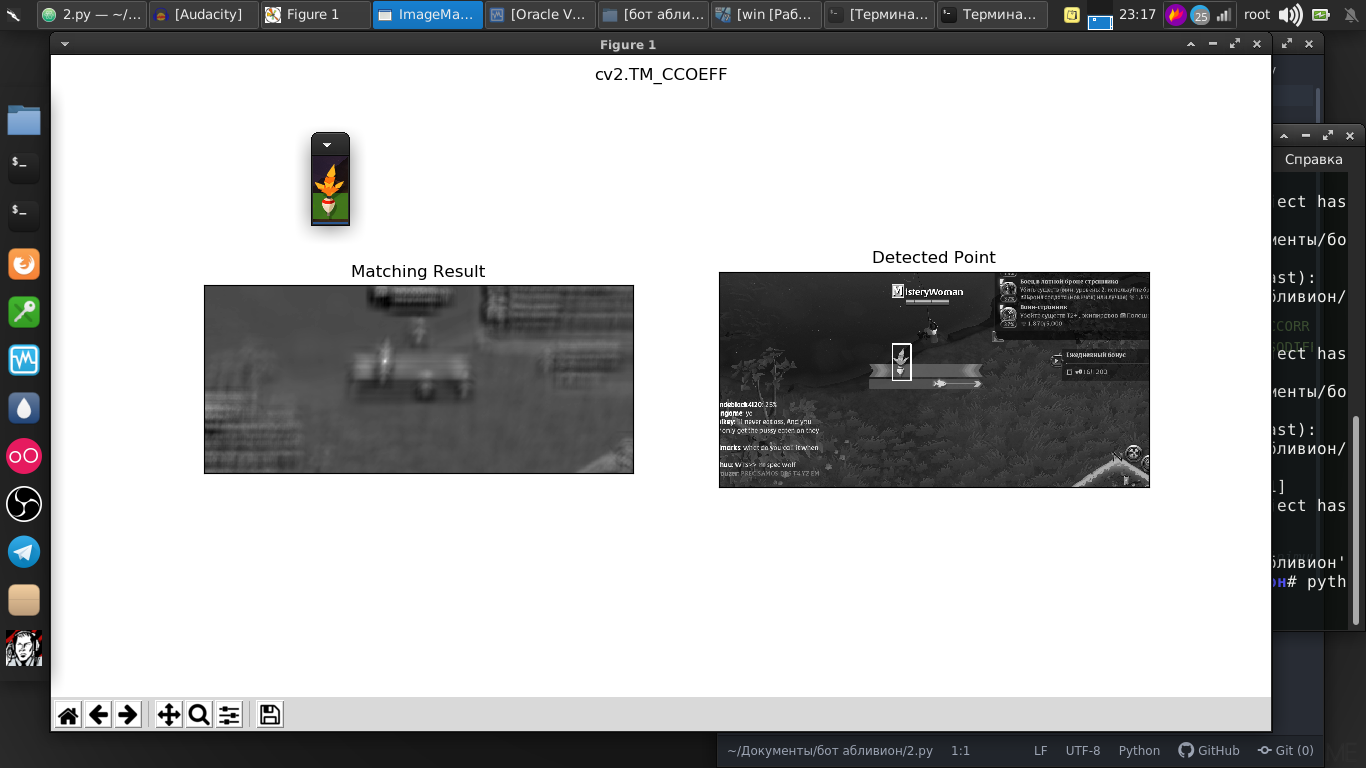
库使我大开眼界。 通过启动它,我们可以检测例如图片中的对象。 但是,图书馆本身并不知道我们到底需要发现什么。 当然,有许多模式可以显示各种对象来定义它们。 但是,Albion Online绝对没有浮动。
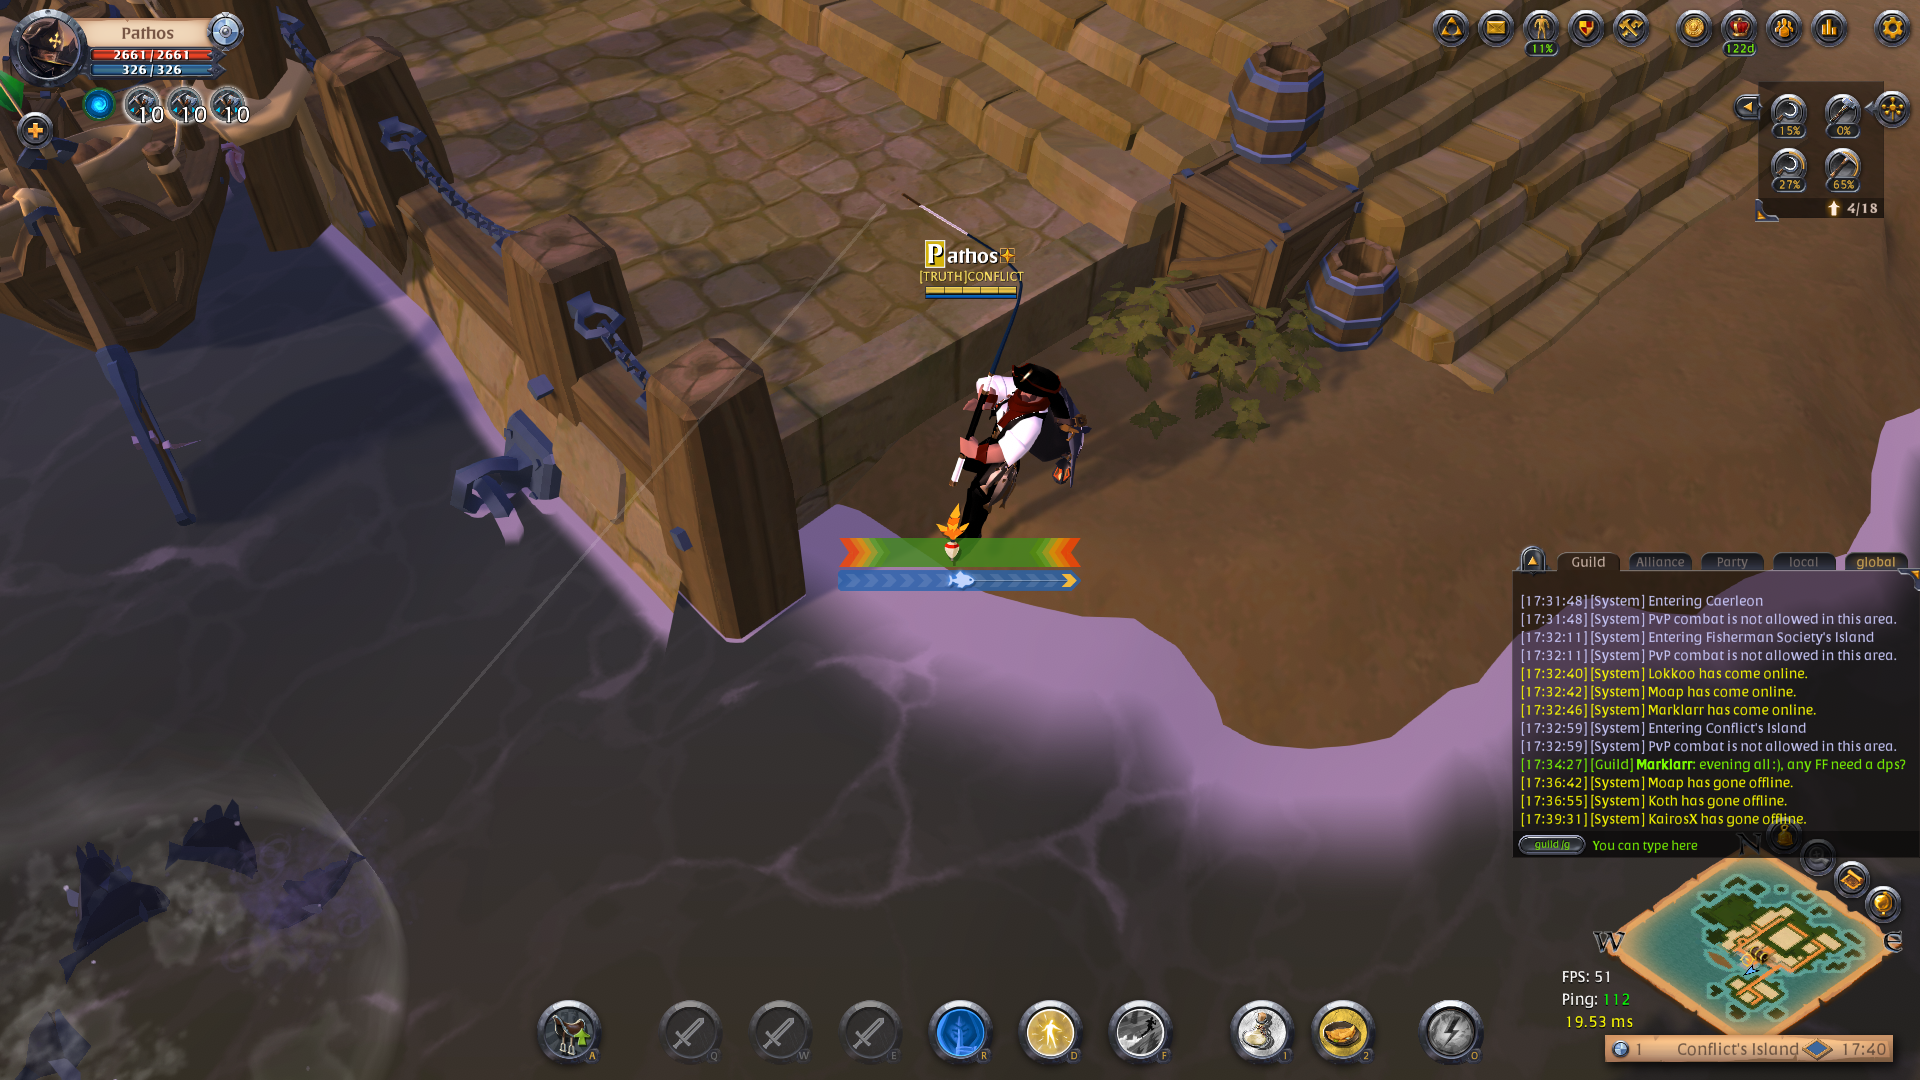
但是在该库中,有一个出色的给定模板搜索功能。 作为模板,我只是截取了我们的浮动截图。
正如我们所见,所有图片都完美地存在。
图片与流式视频之间的差异并不大,因为实际上它只是具有非常快的速度和几行代码的图片流。 现在,我们已经可以找到流式视频中的浮动内容。
代号import numpy as np import cv2 from mss.linux import MSS as mss from PIL import Image import time import pyautogui as pg import cv2 import mss import numpy template = cv2.imread("2019-07-02_06-55_1.png", cv2.IMREAD_GRAYSCALE) w, h = template.shape[::-1] with mss.mss() as sct: monitor = {"top": 40, "left": 0, "width": 800, "height": 640} while "Screen capturing": last_time = time.time() img = numpy.array(sct.grab(monitor)) cv2.imshow("OpenCV/Numpy normal", img) print("fps: {}".format(1 / (time.time() - last_time))) gray_frame = cv2.cvtColor(img, cv2.COLOR_BGR2GRAY) res = cv2.matchTemplate(gray_frame, template, cv2.TM_CCOEFF_NORMED) loc = np.where(res >= 0.7) for pt in zip(*loc[::-1]): cv2.rectangle(img, pt, (pt[0] + w, pt[1] + h), (0, 255, 0), 3) cv2.imshow("Frame", img) key = cv2.waitKey(1) if cv2.waitKey(25) & 0xFF == ord("q"): cv2.destroyAllWindows() break
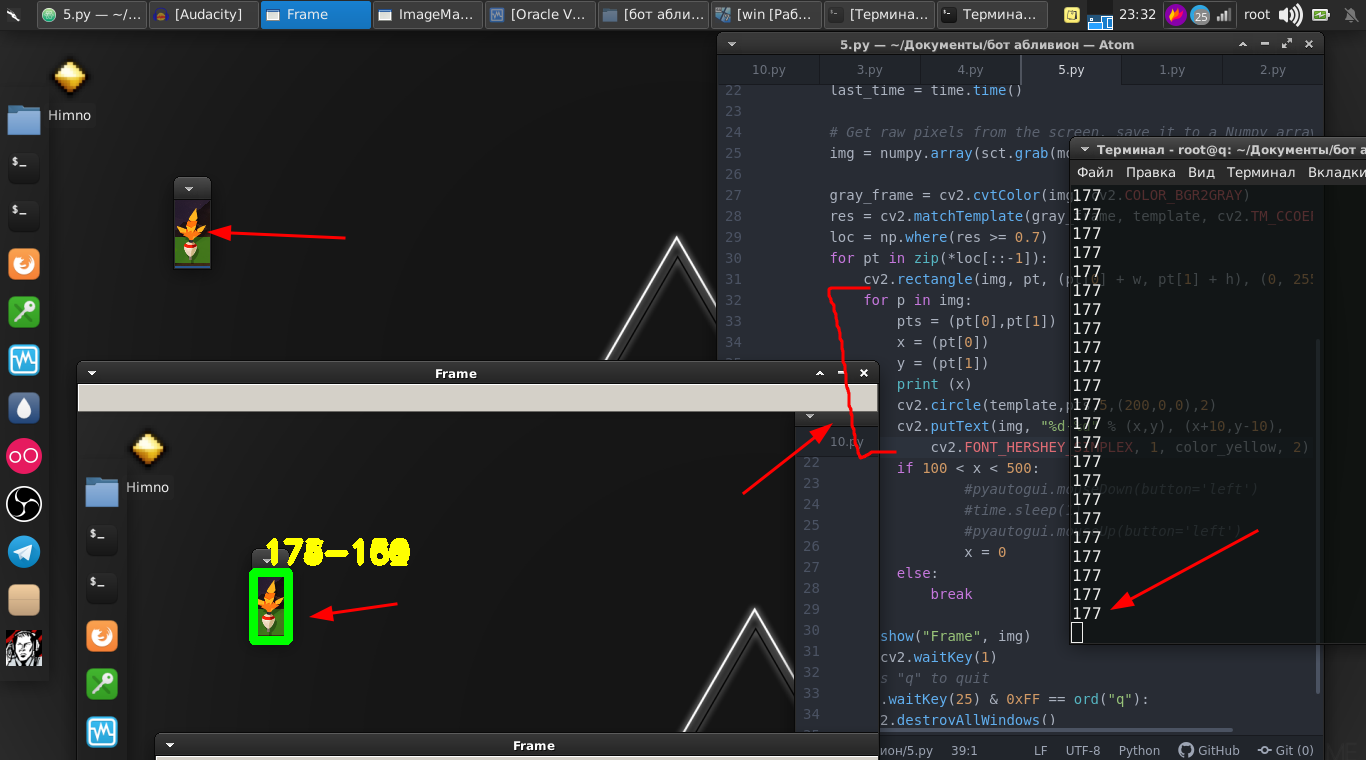
我们走得更远。 浮子本身来回移动,我们还需要通过按鼠标上的按钮来移动它。
因此,我们需要它的坐标。 为此,这些路线可以帮助我们。
for p in img: pts = (pt[0],pt[1]) x = (pt[0]) y = (pt[1]) print (x) cv2.circle(template,pts,5,(200,0,0),2) cv2.putText(img, "%d-%d" % (x,y), (x+10,y-10), cv2.FONT_HERSHEY_SIMPLEX, 1, color_yellow, 2)
然后,我们只使用
PyAutoGUI库,它将夹紧鼠标按钮并以一定的频率按下它。
if 100 < x < 500: pyautogui.mouseDown(button='left') time.sleep(1) pyautogui.mouseUp(button='left') x = 0
迷你游戏本身也成功获胜。
我们将整个事情放到一个函数中,并暂时保留。
然后,我们返回到原始部分,在该部分中,我们必须监视浮动。
都有一点不同,例如,我们可以确定将浮动对象扔到哪里,并尝试分析屏幕的该部分是否存在浮动对象。 但是,被扔到水中的浮子会以不同的角度出现并不断摇摆。
在这种情况下,我们将采用略有不同的方法。 其实质是我们分析,例如,跟踪片段内的像素差异。 如果没有浮动,则接近零。
结果,找到了最佳值,随着浮动的消失,我们可以执行操作。
代号 def screen_record(): sct = mss.mss() last_time = time.time() while(True): img = sct.grab(mon) print('loop took {} seconds'.format(time.time() - last_time)) last_time = time.time() img = np.array(img) processed_image = process_image(img) mean = np.mean(processed_image) print('mean = ', mean) if mean <= float(0.11): print('SSSSSSSS ') pyautogui.click(button='left') break return else: time.sleep(0.01) continue return if cv2.waitKey(25) & 0xFF == ord('q'): cv2.destroyAllWindows() break
然后我们生成它们,即单击鼠标按钮。 我们还将其放入函数中。
最后,总之,我们简单地编写了一个脚本,在该脚本中,在无限循环中,我们扔了一根钓鱼竿,并交替执行第一和第二功能。
while "": time.sleep(1) pyautogui.moveTo(431,175,duration=1) pyautogui.mouseDown(button='left') pyautogui.moveTo(450.200,duration=1) pyautogui.mouseUp(button='left') time.sleep(2) screen_record() time.sleep(0.01) ss()
这是完整的视频说明和该机器人工作的示例:
确实有些细微之处,您需要使用数字进行萨满化,因为这些数字是为我的显示器,位置,角色和设备选择的。 但是我认为对于一个称职的pythonist来说这不是问题。
整个脚本:
代号 import numpy as np import cv2 from mss.linux import MSS as mss from PIL import Image import time import pyautogui as pg import imutils import mss import numpy import pyautogui template = cv2.imread("2019-07-02_06-55_1.png", cv2.IMREAD_GRAYSCALE) w, h = template.shape[::-1] color_yellow = (0,255,255) mon = {'top': 80, 'left': 350, 'width': 100, 'height': 100} def process_image(original_image): processed_image = cv2.cvtColor(original_image, cv2.COLOR_BGR2GRAY) processed_image = cv2.Canny(processed_image, threshold1=200, threshold2=300) return processed_image def ss(): op = 1 with mss.mss() as sct: monitor = {"top": 40, "left": 0, "width": 800, "height": 640} while "Screen capturing": last_time = time.time() img = numpy.array(sct.grab(monitor)) gray_frame = cv2.cvtColor(img, cv2.COLOR_BGR2GRAY) res = cv2.matchTemplate(gray_frame, template, cv2.TM_CCOEFF_NORMED) loc = np.where(res >= 0.7) op += 1 print (op) for pt in zip(*loc[::-1]): cv2.rectangle(img, pt, (pt[0] + w, pt[1] + h), (0, 255, 0), 3) for p in img: pts = (pt[0],pt[1]) x = (pt[0]) y = (pt[1]) print (x) if 100 < x < 490: pyautogui.mouseDown(button='left') time.sleep(2) pyautogui.mouseUp(button='left') x = 0 break else: continue break else: continue break key = cv2.waitKey(1) if cv2.waitKey(25) & 0xFF == ord("q"): cv2.destroyAllWindows() if op > 35: return def screen_record(): sct = mss.mss() last_time = time.time() while(True): img = sct.grab(mon) print('loop took {} seconds'.format(time.time() - last_time)) last_time = time.time() img = np.array(img) processed_image = process_image(img) mean = np.mean(processed_image) print('mean = ', mean) if mean <= float(0.11): print('SSSSSSSS ') pyautogui.click(button='left') break return else: time.sleep(0.01) continue return if cv2.waitKey(25) & 0xFF == ord('q'): cv2.destroyAllWindows() break while "": time.sleep(1) pyautogui.moveTo(431,175,duration=1) pyautogui.mouseDown(button='left') pyautogui.moveTo(450.200,duration=1) pyautogui.mouseUp(button='left') time.sleep(2) screen_record() time.sleep(0.01) ss()
那些想说这是浪费时间的人,我会注意到这只是一个工具,您可以在其他项目中使用这些库。 计算机视觉本身既用于悬停弹道导弹,又用于帮助残疾人的程序。 在决定应用它们的地方,只有您的愿望。
谢谢大家的关注。